In the process of creating a document, to decoratively highlight a piece of text, you can use an editor function such as changing the letter spacing. You can make a sparse or compact interval.
This is what the text looks like with sparse letter spacing (2pt):
And like this - with condensed letter spacing (1pt):
To change the spacing between letters, select the desired text and perform the following steps.
For Word 2003 editor
- From the Format , select Font . A dialog box of the same name will open. The same window can be opened using the keyboard shortcut “Ctrl” + “D”.
- Go to the Interval .
- In the Interval , select Sparse or Dense and set the interval value in numbers.
- Click OK
For Word 2007 editor
- On the Home in the Font , click the dialog box launcher button (in the lower right corner of the group).
- Go to the Interval .
- In the Interval , select Sparse or Dense and set the interval value in numbers.
- Click OK
If you prefer to use your keyboard using keyboard shortcuts, you will need to set your own keyboard shortcuts to use the compact or sparse character spacing commands.
If you are using the Word 2003 editor, then open the Settings ( Tools Settings command ) and click the Keyboard . The Customize Keyboard dialog box opens . In the Categories select the Format , and in the Commands , select the Condensed (condensed interval) or Expanded (sparse interval) line and set the keyboard shortcuts that suit you for these commands.
Word Options dialog box and go to the Settings . In the panel that opens, click the Settings . Next, in the Categories select the category All commands , and in the Commands , find and select the Condensed or Expanded and assign your own keyboard shortcuts for these commands.
how to set sparse character spacing in Word
You select the text (or immediately make a style) - on the selected right mouse - Font - Spacing - Sparse. You put the required value there.
Format - Font - Spacing
Select the required text. Option font / Advanced / Character spacing / Spacing. Interval / Discharged and set the desired value in points. Line spacing can be changed in the Paragraph option.
You select the text (or immediately make a style) - on the selected right mouse - Font - Spacing - Sparse. You put the required value there.
Login to write a reply
Changing the standard letter spacing in the text may be necessary to fix attention on its individual sections. To change the spacing between letters in Word, you need to follow the given sequence of actions.
Changing the Width of Font Characters
To change the width of characters, use the Scale
Spacing
tab
the Font
dialog box (see Figure 6.15).
You can select any value from this list or, without opening the list, left-click in its field and enter the required value.
Zooming in is usually used for titles; Reducing the scale (up to 80...85%) can be used to “adjust” the length of the lines (Fig. 19). The acceptable range of symbol scaling is from 1 to 600%. The scale setting accuracy is 1%.
Rice. 6.19.
Font scaling
Changing character spacing
Using the Interval
Interval
tab and the counter located next to it
in
Font
dialog box (see Fig. 6.15), you can change the intervals (distance) between characters in a line of text.
In the Interval
You can select Sparse or Condensed, and in the counter
set
the required value of sparseness or compression of intervals.
The amount of change in the spacing between characters is set in points (pt) by default, but, if desired, the value can be specified in centimeters or millimeters. To do this, in the counter field on
enter the number and, separated by a space, the abbreviation cm or mm: for example,
0.5 cm
or
3 mm
.
The spacing between characters can be changed with an accuracy of 0.05 pt or 0.01 mm. Sparse spacing is used when designing headings or to highlight individual words in the text (Fig. 20).
Rice. 6.20.
Using sparse font spacing
Condensed spacing is used mainly for “selecting” text: removing short last lines of paragraphs (Fig. 6.21). It is recommended to reduce the intervals by no more than 0.1...0.3 pt., which is almost not noticeable. More compaction makes the text more difficult to read.
Rice. 6.21.
Using dense font spacing
Text offset
down list
The Spacing
tab
Font
dialog box (see Figure 6.15) allows you to move the text above or below the main line level.
is
in the counter - by default in points (pt), but, if desired, the value can be specified in centimeters or millimeters.
To do this, in the counter field on
enter the number and, separated by a space, the abbreviation cm or mm: for example,
1 cm
or
3 mm
. The offset value can be changed with an accuracy of 0.5 pt or 0.1 mm. Offset is often used instead of superscripts and subscripts (superscripts and subscripts).
The difference is that the size of the offset characters does not change (Fig. 6.22).
Rice. 6.22.
Using font character offsets
Kerning
Kerning is used to equalize visual spacing between characters. There are a number of letters, the intervals between which look larger than they actually are - For example, AU, GA, TA, AT, UD, ACH, LT
and etc.
Selecting the Kerning
shortens these intervals.
Kerning can be set for fonts of any size (counter for font sizes
), but it is especially important to use it for capital letters in large fonts (Fig. 23).
Rice. 6.23.
Using kerning
Highlighting
Http://www.intuit.ru/department/office/msword2007/6/5.html
Highlighting with color does not relate to the actual font parameters, but is used when working with text, and the button for highlighting is located in the Font
Home
tabs and on the mini toolbar (see Fig. 6.1).
Highlighting with color is used to draw attention to certain fragments of text. This is a kind of analogue of a color marker, which is used when working with paper documents.
- Select a fragment of the document.
- Click the arrow of the Text Highlight Color
in the
Font
the Home
tab or on the mini-toolbar and select the required color (Fig. 6.24). When you hover the mouse over the selected color, the preview function is triggered, and a fragment of the document is displayed highlighted in the specified color.
enlarge image
Rice. 6.24.
Highlighting
You can do things differently.
- Click the arrow on the Text Highlight Color
in the
Font
the Home
tab or on the mini toolbar and select the desired color. After this, the button will remain pressed, and the mouse pointer in the document text will have a marker image next to it. - By moving the cursor over the text while holding down the left mouse button, select fragments of the document.
- When you're done highlighting, press the Text Highlight Color
or the keyboard key
Esc
.
For a piece of text, select it, click on the triangle on the right side of the text selection color
in the
Font
the Home
tab or on the mini-toolbar and in the palette (see Fig. 6.24) select the No color mode.
Design of the initial letter
A capital letter (capital letter) is used at the beginning of a document or chapter.
- Select a paragraph that must begin with a drop cap.
- On the Insert
in the
Text
, click the
Drop Cap
and select the position of the letter (In text or On margin). When you hover the mouse pointer over the selected option, the preview function is triggered, and a fragment of the document is displayed with a drop cap (Fig. 6.25).
enlarge image
Rice. 6.25.
Creating a drop cap
By default, a drop cap is in the same font as a paragraph, and its height is three lines of text.
To configure drop cap parameters in the Drop Cap
(see Figure 6.25) select the Drop Cap Options command.
In the Drop Cap
(Fig. 6.26) in the
Font
, select the font of the letter, in
the height in lines
, indicate the number of lines that the letter will occupy, and in
the distance from text
, you can specify this distance.
Rice. 6.26.
Setting drop cap options
The initial letter is placed in a special frame.
To select a frame, you must first left-click on the drop cap, after which a dotted frame will appear around the letter, and then click on this frame so that markers appear on the frame.
After this, you can change the font parameters of the letter in the drop cap; By dragging the markers you can change the size of the frame. In addition, by grabbing the frame of the initial letter, you can move it to any place.
If you select not the entire paragraph, but only its first word, then this entire word will be formatted as a drop cap.
To remove the design of a paragraph with a drop cap, select the paragraph and use the Drop Cap
(see Fig. 6.25) select the No option.
Exercise 6
Http://www.intuit.ru/department/office/msword2007/6/6.html
Exercise 1
Launch Microsoft Word 2007.
Open the file exercise_06_1.docx.
- Set the font to Arial for the entire document.
- For all document headings, set the font to Cambria (Headings).
- For the entire document, set the font size to 11 pt.
- For the document title, set the font size to 14 pt.
- In the Perm Mineral Water
, set the font size to 15 pt. - For all document headings, set the font color to Blue.
- Set all document headings to italics.
- Remove the bold style for all document headings.
- Set all document headings to normal underlining.
- For the document title, set a double underline.
- For the document title, set the case to ALL CAPITAL.
- In the section Mineral water “Perm”
, format the signs displayed in blue as a subscript; Signs displayed in red should be formatted as superscripts. - Form the last paragraph of the document as strikethrough text.
Save the file as lesson_06_1.docx. Close Microsoft Word 2007.
Task 2
Launch Microsoft Word 2007.
Open the file exercise_06_2.docx.
- For the document title, set the modification with shadow and outline.
- For the document title, set the character scale to 150%.
- For the first paragraph of text, set the font spacing to 0.1 pt.
- For the second paragraph of text, set the font spacing to 0.1 pt.
- Set kerning for all document text.
- Set a drop cap for the first paragraph of text.
- Set the highlight color for the word Perm
in the first line of the first paragraph of text. - Deselect the fourth paragraph of text.
Save the file as lesson_06_2.docx. Close Microsoft Word 2007.
Date added: 2018-04-05; ; ORDER A JOB
Source: https://studopedia.net/3_49524_izmenenie-shirini-simvolov-shrifta.html
Word 2003: Sparse and dense spacing style
To make a sparse interval, you need to do the following:
- If the text has already been written, then it must be highlighted. If there is no text yet, and you want to change the spacing of all the text that will be written, then go straight to step 2.
- In the “Format” menu, go to “Font” (a quick way to open this window using the “Ctrl + D” key combination).
- Go to the “Interval” tab and specify the value “Dense” or “Sparse” and set the desired interval in numbers.
The text below, with sparse letter spacing of 2 pt, looks like this:
A condensed fragment of text with a letter spacing of 1 pt is presented below:
How to change the font in Word, working with fonts in Word
How to change the font in Word, today we will look at this issue. When working with Word documents, not all beginners know how fonts change in texts. The need to change fonts arises when articles, books and other materials are written. Next, we will step by step analyze the simplest ways to change fonts in the Word text editor.
Why do you need fonts in Word?
For example, you make money on the Internet and write articles to order for customers as a freelancer. As usual, customers indicate in the text task what font is needed for the text.
It is unlikely that people will read an article where everything is written in an incomprehensible font and small size. In this article we will look at the question of how to change the font in Word. I'm sure this information will help beginners.
How to change the font in Word, main
In practice, the process of changing fonts in text is very simple. To change it, open any Word text document on your computer and select the text in it with the left mouse button. Next, on the main document panel you can see a panel with fonts that you can use for text (Screen 1).
Click on the list of fonts and select any font from the list (Screen 2).
As you change the font, the text will change to a different format. It is also possible to increase the font size to make it more visible. On the right side, where the fonts are located, there is a panel with sizes from 8 to 72. You can enter your option in the size field. Now, we know how to change the font in Word. This was the basic and easy way to change the font in Word.
How to make font bold in Word, italics
In Word text documents, not only fonts change. The text can be made bold and italic. Typically, headings or subheadings are highlighted in bold. So, in order for us to do this, we open our Word document again. Then, select any sentence and click the “F” button at the top of the Word panel (Screen 3).
After this, your selected text will become bold. Now, the text can be made italic. This function in Word converts text into italics. We also select the text and click at the top of Word – “K”, this means italics (Screen 4).
As you can see, the text has become italic.
How to change the font in Word from uppercase to uppercase
When you type some text in Word on your computer, you can mistakenly press the Caps Lock key, which makes capital letters. How can I change the font from capital letters to uppercase so that I don't have to type the text again? There is the easiest way to change. Select the text in the document and press two keys on your computer keyboard at the same time - Shift+F3 (Screen 5).
The text that was highlighted in the document will change to uppercase, and the capital letters will disappear.
How to change the font in page numbering in Word
Page numbering is quite common in Word documents. To make the numbering different and noticeable, it is changed to a different font. To do this, click on the number of a particular page twice with the left mouse button. Next, select it. At the top of the main Word panel, we can again select any font we like and set it to numbering (Screen 6).
The list of fonts in Word to choose from is large.
Conclusion
In the article, we examined the question of how to change the font in Word, and worked a little with fonts. Use them when writing articles, books and other materials. This skill will be useful to you, including for making money via the Internet. Thank you for attention!
Best regards, Ivan Kunpan.
Source: https://biz-iskun.ru/kak-pomenyat-shrift-v-vorde.html
Keyboard shortcut to set character spacing
You can also assign a key combination on your own for quick use of commands, which in the future will allow you to set a dense or sparse gap between letters and symbols in two seconds.
Word 2003
In the “Service” menu, select “Settings”.
Now click on the “Keyboard” button.
In the “Categories” area, select “Format”;
- In the “Commands” section, the line “Condensed” (condensed in translation) or “Expanded” (sparse interval);
- Give these commands a key combination of your choice.
Word 2007
In the editor you need to do the following steps:
- Enter “Word Options” - open the “Settings” subsection and then click on the “Settings” button.
- In the “Categories” area, point the mouse at “All commands”.
- In the “Commands” area, in the corresponding line “Condensed”, assign a keyboard shortcut.
- For the line “Expanded” (sparse), also enter a specific key combination.
4.3. Font formatting
Details Category: 4. Document formatting Published 08/22/2011 19:49 Shitov V.N.
After selecting parts of document text, especially headings, you can use font settings. By default, Writer uses the font Times New Roman, font size 12, font styles and effects disabled, font color Automatic (although many people mistakenly think it's black).
A font is a set of letters, numbers, symbols and punctuation marks of a certain type. Font size is measured in points: 72 points equal one English inch (2.54 cm). For example, the letter height of a 12 point font would be 1/6 of an English inch, or 4.233 mm. Often the point is also called the pin.
The simplest font formatting is performed using the drop-down lists on the Formatting - Typeface and Point Size (Font Size) toolbar, and the buttons on the same panel (, ,). Using the drop-down lists, you can select a new font name (Figure 14) or font size.
The font is selected either from the general list or from the list of last used fonts. Selecting fonts from the general list is done using the scroll bar, which is located on the right side of the font list. Fonts are sorted in alphabetical order.
A selection of fonts from the list of most recently used fonts are located at the top of the font list, in front of the horizontal line. After the horizontal line there is a general list of fonts. Moreover, those fonts that were used last are also present in the general list of fonts.
There is another way to change the font. To do this, you need to execute the command Format → Symbols . In the Characters , go to the Font . The font name is selected in the Typeface . In the same window you can make other font formatting settings.
If the parameters of the font that is loaded after creating a new document (for example, after downloading this program) do not suit you, then reinstall these parameters. To do this, you need to run the command Service → Options .
Open the LibreOffice.org Writer . Select Basic. fonts (western) . Open the Default and select the desired font typeface. Here you can also override the default font size (Fig. 15).
Here you can also define font settings for headings, lists, etc.
If these new font settings are needed only for the current document, then check the Only for the current document .
If you go too far when changing the font parameters, you can return to the font parameters that were defined by the developers of this program. To do this, click on the Default .
Changing the font size
The font size is selected in the Size Formatting toolbar or in the Characters , which is opened with the command Format → Characters . To change the font size, go to the Font . Font sizes are selected in the Size .
Changing letter spacing
To set the spacing between characters, you must use the command Format → Characters . Symbols dialog box that opens, go to the Position (Fig. 16). Here the user can set the following options:
- Superscript or subscript;
- Intercharacter spacing (or tracking);
- Width scale;
- Rotate by an angle multiple of 90°;
- Kerning.
Tracking is the distance between all characters in text of a given size. Kerning is the distance in a pair of characters. Leading - line spacing. Gricking is a font size, all sizes smaller than which are displayed on the monitor not as text, but as gray stripes, to increase the speed of drawing objects on the monitor (text is printed, not gray stripes). Justification - text alignment.
Scale by width changes the width scale of the selected text fragment, while the size of the font itself in the Size does not change.
For example, if you select a fragment of text and set the scale to 200%, the width of the fragment's characters will be doubled, but the font size will remain the same.
This text formatting feature should be especially remembered, since a changed font scale can be mistakenly taken for a larger font size than it actually is.
The character spacing determines the horizontal distance between characters (Fig. 17). In many applications this concept is called tracking. Interval list has three possible values:
- Normal - the distance between characters is set as it is in the selected font;
- Sparse - adds spaces after each character. By default, the interval is set to 0 points;
- Compacted—reduces the spaces between characters by a specified amount. The default interval is set to 0 points.
The value of a sparse or compressed interval is determined in the counter located to the right of the Interval .
Creating superscripts and subscripts
The offset determines the vertical distance between characters. You can move the text either up or down. In particular, a classic example of such a shift is superscripts and subscripts in text (cm2 or H2SO4). But let's look at these indices in more detail:
First, the letters (or symbols) used for superscripts or subscripts are usually always smaller than the main text. What if we need to change the font size used to indicate superscripts or subscripts?
Secondly, these letters are always above or below the main text.
LibreOffice Writer offers options to change both the font size for these indexes and the amount of offset up or down (Figure 18).
To change index settings, you must select one in the Symbols dialog box on the Position tab. Please note two things in this regard:
Firstly, the Font Scale counter has become available. This option allows you to change the font size used to create superscripts or subscripts;
Secondly, the Automatic . It has a checkbox checked. This means that the amount of offset up or down is determined automatically. If we need to define this parameter manually, then the checkbox must be cleared. The Shift by counter becomes available .
Kerning refers to the operation of adjusting the distance between individual adjacent characters in a line to improve their appearance when viewed and when printed.
Kerning is not possible for all adjacent characters, but only for some pairs of characters. True, there are hundreds of possible combinations of such pairs. For example, between the characters A and Y, kerning is possible (AU), but between H and I, kerning is impossible (NI).
In the first pair, the upper left tip of the Y symbol can be superimposed on the lower right tip of the A letter. In the NI symbols, this is not possible. That is, kerning is the elimination of the optical gap in some pairs of characters.
In the symbols U and L, T and A, the distance between the symbols also looks disproportionately large.
Let us consider the process by which this gap arises. Each symbol is a rectangular box with a symbol inside. The box, of course, is purely virtual, that is, conditional. But this example very well describes the process of the formation of such a gap. “Collision” of one virtual character lattice onto another during the process of creating text is impossible.
When creating many fonts, developers include automatic kerning for many pairs of characters. But it is impossible to provide for all such combinations.
We considered all the examples not in pure abstraction, but in specific fonts, in particular, in the Times New Roman font. In other fonts, such gaps occur in other characters, since each font has its own spelling of the character. Depending on this, gaps between pairs of symbols may occur in some symbols and not in others.
For example, we said above that there is a gap in the symbols A and Y, but not between the symbols H and I. If we take a different font, the situation may change exactly the opposite. For example, the Odessa Script FWF font characters are: and () or and ().
To correct these shortcomings, font developers would need to create research institutes to study only this issue.
To eliminate this drawback, it is necessary to kerning the characters. As a general rule, kerning should only be done when using large font values. This happens specifically in figured text. In simple text, where the character size is small, there is no particular need for kerning, since on small character sizes the gaps between pairs of characters are also small and unnoticeable.
To configure kerning, you need to check the Paired Kerning . Kerning is possible for sparse or condensed text.
In small font, the clumsiness of some pairs of characters is blurred and obscured, and therefore kerning can be ignored. But when using large font sizes, for example in headings, it is necessary to set the character kerning.
The figure (Fig. 19) shows that in the pair of characters “A” and “U” in the first example the inter-character distance is greater than in the second, where character kerning was applied. In the first example, each character does not exceed the boundary of the other. The upper left tail of the "U" symbol begins only at the full end of the lower right tail of the "A" symbol.
If you draw a vertical line between these symbols, it will be drawn without intersecting any of them. That's why the intercharacter distance is so large. In the second example, the upper left tail of the “U” symbol is shifted to the left.
If you now draw a vertical line between the symbols, then it will certainly intersect at least one of these symbols.
Don't confuse kerning with letter spacing. Spacing specifies the distance between any selected characters, and kerning between certain pairs of characters.
Rotate text
Rotation/Scale switch . For example, to create vertical text in a table cell, you must select a position of 90°.
Rotation of the text is not allowed at any given angle, but only at a predetermined one: 0°, 90° and 270°.
If the text that needs to be rotated has already been previously created in the document, then such text must be selected.
Fit to Line option becomes available only when you select a rotation value other than 0°. When this option is checked, the vertical text will be scaled to fit the height of one line of the original text. As a rule, such text is simply not readable.
Font effects
Font effects can be selected in the Characters on the Font Effects (Figure 20).
The Underline list offers options for underlining selected text in your document. By default there is no underline. If you select any option except (none) from the Underline , the following options are available on the Font Effects :
Underline color list —select the underline color. The color of the text will remain unchanged;
Words Only indicator —not the entire selected text fragment is underlined, but only the words and punctuation marks. This means that spaces between words are not underlined.
Note: we draw your special attention to the fact that when you check the Only words on screen indicator, the spaces between words in the selected fragment will still be underlined. But this will be an optical illusion - when previewing the document, spaces between words will not be underlined, and
Printed text will be output correctly.
In the Strikethrough , select how to strikethrough the selected text. You can also use the Words Only . The strikethrough color always matches the color of the selected text fragment that you want to strikethrough.
Font color list determines the color of the selected text fragment in the document.
In the Font Effects , select one of the following effects:
- Uppercase —Converts the selected text to uppercase letters. For example: “SHARASHMONTAZHSERVISPLUS LLC”;
- Lowercase —Converts the selected text to lowercase letters. For example, this may be useful if you accidentally pressed the Caps Lock key on your PC keyboard;
- Small Caps - Converts every first letter in every selected word to a capital letter. For example: “Converts Every First Letter”;
- Title - the first letter is uppercase, the rest are lowercase.
In the Relief , select the text volume option: Raised or Recessed .
Note: Similar length options are offered in Microsoft Word. In both programs it looks quite primitive and from a practical point of view, most likely not
applicable.
On the left side of the Font Effects there are indicators whose checkboxes create the following effects:
- Outline —Creates an outline in the characters of the selected text fragment. The middle of the symbol remains transparent. In our opinion, this effect works softer and clearer than a similar effect from Microsoft Word;
- Shadow - creates a small translucent shadow around the text;
- Blinking - creates the effect of “blinking” text, that is, the invisibility of this text and its reappearance at intervals specified in the program;
- Hidden —the text becomes hidden. This effect can be used to hide sensitive information in a document. This means the following: when printing, such text is not printed; On the screen it is visible only in the visibility mode of non-printable characters. In the latter case, such text is underlined with a dotted line.
Source: https://professional-office.ru/index.php/besplatnyj-ofis-libreoffice/4-formatirovanie-dokumenta/120-43-formatirovanie-shrifta
Why do we need the letter-spacing property?
If you increase the spacing between letters in CSS, you can get a unique text style.
To create a unique font, sometimes you have to create spaces between letters. The only way to increase the space between letters is through CSS. In it, this function is performed by the letter-spacing property.
It is an additional tool in CSS that allows you to change the spacing between letters. But sometimes this is precisely what is missing for good stylization of text content.
Instructions
- If you need to stretch the text across the entire width of the line, you can use the special “Width Align” tool. Select a piece of text that you want to stretch across the width of the sheet; if you need to align the entire document, press the key combination Ctrl+A. Open the “Home” tab in the editor and in the “Paragraph” option group, click on the “Align to Width” icon; you can also use the “hotkey” combination Ctrl+J. The width of the spaces in the specified text will automatically change and the text will be evenly distributed throughout the entire sheet. The number of lines and sheets of the document will remain unchanged.
- The text in a document can be stretched vertically; to do this, you will have to select the line spacing yourself. Select all or a portion of the text and go to the Home tab of the editor. In the “Paragraph” options section, click on the “Spacing” drop-down list and select the appropriate line spacing value. If you are not satisfied with the proposed spacing options, you can set it yourself; to do this, click “Other line spacing options” and set the desired value. Ultimately, the number of lines in the document will remain the same, but the number of pages will increase.
Interval option
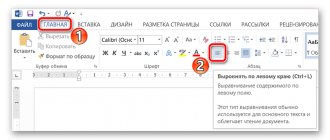
- You can stretch text in a Word document using the letter aspect ratio tool, while the height of the characters remains the same. Select the desired piece of text and go to the “Home” tab, in the lower right corner of the “Font” section there is a small marker, click on it. The font settings window will be loaded; this dialog can be called up with the “hot keys” Ctrl+D.
- Open the “Advanced” settings page and in the “Scale” drop-down list, specify the desired text stretch value in percentage. To stretch the text, you can use changes in the “Spacing” line of this window. In the drop-down list of the corresponding field, select “Sparse” and set the value in points in the adjacent field. You will see a preliminary result of the change in the preview window. Save the changes by clicking on the OK button.
Kerning
The change in letter spacing discussed above is the same for all letters of the selected text. In the Word text editor, it is possible to change the letter spacing more subtly, taking into account the features of the style of adjacent letters. When the kerning function is turned on, Word selects the optimal spacing between pairs of characters automatically, depending on the characteristics of the font. The purpose of kerning is to increase the visual appeal of text.
A careful comparison of the last two screenshots – before and after kerning – allows you to verify this. Kerning is mainly used in texts with large fonts - headings and logos.
Practical use
In CSS, letter spacing is used to create a unique font. Can also be used when creating headings, if used in conjunction with the font-style: italic property and a good color, it can serve as an alternative to a good logo.
Also, if you use this property correctly together with text-align: center, you can set a beautiful article title for your blog.
Letter-spacing is a great CSS property for changing the distance of letters from each other. The main thing is not to overdo it with indents.
spaces between words are predetermined.
,
letter spacing within a word,
and
visual line height
. It should be noted that the spacing between different letters in monospaced fonts such as Courier New is always the same. In other types of fonts, the spacing between letters depends on the letter combinations - in most cases it is fixed, but between some pairs of letters it is deliberately reduced in order to visually make the text more “even” and evenly distributed. For example, the distance between the letters AU is less than between the letters NP, since the letters N and P are straight in shape, and the letters A and U have bevels, moreover, directed in one direction. If the spacing between letters is the same, A and U will appear further apart than H and P. To soften this effect, the distance between them is slightly reduced, resulting in a visually aligned line of text. This phenomenon is one of the most striking manifestations of optical illusion.
In CSS
for text blocks, you can adjust the size of the distances between words in the text, i.e., in essence, change the size of the space. You can also change the distances between letters within a word (i.e. create dense or sparse text) and control the height of the text line. Line height is the distance between the baselines of two adjacent lines.
There are no analogues of such properties in HTML. Spacing can only be set using CSS
.
How to change the space between letters? CSS: letter-spacing
This property is set by default in all browsers. It applies to all modern browsers, and not only (for example, Internet Explorer).
The value of this property is inherited for all descendants of the selector. This means that by setting letter spacing for the body tag, you will change the letter-spacing value for the entire page.
One more thing: consider the given font. The spacing between letters varies for each one. The difference is small, measured in fractions of pixels, but keep it in mind.
The way this property works is that it adds padding to the right side of each letter. It changes the spacing between letters on a more detailed level. It works on the margin-left principle. Letter-spacing can be specified in different quantities: relative (em, rem, ex and others) and absolute (px, mm, cm). The most suitable values to use are px, rem and em. Of course, it is best to specify the value in pixels, as this is the most convenient and best suited for changing small distances.
First, fill the page with the content on which we will test this property.
letter-spacing property
This property specifies the distance between letters within a word. It is set similarly to the distance between words in any units of length. It is possible to set negative values, in which the letters may be too close to each other or even overlap each other. Therefore, use it carefully. Setting the value as a percentage is not allowed.
Using this property, you can thin out letters, for example in headings, which will look quite original. It is recommended that, on the one hand, the distance between letters should be increased so significantly that the title visually stands out against the background of ordinary text, and on the other hand, the spacing should not be too large so that the overall perception of the text does not deteriorate.
How to indent the first line
You can indent the first line of a paragraph inward toward the center. Let's look at how to indent paragraphs in Word:
- Click anywhere in the paragraph where you want to indent and click the Paragraph Options command on the Home tab.
How to indent in Word – Open Paragraph Options
- In the window that opens, on the “Indents and Spacing” tab, in order to make a paragraph indent in Word, in the “Indentation” section, in the “first line:” item, select “Indentation”. In our example, we made a paragraph indent of 1.25 cm.
How to indent in Word - Paragraph indent 1.25 of the first line in Word
Also in this window you can make indents on the left and right.
How to indent in Word – Indent lines in Word
These are the ways you can indent in Word.
Tab characters
Sometimes there may be tabs between words instead of spaces. To detect it, you need:
- On the “Home” tab, go to the “Paragraph” section and click on the “Paragraph” sign; when you click it, all hidden characters are displayed. The tab will appear as a small arrow.
On the “Home” tab, go to the “Paragraph” section and click on the “Paragraph” sign
- Next, you need to perform the same sequence of actions as when replacing a double space with a single one. To do this, in the “Home” tab, in the “Editing” section, click “Replace”.
In the “Home” tab, go to the “Editing” section, click “Replace”
- In the window that appears, insert a tab character in the “Find” field. To do this, click “More”.
Click the “More” button
- Then – “Special”.
At the bottom of the window, click on the “Special” button
- Select “Tab character” from the drop-down menu.
In the menu that opens, select “Tab character”
- In the “Replace with” field, put one space.
In the “Replace with” field put one space
- Click "Replace All".
Click on “Replace All”