In most cases, the microphone may not work in Windows 10 due to restrictions on its use for a specific program on the system side, or due to problems with the driver. That is, you can fix a problem with the microphone without contacting a service center.
In this article, I described in detail what the most common reasons for a microphone not working may be and gave a step-by-step solution on how to get rid of this problem.
Take the test on the topic “Legends of the 90s”, remember which of these you had?
Microphone access not granted
One of the key differences in Windows 10 is the addition of additional privacy settings. The system provides the user with the ability to specify which programs will be allowed access to the microphone and which will not. And if the Windows 10 microphone does not work, then it is quite possible that this is due to these settings.
To check their current status, you need to:
- Press Win + i and open Settings. Next, go to “System”
- Select “Sound” and in the window that opens you need to go to “Microphone Privacy Options”.
- Check whether the required program has access to the microphone. If not, turn it on using the sliders.
And as practice shows, this is one of the most common reasons why the microphone does not work. In Windows 10, by default, permission is granted only to “trusted” programs that are installed from the built-in app store.
What instrument are you? Take the test and find out
If the microphone on Windows 7 is noisy
There are several reasons why there is a lot of background noise from the microphone:
- Low quality of the device itself. It is recommended to buy proven equipment with sufficient sensitivity for high-quality sound recording.
- Incorrect settings in Windows 7. You should check the hardware configuration through the “Volume” menu.
- The computer is connected to electricity without grounding. This situation can cause noise.
- Problems with the integrity of the switching through which the microphone is connected. It is necessary to check the wires for defects and repair them if found.
- Hardware incompatibility, outdated drivers, incorrect Realtek HD configurations. The listed problems can be easily solved by reinstalling the software or changing the settings.
Check microphone settings
The user is given the opportunity to adjust the microphone volume. It is possible that the current set level is 0%. Naturally, in this case, the Windows 10 microphone does not work.
To check this you need to:
- Right-click on the speaker and select “Sound”
- Open the “Recording” tab and select the microphone you are using from the list of devices and click on it 2 times
- In the “Levels” tab, check the current microphone volume. If it is set to “0”, increase it.
Volga or Pobeda? Are you familiar with the Soviet automobile industry? Test yourself in a fun test!
Ways to solve the problem on a laptop
For each problem, an individual solution method is selected. So, if the errors are caused by the lack of suitable drivers, you need to find and download a compatible package on the Internet, indicating the exact model of your laptop or sound card.
In case of mechanical failure, you will need to disassemble the laptop case and check the condition of the module. If the gadget does not see the external microphone or it no longer appears after reinstalling Windows 7, you should roll back the previous hardware configuration, check the correct connection and the integrity of the plug.
Checking application permissions
In the settings you can add or disable applications that use recording.
Often, failures in the operation of sound recording equipment occur due to the lack of permissions granted for individual programs. The problem is resolved by changing the privacy settings. This is done in the following way:
- Open the “Settings” section.
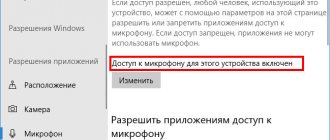
- In the “Privacy” area, select “Microphone”.
- Proceed to setting up access to the device.
- If the option is enabled, disable it and re-enable it.
To check if the problems have disappeared, you need to restart the system.
Checking with built-in Windows tools
To evaluate the performance of the microphone, you must follow these instructions:
- Right-click on the speaker icon on the taskbar (lower right corner) and select settings.
- In the menu that opens, find the “Recording Devices” tab.
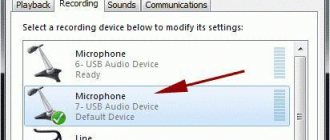
- Go to the “Recording” section and view the list of available devices for entering information into PC memory. There should be information about the connected microphone and a green circle with a check mark indicating the current operating status. If you double-tap the component icon, you can see additional settings, such as adjusting the volume level and input gain.
- To check the operating properties of the equipment, you will need to go to the “Security” category through “Control Panel” or “Windows Settings”.
You can also evaluate the health of a component using the built-in audio recording tool. Try to save a test sample to check the level and quality of the incoming signal.
View programs that use a microphone
If any software is using your microphone, a corresponding icon will be displayed in the system tray. When the OS light theme is activated, it is black, and when the OS dark theme is activated, it is white.
You need to hover your mouse over this icon and see information about the application connected to the recording device. If the icon is missing, you should open the menu of hidden icons by clicking on the arrow in the lower right corner on the taskbar. If desired, you can move the symbol to the tray for easy searching in the future.
There are 2 lists in this menu - one is responsible for applications from the Microsoft store, and the second is for other installed programs on your PC. Be sure to review both sections.
Diagnostics for viruses
The Windows system often experiences errors and crashes caused by viruses and malicious files. They may affect the operation of important components, including the built-in microphone. To restore the previous state, you need to use an antivirus tool or perform a deep clean of disk space from unwanted software, and then reconfigure the drivers manually or automatically.
To avoid such troubles in the future, you should periodically clean your laptop from viruses and scan the system.
Built-in troubleshooting tools
Windows 7 has a standard utility for dealing with system failures. It's called the Windows Troubleshooter. In some cases, the tool effectively solves the problem with the microphone not working, especially if it is caused by software errors.
When running diagnostics in Windows, you need to be connected to the Internet.
To open the tool, you need to go to the Control Panel or Settings of your computer. To do this, you can use the combination Windows + I, and then find the “Update and Security” section on the main page.
In the window that opens, there will be a “Troubleshooting” item on the left. Then on the right side of the screen you can see the “Record Audio” button. You need to click on it and select the “Run the troubleshooter” option and follow the instructions of the operating system.
System rollback
Sometimes, to restore normal operation of important equipment, you have to roll back Windows 7. This is quite simple to do:
- Open the Start bar on your laptop."
- Enter the word “Recovery” in the search bar.
- From the list provided, select the “System Restore” option.
It is possible to change parameters by returning the previous system configuration.
Then the active restore points will be displayed in the window that opens. Select the appropriate option by date and start the process. The changes will take effect after the next reboot of the device.
Installing the correct drivers for your sound card
The most common reasons why the built-in microphone may turn off or malfunction is the lack of necessary software. In most cases, the problem is accompanied by problems with the speakers.
Since the sound recording device is integrated into the laptop, special drivers are needed to ensure its normal operation. Before downloading the latest package, you must open the “Device Manager” and review the information provided in the “Audio inputs and outputs” or “Sound, game and video devices” section. If this list contains the designation “Unknown device” or there is an icon with a yellow exclamation mark, this indicates that there are no suitable drivers.
To troubleshoot problems, you need to open the official website of the laptop manufacturer and find compatible software. During the search, you will be offered several versions of drivers that are suitable for different editions of Windows 7.
Checking using third-party software
To diagnose the microphone, you can use third-party audio editors, for example, the free Audacity utility. To carry out the check, you must:
- Download the utility from the official website and run the installation file.
- Select the interface language and confirm agreement with the license.
- Specify the installation directory and the need to create an icon on the desktop.
- Start the installation process.
- Open the application and record a test audio fragment.
The program works with the microphone built into the laptop system, as well as external headsets.
To listen to the saved segment, click on the play button. If there are no errors, the sound will play without any problems.
Setting up through a specific program
If you do not plan to use your laptop to communicate in instant messengers with a webcam, you can download them to diagnose the microphone. A program like Skype provides 2 tools for checking recording equipment. The first method involves making a test call, before which the system will ask you to configure it. You can also call the Echo/Sound Test Service contact who is responsible for technical support.
When performing a test, you can see directly in the system whether the microphone responds or not, and also configure it.
After a short introduction, you will need to say a few words. The recording duration does not exceed 10 seconds, but this is enough to evaluate the signal quality.
Parameters of an individual device
If there is no signal from the microphone of a wired or wireless headset, you need to make a separate setup. The power button on the external accessory may be disabled or the volume may be set to minimum. Many headphone developers equip their equipment with a special wheel for adjusting microphone sensitivity.
If it is at zero value, the other party will not hear you. In addition, some headsets have special keys to instantly deactivate the microphone. Therefore, you should evaluate the specifications of your device on the official website and make sure that it is configured correctly.
Connecting an external microphone
When figuring out why there is no signal from the built-in microphone on a laptop and what to do to solve the problem, you should try connecting an external device. If it works properly, then the failures are due to a mechanical failure of the integrated component. If the external microphone does not respond to connection, you will need to scan the system for software failures, search for missing drivers and evaluate the performance of the sound card.
When you connect a headset, the device appears in the settings and is ready to change sound settings.
It is possible that there is poor contact between the 3.5 mm jack and the audio card connector. The problem often occurs on budget laptops from Acer, Asus, Lenovo, Samsung, HP and cheap models from other companies.
Microphone disabled by Device Manager
Device Manager allows you to disable the microphone completely at the hardware level. This may be useful for those users who want to be sure that their computer is not being tapped. And for security reasons, Windows can also do this automatically when installing a new driver version.
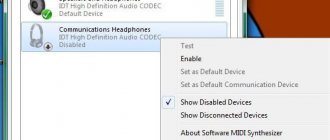
Accordingly, if the computer does not see the microphone at all (that is, it is not even displayed in the “Sounds” section in the control panel), then you should check whether it is enabled through the device manager. To do this you need:
- Right-click on “Start”, select “Device Manager”.
- Check in the “Sound Devices” tab that none of the items are disabled.
If you have a webcam connected to your computer or laptop, make sure it is turned on too. They also have a microphone, and it is this that the system uses as the main one by default.
Super test on the topic “Money” and how can you be friends with it?
The main reasons for the microphone not working on Windows 7
To find the reasons why Windows 7 does not see the microphone, you need to check that the connection is correct. If the device is not visible from the front panel connector, you should try connecting it through the interface on the rear of the system unit. By default, the socket is indicated in pink. Often, due to the actions of unscrupulous assemblers or technicians from the service center, the panel with connectors is not connected to the motherboard, which leads to various failures with audio devices.
In case of problems, you need to check that the device is connected to the computer correctly.
Sometimes errors occur after updating the operating system or installing third-party software that affects the operation of the sound card.
If your PC refuses to respond to a connected microphone, this may be due to a lack of suitable drivers or hardware incompatibility. Software causes of problems can be detected using standard Windows tools, but to solve hardware failures you will have to diagnose the audio recording device manually.
The microphone stopped working during a system update
By default, Windows 10, along with updates, also downloads drivers for all devices detected in the system. And if the OS has only recently been installed, but the microphone on the computer does not work, then it is likely that the system simply has not yet installed the necessary updates, and along with it the software necessary for the correct operation of the connected audio devices.
- To fix this, you need to go to “Options”, then:
- Open Update & Security.
- Click on “Check Availability”.
- If new packages are detected, give the system the opportunity to install them.
Next, you should restart the PC, since after installing new drivers, they will be used by the device only the next time you turn on the computer.
If the microphone in the laptop does not work, then you should do the same.
By default, the system automatically downloads and installs all updates in the background when the device is idle. But if the operating system was installed recently, then this process can take 3 to 5 days. Depends on the speed of the Internet, as well as on how long the computer was not used, but remained turned on.
Built-in troubleshooting tools
Windows 7 has a standard utility for working with system failures. It's called "Windows Troubleshooter". In some cases, the tool effectively solves the problem of microphone malfunction, especially if it is caused by bugs in the software.
When running diagnostics in Windows, an Internet connection is required.
To open the tool, you need to go to Control Panel or Settings on your computer. To do this, you can use the Windows + I combination and then find the Updates and Security section on the main page.
In the window that opens, the “Troubleshooting” item will appear on the left. Then a “Record Audio” button appears on the right side of the screen. Click on it, select the “Run troubleshooting program” option and follow the instructions of the operating system.
Update the drivers and the microphone will work
If all updates are installed, the device appears correctly in Device Manager, but the microphone still does not work, this may indicate a driver failure. How to fix the microphone in this case?
You can try updating the driver, and if this does not help, then roll back to the previous version. You can do it like this:
- Go to “Device Manager” (you can from the “Control Panel” or simply by right-clicking on “Start” and selecting the appropriate item).
- Select the microphone you are using from the “Audio inputs” list and double-click on it. A device settings window will open, in which you need to go to the “Drivers” tab. Select "Update".
- Select "Automatic search". Wait for completion.
- Restart your PC.
- Check the functionality of the device. If the problem is not fixed, then also select “Roll Back” (if the item is active).
- Restart your PC.
If a microphone on a computer or laptop is connected to the built-in sound card, then in the “Device Manager” it will be displayed in 99% of cases as a “Device with High Definition support”.
Setting up through a specific program
If you don't intend to use your laptop to communicate with a webcam, you can download them for microphone diagnostics. A program like Skype has 2 tools for testing audio recording equipment. The first method is to make a test call, before which the system will ask you to make a setup. Alternatively, you can call Echo Sound Testing for technical support.
When you run the test, directly in the system, you can see whether the microphone responds or not, and also adjust it.
After a short introduction, you will have to say a few words. The recording duration is no more than 10 seconds, but this is enough to assess the signal quality.
Reconnect the microphone and test on another PC or device
If there were no problems with the device before, and the microphone suddenly stopped working, then you need to check whether it is faulty. Although this technique is rare, it still fails.
First, you should make sure that the microphone is correctly connected to the computer and its connector is inserted into the correct connector.
The microphone connector is usually marked in pink (green for an external speaker system, blue for line output). If everything is in order in this regard, then you should connect the microphone to another device, a computer, and check its functionality there. If the problem persists, this indicates a hardware failure and you will have to contact a service center.
Late sound on microphone
The application is free and supported in many languages.
The problem of audio delay when recording from a microphone often occurs when using drivers for built-in audio cards. You can try installing the ASIO ALL package, which interacts with the hardware on the computer and supports the following options:
- Adjustment of response time.
- Reduced system resource usage.
- Integrated resampler for sampling frequency conversion.
Causes of the problem
When the headset owner tries to use the microphone, he may see the message “Input device not found” on the screen. In this situation, applications do not recognize the recording device and do not recognize the person's voice. At the same time, audio playback through headphones works without any complaints.
There are several reasons for this problem:
- applications are prohibited from using the recorder;
- disabling the microphone in the PC or program settings;
- system failure;
- outdated or faulty drivers;
- Incorrectly installed OS update.
As you can see, there are quite a few factors influencing the performance of the headphone microphone. In addition, to the indicated reasons, you can safely add viruses, which also affect the condition of certain hardware elements.
Professional laptop repair at home
Problems with sound recording and playback on a laptop are a multi-faceted problem. Often the problem lies in incorrect settings of sound recording devices, as well as driver conflicts. Less often, the malfunction is associated with a physical breakdown of the microphone or sound card. Service specialists will be happy to help solve any problems with audio devices on your laptop. Our specialists are available any day and time of day by calling 8(495) 213-33-33
, as well as on the official website.