Some users, when working on a computer, are faced with the need to increase the size of the “C” drive in order to add additional space to the system partition. By default, the Windows operating system, various system components, third-party programs are installed on the “C:” drive, and user data is stored here.
In other cases, on the contrary, you need to shrink the “C:” drive if it is large in order to attach more space to the “D:” drive (or a drive under another letter) used to store data.
There are several ways to solve this problem. In this guide, we will look at instructions on how to change the disk size in the Windows operating system, redistributing space between partitions using the system's built-in tool, increasing or decreasing the size of the system disk.
First, let's look at some reasons why this operation may be needed.
How to change the disk size in Windows when installing the operating system
Boot your computer from bootable media: flash drive or DVD. In Windows Setup, go to the window that asks where you want to install the operating system.
The user may have several options for further actions:
- If you are reinstalling Windows and there is another disk or several disks with data on the computer, you need to first remember or write down on paper the size of the disk (disk partition) in order not to delete this partition when selecting or creating a disk for installing the system.
- If your PC has one disk, remove all partitions remaining from the previous operating system: select the partition, and then click the “Delete” button. Unallocated space will appear in place of the deleted partitions.
- If your computer has not yet installed an operating system, all available space on your hard drive is unallocated space.
Using the example in this article, there are no other data disks on the PC; all partitions have been deleted. If your computer has a data partition, don't touch that drive.
First you need to create a system partition to install the Windows operating system:
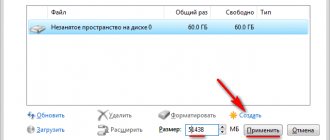
- Highlight "Unallocated space on disk 0".
- Click on the “Create” button.
- In the "Size" field, select the appropriate space size for the system disk. Leave some space to create another partition that will serve as data storage.
- Click on the "Apply" button.
- A warning window will inform you that additional partitions will be created for system files. Click on the "OK" button.
- In the next window, new partitions will appear on your hard drive: “Primary”, on which you can install Windows, and the “System Reserved” partition. This option is displayed when using the old BIOS.
On modern computers with UEFI there will be not one, but several small system partitions that do not need to be touched after they are created.
- Select the unallocated space, click on the “Create” button and then “Apply” to create a new partition.
- Select the newly created partition, click on the “Format” button to format the partition into the NTFS file system. This operation can be performed after installing the system from the Disk Management snap-in.
- The necessary partitions on the hard disk have been created. Select the partition selected for installing Windows (in the image - “Disk 0 Partition 2”), click on the “Next” button to continue installing the operating system on the computer.
Why is system disk expansion not active?
How to hide a drive in Windows 10 - description of possible methods
How to expand a volume: not active Windows 10? If on Windows 10 the expand volume button is not active in order to redistribute unallocated space, you need to eliminate some reasons. The button may be inactive if:
- The empty space has an inappropriate configuration. This means that you can attach it to the desired disk only if it is located to the right of the drive, and adjacent to the border of the disk being expanded. For example, if you want to enlarge media C, media D will have to be removed rather than compressed.
- Inappropriate file format. The pre-installed software diskmgmt.msc recognizes only NTFS file systems. If the disk is initially formatted as FAT32 or exFAT, you will have to format it to NTFS.
- Physical volumes are located on different disks. In this case, only combining media using a software RAID array will help.
System disk expansion is not active
How to increase the size of the C drive using Windows
The Windows operating system has a built-in disk management tool that allows you to create, expand, shrink, or delete a volume (disk).
We need to increase the system partition using the “D:” drive.
Keep in mind that you will not be able to enlarge the “C:” partition by borrowing additional space from the drive under the letter “D” without deleting information from the “D:” drive. After compressing the disk, there will be unallocated space located after the “D” drive, which cannot be attached to the “C” drive due to the fact that the volume expansion function will not work. This feature works if the space you are attaching is immediately behind the drive (“to the right”) to which you want to add additional disk space.
Follow these steps:
- Press the "Win" + "R" keys.
- In the “Run” window, enter the command: “diskmgmt.msc” (without quotes), click on the “OK” button.
- The Disk Management window will open, displaying all the disks connected to the computer.
On this computer, the hard drive has two hidden system partitions (they do not have letters) and two logical drives: “C:” and “D:”.
In order to increase space on drive “C”, we need to perform the following steps:
- Remove drive "D".
- Attach a certain amount of unallocated space to drive “C”.
- Create drive "D" from unallocated space.
Before deleting the partition, copy the necessary data from the “D:” drive to a flash drive or external hard drive.
- Right-click on the “D:” drive, select “Delete Volume...” in the context menu, agree to delete the partition.
- An area with unallocated space will appear on your computer's hard drive.
- Right-click on the “C:” drive, and in the menu that opens, select “Extend Volume...”.
- In the "Extend Volume Wizard" window, click the "Next" button.
- In the "Select Disks" window, select the required size of the attached space, displayed in MB (megabytes).
- In the “Completing the Extend Volume Wizard” window, click the “Finish” button.
In Disk Management, you will see that the size of the C: drive has increased. There is unallocated space left on the hard drive, from which we will create a new logical drive.
Now we need to re-create the “D:” drive:
- Right-click on the area of the hard drive that says “Unallocated” and select “Create a simple volume...”.
- In the “Create a Simple Volume Wizard” window, click the “Next” button.
- In the “Specify volume size” window, click on the “Next” button. By default, the system tool will select all available unallocated space.
- In the “Format Partition” window, agree to the selected settings. You can set the volume label (the name under which the disk will be displayed in Explorer): “New Volume” (default), “Local Disk” or any other name. In this example, I chose the label "vellisa".
- In the Completing the New Volume Wizard window, click Finish.
As a result, a new drive “D:” appeared on the computer.
MiniTool Partition Wizard Free
To enlarge the specified partition of the Windows operating system, you can use third-party applications. User action steps:
- download the installation package of files from the official website of the software developer, start unpacking and installation;
- on the welcome work panel, click on the “Disk and Partition Manager” button;
- select the block whose space will be used for expansion, click “Extend”. Attention! Before starting work, the drive must be removed using the block’s context menu. If there is space left after the procedure is completed, it can be converted into a separate subsection;
- set the size of the add-on, confirm the changes made with the “OK” button, then “Apply” and “Yes”.
The procedure takes a few seconds, after which a notification about the successful completion of the task will be displayed on the monitor of your personal device.
To continue working with a disk whose memory is full, you must transfer additional space. It is allowed to use megabytes combined in subsection “D”. A built-in tool or third-party software is used to perform the procedure.
How to reduce disk size using Windows
Now consider the reverse situation, where you need to shrink the C: drive by attaching some space to the drive letter D: (or to the drive with another drive letter).
Follow these steps:
- Right-click on the “C” drive and select “Shrink Volume...” from the context menu.
- The Query Compact Space window polls the volume to estimate available space.
- The window that opens shows the amount of disk space available for compression. If the available size is large enough, you can select a smaller size for compression. Click on the "Compress" button.
In Disk Management, unallocated space appears between the “C:” and “D:” drives.
You won't be able to attach this space to the "D" drive because it is located "to the left" of the "D" drive. If this location was "to the right" of the "D:" drive, we could expand this partition without removing the "D:" drive.
Remove the “D:” drive, and then create a new partition under the letter “D:” in place of the unallocated space. This process is described in detail above in the article.
Increasing space on drive C using Acronis Disk Director - Method 2
Acronis Disk Director is a very powerful product for working with computer hard drives and local drives. You should read the system messages very carefully so as not to accidentally make a mistake and destroy data.
When entering the program, we are greeted by an intuitive interface in which we can select disks and perform operations with it. To increase the volume size, select the disk and click “Change Volume Size”.
In the window that opens, check the boxes next to “Add unallocated space to a volume” and “Take free space from other volumes.” By clicking on the button next to the percentage window, select how much space you want to take from other drives. Once you have freed up space, change the Volume Size.
After making all the changes, click “Ok” and apply the actions. The system will ask you to reboot and after reboot you will have a disk with a large amount of free space.