Some users, when working on a computer, are faced with the need to increase the size of the “C” drive in order to add additional space to the system partition. By default, the Windows operating system, various system components, third-party programs are installed on the “C:” drive, and user data is stored here.
In other cases, on the contrary, you need to shrink the “C:” drive if it is large in order to attach more space to the “D:” drive (or a drive under another letter) used to store data.
There are several ways to solve this problem. In this guide, we will look at instructions on how to change the disk size in the Windows operating system, redistributing space between partitions using the system's built-in tool, increasing or decreasing the size of the system disk.
First, let's look at some reasons why this operation may be needed.
How to change the disk size in Windows when installing the operating system
Boot your computer from bootable media: flash drive or DVD. In Windows Setup, go to the window that asks where you want to install the operating system.
The user may have several options for further actions:
- If you are reinstalling Windows and there is another disk or several disks with data on the computer, you need to first remember or write down on paper the size of the disk (disk partition) in order not to delete this partition when selecting or creating a disk for installing the system.
- If your PC has one disk, remove all partitions remaining from the previous operating system: select the partition, and then click the “Delete” button. Unallocated space will appear in place of the deleted partitions.
- If your computer has not yet installed an operating system, all available space on your hard drive is unallocated space.
Using the example in this article, there are no other data disks on the PC; all partitions have been deleted. If your computer has a data partition, don't touch that drive.
First you need to create a system partition to install the Windows operating system:
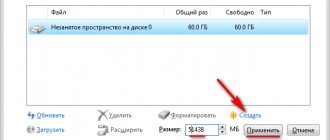
- Highlight "Unallocated space on disk 0".
- Click on the “Create” button.
- In the "Size" field, select the appropriate space size for the system disk. Leave some space to create another partition that will serve as data storage.
- Click on the "Apply" button.
- A warning window will inform you that additional partitions will be created for system files. Click on the "OK" button.
- In the next window, new partitions will appear on your hard drive: “Primary”, on which you can install Windows, and the “System Reserved” partition. This option is displayed when using the old BIOS.
On modern computers with UEFI there will be not one, but several small system partitions that do not need to be touched after they are created.
- Select the unallocated space, click on the “Create” button and then “Apply” to create a new partition.
- Select the newly created partition, click on the “Format” button to format the partition into the NTFS file system. This operation can be performed after installing the system from the Disk Management snap-in.
- The necessary partitions on the hard disk have been created. Select the partition selected for installing Windows (in the image - “Disk 0 Partition 2”), click on the “Next” button to continue installing the operating system on the computer.
Using the MiniTool Partition Wizard Free program
Like the previous utility, it is freely available on the World Wide Web and does not contain additional (imposed) software. It is also very easy to use, but there is no Russian-language interface.
Externally, the main menu of the application is similar to “Aomei Partition Assistant” and the algorithm of actions in it is also similar.
The following steps are required:
- Call the context menu on “D” and click on the line “Move/Resize Partition”, in the window that appears, set the required values;
- Click “Ok”;
- In a similar way, change the dimensions for “C”;
- Click “Ok”;
- In the main menu, click “Apply”.
How to increase the size of the C drive using Windows
The Windows operating system has a built-in disk management tool that allows you to create, expand, shrink, or delete a volume (disk).
We need to increase the system partition using the “D:” drive.
Keep in mind that you will not be able to enlarge the “C:” partition by borrowing additional space from the drive under the letter “D” without deleting information from the “D:” drive. After compressing the disk, there will be unallocated space located after the “D” drive, which cannot be attached to the “C” drive due to the fact that the volume expansion function will not work. This feature works if the space you are attaching is immediately behind the drive (“to the right”) to which you want to add additional disk space.
Follow these steps:
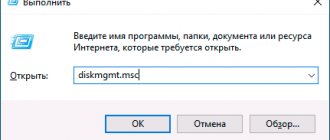
- Press the "Win" + "R" keys.
- In the “Run” window, enter the command: “diskmgmt.msc” (without quotes), click on the “OK” button.
- The Disk Management window will open, displaying all the disks connected to the computer.
On this computer, the hard drive has two hidden system partitions (they do not have letters) and two logical drives: “C:” and “D:”.
In order to increase space on drive “C”, we need to perform the following steps:
- Remove drive "D".
- Attach a certain amount of unallocated space to drive “C”.
- Create drive "D" from unallocated space.
Before deleting the partition, copy the necessary data from the “D:” drive to a flash drive or external hard drive.
- Right-click on the “D:” drive, select “Delete Volume...” in the context menu, agree to delete the partition.
- An area with unallocated space will appear on your computer's hard drive.
- Right-click on the “C:” drive, and in the menu that opens, select “Extend Volume...”.
- In the "Extend Volume Wizard" window, click the "Next" button.
- In the "Select Disks" window, select the required size of the attached space, displayed in MB (megabytes).
- In the “Completing the Extend Volume Wizard” window, click the “Finish” button.
In Disk Management, you will see that the size of the C: drive has increased. There is unallocated space left on the hard drive, from which we will create a new logical drive.
Now we need to re-create the “D:” drive:
- Right-click on the area of the hard drive that says “Unallocated” and select “Create a simple volume...”.
- In the “Create a Simple Volume Wizard” window, click the “Next” button.
- In the “Specify volume size” window, click on the “Next” button. By default, the system tool will select all available unallocated space.
- In the “Format Partition” window, agree to the selected settings. You can set the volume label (the name under which the disk will be displayed in Explorer): “New Volume” (default), “Local Disk” or any other name. In this example, I chose the label "vellisa".
- In the Completing the New Volume Wizard window, click Finish.
As a result, a new drive “D:” appeared on the computer.
Using the "Aomei Partition Assistant" application
This utility is distributed freely on the global network and does not contain unnecessary software. The application interface is intuitive and completely Russified. The application functions perfectly in the Windows 7 OS environment. The choice of language is carried out during the installation procedure of the program.
The following sequential steps must be performed:
- Call the context menu on volume “D”, then click the line “Resize partition”;
- Next, a menu will be displayed where you need to specify the required dimensions for compression “D”;
- Click “Ok”;
- In a similar way, enter the volume adjustment window “C” and expand, taking the freed space from “D”;
- Click “Ok”;
- Then, in the main menu of the program, click on “Apply”;
- Wait for the processes to complete and 2 automatic PC restarts;
- Ready! Drive "C" is expanded to include "D".
How to reduce disk size using Windows
Now consider the reverse situation, where you need to shrink the C: drive by attaching some space to the drive letter D: (or to the drive with another drive letter).
Follow these steps:
- Right-click on the “C” drive and select “Shrink Volume...” from the context menu.
- The Query Compact Space window polls the volume to estimate available space.
- The window that opens shows the amount of disk space available for compression. If the available size is large enough, you can select a smaller size for compression. Click on the "Compress" button.
In Disk Management, unallocated space appears between the “C:” and “D:” drives.
You won't be able to attach this space to the "D" drive because it is located "to the left" of the "D" drive. If this location was "to the right" of the "D:" drive, we could expand this partition without removing the "D:" drive.
Remove the “D:” drive, and then create a new partition under the letter “D:” in place of the unallocated space. This process is described in detail above in the article.
Increasing space on drive C using Acronis Disk Director - Method 2
Acronis Disk Director is a very powerful product for working with computer hard drives and local drives. You should read the system messages very carefully so as not to accidentally make a mistake and destroy data.
When entering the program, we are greeted by an intuitive interface in which we can select disks and perform operations with it. To increase the volume size, select the disk and click “Change Volume Size”.
In the window that opens, check the boxes next to “Add unallocated space to a volume” and “Take free space from other volumes.” By clicking on the button next to the percentage window, select how much space you want to take from other drives. Once you have freed up space, change the Volume Size.
After making all the changes, click “Ok” and apply the actions. The system will ask you to reboot and after reboot you will have a disk with a large amount of free space.
Source: https://www.vashmirpc.ru
Extending the base volume
Applies to: Windows 10, Windows 8.1, Windows Server 2022, Windows Server 2016, Windows Server 2012 R2, Windows Server 2012.
Using Disk Management, you can add additional space to an existing volume using empty disk space, but only if the empty space contains no volumes (that is, is not allocated) and is located immediately behind the volume being expanded with no other intermediate volumes, as shown in the following image . To expand, the base volume must be formatted with the NTFS or ReFS file system.
If you're using Windows Server 2012 R2 or later, you can also use Azure File Sync to extend your volume to the cloud. For more information, see Plan to deploy Azure File Sync on Windows Server.
Expanding a volume using Disk Management
To expand a volume into the empty space located on the disk immediately behind this volume, do the following.
Open Disk Management with Administrator rights.
To do this, type Disk Management in the search box on the taskbar, select and hold (or right-click) Disk Management , and then select Run as administrator > Yes . When Computer Management opens, go to Storage > Disk Management .
Click and hold (or right-click) the volume you want to expand, and then select Expand Volume .
If the Extend volume is not active, check the following:
- Disk Management or Computer Management is opened with administrator rights;
- There is unallocated space immediately after the desired volume (to the right of it), as shown in the image above. If there is another volume between the volume being expanded and the unallocated space, you can delete the staging volume and all files in it (remember to archive or move any important data first!), use a third-party (non-Microsoft) sharding application that can move volumes without destroy data, or stop the volume expansion process and create a new volume on unallocated space.
- The hard drive is formatted to the NTFS or ReFS file system. The extension is not supported for other file systems, so you will have to archive or move the desired files from this volume and reformat it to the NTFS or ReFS file system.
- If the disk size is larger than 2 TB, the GPT partitioning scheme must be applied to it. To use more than 2 TB on a single disk, it must be initialized using the GPT partitioning scheme. See how to change the disk partition style from MBR to GPT.
- If you still can't expand the volume, check the Microsoft Community site under Files, Folders, and Storage for possible problems. If there is no answer here, post your question and have Microsoft or other members of the community try to help you, or contact Microsoft Support.
Click Next , and then on the Select Disks (shown here), specify how much capacity you want to add to the volume you are expanding. It is usually best to use the default, which is all free space, but you can specify a lower value if you want to create additional volumes in the free space.
Click Next and then Finish to complete the extension.
Extend a volume using PowerShell
Click and hold (or right-click) the Start button, and then select Windows PowerShell (Admin).
Enter the following command to resize the volume to its maximum size and specify the drive letter of the drive to be expanded in the $drive _letter variable.
Unable to delete volume
Another problem that you may encounter when editing disks is that the “Delete Volume” button is inactive. It can occur for two reasons:
- The partition that you cannot delete contains the page file. You can verify this by looking at the information in brackets in the “Status” column. The way out of this situation is to delete the swap file or move it to another partition. The first option is better, since this file is important for the system, it helps it run games and applications for which the computer does not have enough RAM;
- the partition contains several volumes that must be deleted before erasing the entire partition.
The inactive “Delete volume” button cannot be pressed
Extend System Reserved Partition in Windows 10/8/7
This article explains how to resize and expand System Reserved Partition in Windows 10/8/7 32/64 bit without losing data.
Content:
Why expand the system reserved partition in Windows 10/8/7
In Windows XP and Server 2003, the system and boot partitions are the same C: drive. From Windows 7 and Server 2008, a system reserved partition has been introduced. The “System Reserved” section contains two types of files:
- Boot manager and boot configuration data. When your computer starts, Windows Boot Manager first reads boot data from the Boot Configuration Data (BCD). Your computer then boots into Windows from your system C: drive.
- Startup files used for BitLocker drive encryption. If you enable BitLocker Drive Encryption, your computer boots the unencrypted system-reserved partition, then decrypts the main encrypted drive and starts the system's encrypted Windows drive.
In general, you don't need to care about the system-reserved partition. When upgrading from Windows 7/8 to Windows 10, or upgrading from Windows 10/8/7, you may encounter the error “ The system reserved partition could not be updated ,” error code 0xc1900104 or error code 0x800f0922 . It's because:
- The System Reserve Partition (SRP) is a small partition on your hard drive, some third party antivirus and security applications write to the SRP and can fill it up.
- The system reserved partition takes up 100 MB of space on Windows 7, 350 MB on Windows 8 and 500 MB on Windows 10. When upgrading from Windows 7/8 to Windows 10, the original system reserved partition is too small.
You can solve this problem by using System Reserved partition extension in Windows 10/8/7 .
Cannot extend system reserved partition using diskpart or Disk Management
Although there is Expand Volume in Windows 10/8/7 Disk Management Tool, you cannot expand the system reserved partition by reducing C or other volume. Because when you expand a partition using Disk Management, there must be adjacent Unallocated space on the right. If you reduce the size of the adjacent C drive, the Unallocated space will not be adjacent to the system reserved partition.
The only way to get contiguous unallocated space for a system-reserved partition is to delete Drive C. You can't delete it because that's where the Windows Operating System is located. As you can see in the screenshot, Volume Expansion is disabled for the partition reserved by the system after shrinking the C drive.
Windows 10/8/7 and very old Windows Vista/XP has another native tool - diskpart. It helps you manage disk partition from the command line. Although there is an expand command, diskpart cannot expand a system-reserved partition . Since the same is with Disk Management, it requires deleting the right contiguous partition (C: drive). To change the size of a system reserved partition in Windows 10/8/7, you must run partition editor.
How to extend a system reserved volume using partition editor
Unlike Windows Disk Management, which can only shrink the volume to the left, NIUBI Partition Editor can shrink the disk and make the unallocated space on either the left or the right. In this way, the system reserved partition can be easily expanded after shrinking the C drive. If you have shrunk the C or other partition using Disk Management, NIUBI Partition Editor can move the unallocated space to the left of the C drive, and then merge them into a system reserved partition.
Download NIUBI Partition Editor and you will see the initial partition size and other information, my test computer has a system partition of 550 MB in size.
Steps to Extend System Reserved Partition in Windows 10/8/7 Laptop/Desktop:
Step 1: Right-click the C: drive and select "Resize/Move Volume", drag the left border to the right in the pop-up window (or enter the amount in the "Unallocated space before").
The C drive will be compressed and there will be unallocated space on the left side.
If you drag the right border to the left, the Unallocated space will be on the right side.
Step 2: Right click on the system reserved partition and select "Resize/Move Volume" again drag the right border to the right to merge this unallocated space.
The system partition is reserved up to 2.5 GB.
If you want to get Unallocated space from a non-contiguous partition such as D, there is an additional step to move the Unallocated space before adding it to the system-reserved partition. Requires computer reboot when shrinking and moving C: drive.
Follow the video tutorial to extend system reserved partition in Windows 10/8/7:
Take care of your system and data when resizing your partition
When you change the size of any partition, the setting of each partition and all files in it will be changed, sometimes all files will be moved to new locations. Therefore, there is a potential risk of system damage and data loss. It's better to make a backup in advance and run secure software.
Better than other tools, NIUBI Partition Editor provides a unique 1 second rollback technology that can automatically return your computer to its original state in the blink of an eye when any error occurs. It also has Virtual Mode, Undo-on-Good and an advanced file-moving algorithm to help resize partitions more securely and much faster. Apart from compressing and expanding partition, it helps to copy, convert, defragment, erase, scan, hide partition, etc.
Extend Volume feature is not available
Some users encounter that the “Extend volume” item in the built-in utility or during the installation of Windows 7 is inactive, that is, it is highlighted in a neutral color.
A similar problem occurs if you do not have space that can be allocated to one of the disks. That is, you do not have unallocated memory.
Please note that free disk space and unallocated space are two different things. To achieve the presence of a second one, you need to delete one of the volumes or compress it, moving the free space to unallocated space. How to do this is described in the paragraphs in the “Through the built-in utility” section above in the article.