Windows in its current form has many different functions, applications, add-ons. But some of them may not be used. Users are often interested in how to disable OneDrive in Windows 10 or remove it completely from their computer or laptop. This need may arise for those who are bothered by the application icon in the system tray, the section in Explorer, and system messages that appear from time to time in the notification section. And really, why do you need cloud storage if you don’t use it? After all, the program consumes PC resources and also consumes traffic when synchronizing data stored in the cloud.
In this article, we'll look at simple instructions that describe in detail how to completely disable OneDrive in Windows 10, remove it from the device, and also figure out how to cancel the synchronization function, which will be very useful for those who are not entirely sure whether they will continue whether to use cloud storage or not.
How to disable OneDrive startup in Windows 10
Conservative users who prefer not to make drastic decisions regarding a system that is working properly are primarily interested in how to disable OneDrive startup in Windows 10. That is, the application itself will not be removed, but it will not work in the background and will not consume resources and looming before your eyes with an application icon and, of course, annoying notifications. Of course, this is the best solution and it is recommended to use it.
Instructions for disabling OneDrive autorun in Windows 10:
- Click on the OneDrive icon in the Windows system tray, located on the right side of the taskbar;
- Go to the “Help and Settings” section;
- Select the “Options” item in the context menu that opens (you can also quickly select this item by right-clicking on the application icon in the system tray);
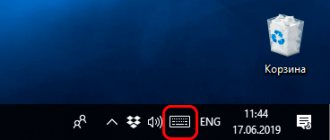
If the OneDrive icon is not in the tray, it may be located in the hidden icons section. In this case, you need to click on the arrow, as shown in the screenshot below, and then click on the cloud storage application. - Go to the “Options” tab in the window that opens;
- Uncheck the box “Automatically launch OneDrive when you log into Windows”, located in the “General” subsection;
- Click “OK” to save the changes made.
If all the steps from the instructions above are performed correctly, then the next time you boot your computer or laptop, the application will not load. There will be no icon or notifications.
There is no OneDrive icon in the Windows system tray
Problems with disabling OneDrive in Windows 10 may occur if the program icon is not in the system tray. There is a possibility that the application was simply closed by the user after loading the operating system. In this case, you can restart your PC and the application will appear again. Or - launch OneDrive yourself. You can do this from the Start menu.
Or find the application through the Windows search form.
What is OneDrive
See also: “Can’t access a folder in Windows 10: what to do”
OneDrive is cloud storage that is activated immediately after installing the Windows 10 operating system and runs in the background. The utility, formerly called SkyDrive, is one of the company's efforts in the field of partially free online services. After seven years from the project's launch date, the name was changed to OneDrive in 2014 due to lawsuits.
The so-called cloud on a remote server, into which the user is invited to upload files and information from his device, makes it possible to access his documents from any other device, as well as transfer information to other users.
The service is certainly convenient, however, not everyone wants to use it. And there are a number of good reasons for this. Perhaps the most important thing is that Microsoft will have access to personal data and files. This can become a big threat when, for example, it concerns company secret data, etc.
In this regard, it is often necessary to deactivate the utility. The shutdown or removal procedure differs for 64-bit and 32-bit versions of the OS, just as there are differences in the algorithm of actions between the home and other versions of the “ten”.
Attention! Completely removing the utility from the system may have undesirable consequences. In some cases, problems and malfunctions in the operating system may occur.
How to remove OneDrive in Windows 10 when PC starts
There is an alternative way to go to settings and remove OneDrive in Windows 10:
- Open the Explorer application;
- Right-click on the application folder;
- Select the “Options” item in the context menu;
- Go to the “Parameters” tab;
- Uncheck the “Automatically start OneDrive when you sign in to Windows” checkbox and save the changes by clicking the “OK” button.
OneDrive file classification
Files in your OneDrive account fall into one of three categories when viewed through File Explorer:
- Internet-only files: These files do not take up space on your computer. You can only access them if you have an Internet connection. They are marked with a cloud icon.
- Locally Available Files: These are former online-only files that you have downloaded to your computer. They are shown with a green tick in a white circle.
- Always available files: These files are downloaded to your computer immediately after creation and are available at any time. They use a white tick in a green circle.
If you want to delete OneDrive files from your local computer without deleting them from your cloud storage, you have two options. It depends on whether you start with Always Available Files or Locally Available Files .
How to close OneDrive on Windows 10
After performing the procedure of disabling the application at startup, all changes will take effect only after restarting the computer. You can reboot your device to make sure everything is done correctly. But if a reboot is currently undesirable, and you need to exit the application, then this is very easy to do by using the instructions below.
How to close OneDrive on Windows 10:
- Click on the application icon in the Windows system tray;
- Go to the “Help and Settings” section;
- Select “Close” in the context menu that appears.
How to set a data limit on OneDrive
In the latest update, Microsoft introduced a feature that is well worth it if you often use the mobile Internet or have a slow connection and don’t want to load it too much.
With the latest update to the OneDrive service, a feature has been added that allows you to manually set a data transfer or download limit. This feature is ideal when you use mobile Internet a lot or have a slow connection and don't want to overload it - in general, if you have limited access to the Internet. Of course, you can temporarily disable OneDrive.
The latest feature added to the OneDrive virtual drive settings allows you to set a limit for downloading and transferring data. Let's move on to changing the settings.
To get started, go to the Windows 10 notification panel and right-click on the OneDrive icon located in the so-called system tray. Then, from the list of available context menu options, select Settings.
As part of setting up the program to synchronize data, select the “Network” tab. There are two sections that can be freely edited:
- transmission speed;
- download speed.
Now you only need to select the “Limit to” function in one or both options, and then enter the number of kB/s to the limit of which you want to limit the transfer or download of files from the virtual disk. Click OK to save your changes, which will take effect instantly—no need to restart your computer.
How to turn off OneDrive syncing in Windows 10
The instructions for disabling OneDrive synchronization in Windows 10 can be very useful. In addition to the fact that the user does not need to uninstall the application, there is another significant plus, namely, deleting the OneDrive folder from Explorer , which, as it turns out, irritates many simply by its presence.
How to disable OneDrive syncing in Windows 10:
- Click on the application icon in the system tray;
- Select the “Help and Settings” section;
- Select "Options" from the menu. You can also go to settings by right-clicking on the OneDrive folder in Explorer and selecting the appropriate item in the menu;
- Click “Unlink this computer” in the “Account” tab (active by default);
- Click “Delete account association” in the window that appears to confirm the operation.
If you decide to cancel your decision and restore the backup again, you just need to launch the application and enter the username and password for your Microsoft account.
Removing the OneDrive folder from Explorer
If you were able to somehow disable OneDrive, but the folder still appears in Explorer, you need to follow these steps.
Launch the registry editor using the regedit . Let's go to the address:
HKEY_CLASSES_ROOT\CLSID\{018D5C66-4533-4307-9B53-224DE2ED1FE6}
Change the value of the System.IsPinnedToNameSpaceTree from one to zero.
How to completely remove OneDrive on Windows 10
“How to completely remove OneDrive in Windows 10?” — users who are 100% sure that they will not use this application are interested. Easily. In new versions of the operating system, uninstallation is carried out in the standard way - through the Windows Add or Remove Programs Wizard:
- Open the Start menu;
- Go to the settings by clicking on the button with the gear icon (hot keys Win+I);
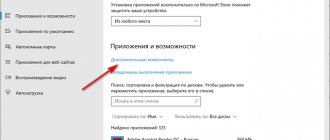
- Go to the “Applications” section;
- Go to the “Applications and Features” subsection (active by default);
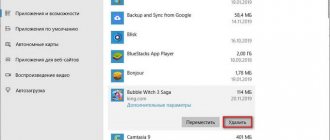
- Find the Microsoft OneDrive application in the list and click on it so that the “Delete” button appears.
Empty trash
When something is deleted, whether it's deleted from the OneDrive website, the OneDrive folder on your computer, or the mobile app, it moves to the Trash. You'll want to empty the Trash to permanently delete everything.
Empty the Trash using your computer
To empty the Trash using your computer, return to the OneDrive website and click Trash in the left pane.
Then click the item you want to delete permanently. Or click the bubble next to "Name" at the top of the list to quickly select all the items in your cart.
Once selected, you will see the option to delete selected items in the header menu. This option will say "Empty Trash" if you have selected all the items in the Trash. Otherwise it will say "Delete".
A message appears asking you to confirm that you really want to delete all items. If you are sure, click Yes.
Warning. Once you empty the Recycle Bin, you will not be able to recover files or folders. Empty the Recycle Bin only if you are sure that you will no longer need the files and folders.
Files and folders are now permanently deleted from OneDrive.
Disabling One Drive in Windows
You can also permanently disable One Drive in Windows using the Local Group Policy Editor:
- Press the hotkey combination Win+R;
- Enter the command gpedit.msc into the field;
- Press Enter or “OK”;
- Go to the following path: “Computer Configuration” - “Administrative Templates” - “Windows Components” - “OneDrive”;
- Double-click on the item “Prohibit the use of OneDrive for storing files”;
- Set the switch to the “Enabled” state in the window that opens;
- Click “OK” to save the changes.
How to disable OneDrive through the registry
If you have the Home version of Windows 11 or Windows 10, you can try disabling OneDrive through the registry. To do this, press the Win-R key combination and execute the “regedit” command.
In the Registry Editor you need to open the following section:
HKEY_LOCAL_MACHINE\SOFTWARE\Policies\Microsoft\Windows\OneDrive
If there is no “OneDrive” subsection, then you need to create it.
In this registry key, you need to create a 32-bit DWORD value called "DisableFileSyncNGSC" and set it to the value "1".
As a result, the OneDrive app will be disabled after you restart your computer. The method works on Windows 11 and 10.
Uninstalling OneDrive via Windows PowerShell
Another way to remove OneDrive is through Windows PowerShell (or Command Prompt) as an administrator. Considering that PowerShell is a more modern and convenient tool, it is recommended to use it.
- Right-click on the Start menu;
- Select “Windows PowerShell (Administrator)”;
- Enter the following command in the input field: taskkill /f /im OneDrive.exe (to stop the service) * you can simply copy and paste;
- Press Enter;
- Enter the command: C:\Windows\System32\OneDriveSetup.exe /uninstall (for 32-bit systems) C:\Windows\SysWOW64\OneDriveSetup.exe /uninstall (for 64-bit systems)
- Press Enter.
If everything went well, then no messages or alerts will be displayed on the command line, but the application will be removed.
Didn't find the answer? Then use the search form: