You can work with autoshapes in Microsoft Office documents. You can create compositions, combine pictures, insert WordArt objects. But you will have to change them separately. This is very inconvenient if you are making a pattern from many different parts. To avoid moving each circle, figure out how to group shapes in Word.
For transfer or other operations with autoshapes, they can be combined
If you combine images, the program will perceive them as a single whole. This way you can change all elements at once, move them or apply certain attributes to them.
How to group objects
In order to group several shapes or drawings in a Word document, you need to press the “ Ctrl ” button and mark the required elements, namely:
- First you should insert into document the necessary pictures or elements, mark them as you wish. For now, each one stands out separately and is not connected to the others.
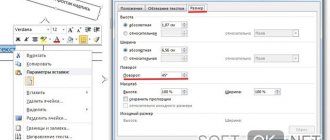
- Now you need change the flow type each element. Initially, Word assigns the wrapper " In the text”, however, it is precisely this that usually prevents grouping. Let's change the view to any other, in the example - to " Around the frame" Changes must be made to all images.
- To group, select one picture while holding down the "Ctrl" Then, without releasing the key, click on other pictures and objects in the document that you want to group.
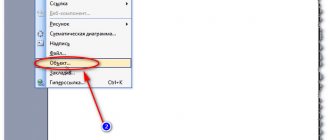
- Right-click on any selected object and in the action menu click “Group" You can also do this by going to “ Working with drawings» — «Format" and press "Group».
- After the completed actions, all images will be combined, having a common frame.
Editing objects in a group
At the stage when the pictures are grouped, they can be easily moved, style, effects, and borders can be edited.
When selecting the entire group, the changes will be applied to all objects simultaneously.
The entire group must be selected. To do this, left-click once on any of the pictures in the group. Additionally, to visualize selected objects in the “Layout” tab, click on “Selection Area” and see the information in the context menu on the right.
Now go to the “Format” tab (“Drawing Tools” or “Working with Pictures”).
In the first option, you can change shape styles and other parameters that will change for the entire group (fill changes only shapes drawn in Word, and effects – all objects).
In the second option, you can also edit images: styles, frames, borders, effects, color and more. The last of the listed parameters changes only images, does not affect shapes).
Cancel grouping
You can use any of the following to unmerge shapes or pictures:
- Make active group. Go to page " Format" and in the section "Group" use "Ungroup».
- Select combined elements, use the left mouse button to call up the menu and indicate “Group» — «Ungroup».
The elements will become ungrouped and it will be possible to change them individually.
The "Group" button is disabled
Below are the reasons why the Group
painted gray and ways to restore it.
- Only one object is selected. Make sure you select multiple shapes or images. You can't use the Group tool with SVG icons, so they don't count.
- To group SVG icons, you first need to convert them into shapes. For more information about converting to shapes, see Convert an SVG picture to an Office shape.
- You selected a table, sheet, or GIF image. Button Group
will not be available if any of these objects are selected.
- If you use PowerPoint, you may have tried to group something with a title placeholder (“click to add title”) or a content placeholder (“click to add text”).
In the example above, the blue square and green circle can be grouped. But shapes cannot be grouped with placeholders.
To reactivate the Group
, move the shape, image, or object to another location on the slide outside of the placeholders, or remove the placeholder from the objects you want to group.
Note:
If none of the suggestions help activate the
Group
, use the search in the Answers forum or ask your questions there.
Click the headings below for more information.
Sources
- https://FB.ru/article/315883/kak-sgruppirovat-risunki-v-vorde—poshagovyie-instruktsii
- https://naprimerax.org/posts/110/gruppirovka-v-word
- https://composs.ru/gruppirovka-figur-v-word/
- https://nastroyvse.ru/programs/review/gruppirovka-figur-word.html
- https://vacenko.ru/obedinyaem-kartinki-v-programme-word-prostymi-sposobami/
- https://mir-tehnologiy.ru/kak-v-vorde-obedinit-figury/
- https://support.office.com/ru-ru/article/%D0%BA%D0%B0%D0%BA-%D0%B3%D1%80%D1%83%D0%BF%D0%BF% D0%B8%D1%80%D0%BE%D0%B2%D0%B0%D1%82%D1%8C-%D1%84%D0%B8%D0%B3%D1%83%D1%80%D1 %8B-%D0%B8-%D0%BE%D0%B1%D1%8A%D0%B5%D0%BA%D1%82%D1%8B-%D0%B2-word-%D0%B8-office -a7374c35-20fe-4e0a-9637-7de7d844724b
Changing individual objects without ungrouping
If you need to edit one element in a group, you do not need to separate them each time. You can change an individual shape or image from a group as follows:
- Mouse button mark merged images or figures. Now click on the desired object again and a selection stroke will appear around it.
- To edit several shapes, you need to select them by pressing the "Ctrl».
Grouping Shapes in Microsoft Word
You can work with autoshapes in Microsoft Office documents. You can create compositions, combine pictures, insert WordArt objects. But you will have to change them separately. This is very inconvenient if you are making a pattern from many different parts. To avoid moving each circle, figure out how to group shapes in Word.
For transfer or other operations with autoshapes, they can be combined
If you combine images, the program will perceive them as a single whole. This way you can change all elements at once, move them or apply certain attributes to them.
Group text and image
Text and images cannot be grouped directly or selected at the same time as other objects. But there is a workaround:
- Open item "Insert" and print the text using "WordArt" There is also the ability to insert text using “ Figures" and selecting "Inscription».
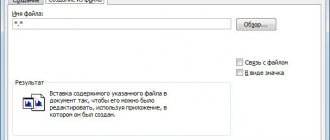
- Now you need to select a text fill and enter it in the field that appears. Opening the " Format» select the item «Filling a shape» — «Drawing».
- To group an inscription with other images, you need to hold down "Ctrl» click on the previously created grouping and the printed text. Then left-click and select “ Group».
- For editing display levels, in this case, you need to use the functions "Send to foreground/background».
Fills and outlines
Step-by-step instructions on how to connect a CCTV camera via phone
Fill
- filling with color, pattern or texture the internal area covered by the outline of a closed object.
Graphic objects can be thought of as being drawn with some kind of pen, with customizable size, shape, and color. The line created by this pen and enclosing an object forms the outline
of the object, which can simply be an open line. For object outlines, you can specify color, width, and style.
To change the outline line of a graphic object, you need to:
Rice. 20.13. Rice. 20.14.
To select a fill for a graphic object, you need to:
To remove the fill you need:
Select a graphic object.
Drawing toolbar
Click the arrow next to the
Fill Color
.
Select No Fill
(Fig. 20.15).
Adding shadows
In Word, it is possible to add a shadow effect, as well as change the size, direction and color of the shadow of any graphic object, as well as inscriptions.
H
Rice. 20.16.
To add a shadow to a graphic object, you need:
When you add a raised or recessed shadow, the object's outline line may become invisible. To make the line visible, you will have to define it again.
To change the color or shift the shadow, click the Shadow Settings
Shadow Settings
toolbar (Fig. 20.16). On the same panel there is a button designed to turn the shadow on and off temporarily.
To remove the shadow of a graphic object, you need to:
Select the graphic object that needs to be changed.
On the drawing panel, click the Shadow
and select the command
No shadow
.
Adding dimension
ABOUT
Rice. 20.17.
The highlight of autoshapes and lines can be significantly improved by applying a three-dimensional effect to these objects. In this case, it is possible to set parameters for depth, rotation and tilt angles, lighting direction and object texture. Changing the color of the volume does not affect the color of the object itself. When adding volume to an object, keep in mind that shadow and volume are mutually exclusive effects: when adding volume to an object that has a shadow, the latter disappears.
To apply or change the three-dimensional effect of a graphic object, you need to:
To change volume parameters - depth, rotation angle, tilt angle, color, lighting direction and surface texture, there is a special Volume Settings
(Fig. 20.17).
To display it on the screen, you need to click the Volume settings
. After this, you can make the required settings for the object view. To add the same effect to several objects at once, before adding the effect you need to select these objects or combine them into a group.
To remove the volumetric effect from a graphic object, you need to select the graphic object and click the Volume
and in the samples palette select the command
No volume
.
PRACTICED INDIVIDUAL PRACTICAL TASK
The Word text editor has built-in tools for inserting various shapes and objects into a document. With their help, you can build simple diagrams and illustrations that will complement the text well. You can read more about how to use these tools.
Here we will talk about how to group shapes and Word objects. Using this grouping, you can combine a number of shapes or objects and subsequently manage them as a single whole. This feature can be useful in different situations, for example, you cannot do without grouping if you need to move a previously drawn diagram to another place in the document. Grouping will also be useful when changing the parameters of a large number of objects, for example, when changing color.
The article will be useful for users of all modern versions of Word, including Word 2007, 2010, 2013 and 2016.
Let's say you have some kind of diagram or set of shapes that you want to group into one object. To do this, you first need to select with your mouse all the shapes that are included in your diagram. To do this, press the CTRL or SHIFT button on the keyboard and, without releasing it, click on each of the shapes in turn with the left mouse button. This way you will select all the shapes.
After selecting all the shapes, you can group them. To do this, release the CTRL or SHIFT button that you were holding and right-click on the selected shapes. In the menu that appears, select “Group”.
You can also go to the “Format” tab and click on the “Group” button there.
In any case, after grouping, the selected objects will behave as a single unit and you will be able to move them around the Word document without any problems.
Combining shapes and pictures
Grouping images and figures follows the same principle as described above:
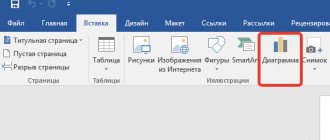
- Upload drawings to a Word file: go to the “Insert" and in the column "Illustrations" choose "Drawings».
- Then we create the necessary shapes. Change the wrapping of each element to “Around the office”. You can link them using the button " Ctrl"and selecting the required files with the mouse. Then in the context menu click on “ Group».
- To change the position of objects between each other, you can use the “Send to foreground/background» for a single image in this association.
The most common keyboard shortcuts in Word
How to Draw Diagrams Using SmartArt
A diagram is added to a text editor by inserting a SmartArt drawing into the document. To do this, go to the “Insert” tab and in the “Illustrations” group, click on the “SmartArt” button.
A window like this will appear. In it you need to select a suitable drawing. On the left, click on the section, in the example “Hierarchy”, and select one of the proposed pictures. There's a preview area on the right, see what it looks like and what it's best suited for.
Now let's start placing blocks. You can delete unnecessary ones by selecting it with the mouse and clicking the “Delete” button. Thus, remove all unnecessary rectangles.
Next you need to add blocks. Select the one under which you want to insert additional ones, and on the “Working with SmartArt Drawings” - “Design” tab, click on the “Add Shape” button, in the list click on the “Add Shape Below” item.
After that, select the top rectangle again and add another one below. Here you can choose to add the desired object above, in front of, or behind the selected block.
After you complete the previous step, you need to print the text. Select the diagram area and on the “Working with SmartArt Drawings” - “Design” tab, click on the “Text Area” button. Or, on the left border, click on the button with two small arrows.
A small window will open on the side. In it you need to enter text for each of the blocks. Here markers indicate the levels, and by clicking in front of the marker you can see where the text will be entered.
Write next to each marker which text should be in which object.
When everything is filled out, the window for adding text can be closed by clicking on the cross in it.
Now you can work on the appearance of the circuit itself. To do this, select it and go to the “Working with SmartArt Drawings” – “Design” tab. In the “SmartArt Styles” group, you can choose any other style.
You can also “Change the colors” of the scheme by clicking on the corresponding button.
If the selected view is not very suitable for you, you can change it in the appropriate group. Hover your cursor over any of the proposed layouts to see what your diagram will look like. If this layout suits you better, click on it to select it.
By going to the “Working with SmartArt Drawings” - “Format” tab, you can change any shape or text. For example, select a shape, click “Edit Shape” and click on any other from the proposed list. For each, you can change the fill, outline, or add an effect.
Similarly for text, select it and you can apply one of the ready-made styles, change the fill, outline, or add an effect.
In the end, I came up with this diagram.
How to combine simple shapes to create more complex shapes
An effective way to create more complex illustrations is to combine simpler images in different ways using the Shape Builder tool and Pathfinder effects.
Combine shapes using the Shape Builder tool
- Select the shapes you want to merge.
- Select the Shape Builder tool from the toolbar. The Shape Builder tool lets you combine or remove selected shapes.
- Drag the shapes to combine them.
Removing shapes using the Shape Builder tool
- To remove parts of shapes, press the Option key (macOS) or Alt key (Windows) and click or drag your mouse over the drawing.
Combining shapes with Pathfinder effects
Effects
Pathfinder allows you to combine shapes in more ways than the Shape Builder tool. With multiple shapes selected, you can apply a Pathfinder effect by clicking the effect in the Properties panel.
- To see more Pathfinder effects, click More Options in the Pathfinder section of the Properties panel.
.
How to Compare and Merge Two Documents in Word
If you have more than one saved version of a document, or revisions from multiple people in the same document, you'll probably want to check what changed between each version and, if necessary, save any changes that were made to the same document. Luckily, Microsoft Word's built-in diff tool can help you merge two versions of a document into one.
For example, perhaps you've created two (or more) versions of your resume and want to see how the updates differ, or want to compare the original report with a newer one. Word's compare and combine tools can help you see and combine those similar documents.
1. Click the Review tab on the ribbon, then , then Compare > Compare
2. Find the original document and the modified document in the two drop-down lists.
3. Optionally click the More button to select the types of changes you want to see.
4. Click OK.
5. Review changes to documents. Click any highlighted version and click the Accept button on the ribbon to accept the changes.
Alternatively, you can use the Merge menu option to merge all changes into one document at once.
Tips for Microsoft Word
.
Shape styles
The shape styles are almost identical to the image styles we covered in the last lesson. But let's briefly go over them:
- Style gallery allows you to select a ready-made figure layout for quick styling. Click on the Down arrow in the Format - Shape Styles block to select one of the ready-made styles. Click on the appropriate thumbnail to apply.
- Filling a shape — change the color and fill method of the object. You can, for example, make a gradient fill or texture. Click on the Format - Shape Fill ribbon to make the appropriate settings
- Figure outline — allows you to change the color, thickness, type of contour line, add arrows. On the ribbon, perform Format - Shape Outline, make your selection in the appropriate paragraphs
- Shape effects — Add various effects to the shape to add volume: shadow, reflection, highlighting, smoothing, etc. Click on the Format — Shape Effects ribbon to select additional effects
Brief description of possible methods
Here are some table merging techniques:
1
By removing all characters between tables.
2
By copying and pasting the second table into the last row of the first (Ctrl+C and Ctrl+V).
3
By copying and pasting the second into the first using the Paste as new lines option.
4
Horizontal connection
Let's look at them all in order, with detailed instructions and screenshots.
Delete all characters in between
This method is the most common and is described in all manuals. This is especially true of older versions of Word: any tables are joined automatically if you erase everything written between them.
Here's how to do it:
1
Place the tables one above the other. If there is text between them, cut it out and paste it somewhere else.
2
Place the cursor on the empty space between the objects.
3
Press Backspace or Delete, which will eliminate the gap between the objects and automatically merge them.
4
If this does not happen, then try activating the Display all characters function in the main section. This will allow you to see and remove hidden characters, if any.
5
Simply position the cursor next to paragraph characters and also delete them using Backspace or Delete. If you can’t erase a paragraph character, try doing it by searching and replacing characters. In this case, the second line in “Symbol replacement” must be left empty.
If there is a repeating column or row, select it and press Delete.
If the method does not work or you cannot find the functions you need, then move on to the next option.
Copy directly Ctrl+C and Ctrl+V
The simplest copy-paste usually works with tables. Convenient in its simplicity and lack of additional steps.
Here's what to do:
1
Select the table you want to paste.
2
Use Ctrl+C to copy or Ctrl+X to cut. You can also right-click and select Copy or Cut.
3
Place the cursor in the last row of the first table.
4
Use the combination Ctrl+V or right-click on the cell with the cursor and select Paste. Objects will be merged without breaking formatting
When selecting, you need to capture the table itself, and not just the text inside it. Otherwise, only the content will be copied, which will break the entire structure.
If this method did not work in your version of Word, then move on to the next one.
Copy and paste new lines
The method works on later versions of a text editor and is a type of table copying.
Here's how it works:
- Select and copy the second table to the clipboard (Ctrl+C combination)
- Right-click on any of the first columns
- In the drop-down menu, select the “Paste as new rows” function and the copied table will be glued to the main one
Typically, one of the three methods above is suitable and solves the problem. Now let's look at a non-standard merge option.
Horizontal merger
Sometimes you need to glue tables horizontally so that they are joined at the sides rather than at the top and bottom. This can be done using a variation of the copy-paste method.
Here's how it works:
1
Copy the second table to the clipboard.
2
Place the cursor behind the first table where the first row ends.
3
Paste an object from the buffer in any convenient way. Automatic merging will occur immediately. If necessary, remove the duplicate row or column.
This was the last method of unification. Now you can quickly select and use a working method even on an unfamiliar computer with an unknown version of a text editor.
If all else fails
The likelihood of such a coincidence is low, but judging by user comments on forums, it can happen. Here's what you can try:
- Download another version of Word or update the current one.
- Use the online version of a text editor. The Microsoft OneDrive service will provide access to Word-online, in which two of the described methods work exactly. The only downside to this option is that you need a Microsoft account