10/15/2020 windows
User Account Control, or UAC, in Windows 10 notifies you when you run programs or perform actions that require administrator rights on the computer (which usually means that the program or action will change system settings or files). This was done to protect you from potentially dangerous actions and running software that could harm your computer.
By default, UAC is enabled and requires confirmation for any actions that may affect the operating system, but you can disable UAC or customize its notifications in a way that suits you. At the end of the instructions there is also a video that shows both ways to disable User Account Control in Windows 10. Note: if even with User Account Control disabled, one of the programs does not start with a message that the administrator has blocked the execution of this application, these instructions should help: Appendix blocked for security purposes in Windows 10.
- Disable User Account Control in Windows 10 Control Panel
- Changing UAC Settings in Registry Editor
- Disabling UAC on the Command Line
- How to disable User Account Control in the Local Group Policy Editor
- Video instruction
How to disable User Account Control in Windows 10 Control Panel
The first way is to use the appropriate item in the Windows 10 Control Panel to change User Account Control settings.
- Open the Control Panel, to do this you can use the search in the taskbar or press the Win+R , type control and press Enter. Or you can go straight to step 4 by pressing Win+R and entering UserAccountControlSettings
- In the control panel at the top right, in the "View" field, instead of "Categories", set "Icons", and then open the "User Accounts" item.
- In the next window, click “Change User Account Control Settings.”
- Next, you can manually set UAC settings or disable Windows 10 User Account Control; just select one of the UAC settings options, each of which is explained below.
Possible options for User Account Control settings in the control panel from top to bottom:
- Always notify when applications try to install software or when computer settings change is the safest option; you will be notified about any action you take that could change something, as well as actions from third-party programs. Regular users (not administrators) will be required to enter a password to confirm the action.
- Notify only when apps try to make changes to your PC —This setting is enabled by default in Windows 10. It means that only the actions of programs are controlled, but not the actions of the user.
- Notify only when applications try to make changes to the computer (do not dim the desktop). The difference from the previous point is that the desktop is not darkened or blocked, which in some cases (viruses, Trojans) can be a security threat.
- Don't notify me —UAC is disabled and does not notify you of any changes to computer settings initiated by you or programs.
If you decide to disable User Account Control in Windows 10, which is not a safe practice at all, you should be very careful in the future, since all programs will have the same access to the system as you, while User Account Control will not inform you if some of them may affect the operation of the system. In other words, if the reason you disable UAC is simply because it is “interfering,” I strongly recommend turning it back on.
What is UAC?
User Account Control in Windows 10 is an integral part of OS security. When a third-party utility tries to make changes to your computer, it intervenes and asks for confirmation. Acceptance allows the application to temporarily operate with full user rights, that is, Administrator rights.
Every time you need to open or install software, the following messages will be displayed in the UAC control: “Do you want to allow this program to make changes to your computer?” and “Click Yes to continue.”
Changing User Account Control settings in Registry Editor
Disabling UAC and choosing any of the four options for Windows 10 User Account Control is also possible using the Registry Editor (to launch it, press Win + R on your keyboard and enter regedit).
UAC operation parameters are determined by three registry keys located in the section
HKEY_LOCAL_MACHINE\SOFTWARE\Microsoft\Windows\CurrentVersion\Policies\System
Go to this section and look for the following DWORD parameters on the right side of the window: PromptOnSecureDesktop , EnableLUA , ConsentPromptBehaviorAdmin . EnableLUA setting to 0 (zero), close Registry Editor, and restart the computer.
However, when you change UAC settings in Control Panel, Windows 10 itself operates on three settings at once and does it a little differently (although the previous method is simpler and faster). Below are the values of each of the keys PromptOnSecureDesktop, EnableLUA, ConsentPromptBehaviorAdmin in the order they are specified for different options for User Account Control alerts.
- Always notify - 1, 1, 2 respectively.
- Notify when applications try to change parameters (default values) - 1, 1, 5.
- Notify without dimming the screen - 0, 1, 5.
- Disable UAC and do not notify - 0, 1, 0.
Is it safe to disable UAC?
By default, User Account Control should be enabled. And for good reason. Under normal circumstances, the user will be prompted to confirm various actions before they can occur on the computer. In particular, when installing programs, opening the registry editor and changing basic system settings.
Without this control, hacking your computer with malware can be trivial. Applications do not require user permission to make changes to the system, so they can make any changes they want without their knowledge.
Many people prefer to disable UAC altogether. After all, every time you need to complete specific tasks, requests are constantly displayed, which seems intrusive. But this should only be done in certain circumstances. For example, if you have an account without Administrator rights and a separate administrator account to perform any installation or configuration tasks, or you need to troubleshoot software problems.
Disabling UAC on the Command Line
A quick way to completely disable User Account Control is to use the command line, to do this:
- Run Command Prompt as an administrator; in Windows 10, you can do this by typing “Command Prompt” into the search on the taskbar, and when you find the desired result, either right-click on it and select the desired menu item, or select “Run as” administrator" in the panel on the right.
- Enter the command (pressing Enter after typing) reg ADD HKLM\SOFTWARE\Microsoft\Windows\CurrentVersion\Policies\System /v EnableLUA /t REG_DWORD /d 0 /f
- Close Command Prompt and restart your computer or laptop.
At its core, this method is a variant of the method with the registry editor, which is described above: simply the desired parameter is changed using the specified command.
What to look for when the console appears
When you download an application, the OS 10 notification window that appears contains information about the name of the program, its publisher and the source of the file. All this gives a complete picture of the software being launched. Therefore, when an application does not have a name, users should question its “integrity”. Thus, viruses very often penetrate along with the installation file. If the program is scanned or you rely on an antivirus, in any case it is possible to disable the protection.
IMPORTANT. UAC in Windows 10 is enabled by default. After disabling it, you can always enable control again.
How to disable UAC in Windows 10 Local Group Policy Editor
This method is suitable for Windows 10 Pro and Enterprise, where the Local Group Policy Editor is present. The steps will be as follows:
- Press the Win+R on your keyboard, type gpedit.msc and press Enter.
- In the editor, go to the section “Computer Configuration” - “Windows Configuration” - “Security Options” - “Local Policies” - “Security Options”.
- In the right pane, find the option “User Account Control: All administrators run in administrator-approved mode” and double-click on it.
- Set the option to Disabled and click OK.
Restarting your computer is usually not necessary.
How to Bypass UAC Using Task Scheduler
To disable UAC in Windows 10 for a specific application or program, you can use the Task Scheduler feature. This option is suitable when it is not possible to disable the blocking using other options.
- To do this, launch the task scheduler. Press the keys Win+R and enter the command taskschd.msc
- In the task manager window, right-click on the line “Task Manager” and select “Create a task».
- In the additional window that opens, you need to enter the name of the task and check the box:Run with highest rights”
- After that, in the window “Create a task» select subtab «Actions" and activate the option "Create" In the next “Create actions” window, click “ Review» select the required program for its smooth operation on the OS.
- Next, right-click on the desktop and create “Label”
- In the window that opens, paste the path:C:\Windows\System32\schtasks.exe /run/TN the name of the task that was entered earlier.
- After this, give the shortcut a name and confirm with the “Done” option.
Super test on the topic “Money” and how can you be friends with it?
Instructions for turning off the tool
Among all the methods, the most popular are those listed below. It should be noted that their use should not in any way affect the performance of the system, provided that you strictly follow the instructions. Inexperienced users are recommended to resort to the first option, as it is simpler and more understandable. An administrator account is required for almost any action.
Control Panel
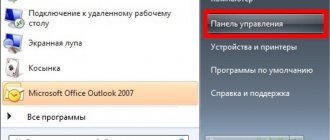
First you need to open it. The fastest way to do this is to press the Win and R keys together, and then in the window that appears, write the word “control” (without quotes). In addition, the utility shortcut is in the Start menu: it is located in the System folder. You can even add it to your desktop if you wish.
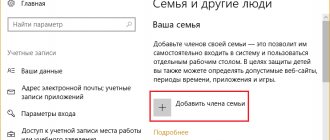
Next, among the large list of sections, you need to find the one that is responsible for accounts. You can see where it is located and what icon it has in the image below:
Next, you need to select the settings section again. In our case, you should click on the very last one, which is responsible for the security element.
A small window will then appear with a large slider. By default, the system uses a strong control type, i.e. the slider is located at the second mark from the top. To disable the tool, you just need to move it to the very bottom. You can also set an intermediate value to reduce control, but leave at least a minimum level of security (more details about this will be specified in the tool settings).
Immediately after clicking “OK” the changes will be applied. Using this method, UAC can also be turned back on at any time.
Registry
To start the procedure, you need to open the editor. The latter can be found, like the Control Panel, in the Start menu (this time in the Administrative Tools folder). You can also use the search function on the taskbar.
Sections are located on the left side of the window, and parameters are located on the right. You need to do the following:
- Go to the address circled in the screenshot.
- Find the parameter responsible for enabling the tool (DWORD; underlined in the image above) and double-click on it with LMB for further settings.
- Enter 0 in the “Value” field, then click on the “OK” button to save the changes.
When finished with deactivation, you should close the editor and restart your PC.
In fact, this method is no different from the previous one. Moreover, the control panel itself changes the settings in the registry. True, she does it a little differently. In any case, it makes sense to use this method only if it is impossible to use the panel, since it takes more time and can be dangerous. Under no circumstances should you change other parameters and sections: this often leads to incorrect operation of the OS.
Local Group Policy
This option is similar to the previous one, but much safer. It is important to warn that the editor is only available if you have the Pro edition. Disabling is carried out in a few fairly simple steps:
- Open editor. To do this, you must first open the “Run” window (appears when you press Win and R at the same time), and then enter the “gpedit.msc” command into it.
- In the sections on the left you need to find “Security Settings”. The exact path to them is indicated below:
- Next, pay attention to the circled parameter. To configure it, you need to double-click on it with LMB.
- In the new window, select “Disabled” and click “OK”.
In most cases, changes can be seen without rebooting.
Disable UAC or Which UAC level provides the lowest level of security?
If you've gone through our guide insisting on not disabling UAC and still decide to disable it, move the slider to the bottom Never notify option, the lowest security level. This disables User Account Control, which allows malware to infect and take control of your Windows 10 computer or device. On the other hand, annoying notifications stop as all apps can do whatever they want without your permission.