Like other operating systems, Windows 10 has many services running in the background. These are processes designed to perform various tasks. Most of them are really needed, but there are also those that simply consume OS resources and are useless to humans. To improve the performance of your computer or laptop, you can disable them if you know how to do it correctly.
Calling a list of services
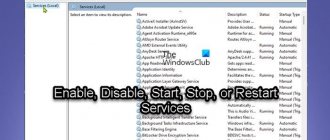
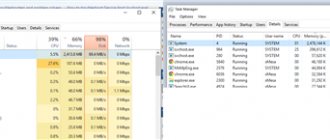
First, you should familiarize yourself with operating system services This can be done as follows:
Step 1. Right- on the “Start” and select “Computer Management” .
Step 2. In the window that opens, select “Services and Applications” and select “Services” .
You can also call the list of services by calling the “Run” Win+R to call services.msc in it .
The window that opens will show all services and programs of the system.
To disable any service , double-click on it with the left mouse button and in the window that opens, click on the “Startup Type” and select “Disable” . After this, click on the “Apply” to confirm the changes made.
It should be remembered that disabling some services may affect the operation and stability of the system , so it is strongly recommended to create a Windows restore point before disabling it. This way you can protect yourself and at any time return the operating system to its previous state .
Why disable unnecessary services in Windows 10
Unused operating system services start when Windows 10 starts and continue to run in the background, consuming PC resources. This results:
- to reduced laptop/computer performance;
- game freezes and lags;
- long software startup times;
- overload and overheating of hard drives and graphics adapters (video cards).
Some services use an Internet connection for stable operation.
This means that they consume traffic and also compromise the security of the PC and the privacy of a person’s personal data. Optimizing system services will improve your computer's performance, speed up programs and games, and protect your device from possible hacking.
List of services that can be disabled
Below are services that can be disabled without significant consequences for the stability and operation of the OS.
- Dmwappushservice – function for telemetry data.
- Superfetch is a service for HDDs that can be disabled if only SSD drives .
- Machine Debug Manager is a utility designed for programmers.
- NVIDIA Stereoscopic 3D and Streamer Service - the first is a stereo 3D image service, the second is intended for streaming NVIDIA Shield images.
- Grouping network participants is a function necessary for the correct operation of a peer-to-peer network . If the local network is not used, you can safely turn it off.
- Computer Browser is a service for the local network.
- Windows Firewall – built-in OS protection. Can be disabled if third-party antiviruses and firewalls are used.
- Network Member Identity Manager is a service for running on a local network.
- Secondary login is a service required for multiple logins to an account from one PC. If you use one account, you can safely disable it.
- CD burning service - disable it if there is no drive.
- Windows Biometric Service is a special service designed to log into the system using fingerprints and other biometric data. Can be disabled if biometric login methods are not used.
- Windows Search is a fairly demanding service for searching files and folders by name in Windows. Can be disabled if search is not used.
- Setting up a remote desktop server is a function that expands the capabilities of the local network.
- Homegroup listener – required to work in a homegroup.
- Tablet PC Input Service is a service required to work with a graphics tablet.
- Bluetooth support service is a feature for wireless devices. Can be disabled if Bluetooth connection is not used.
- Fax – can be disabled if it is not available.
- Hyper-V Services – The entire Hyper-V services package is designed to work with virtual machines. If these are not used, you can disable all services called Hyper-V.
File update function
Once you've finished disabling unnecessary services, you should begin disabling features. This integrated approach will improve overall performance and relieve the processor load.
The developers of Windows 10 have introduced a function for quickly updating OS files, which operate on a principle similar to how torrents work.
This means that Windows updates can be downloaded not only from the official Microsoft website, but also from third-party PCs that have already been updated. This function is useful for quickly updating the system , but at the same time, after the update, the user’s computer becomes a distributing one, that is, it begins downloading a stream of files for other users. It is also worth understanding that any ability to download something from a computer is a weak point in system security , which third parties can take advantage of.
To disable the file update feature, you must complete the following steps:
Step 1. Right-click on the “Start” and select “Settings” .
Step 2. At the bottom of the list, open the item “Updates and Security” .
Step 3. Scroll the slider to the middle of the “Windows Update” and select “Advanced options” .
Step 4. Scroll down the window and select “Delivery optimization” .
Step 5. Disable loading from other computers in the appropriate section.
Recommendations
In this article, we looked at four ways to stop services, and also found out which of them can be disabled without harm to the computer.
I would also like to advise our readers that if you want to disable a certain service not from the list considered, then carefully read its functions and purpose so as not to harm the system.
For example, if you stop Windows Audio, you will disable all audio devices and audio programs. To restore the functionality of audio devices and sound programs, you need to restart unused Windows Audio. From this example, it can be noted that it is necessary to remember the disabled services in order to restore normal operation of Windows 10.
We hope our material will help you disable unnecessary services and you will be able to increase the performance of Windows 10.
Disabling notifications from third-party software
In Windows 10, each user can receive notifications from third-party applications, the targeted advertising of which is created automatically based on requests from the account. To disable tracking and advertising messages, follow these steps:
Step 1. In the settings menu , go to the “Privacy” .
Step 2. In the “Confidentiality” , disable the first option, as shown in the screenshot.
How to close running applications on Android?
To close one app, swipe up from the bottom edge of the screen, hold, then lift. After that, swipe the application window up. To close all apps, swipe up from the bottom of the screen, hold, then lift. After that, swipe from left to right and tap Clear All.
Interesting materials:
How to take a long screenshot on Honor 10i? How to take a long screenshot on Honor 9 Lite? How to take a long screenshot on Honor 10i? How to take a long screenshot on Honor 9? How to take a long screenshot on Honor? How to take a long screenshot on Redmi? How to take a long screenshot on Samsung S8? How to take a long screenshot in Chrome? How to take a long Windows screenshot? How to make a document horizontal in Word?
Disable Cortana feature
The Cortana function is an English-language Windows voice assistant (a direct analogue of the Siri system on Apple devices). A number of functions of this software are designed to collect and analyze information about the user . Data is collected based on queries and various actions performed (recording audio tracks, creating drawings, etc.). You can disable it as follows:
In the “Options” select “Personalization” and go to the “Speech and handwriting” and turn it off.
Turn off sync options
Synchronization is a convenient feature of Windows 10 that links different devices (PC, smartphone, tablet) when logged in with a single account. For example, this allows you to view your smartphone’s browser history on your computer, synchronize data in the cloud, etc.
If the user does not need it, the function should be disabled:
In the “Options” , select “Accounts” and “Synchronize your settings” . You can disable synchronization in the window on the right.
If the user needs to synchronize only certain parameters, they can also be selected in this window.
Strange decision of the developers
It is not clear why the creators of the OS activate so many services that the vast majority of users do not need? In fact, the “developers” cannot know what exactly YOU will use, which is why they decided to include EVERYTHING. Just in case!
It’s good that it’s possible to change settings (unlike MacOS), but if you’re new to this business, then when you see a large list, you’ll really end up in a stupor. “Where to start, won’t I make it worse?”
It is worth noting that most of the elements have a Russian-language and completely understandable name, that is, a person can read it, read the description and draw a conclusion whether he needs it or not. Next I will show everything using a real example.
Disabling the notification feature
Windows 10 notifications help new users understand the interface, and also notify them about the installation of unwanted or potentially dangerous software. This feature requires PC resources, so advanced users can easily do without it.
To turn off notifications, go to the Settings and follow these steps:
Step 1. In the “Options” , select “System” .
Step 2. Select the “Notifications and Actions” , then scroll the slider to the “Receive tips, hints...” and turn it off.
Start menu suggestions
Products from the Windows Store can sometimes be advertised in the Start menu, to remove unnecessary messages and disable the annoying feature you need to:
Step 1. Go to the “Options” and select “Personalization” .
Step 2. Go to “Start” and disable “Show notifications sometimes...”.
Disabling the lock screen
Lock screen is a useful feature on smartphones and tablets, but on a desktop PC or laptop, locking the screen is not very useful. To disable it:
Step 1. Right- on the “Start” and select “Run” . In the window that opens, enter regedit – registry editor.
Step 2. In the Registry Editor, you need to go to HKEY_LOCAL_MACHINE\SOFTWARE\Policies\Microsoft\Windows and find the “Personalization” . In some cases it is missing, so you need to create it manually. To do this, create a new partition by right Windows folder and selecting the appropriate item.
Step 3. Call the created section Personalization , open it and right-click the empty space in the window on the right. In the menu that opens, select “DWORD value (32 bits)” . This parameter is always created in 32-bit, regardless of the user's system.
Step 4. Assign the name “NoLockScreen” .
Step 5. Click on the RMB , select the “Change” and in the window that opens, replace zero with one .
After you restart your computer, the lock screen will be disabled.
Disabling design effects
Each detail of the design of OS windows and buttons requires certain resources from computer components. To relieve the system, you can turn off some visual effects, which will have a positive effect on performance.
Step 1. Open the “Control Panel” right -clicking on the “Start” . In the window that opens, set the display mode to “Small icons” and go to the “System” .
Step 2. In the window that opens, select “Advanced options” .
Step 3. Select the “Performance” and the “Options” .
Step 4. In the window that opens, you can remove unnecessary effects and thereby relieve the system.
Removal with special programs
In addition to standard Windows tools, there are special programs that allow you to remove the listed items more effectively.
Such programs include:
- CCleaner, which combines many Windows cleaning tools, incl. Registry cleaning and simple interface;
- Advanced System Care, which has built-in components for searching for problems in the OS, removing viruses and spyware;
- iObit Uninstaller, which scans and removes data, folders and files left behind by programs, as well as web browser panels.
Uninstall using iObit Uninstaller
Step 1. Go to the website: https://ru.iobit.com/advanceduninstaller.php and click “Download”.
Go to the website and download the program
Note! Once downloaded, the file can be found by opening Settings and going to Downloads in your web browser.
Open the file in “Downloads”
Step 2. Run the installation file.
Run the installation file
Step 3: Click “Install”.
Click “Install”
Step 4. After installing and launching the program, go to “All Programs”, click on the one you want and click the “Uninstall” button at the bottom of the window.
Click the “Delete” button
Step 5. Click “Delete”.
Click “Delete”
Step 6. After removal, click “Power Scan”.
Click “Power Scan”
Step 7. A list of remaining program elements will appear. Click "Delete".
Click “Delete”
Step 8: A message will appear telling you to clean your system of residual files. Close the program by clicking on the cross at the top of the window.
Close the program