Modern computer technology is quite complex and malfunctions occur from time to time. The hard drive (HD) is not immune to this. There are two types of breakdowns:
- software – when recorded information is damaged;
- hardware – when defects appear on the surface of magnetic disks. The head loses the ability to read a block of data in some places, this causes failures.
To combat these phenomena, the creators of Windows operating systems have developed built-in programs that help the user eliminate (in many cases) this problem.
Chkdsk, how to run?
Chkdsk utility utility
On earlier Windows systems, Scandisk was installed. The same software was included with MS-DOS, and was last used on the Windows ME operating system.
Starting with Windows NT, Chkdsk becomes a standard utility for checking a hard disk. It is present in the OS by default and is launched by the system owner in several ways.
The main purpose of the Chkdsk utility utility
Its main purpose:
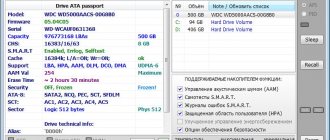
- diagnostics of storage media for the presence of errors: conventional disk drives, flash-drives, as well as floppy disks, which are rarely found today. The serviceability of file systems is checked;
- analysis of HD sectors, “broken” fragments are marked in a special way and the OS does not use them in the future;
- automatic general data check after a system failure - carried out, for example, after an abnormal shutdown of the PC.
Reference! Chkdsk cannot work with optical discs (CDs and DVDs).
The speed at which the utility processes data depends on the size of the logical partition and the power of the PC. The most time is spent on testing the disk surface and can reach several hours.
Results
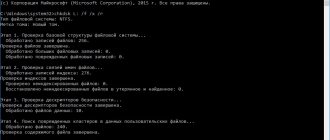
Today we looked in detail at the topic of how to run CHKDSK - hard drive recovery, we checked our hard drive for errors and bad sectors in three different ways, using the magic disk check program. For video lovers, I recorded a video lesson, which you can watch below.
How to run chkdsk | Moicom.ru
You may have questions related to the chkdsk utility and hard drive recovery. You can ask them below in the comments to this article, and also use the feedback form with me.
Thank you for following me on Twitter.
Stay connected - my You Tube channel.
If the above information was useful to you, then I recommend subscribing to my blog updates to always be aware of fresh and relevant information on setting up and repairing your computer.
Don't forget to share this information with your acquaintances and friends. Click on the social buttons and thank the author.
Sincerely, Dmitry Sergeev April 28, 2012
Blog navigation
You can share your opinion, or you have something to add, be sure to leave your comment.
Please share links on social networks.
Additional features
In versions seven to ten, you can use the built-in PowerShell:
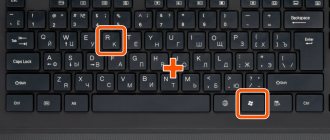
Step 1. You can open it by calling up the menu using the “Windows + R” hotkeys.
Press the key combination “Windows + R” to open the “Run” window
Step 2: Enter “Powershell” in the text field.
Enter “Powershell” in the text field
Step 3. A window will open with a dark blue background and command line options.
Powershell console window
Step 4. Type “Repair-Volume -DriveLetter X”, where X is the name of the partition being tested. Another option is “Repair-Volume -DriveLetter X –OfflineScanAndFix”.
Type the command “Repair-Volume -DriveLetter D”, press “Enter”
Enter the command “Repair-Volume -DriveLetter D –OfflineScanAndFix”, press “Enter”
Step 5. If the program does not find any errors, the user will see: “NoErrorsFound”.
The message “NoErrorsFound” means that no errors were detected during the check
Otherwise, the program will display a list of faults.
Test result with error report
Method 1. Hard shutdown. (Not recommended?)
1. First you need to launch the registry editor. Standard way:
2. Next, go to the section “HKEY_LOCAL_MACHINESYSTEMCurrentControlSetControlSession Manager”
3. Find “ BootExecute ” and erase its contents.
Before executing, do not forget to save the original value of the parameter! Usually it
4. Let's reboot. If CHKDSK did not start and nothing bad happened, everything was done correctly. Only this method helped some users and everything worked successfully for them. But (!) For some other users, for one reason or another, this method either did not work or periodically led to Blue Screens of Death (BSOD). So if you are not sure, I advise you to either take a risk or use a less harsh method (Next method).
How can I get everything back?
If data is restored incorrectly, some information may be lost. Then you will have to use specialized software:
- R-Studio is a paid program, but there is a trial version;
- Recuva – distributed free of charge;
- Pandora Recovery – free software;
- Hetman Partition Recovery – you can use the trial version.
To recover data, we recommend using specialized software
However, these programs require a fully functioning hard drive. In other cases, you will have to contact specialized companies engaged in recovering lost data from broken devices.
Startup procedure using bootable media with Windows 7
The following steps need to be taken:
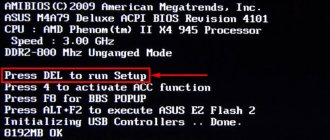
- First, you need to set the priority of booting the system from bootable media in the BIOS;
Note: Instructions for entering the BIOS are in the documentation that came with your computer. The process may vary slightly for each PC model. In the “Boot” tab, the priority of starting the system from media is manually set.
- After starting the PC from the boot disk, indicate the OS modification in the recovery console, but most often there is only one on user computers, so you can enter “1”;
- Next, click “Enter”;
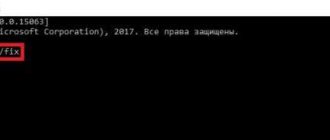
- Then, by analogy with the method described above, print a command with the parameter required by the user, for example, /r;
- You may then be required (if prompted) to enter an administrator access code for the system. In the case where the password was not set by the person who installed Windows 7 on the computer, just click “Enter”.
Automatic disk check on reboot, how to stop
If the PC was turned off in an abnormal way, the system may decide to automatically check the disk. Most often this concerns the system partition. In some cases it fails and the file system test continues after each reboot. This greatly slows down Windows startup. You will have to disable the scan manually.
Editing the Registry
Step 1. You should open the “Registry Editor” like this: “Windows + R”, enter the command “regedit”, press enter.
We write the command “regedit”, press enter
Step 2. Open the directory branch one by one, following the specified path: “HKEY_LOCAL_MACHINE”/”SYSTEM”/”CurrentControlSet”/”Control”/”Session Manager”.
Expand the directories “HKEY_LOCAL_MACHINE” - “SYSTEM” - “CurrentControlSet” - “Control” - “Session Manager” one by one
Step 3. In the right zone (window) there is a parameter “BootExecute”, you need to click on it a couple of times with the left mouse click.
Double-left-click to expand the “BootExecute” parameter
Step 4. Add the value “/K:C”, click “OK”.
In the “Value” field, add the “/K:C” parameter to what was written and click “OK”
Step 5. Close the editor.
Using a terminal
After opening the window (as an administrator), you need to enter the command: “chkntfs /x c:” (c is a logical drive), if necessary, list all the drives that are on the PC.
Enter the command “chkntfs /x from:”, press “Enter”
Now the scan will not run.
Startup procedure using GUI
You need to do the following:
- Open “Computer” in Explorer;
- Right-click on the disk you want to analyze;
- Click “Properties”;
- Then go to the “Service” tab;
- Click the virtual button with the image of a shield - “Perform check”;
- It is recommended to check both available boxes in the next menu that appears and only then click “Launch”;
- In cases where the user has performed the above steps for a logical volume that is not a system volume, the analysis will begin immediately after clicking on the virtual “Launch” button. If an OS is installed on the volume being diagnosed, a menu will be displayed warning the PC owner about performing a scan during the next OS reboot;
Developer errors in Chkdsk
In a number of distributions, the program may behave incorrectly:
- Windows 2000;
- Windows XP HE (with add-on pack);
- Windows 2003 (server version);
- Windows Vista (SP1).
There are problems with file access rights, which are either partially resolved using the Secedit program (XP HE and Professional), or there is a need to reinstall the OS.
Reference! If a program was installed incorrectly, and then the automatic Chkdsk test is launched, this may indicate damage to one of the RAM modules or a failure of the corresponding slot.
Method 2. Softer shutdown
1. Go to RegEdit
2. Let's go back to the section
3. To your autocheck autochk * in the BootExecute before the * , add “/k:C” without quotes. Where C: is the letter of your drive for which you want to disable scanning. It should now look like this: “autocheck autochk /k:C *”.
If you have several volumes, then, separating them with spaces, add the required number of “/k:C” entries, where C is the desired volume letter. For example: “autocheck autochk /k:C /k:D /k:E *”.
That is, I disabled automatic CHKDSK check for volumes C:, D:, and E:.
How to test a disk when the OS does not boot
If the OS stops starting, you should either use the installation disk or use alternative “rescue” distributions running on a lightweight version of Windows PE or Linux.
If the system does not start, we recommend using programs to test the hard drive
Examples:
- Hiren's BootCD;
- Ultimate Boot CD;
- SystemRescueCd;
- Knoppix;
- FalconFour's Ultimate Boot CD.
They can help you restore your system or at least retrieve data from your hard drive.