Often, a computer user is faced with the fact that his PC begins to work slowly. It begins to “slow down” the launch and operation of some programs, although the window with a message and error code did not pop up on the monitor. This requires checking Windows 10 for errors. You should not immediately “tear down” and reinstall the operating system. After all, the reason may lie in changes or damage to system files.
This can often happen due to the influence of viruses and other malware, incorrect shutdown of the computer after work, and other problems. It is worth considering that not all errors may be displayed on the screen; they accumulate imperceptibly, interfering with the operation of the PC. In order to identify and eliminate them, it is necessary to periodically conduct a full check of Windows 10 for errors. You also need to analyze the integrity of the system, registry, video card, hard drive and other vital elements of the computer.
Checking your hard drive for Windows 10 errors
The hard drive and its bad sectors in Windows 10 can mainly be checked in the Explorer interface and through the command line. Moreover, installation of any programs is not required during this process.
- Through Explorer. This check is the main one and is performed automatically by Windows 10. Since it takes about 60 minutes, it is better to run disk defragmentation at night, since it checks all disks. In “Explorer” (right mouse button), open its “Properties” on one of the drives, then go to “Tools” and click “Optimize”.
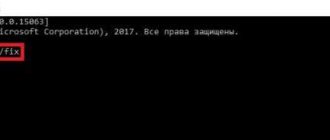
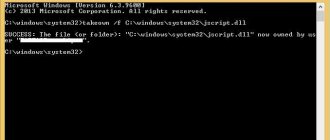
- Using the command line. Using this method, you cannot restore order on your hard drive, as with defragmentation, but you can quickly recover data from damaged sectors. To do this, open the Command Prompt (Administrator) and enter the command chkdsk C: /F /R (F – automatic correction of problems found, R – attempt to restore data).
After checking drive C, you need to check all other drives for errors, replacing only the letter designation.
Mobile
Windows mobile error
Computers are not the only ones capable of producing errors. Mobile devices running on this OS have become very popular. However, Windows mobile sometimes displays an error code.
However, even knowing about such issues, developers do not fix the problem, so they have to look for a solution on their own.
Let's figure out what codes mobile Windows 10 knocks out:
- 0x80073cf9. Indicates that the downloaded application cannot be installed. This problem occurs because the utility is designed for a different type of media. It is enough to indicate that the application is loaded onto the built-in memory - the problem is resolved.
- 0x80073d05. Occurs when the application is reinstalled. The only solution that can be solved is resetting the settings (this method deletes all data saved on the phone).
- 0x80000ffff. Crashes when updating already installed programs. Usually caused by a mismatch between the set time or date, or by a network outage. You need to double-check the date and time data and your Internet connection. If everything is normal, but the problem is not solved, then the new version of the application is probably not available for Windows 10.
It should be understood that there are many malfunctions, but there are the most common ones. Let's look at them in detail.
Checking RAM for Windows 10 errors
You can diagnose memory errors using the built-in Windows utility. To launch it you need to take the following steps:
- Win + R – enter the command mdsched – Enter.
- Next, reboot the PC to check the memory for problems. After it, a scan will begin to identify errors.
- During diagnostics, you can press F1 to change scan settings, such as scan type, cache usage, and test completion number.
After the check is completed, the PC will restart and information on checking memory for Windows 10 errors will be displayed on the monitor after logging in. To view the results (MemoryDiagnostics-Results), you need to go to “Windows Logs” - “System”.
0x8007007b
error 0x8007007b
When activating Windows 10, some people encounter the following message: “error code 0x8007007b.” This usually means that the OS version key was entered incorrectly or there is a network failure.
This error is the most common when activating Windows. It manifests itself due to such moments:
- entering the wrong product key;
- attempts to activate without connecting to the network;
- Incorrect network settings.
It is worth checking all these points, this usually helps solve the problem.
Checking the Windows 10 registry for errors
If the error in the registry is not corrected in time, then the consequences of its “life” in it may result in a blue screen of death for the computer, or even a complete failure of the system to start. You can check the Windows 10 registry for errors via:
- Through the built-in utility in Windows 10, but it is more suitable for identifying critical errors in the registry. Launch Command Prompt (Administrator) – enter the command scanreg /fix – Enter.
- Through the computer cleaning program CCleaner. After launching the utility, you need to go to the “Registry” section, then “Search for problems” and after checking, click on “Fix selected...”. To fix problems with the registry, use "Fix flagged".
0x800f081f
There is a problem with the new Windows that a number of programs only work if NetFramework 3.5 is installed.
However, here too a difficulty arose - after downloading this utility in Windows 10, error code 0x800f081f appears.
Typically this code means that the NetFramework 3.5 library files are missing or damaged.
The usual solution to this problem is to uninstall and reinstall the program.
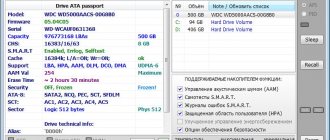
Checking ssd disk for Windows 10 errors
An SSD disk can be checked for errors using the functionality of some appropriate programs that will conduct a full test. Among them it is worth paying attention to:
- It needs to be downloaded, installed and launched. It will scan your hard drive and display the test result. In the main menu you need to use the “Service” tab.
- This free utility will identify all problems, because it is specially created to analyze the performance of an SSD drive.
In addition to these programs, you can also use SSD Life, DiskCheckup and HDDScan.
Turn off USB port power saving
Very often, the “Code 10” error occurs due to the port power saving function. It is enabled by default in laptops in order to increase battery life. For example, if the mouse is not used for more than 10–20 minutes, the system switches it to energy saving mode. But after this, it may not be possible to start it again until the OS is rebooted.
Accordingly, if equipment connected via USB does not work correctly, then it is recommended to simply disable energy saving. To do this you need:
- Go to "Options"
- Next “System”
- Then select “Power” and select “Advanced options”.
- Select "Scheme Settings".
- Select "Advanced options".
- In the “USB Options” section, select “Prohibited” and click OK.
- Next, it is recommended to restart your PC.
After this procedure, the “Code 10” error should disappear
Checking the Windows 10 system and system files for errors
Windows 10 system files are checked for errors using SFC.exe and DISM.exe. Let's consider both options.
- SFC.exe. To run the command, you need to log into the Command Prompt as an Administrator and enter sfc /scannow – Enter. Next, a corresponding check will occur, during which errors in system files will be automatically corrected. If you want to analyze a specific system file, use the command sfc /scanfile=”path to file.
- DISM.exe. Through the Command Line (Administrator), you need to run the following commands in turn: dism /Online /Cleanup-Image /CheckHealth, dism /Online /Cleanup-Image /ScanHealth, dism /Online /Cleanup-Image /RestoreHealth, each of which takes a certain period of time when checking and troubleshooting system files.
System Troubleshooting
A Windows 10 laptop or computer has many system built-in tools that provide many ways to solve problems that arise. One of the main such tools is the troubleshooter, which scans the system and offers its own solutions.
There are two ways to run this utility:
- Open search on the taskbar and ask the appropriate request.
- Go to next path: Start - Settings - Update and Security - Troubleshooting
After launching this utility, the user will need to select the required category and subcategory to which his problem belongs. Then all you have to do is follow the built-in tips.
Causes of difficulties in the operation of the OS:
- virus;
- damage to service data of the operating system;
- driver problems;
- simultaneous operation of several protection systems (built-in and third-party);
- critical inaccuracies in BIOS settings;
- failure during the installation of new system files;
- overheating of the video card, processor and other devices;
- incompatibility of computer components;
- hardware problems.
Before solving a problem, you need to determine its nature. A blue screen on Windows 10 indicates an error code. But, since the system quickly begins the reboot procedure, remembering the code can be problematic. To see the nature of the problem, you need to remove the automatic reboot setting. To do this, perform the following steps:
- At the same time press Win+Pause Break.
- In the “system” window, follow the specified link.
- In the “Download and Recovery” block, click on the “Options” button.
- Uncheck the automatic reboot box.
- We reboot for the settings to take effect. Now, if a blue screen occurs, you can write off the error code and find out its meaning on specialized resources dedicated to Windows 10.
If you experience errors after installing the Fall Creators Update, read the article about the most common problems after installing the Fall Creators Update.
Disable device power saving
Also, the device itself can automatically switch to energy-saving mode, which also causes error 10 (as there is a conflict with the system energy-saving parameters). And to disable this, you need:
- Right click on “Start” and select “Device Manager”
- Call the context menu on the problematic equipment and select “Properties”.
- Go to the “Power Management” section and select “Disable Power Saving”, click OK.