12/15/2016 windows | for beginners
This instruction details how to create a Windows 10 recovery disk, as well as how to use a bootable USB flash drive or DVD with system installation files as a recovery disk, if such a need arises. There is also a video below that shows all the steps clearly.
The Windows 10 recovery disk can help in case of a variety of problems with the system: when it does not start, it begins to work incorrectly, you need to restore the system by performing a reset (returning the computer to its original state) or using a previously created Windows 10 backup.
Many articles on this site mention a recovery disk as one of the tools for solving computer problems, and therefore it was decided to prepare this material. All instructions related to restoring the startup and performance of the new OS can be found in the material Restoring Windows 10.
Restoring Windows 10 from Control Panel
The latest version of the operating system has many bugs and sometimes after updating it may not start for some users. A solution to this problem has been provided by Microsoft and a Windows 10 recovery disk can be created from the Control Panel.
If the creation of a Windows 10 recovery disk does not take place on your own computer, then you must definitely find out the bitness of the broken and temporarily used Windows, they must be the same.
Instructions on the question: how to create a Windows 10 recovery disk :
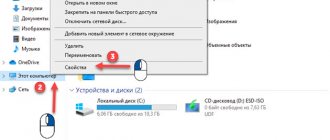
- First go to Control Panel. To do this, go to system settings and enter “control panel” in the search. Or press the Win + R key combination and write control in the input line
- Find the icon or item "Recovery».
- After opening this section, the user is offered 3 options for system recovery; open the “ Create a recovery disk ” item.
- In a new window, the user is prompted to save system files to a recovery disk. If you select this item, you will need a flash drive of at least 8 GB, since a recovery image is additionally written to the media. This will allow you to quickly reset the operating system to its original state, even if the built-in recovery program does not work. Click " Further", to continue.
- Select the media on which the reset files will be written.
- Next, the creation of the recovery disk begins. Wait for the process to complete.
After the program finishes, the flash drive can be used to restore Windows 10 and install it. Sometimes creating media using this method fails, in these cases you need to create a rescue disk using other methods.
Some users may need to create a Windows 8 recovery disc. This can be done in the same way as described above.
What is the recovery partition for?
In the “ten”, the volume of this partition located on the system disk is about 500 MB. It is located in the Recovery directory, and the recovery image itself is a file named Winre.wim, located in one of the subdirectories. For security reasons, the section is set to hidden so that it is not accidentally deleted. In addition to the recovery partition, there are 2 more hidden partitions on the system disk, occupying another 250 MB.
The Recovery directory is intended for those cases when the operating system malfunctions or does not boot at all, and the user does not have the ability to use the installation disk/flash drive. This is the easiest and fastest way to solve problems.
But if the installation media is available, then the question “Why do we need a recovery partition?” can no longer be interpreted unambiguously, especially if there is a need to free up the space it occupies. In other words, it can be painlessly removed or simply hidden, but in any case you need to understand that you will carry out such actions at your own peril and risk.
Reinstalling Windows 10 with the official application
The Microsoft website suggests using a separate application to create a bootable USB flash drive.
- Download the program and run it.
- Next you need to select “Create installation media for another computer».
- After this, the user is asked to select settings for the image that will be installed on the flash drive. In chapter " Architecture" select option "Both».
- In the next window, select the media type to be used (USB or DVD).
- The last step is to select from the list the desired media on which the image will be installed.
After these steps, you can use the USB flash drive to install or reset the system.
Windows installation flash drive from system image
To restore Windows 10 from a system image, you must first create this file. This can be done through the built-in application. To open it, go to “ Control Panel ” → “ All Control Panel Items ” → “ File History ” → “ System Image Backup ”.
In the next window you need to select the “ Create a system image ” section.
In the window that appears, you need to select the media on which the image will be saved.
It is advisable to create a separate disk partition to store this data, as it will be needed to restore Windows 10 from an image. If you don’t have a flash drive at hand, you can reset the system settings from the created file on your hard drive.
After data archiving is completed, the user will be prompted to create a system recovery disk. Thanks to this, in the event of an unexpected error in the system, you can restore all the data that was on the archived disk.
How to hide the recovery partition
As we already know, the Recovery directory is hidden by default. In some cases, this rule may be violated, most often when transferring the operating system to another disk or after the next Windows 10 update. In such cases, a new disk called “Recovery” may appear in Explorer (sometimes without a name, just “Local disk "). Its size should serve as a guide, about 580 MB. If you have only one system disk, then you do not need to delete the recovery partition, but hiding it from prying eyes is highly recommended.
Step-by-step algorithm:
- Press the Win+R key combination and type the command diskmgmt.msc in the “Run” panel;
- The system disk management utility will launch. In the lower block, we look at which disk this recovery partition is located on (this means the serial number of the disk, usually 0). Again, we focus on its size;
- Now we launch the command line, always with administrator rights;
- enter the sequence of the following commands, completing each by pressing Enter: diskpart
- select disk X (here instead of X we substitute the number of the disk with the recovery partition)
- list partition (a list of all partitions on this disk will be displayed, remember the number of the one whose size is about 580 MB)
- select partition X (here X is the number from the previous paragraph)
- remove letter=Z (here Z is the partition letter that we determined from the disk management utility).
ATTENTION. If, as a result of transferring the OS, the Recovery directory is not on the system disk, you can safely delete it, since it is just a duplicate of the real hidden partition.
Installation flash drive for Windows via UltraISO
First, you need to download the ISO file of the desired OS version from the Internet. Also, to create a Windows 7 system recovery disk, just like other versions, the user will need the UltraISO or its analogues ( Rufus , Wintobootik , etc.) capable of writing system images to a USB drive.
- Launch UltraISO, then open the image file you downloaded earlier. Through the section " File» → «Open» or through the button on the quick access panel.
- After this, all files inside the ISO archive will appear in the side window of the program.
- The next step is to go to the “Bootstrapping" and select the item "Burn a Hard Disk Image...».
- In the window that appears, you need to select the USB drive on which to install. The recording method should be USB-HDD+.
- The flash drive must be at least 8 GB and pre-formatted for the FAT32 file system. This can be done directly in UltraISO.
- After cleaning the disk, you need to click “ Burn ” and copying files to the USB drive will begin.
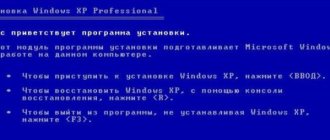
To restore Windows 7 via an ISO image, you need to do exactly the same steps, but at the stage of selecting an image file to burn, you need to use an image of the seven or other versions of the OS. The same method is suitable if you are wondering how to restore Windows XP or another version of this OS.
How to create a hidden recovery partition with your customized Windows in the Dism++ program
In one of the previous videos, I showed how to optimize Windows 10 2004 and speed up its operation as much as possible. We disabled monitoring, unnecessary settings and removed built-in applications.
See text and video here.
It would be a good idea to save such a configured system as a backup copy.
If something happens to your current Windows, this backup copy can be quickly restored, and you have a system ready to work, with the settings, necessary programs and drivers.
Let's do that.
What I have? Freshly installed Windows 10 2004, optimized and configured. I installed a couple of programs here, these are the Google Chrome browser and the 7-zip archiver.
Everything we cover in this video works on Windows 10, Windows 8.1 and Windows 7.
You can install everything you need on your system. The programs you need in any quantity. Of course, the more programs, the larger the image. But, in this case, this is not very critical.
There are different ways to save a system backup. The first thing that comes to mind is to use Windows' built-in backup and recovery. It worked out well before.
Today, JUST creating such an image is not possible.
If you don’t use the tools built into Windows, then you need a simple third-party program. It would be good if this program was free and in Russian.
The Dism++ program that we recently used can save a working system into an image. And also restore it.
Compress disk (C:), create partition.
I promised to create a backup copy on a hidden partition. So you need to create this section.
I want to say right away that if you also have Windows 10 2004 installed, then you can create a separate hidden partition only if you have one system partition in Explorer, like I do. That is, only Disk (C:).
If your hard drive is divided into two partitions, and there is a drive (D:) or (E:) or some other letter, then you will not be able to create another partition. The limitation of 4 primary partitions on a disk with a master boot record (MBR) would be a problem.
But, you can perfectly place a backup copy on your second partition. There's a little more detail about this at the end of the video.
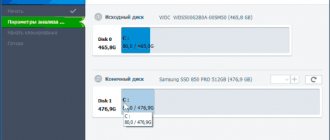
I only have one system partition, so I create a partition. To do this, you need to shrink the system partition. I open the Disk Management snap-in. Right-click on the Start button and click on Disk Management.
Here we see all the disks and partitions that are in the system.
I show the example of a laptop with a BIOS, which is still more common. Accordingly, my disk is partitioned in MBR style. The file system is NTFS everywhere.
If the video is interesting, we will make a separate video for UEFI and FAT32.
Here is the system partition, which under Windows has the letter (C:). To compress it, I right-click on the section. and select the option Shrink Volume...
If this option is not active for you, then you can shrink the volume using a third-party program.
In this text and video, I explained in detail how to download and use it.
How much should I compress the partition? This depends on the size of your system. If you have no more than 20 GB occupied on your disk. then I think that 10 gigabytes will be enough for you. I will make this exact size 10 GB.
The section is compressed. Unallocated disk space has appeared. Now let's create a section here. Take your time in this window. Let's assign our familiar label to the section. I'll explain why later. You can make any mark that makes sense to you. So that, even after a few months, you understand that this is your partition with a Windows backup.
I'll make the label: hidden. Hidden
In addition, I highly recommend that you assign a clear label to the system partition, drive (C:). To do this, right-click on the desired section and select Properties in the context menu. And here I print the required label.
I'll do this: System. That is, the system partition is logical. Make a mark so that it is clear to you.
So, the section is ready. It's still visible, and that's good.
As I already said, we will create a backup copy in the Dism++ program. Therefore, we need to download Dism++.
Download link from the official website: https://www.chuyu.me/ru/index.html
I unpacked the program. Since we will be using the program as a backup and recovery tool, let's put the program in a safe place.
We will use the backup copy to reinstall the system. This means the system partition will be formatted. Therefore, this place cannot be called reliable. You can lose access to the resuscitation program at the most crucial moment.
Let's put the program in the same place where the backup copy itself will be located. To the newly created section. From what is in this folder, we only need one launch file, the executable. And also a folder with program settings called Config.
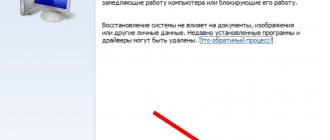
The file we will use to launch the program must match the system bit size. Check the capacity of your system if you forgot. To do this in Windows 10, you can right-click the Start button and select System from the menu.
Here, in the Device Characteristics section, there is a system type. I have an x64 system. My file is this one. If suddenly you have 32-bit Windows, then take this file for yourself.
To select a folder and a file that are not adjacent, you can press the Control key and hold it down and click on the desired positions. I move the cursor over one of the selected objects and copy.
I'm pasting this into my section. Ready. I run the program as administrator. Now you need to add Dism++ to your computer's boot menu.
I click on the menu
Options ▹ Settings.
I put a tick in the line: Integration into the BCD boot loader menu.
Creating a system backup.
Now you can create a backup copy of this system. Before doing this, the system can be cleaned of debris and some additional settings can be made.
This is not the topic of this manual. You can watch my video on this topic.
We will assume that you have prepared the system for backup. You can start it. We check that the currently running system is mounted in the program. If you only have one blue block here, then everything is fine. Perhaps you have mounted something in Dism++ before. Then there may be more of them. In this case, highlight the left block that says (C:) Local Disk.
I click on the program menu:
Recovery ▹ System backup.
In the window that appears, we need to indicate where we are saving the backup. To do this, click the Browse button. In the Save window, you need to find and open our section, which was just created. If you simply save the image to your drive (D:) or for example (E:), then select it.
I select my disk (partition) labeled hidden. If I had hidden it ahead of time, I would not be able to choose now.
I chose a section. Now you need to give this backup a name. This can be any name, as long as it is clear to you what you have backed up. The name may contain English (Latin) letters, numbers, and dashes.
I'll enter the name: Win10-2004. You make a name that will be clear to you.
In the drop-down list you can select file compression. Those. how tightly it will be compressed. The stronger the compression, the smaller the file. But the more time and computer resources are spent on its creation.
I usually choose to quickly compress the image with a .wim extension and select it. In my opinion, this is the optimal compression, especially for weak laptops and computers. You can experiment.
So, the name is set, compression - extension is selected, I click Save.
After creating a backup, hide the section.
It took me 9 minutes to create a backup on this laptop. Not a bad result. This is a pretty powerful laptop. On a weak PC or laptop with an old magnetic SSD, the backup process can take an hour or even more. Next I will show how it can be significantly accelerated.
So, the backup has been created. Now we are ready for various surprises.
You can safely work and play in Windows and make the most of its capabilities.
Restoring a backup.
Let's say your Windows is malfunctioning. It began to work more slowly, possibly viruses, or other brakes. And you decide to reinstall the system.
You can easily do this even if Windows itself no longer boots. But the bootloader menu still appears. Just turn on or restart the computer. When loading, when the menu appears, press the down arrow key. I chose Dism++. I press Enter.
The program has loaded, you can restore my backup. I just click Recovery in the menu and select Recovery.
In the window that opens, you need to tell the program where the backup copy is located. To do this, click the top Browse button. I open this computer. This is where the convenient labels that I assigned to the necessary sections will come in handy.
Drive letters won't help us here; they don't match those assigned in Windows. But we don't need them. Here you can clearly see the section that I marked hidden. I select it and click open.
Here's my backup. I just select it and click Open.
Now we need to tell the program where we are restoring the backup. To do this, click the second Browse button. I open this computer again.
We need to restore the backup to the system partition. That's why I gave it the label System. Here she is. I just select a section. And click Select Folder.
Take your time here. If you do not need to save any of your files and folders, videos, photos or documents from the old system, then be sure to check the box next to Format. In this case, the partition will be formatted and this will be a clean installation of the system.
It is also recommended to check this box if there is a suspicion of viruses in the old Windows.
If you do not check the box, then during recovery, a Windows Old folder will be created on drive C. In this folder you can find the files that you had on the old system.
Attention! If you do not check this box, this may result in a recovery error. If, for example, you had very little disk space left in your old Windows.
We make system backups faster, in the Windows recovery environment.
— We created a backup copy of the system directly from under the working system. In this case, the system prevents you from doing this. It uses up computer resources. In addition, the program captures the state of the system, its image, while it is running. This in itself increases the time.
It is much easier and faster to make a backup of an unloaded Windows. Dism++ allows you to do this. Moreover, for this you do not need to boot from a flash drive and run the program. Dism++ uses the Windows recovery environment for this.
Simply click on the Recovery menu and select Run in recovery environment. In this case, the computer restarts and automatically loads the Windows Recovery Environment. And in this environment it launches the Dism++ program.
Now we have a working program in front of us and we can make a backup copy of our system. There's no need to rush here. If we now click on the Recovery menu and select System Backup, we see a strange description of the system. Here is Windows PE. And, as you remember, I have Windows 10 Pro.
I don't need such a backup. I'm closing.
Notice these blocks at the top. These are currently mounted images. On the left, the image is highlighted in blue. And here it also says Windows PE. This is the same Windows Recovery Environment we are currently working in.
To the right we see the second image. It says Windows 10 Pro x64. This is my Windows. To create a backup copy of it, I simply select it like this.
Now you can click on the Recovery menu and select System Backup. Now the description is correct - Windows 10 Pro. All that remains is to indicate to the program the location where we will save the backup.
I click Review. I open This computer, you can do it here or here. We see all the disks and partitions available in the system. Now we will not go into detail about each of them. Since I made convenient labels, it’s easy to find the necessary disks and partitions.
I'll save again to the hidden section hidden. As you can see, with this way of working, we can also work with hidden sections.
I select a section and click Open. Everything is similar here. I type the file name. I’ll add fast to the name, you can just add one. And, so that the comparison is correct, I again select Fast image compression with extension (.wim). I click OK. We are waiting for the process to finish.
The image was saved for 5 minutes. Almost 2 times faster. The difference in speed is even more noticeable on very weak hardware. If creating an image from Windows took, say, an hour, then in this mode it can take 10 minutes.
Why doesn't Windows Backup and Restore work?
In version 2004, Microsoft places the recovery tools on a separate, hidden partition. It can be seen in the Disk Management snap-in. If you create a system backup using standard Windows 10 2004 tools, an error almost always occurs. It occurs because there is not enough free space on this recovery partition.
This problem is solvable. But, firstly, this will have to be dedicated to a whole separate video. Secondly, listen to this: When creating a backup using Windows, an error initially occurs. In my opinion, just after this phrase, you can forget about this backup. And use third-party programs, of which there are many.
Creating an installation disk
If for some reason a laptop or PC does not want to accept a bootable USB flash drive, for example, on very old devices or if the USB ports are malfunctioning, then in these cases you can use a DVD-R or DVD-RW disc.
Due to the fact that disk media capacity is limited, you need to find an image up to 4.7 GB (capacity for DVD-R and DVD-RW). Such files contain only the base assembly without additional data and applications. Official images of all Windows OS occupy a volume of 2–3 GB. But amateur versions have a basic set of popular programs and improvements, so they can take several times more.
How to make an installation disk
To do this you will need a floppy drive, DVD and UltraISO. The program can be replaced with another one that can write information to disk.
- The first step is to open UltraISO and select the desired operating system file.
- Next, press F7 or go to the “Tools» → «Burn CD image...».
- After this, a new window will open in which you need to click “Write down».
Now you need to wait for the transfer of information to the optical disk to complete.
Multiboot flash drive
Such a multifunctional device is necessary for computer technicians. It is much more convenient to restore Windows XP, Vista, 7, 8, 10 and other versions from one universal flash drive. This solution is called a multiboot device. To create it you will need the WinSetupFromUSB . It uses the minimalistic Grub4dos bootloader, which allows the boot disk to be used with several system images at once.
Initially, you need to download WinSetupFromUSB and ISO images of the desired systems. After starting the program, a window with settings appears in front of the user.
It needs:
- Select the drive to install on.
- A. This allows you to format the media to the desired format before starting installation.
- Select FAT32 format. Please note that this file system does not recognize images larger than 4 GB in size. When installing NTFS, some computers will not be able to see the flash drive and it will not work.
- Select the type of operating system that will be installed.
- In Explorer, assign a system image file.
- Click the “ GO ” button and confirm the actions in the new warning windows.
After this, the process of installing files on the specified media will begin. Installation details can be viewed on.
After completing the installation of one system image, you can immediately begin mounting the next OS. Now you can restore Windows XP and other versions of the operating system using a single flash drive or a separate hard drive.
When recording a second OS distribution, you need to uncheck the “ Auto format it with FBinst ” checkbox. Otherwise, the previously recorded system will be deleted from the drive.
In addition to the installation version of Windows, you can load Linux distributions and many useful programs like Acronis, antivirus and backup bootloaders onto the drive using this method. To do this, you need to first download the necessary ISO files and when installing on the drive in the WinSetupForUSB program, select the “ Linux ISO/Other Grub4dos compatible ISO ”
After installation is complete, immediately check the functionality of the programs on the flash drive.
For the drive to be recognized by the computer, it must be inserted into a USB 2.0 port connected directly to the motherboard.
When starting in the BIOS, the user will see a minimalistic GRUB4DOS window, in which you need to use the keys to select the OS to be launched or the installed program.
To create a multiboot flash drive, they also use the MultiBoot . It includes Grub4Dos installer, formatter and WinSetupUSB. The only difference from the previous creation method is a more beautiful graphical menu when starting the media and already built-in programs for recovery, Acronis, etc.
How to run an installation flash drive or disk
After creating a Windows 7 recovery disc on your laptop or PC, you need to run it. To do this, insert the storage medium into the device. After this, turn off your computer.
To restore the system, you must first configure the device's BIOS so that it can start the flash drive or disk. To do this, you need to press a certain key in the first 2 seconds after turning on the computer. It differs for different manufacturers. You can read more about this in the instructions for the device. Approximate use of keys to enter the BIOS on different branded devices:
- Acer, Lenovo, Asus, Sony - F2 or Ctrl + Alt + Esc
- HP - F10
- Samsung - Del
- Dell devices - F1 or Del
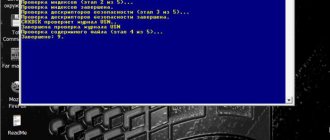
To ensure that the BIOS boots on the first try, press the desired key 3-5 times. After this, a blue menu with items in English will appear on the screen. On personal computers, the BIOS may look more attractive.
To boot from the installation disk, you need to go to the “ Boot” and change the boot priority (“ Boot Device Prority” ). In the same section, you need to find a previously made flash drive or disk with recovery files and move the media to the first boot position using the F5 and F6 keys.
After this, you need to find the “ UEFI Boot Support ” or “ Boot Mode” and set Enabled or UEFI Boot there.
After these settings, you need to go to the “ Exit ” section and select “ Exit & Save Changes ”.
The installation version of Windows will begin to load from the disk. Depending on the OS version, the boot menu may differ in appearance.
Using a recovery disk, you can perform not only a complete reinstallation, but also partial repair of damaged files via the command line, or restore damaged download files.
Select the desired recovery method from the program menu and wait until the utility finishes. The main thing is that the device does not turn off during recovery; it is better to connect it to the network. If this is not done, the recovery process may fail and result in a hard drive error. A similar problem will have to be solved by physically repairing the device.
How to Use a Windows 11 Recovery Disk
If your Windows 11 operating system stops booting, you won't be able to use the built-in system tools to repair it. To solve the problem, you must use a previously created bootable media.
Follow these steps:
- Connect the USB drive containing the recovery disc to your computer.
- Turn on your computer, and then enter the Boot Menu or UEFI to select the USB flash drive as the boot target.
More details:
- How to enter the Boot Menu on a desktop PC or laptop
- How to enter BIOS on a desktop PC and laptop: table
- A window will open on the screen where you need to select a keyboard layout.
- In the “Select Action” window, click on the appropriate button to begin certain actions:
- Recovery from disk.
- Continue.
- Use the device.
- Troubleshooting.
- Turn off computer.
The Disk Recovery function is designed to automatically reinstall Windows 11 and has two options for cleaning the system disk:
- Just delete my files - use this option if you never part with your computer.
- Completely wipe the disk - use this option if you are disposing of your computer. This will take several hours.
In the first case, the system disk will be formatted and Windows 11 will be installed on it. Personal data will be deleted.
In the second option, data is securely erased before the subsequent installation of Windows 11. Personal data and programs will be deleted, and the PC will return to its pre-sale state with “factory” settings. Of course, such an operation takes a lot of time.
In most cases, it is recommended to use the Troubleshooting feature, which can help you solve most problems.
The following tools will become available to you:
- Startup Repair - Fix Windows boot failure.
- Command Line - Advanced troubleshooting using the command line.
- Uninstall updates - Removes recently installed updates or patches from Windows.
- UEFI Firmware Settings - Enter the computer's BIOS to change settings.
- System Restore - Restore Windows using a restore point.
- System image recovery—restores Windows using a previously created backup system image.
Perform the necessary operations by selecting the appropriate option depending on the cause of the problem with your PC.
Resetting the system on laptops
To restore the system on laptops, there is a built-in reset of OS settings. To restore Windows 7 without a disk, you need to run a standard recovery tool on your laptop.
To do this, after starting the device, hold the power button or a specific key combination for 5-10 seconds. Next, to restore the system using the built-in program, select the desired item in the menu that appears and wait until the program finishes.
The laptop will restore Windows XP if it was originally installed on it. The same will happen with all other OS versions. If at the time of purchase there was an old version of the operating system, then it will be restored.
There are many different ways to restore a system after a breakdown or infection. The simplest method is to completely reinstall the OS using an installation disk, which is created in 10 minutes and can then be used on any device to repair them.