Not only malware and viruses can affect the stability of the operating system, but also damage to system files or hard drives - hard drives on which the OS itself and all its programs are recorded. You can restore minor problems using either third-party system tools or built-in programs. Developers from Microsoft took care of their users and added many diagnostic and error correction tools to Windows. One of them is for hard drives and is called CHKDSK. It is necessary to consider how Windows 10 checks the disk for errors and whether CHKDSK can be replaced with third-party utilities.
What is CHKDSK Windows 10
As has already become clear, CHKDSK is the main system tool for console checking and fixing various problems that arise with hard drives and removable drives. Depending on the launch parameters, CHKDSK corrects logical errors, marks “bad” sectors and transfers the information that is recorded in them to other entire areas of the device.
Checking the file system in the console
Important! Checking your hard drive for Windows 10 errors using this tool does not present any difficulties for PC beginners, but there are still some nuances in its use.
Checking RAM
The hard drive is fine, all that remains is to check the RAM - what if all the problems were caused by it? To do this, we use the built-in Windows memory checker. That’s what it’s called – you can easily find the utility through the search. After launching the utility, you will be prompted to reboot and check. Quit all programs and agree to this operating procedure.
After the reboot (which will take a little longer), the scan will start. You can press the F1 button and change its parameters - for example, set a wide scan type with multiple passes to increase efficiency.
Once the scan is complete, the computer will reboot. When the system starts, a notification will appear with the results of the scan. If there is no information, look at Windows events:
- Search for the Event Viewer tool through Windows Search.
- Expand the Windows Logs - System section.
- Find MemoryDiagnostics-Results and see the result.
If your RAM problems are more serious than you thought, use Memtest 86+ to check. On the website you will find a kit for creating an installation flash drive. The scan starts automatically after booting from the created installation media.
It is recommended to check memory modules one at a time. We left one bar, checked for errors, installed the next one - this approach allows us to identify the faulty module. If the program has detected many errors on one board, and they greatly interfere with the operation of the computer, then it is easier to replace the board, although in some cases cleaning the contacts helps.
How to check a disk for errors in Windows 10 through the OS interface
To check your hard drive for software or hardware problems, you can use third-party utilities that provide great capabilities for analyzing and restoring bad sectors, or you can run a standard scan using CHKDSK. The advantages of third-party programs are obvious, but they need to be found and downloaded. Sometimes they are paid, and attempts to find a hack end in infecting a personal computer or laptop with malware, miners and password stealers.
How to run CHKDSK Windows 7 to diagnose your drive
CHKDSK, despite its ease of use and lack of a user interface, is a built-in, completely free and quite powerful tool for checking a disk for bad sectors in Windows 10. It is what will be discussed below.
The easiest way
Through the interface of the Windows 10 operating system, it can be launched using several tools. First, it’s worth considering a simple method for beginners. To use it, just follow these step-by-step instructions:
- Go to the desktop, minimizing all windows and open programs.
- Find the “My Computer” or “This Computer” icon and right-click on it.
- Select the “Tools” dialog box tab and click on the “Run check” button located in the “Disk check” section.
- Wait for a new window to open and press the “Launch” button.
Important! It is worth understanding that checking non-system partitions will begin immediately, but to analyze the system you will have to restart your PC. The utility also allows you to set up a scan schedule.
Using the command line
Another method is based on the command line. It will be discussed below, but first it should be mentioned that “scandisk” Windows 10 is launched via the command line in two ways. One of them is direct and will be discussed further, and the other is indirect.
You can also find out disk information in the Windows 10 Check Disk program in the user interface
The second one is extremely simple. To do this, launch the “Run” utility window and enter the “chkdsk” command into the line. After executing it, the command line will open and a basic check of the hard drive will begin. To perform the check more flexibly, you should immediately go to the console and execute commands with various attributes directly there.
How to remove cells in Word
You can remove the visibility of cells on the sheet in the same sections of the menu where you configured the display. Thus, you need to do one of the following options:
- Option No. 1. In the “View” tab, you need to find the “Grid” line (the “Show” tool block) and uncheck the box next to it.
- Option No. 2. In the “Page Layout” tab, you need to open the list of “Align” commands and uncheck the box next to the “Display grid” line.
You can delete a table with cells in the following way:
When you open any Word document (2003), it looks like a sheet lined with small squares. This marking does not go beyond the boundaries of the fields, and the text goes on top of these cells. This is observed only when selecting View-Page Layout; in other views there are no cells. The backing is turned off.
Indeed, this is a fairly common question asked by users of the Word editor on various sites. Externally it looks something like this:
You can get rid of the checkered background in the following way. In the Word 2003 editor.
- Open the Drawing Toolbar. A panel should open above the status bar in Word.
- Click the Draw button on the toolbar. A submenu will open.
- In the menu that opens, select the Grid command. The Snap to Grid dialog box opens.
- In the dialog box, uncheck the Show grid lines on screen option and close the window.
In Word 2007 editor
- Go to the View tab.
- Uncheck the Grid option.
By the way, if the above methods do not help, there is a possibility that you have selected a checkered pattern fill as your background. In this case, the cell will occupy the entire page, and not be limited to the margins. To get rid of such a fill, in the Format menu, move the mouse pointer to the Background item and in the submenu that opens, select the command No fill. If you are working in the Word 2007 editor, then go to the Page Layout tab and in the Page Background command group, click the Page Color button. In the submenu that opens, select the command no color.
Indeed, a situation can happen that you open a file in Word format and see that behind the text on all sheets there is a marking in the form of a cell. A person who encounters a similar problem for the first time may not immediately understand how to remove it. Therefore, let's look at this issue in more detail.
Below we see a drawing in which there is a small fragment of text, and in the background there is a grid, and if you scroll through all the sheets of this file, then in places where there is even no text, the grid will still be present.
To get rid of this grid, which quite dazzles the eye, you need to find the “View” tab on the top panel of Word settings and activate it. In this tab you need to find the “Show and Hide” section (located on the left side), where you will see the inscription grid, and opposite it there will be a checkmark. Your task is to uncheck this box, after which the grid will immediately disappear from the file.
How to call CHKDSK on Windows 10 through the command line
The command line is an extremely useful and powerful system tool for editing files, diagnosing the operating system and a number of other actions. It, of course, cannot be compared with the terminal in Linux, but, nevertheless, it allows you to do a lot.
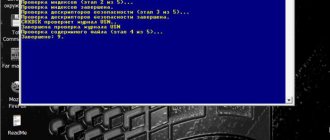
Command SFC /Scannow Windows 7 - how to check system integrity
To launch the verification utility, follow these step-by-step instructions:
- Go to the Start menu and search for “Command Prompt” in the special field.
- Click on the corresponding list item in the search results. You can also launch the console using the shortcut Win + R by typing the cmd command in the line.
- Wait for the command line interface to launch.
- Write or paste the command “chkdsk c:” or “chkdsk d:” into the line.
Important! As in the previous case, when the check was performed through the graphical interface, the system disk cannot be checked completely without rebooting the system. Disk D will be checked without problems. To restart, just press the “Y” key, which means “Yes”.
What attributes to set to restore a hard drive using CHKDSK on Windows 10
As is already clear, checkdisk in Windows 10 is performed via the command line. Immediately after the command you must enter the name of the disk. If this is not done, then only the system hard drive will be checked. The remaining attributes mean the following:
- /f – fixes found errors.
- /r – detects bad sectors and fixes them.
- /x – unmount the disk before starting the scan.
- /v – displays full paths and file names during scanning.
- /i – prohibits strict checking of index elements.
- /с – prohibition of checking cycles inside directory structures.
- /l size – as a result of analysis, change the size of the log file to the value specified in the parameter.
One of the Scandisk-type programs for Windows 10
Executing “chkdsk”
The CHKDSK command may take some time to complete, especially if you are checking a large disk. After completing this process, it will provide a summary result. Including the full disk capacity, byte distribution and, most importantly, any errors that were found and corrected.
The CHKDSK command works on all versions of Windows, including the latest 7, 8 and 10. As for older versions of operating systems, users can launch the Command Prompt from the Start / Run menu and typing “cmd”. After launching the Command Prompt, you need to right-click on it and select “Run as Administrator” to gain access to the necessary rights.
So, we figured out how to run the CHKDSK command on older versions of Windows, and many of those who followed the suggested steps saw that their hard drive capacity decreased significantly after running the command. This indicates that this disk is faulty, since one of the functions of CHKDSK is to identify and block bad sectors on the hard disk.
If we are talking about several bad sectors on a hard drive, then they usually go unnoticed by the user. But if the disk is faulty, then there can be a huge number of such sectors. And by blocking them, CHKDSK eats up a significant chunk of your disk’s capacity.
You need to be prepared for this result, and this means that all data that is hypothetically stored in these sectors will be lost. Even if the operating system itself doesn’t know about it yet. CHKDSK will try to recover data from such bad sectors when using the /r option, but some data will remain damaged and unrecoverable. And this result is not CHKDSK's fault - this command simply displayed the current state of your hard drive.
Author: Vladimir Mareev
, Technical Writer
Source
How to find bad sectors using third-party utilities for Windows 10
How to map a network drive in Windows 10
There are a lot of useful programs that allow you to analyze the state of hard drives and correct logical or physical errors on them. Here is a list of the most popular ones:
- Hetman Partition Recovery.
- HD Tune Pro.
- Victoria HDD.
- MHDD.
- HDDScan.
- Seagate SeaTools.
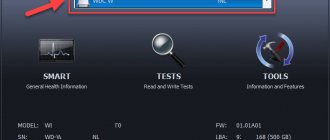
- Western Digital Data LifeGuard Diagnostic.
- HDDlife.
They all have a different interface, but even beginners have no problems scanning a hard drive with their help. Everything is extremely simple. As a last resort, you can watch video lessons.
HDDLife - a program for monitoring the status of your hard drive
Usually the heart of a computer is called the processor or motherboard. But they serve faithfully for several years, and then the hard drive suddenly fails. In terms of loss, no component can compare with it.
The hard drive is computer memory, which, of course, needs to be protected. In order to prevent sudden data loss, you need to regularly back up your data to another HDD or storage media. However, if you want to prevent hard drive failure in advance, you need to determine its current state. The HDDLife program will help with this.
The second important section is displaying the disk temperature. Any electronics works, or rather wears out faster, at elevated temperatures. And too high a temperature, as a rule, leads to disastrous consequences. If the indicator text is green, then everything is in order and the disk is in good thermal conditions. Otherwise, you need to buy special cooling or check the ventilation of the slot in which the disk is located. On some HDDs, the program allows you to adjust the noise level and performance. This is done using a slider that determines the relationship between the characteristics. Either this is the possibility of a special version for a laptop, or a limitation of the trial version - however, the option was not available for us. Some HDDLife features cannot be called unique: for example, an indicator of available space. If there is not enough space on the partitions, the now familiar warning is displayed. Free space monitoring is available in Windows, as in almost any OS, so the message is more annoying than informative.
The program is distributed in three versions: free, HDDLife Professional and HDDLife for Notebooks. The differences can be found on the page https://www.hddlife.ru/rus/compare.html.
Features of checking the service life of SSD drives on Windows 10
SSD drives differ from conventional magnetic drives in their operating speed, but they are more limited in information recording cycles. Standard Windows tools can analyze the “health” of an SSD just as well, and the standard CHKDSK function copes with this with a bang. Just enter a command in the console similar to the examples above and specify the letter of the SSD. The device itself will show all the main parameters. Also popular in the top ten is another utility called by the command “wmic diskdrive get status”.
Hetman Partition Recovery interface
Now it’s clear how to run CHKDSK on Windows 10. There’s nothing complicated about it. To scan, just boot into administrator mode, start checking the OS using the appropriate command and view the results. If the system disk is loaded for analysis, you will have to restart the PC