Windows 7 is a popular OS from Microsoft
Today, more and more people are well versed in computers. They actively use the Internet and social networks, navigate programs, can treat particularly annoying viruses and even disassemble and reassemble the system unit. And when they need to install Windows 7 via BIOS, they get confused. It would seem that what is so difficult about this? Just run the disk or flash drive, restart the computer and follow the step-by-step actions that the installer prompts. The principle is approximately the same as when installing any program, except that it is a little more complicated. And the difficulty lies in the fact that you need to know the correct sequence - what and how to do. More precisely, you need to know how to enter the BIOS and how to reinstall Windows through the BIOS.
Setting up BIOS under Windows 7
When setting up the BIOS to install any operating system, difficulties arise, since the versions may differ from each other. First, you need to enter the BIOS interface - restart the computer and until the operating system logo appears, press one of the keys in the range from F2 to F12 or Delete. In addition, key combinations can be used, for example, Ctrl+F2.
Further actions depend on the version.
AMI BIOS
This is one of the most popular BIOS versions that can be found on motherboards from ASUS, Gigabyte and other manufacturers. Instructions for setting up an AMI for installing Windows 7 are as follows:
- Once you have entered the BIOS interface, go to the “Boot” item located in the top menu. Moving between items is done using the left and right arrows on the keyboard. The selection is confirmed by pressing Enter.
The setup is complete. To save changes and exit the BIOS, press F10 and select “Yes” in the window that opens. If the F10 key does not work, then find the “Save & Exit” item in the menu and select it.
After saving and exiting, the computer will reboot and boot from the installation media will begin.
AWARD
The BIOS from this developer is in many ways similar to the one from AMI, and the setup instructions before installing Windows 7 are as follows:
- After entering the BIOS, go to “Boot” (may be called “Advanced” in some versions) in the top menu.
- To move "CD-ROM Drive" or "USB Drive" to the top position, highlight the item and press the "+" key until the item is moved to the top.
There is no need to configure anything additionally.
Phoenix BIOS
This is an outdated version of the BIOS, but it is still used on many motherboards. Instructions for setting it up are as follows:
- The interface here is presented as one continuous menu, divided into two columns. Select the "Advanced BIOS Feature" option.
Go to "First Boot Device" and press Enter to make changes.
In the menu that appears, select either “USB (name of flash drive)” or “CDROM” if installation is from a disk.
Save the changes and exit the BIOS by pressing the F10 key. A window will appear where you need to confirm your intentions by selecting “Y” or pressing a similar key on the keyboard.
This way you can prepare your computer with Phoenix BIOS to install Windows.
UEFI BIOS
This is an updated graphical BIOS interface with additional features that can be found in some modern computers. Versions with partial or complete Russification are often found.
The only serious drawback of this type of BIOS is the presence of several versions, in which the interface may be greatly changed, due to which the required items may be located in different places. Let's look at setting up UEFI to install Windows 7 on one of the most popular versions:
- In the upper right side, click on the “Exit/Advanced” button. If your UEFI is not in Russian, then the language can be changed by calling the drop-down language menu located under this button.
- A window will open where you need to select “Additional mode”.
An advanced mode will open with settings from standard BIOS versions, which were discussed above. Select the "Download" option located in the top menu. To work in this BIOS version, you can use the mouse.
Now find “Boot Option #1”. Click on the value set opposite it to make changes.
In the menu that appears, select the USB drive with the recorded Windows image or the “CD/DVD-ROM” item.
- Click on the "Logout" button located on the top right side of the screen.
- Now select the “Save changes and reset” option.
Despite the large number of steps, there is nothing complicated in working with the UEFI interface, and the likelihood of breaking something through an incorrect action is lower than in a standard BIOS.
In this simple way, you can configure the BIOS to install Windows 7, or any other Windows on your computer. Try to follow the instructions above, because if you mess up some settings in the BIOS, the system may stop starting.
Thank the author and share the article on social networks.
Hello, my dear readers!
If you've ever installed a new operating system, chances are you've simply updated it. For example, from “seven” to “eight” and so on. Yesterday I tried to install the OS from scratch, and I had to do it through the BIOS settings. The matter requires care, but everyone should know these aspects. Today I will tell you how to reinstall Windows via BIOS, in different ways and from different media.
The content of the article
What is BIOS and what does it have to do with it?
To explain it in simple words, BIOS is a set of small programs that control the operation of your computer hardware. It is available on any PC, whether desktop or laptop. Without knowing the purpose of this or that section in it, I strongly do not recommend changing anything in it yourself. In the worst case scenario, you can simply burn the iron in your car.
For example, turn off the fan on the video card and that's it. The service will no longer help you here. But you still have to interact with the BIOS. Especially with the section that is responsible for the boot order from an optical drive, hard drive, flash drive or other device. This is necessary when installing the OS from scratch.
How to enter BIOS
Everything is very simple. This is done without a disk or flash drive. First, you need to restart your laptop. Or your desktop PC. As soon as the motherboard loading screen appears, you will see a picture like this.
Where does Windows come from?
Perhaps some of you will feel that this point should have been placed at the beginning of the process being described. Meanwhile, this “discrepancy” in the presentation of the material does not in any way disrupt the sequence of actions; moreover, it is the most acceptable option to learn how to do everything according to the rules. Now insert the Windows distribution disk. If you are using licensed software, and the disk with the system image you purchased is original, then you have nothing to worry about. When you have free Windows, downloaded from a dubious Internet resource, the chances of long-term and fruitful “cooperation” with the OS are negligible.
However, there are exceptions. Perhaps you will be one of the lucky ones, and the “cracked” system will turn out to be quite suitable for work. But do not forget that the final result—the success of the OS installation—depends on the correctness of the changes made to the BIOS settings. It is the microprogram that monitors the “fairness of the game” of the user. Therefore, installation of a system distribution kit from a Windows environment is often fraught with software failures and, as a rule, does not proceed correctly. As a result of using a “treacherous” method when solving the question: “How to reinstall Windows XP?” the efforts of an uninitiated user simply become wasted time. Moral: install Windows from DOS, that is, through BIOS!
What is BIOS and UEFI
Each motherboard has a special program for booting the computer and configuring the parameters of various devices. This program is flashed (programmed) into a special chip on the motherboard and is therefore called firmware.
Previously, all motherboards had firmware called BIOS, which had a simple graphical interface with white letters on a blue background and was limited in functionality. For example, in the BIOS it was impossible to use the mouse, select a language, and there were no graphic elements (pictures) due to the limited capacity of the BIOS memory chip. Also, motherboards with BIOS did not support disks larger than 2 TB due to limitations of the old disk partitioning system (MBR).
Nowadays, many motherboards have a new type of firmware called UEFI, which features an improved graphical interface using a beautiful background, hand-drawn buttons, the ability to select a language (including Russian) and some improvements. For example, support for a new type of disk partition (GPT), allowing the use of hard drives with a capacity of more than 2 TB.
What type of firmware your motherboard has can be found in its manual, on the website of the motherboard or laptop manufacturer, and also visually when entering the Setup configuration program. The Setup program is also flashed into the motherboard and is used to change BIOS or UEFI settings.
From words to deeds
- Format the Flash media using standard Windows tools. The file system should be NTFS.
- Then you need to prepare the system distribution for recording. That is, if the installation files are on an optical disk, insert it into the drive; when the data is in the form of an image, download it to a virtual device.
- The next step is to use the “WinSetupFromUSB” program. This software is freely distributed on the Internet, you should not have any difficulties downloading it. After installing and launching the specified program, you will be literally two steps away from the moment when you can consider yourself a professional in solving the question: “How to install Windows?”
- In the top checkbox, select the flash drive installed on your PC.
- Check the corresponding box (Windows 7) and, by clicking the button, specify the path to the OS distribution next to it.
- After activating the “GO” toolbox, all you have to do is wait a few minutes. Upon completion of the process, the program will display a corresponding message.
It's time to start a practical solution to how to install Windows through BIOS!
How to enter BIOS Setup
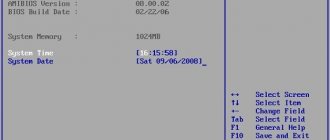
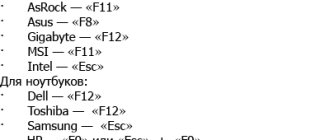
To enter the Setup program, immediately after turning on the computer, press the “Delete” button on the keyboard. On some motherboards and laptops, the “F2”, “F10” or “Esc” keys are used for this. You can read which button to press in the messages that appear immediately after turning on the computer.
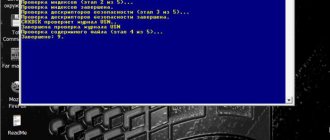
In text form
Graphically
If you don’t have time to read, then press the “Pause” button on your keyboard to pause the download. You can continue loading by pressing any key. If you press the key designated to enter Setup, you will immediately be taken to the motherboard setup program.
Classic BIOS
UEFI interface
How to reinstall Windows via BIOS: thumbs up!
We won’t rush, because you know that “rush is only needed when fishing...”. Before you get into the holy of holies of the PC, that is, when the Bios interface opens in front of you, know: carelessness in actions, which is expressed in mindlessly pressing keys and changing “incomprehensible” parameters, is critical, and in poetic language it’s even like death!
However, you still have to do some “editing” yourself.
Basics of working in Setup
3.1. Control keys
The Setup program is a set of various parameters grouped on separate tabs, depending on their purpose. On the right or below there will be a description of the keys with which all actions are performed.
To navigate between tabs, you usually use the “right” and “left” arrows on the keyboard. To move between lines within one tab, use the down and up arrows.
To change values, use the arrows to navigate to the required field, press the Enter key, and then use the arrows to select a new value from the drop-down menu. For this, the “+”, “-” or “Page Up”, “Page Down” keys can also be used.
To return up a level or to the previous page, press the Esc key. The “Esc” key on one of the main tabs will mean exiting the BIOS without saving the settings, which you will need to confirm or refuse to exit.
In the Setup program with the UEFI interface, you can perform all actions using the mouse.
3.2. Saving settings
This is a very important point. After making all the necessary settings, go to the “Exit” tab, select the “Exit and Save Changes” item using the arrows (“Exit and Save Changes”, the word order may be different), press “Enter” and confirm saving the settings by selecting the “OK” arrows or “Yes” and “Enter” again.
You can save the settings much easier and faster by pressing the “F10” key on the keyboard and confirming your decision. This key works in many versions of BIOS, UEFI and is often indicated in tooltips (bottom or right).
3.3. Cancel Settings
If you accidentally changed something or are not sure about the correct settings, then go to the “Exit” tab and select “Exit and Discard Changes” or press the “Esc” key until a message appears about exit without change settings and confirm the action (“OK” or “Yes”).
3.4. Restoring settings
To restore all settings to optimal defaults, go to the “Exit” tab and select “Load Setup Default”. After this, you can immediately change other settings or simply exit the BIOS and save the settings (“Exit and Save Changes” or “F10”).
Tips after installation
- Disable hibernation mode (relevant for systems on SSD, it allows you to free up disk space).
- If the OS is on an SSD, move the page file, temporary files and browser files to the HDD.
- Disable updates (there will be no unnecessary traffic consumption, activation will not fail, and you will not have to wait several minutes for updates to install before turning off).
- Install drivers for your video card and sound card.
After installing all the applications and configuration, use Acronis True Image to make a “clone” of the local disk. In case of problems, you can restore an exact copy of the system and the entire C drive in 5 minutes, and you do not need to reinstall everything again.
After this, you are the happy owner of a customized, clean OS, and no experiments or failures are now scary. If something goes wrong – 5 minutes and everything is fine again!
BIOS setup
5.1. Changing boot priority
Go to the "Boot" or "Download" tab.
Install your DVD drive or flash drive first in boot device order.
If you install Windows from a disk, then the first item is to select a device like “ATAPI CD-ROM”, a name indicating the manufacturer or model of the drive. For example, “CDROM:PM-HL-DT-STDVD-RAM GH22NP” (this is an LG DVD drive).
If you plan to install Windows from a flash drive, then first choose something like “Removable Dev.” or the name of the flash drive with an indication (this is a “PATRIOT” flash drive). Transcend JetFlash 790 8Gb
What should be ready before installation
Review the list below to ensure your computer and system are ready to install or reinstall Windows 7 and follow the steps required to complete the preparations.
1.1.
What types of installation are there, how to save personal files and programs
There are two types of installation:
- A complete reinstallation of the operating system (OS), which completely erases a hard drive partition (or the entire drive), including all your programs, documents and files.
- An OS update that only updates system files.
Updating the OS has a number of disadvantages.
Therefore, it is recommended to perform a complete reinstallation of the system, and for this you will need to save all personal files and program settings. If you haven't already done so, read the article on preparing for installation, from it you will learn:
- how to save all important personal data;
- what programs will be needed immediately after installation and where to download them;
- Is it possible to copy installed drivers, where can I find the drivers after installation;
- analysis of some special cases;
Save all data and proceed to the next step.
↑ Return
1.2.
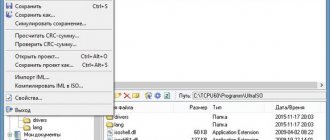
How to legally download the original image of Windows 7 x64 or x32 for free.
Program for downloading Windows 7, 8.1, 10. | 3.24 MB Attention! Currently the program cannot download Windows 7 due to changes made by Microsoft. Original images from the official Microsoft website with Windows 10 are still available
!
download the original image
legally using the
Windows ISO Downloader program: the file with the Windows image will be downloaded from the official Microsoft website
.
“Windows ISO Downloader” program file with version 5.21 (dated September 20, 2022) is attached to the article (to the right of this text).
How to download the image correctly is shown in the figure below:
Select the Windows 7 partition, then the desired edition of the Windows 7 image and the “Confirm” button.
Attention! We strongly do not recommend using builds of Windows 7 - use only original system images.
The authors of assemblies cut out services that seem unnecessary to them, and also add a number of drivers and programs to the assembly at their own discretion.
In addition, the author can include something unnecessary and even dangerous in the image, such as a virus or a miner. Moreover, cut services and settings changes may not be suitable for all users.
Microsoft has several aircraft hangars with a variety of equipment designed to test the operation of the operating system on various combinations of devices. Therefore, the official OS image works correctly for the vast majority of users.
The authors of assemblies do not have such testing capabilities, so a certain percentage of users will experience problems during the operation of the assembly, which can only be resolved by completely reinstalling Windows.
↑ Return
1.3.
Which image version to choose: 32 bit or 64 bit
Everything is very simple: a 64-bit OS is needed in two cases: so that the computer can “see” 4GB or more of RAM and so that you can work with “heavy” programs or games.
Attention! Some new programs and games may not run on 32-bit Windows. Conclusions:
- If the amount of RAM is 4GB or more, feel free to choose x64 (64 bits).
- If the computer is old and complex programs (for example, audio and video editors, design systems, multimedia packages) are not used, choose x32 (32 bits).
More detailed information about the difference between a 32-bit and a 64-bit operating system is provided in this article.
The easiest way to see how much RAM you have is to right-click on the “My Computer” → select “Properties” in the context menu.
The window that opens will indicate the amount of RAM, as well as the bit capacity of the system currently installed.
↑ Return
1.4.
Which version of Windows 7 should I choose: Home, Professional or Ultimate?
There are different versions (editions) of Windows 7, some of which differ greatly in functionality. You can read more about Windows versions here.
Most often, when installing, you choose between the “ Professional ” and “ Ultimate ” versions. The best choice in terms of image version would be “ Windows 7 Professional ” . But don’t worry if you have a different edition of Windows - the installation process will be similar. In the “ Professional ” edition, as opposed to “Ultimate”
there are a number of services that most users will never use.
You probably haven't even heard their names: DirectAccess, Unix Application Launch Subsystem, BranchCache, BitLocker, etc. “ Professional ” version will take up less space on your hard drive .
↑ Return
1.5.
How to properly burn an image to a DVD or USB flash drive?
If you have already recorded the image and the installation from it went smoothly, then you can immediately move on to the next chapter. If you don’t know what programs you can use to burn an image to a disk or flash drive, then the following auxiliary articles will help you:
- How to burn an image to a DVD disc.
- How to burn an image to a flash drive.
Please note that installation from a USB flash drive is more reliable and also faster.
If you have a flash drive with a capacity of 4GB or more, then it is better to install from it. ↑ Return
2.
Booting using the "Boot Menu"
There is an easier and more convenient way to boot from a DVD or flash drive for both BIOS and UEFI - boot using the “Boot Menu”.
To call the boot menu, the “F8”, “F10”, “F11”, “F12” or “Esc” keys can be used. They can often be seen in prompts on the initial boot screen of your computer. You can also find out this information from the instructions, on the website of the motherboard or laptop manufacturer, by searching on the Internet, or at random.
Immediately after turning on the computer, press and hold the “Boot Menu” key until the boot device selection menu appears.
Use the down and up arrows to navigate to the DVD drive or flash drive and press Enter. Sandisk Cruzer
The advantages of this method are obvious - you don’t need to delve into the BIOS, you don’t need to return the BIOS settings back later (although this is not always necessary), and it’s enough to call this menu just once, since after you start installing Windows, this will no longer be needed. Additionally, using the "Boot Menu" does not change the BIOS or UEFI settings.
When the disc “whispers” - the user is drinking coffee
Once you've designated the drive as boot device #1, then inserted the Windows disc and restarted your computer using the Alt+Ctrl+Delete key combination, it's time to observe. As promised, the system will “become” automatically.
- When the message “Press any key...” appears, press any button.
- After the initialization process, a window will open in which you need to assign the OS installation directory.
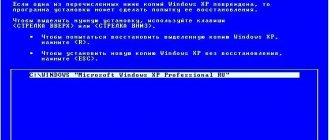
Attention: do not mindlessly press “Enter” on a non-functional Windows OS, which usually takes up space in the system partition of the HDD and is designated by the letter “C”. “How to reinstall Windows XP?”, you ask, if the required disk area is occupied by an old copy? Easily! To do this, simply format the partition, first erasing the old data.
- On the highlighted OS, press “D”, which means delete.
- Then use the "L" button to confirm your intentions.
- After the unallocated area appears, press “Enter” and format the created partition to the NTFS file system.
You don’t have to do anything else, except at the end of the installation to make some adjustments regarding the system language for using the operating system, as well as user data. As you have probably already seen, everything is quite simple and transparent, and the solution to the question “How to install Windows through BIOS?” - not a labor-intensive process at all.
Download problems
Friends, due to the fact that many people had problems loading when installing Windows and some wrote about it in the comments, I decided to make a separate section where I collected methods known to me to solve these problems.
- If the computer stops booting at the very beginning and asks you to press F1, after which it enters the BIOS, then you most likely either have a low battery on the motherboard (the timing may be off), problems with the processor cooler (failure, not connected there) or hard drive (errors in SMART).
- If, when you turn on your PC, the message “Reboot and Select proper Boot device or Insert Boot Media in selected Boot device and press a key” appears, this means that the boot area on the disk or flash drive is not found or is damaged. Try booting from the installation disk or flash drive using the Boot Menu (Section 6 of the article), if that doesn’t help, make the bootable media again using the Windows USB/DVD Download Tool utility.
- If, after restarting the computer, the Windows installation starts from the beginning, then remove the boot disk or flash drive and restart the computer, the installation should continue from the hard drive.
- Disconnect all unnecessary USB devices (flash drive, 3G modem, smartphone, printer) from the computer. You only need to leave the mouse, keyboard, DVD or flash drive from which you are installing Windows.
- If you have several hard drives, then disconnect all drives from the motherboard except the one on which Windows will be installed.
- Reset BIOS settings to default (described in this article).
- If the installer does not see the disk or error 0x0000007B appears at the end, change the SATA controller mode in the BIOS from AHCI to >
Saving data
There are two options for reinstalling the system:
- The system is installed on top of the old one.
- Everything is removed and reinstalled.
In the first case, all data is saved (settings, passwords on sites, files, etc.), but glitches may also be saved. If you install on top, then this section about saving data is irrelevant for you.
Formatting a disk deletes all data. There are several ways to avoid losing the necessary files:
- Copy your personal information to another drive on your computer. Suitable if you have 2 hard drives.
- Dump the files to an external storage device (HDD, flash drive, memory card, smartphone).
- Save files in the cloud (Yandex Disk, Dropbox, Google Drive).
- Confidential files can be saved to a WinRar archive with a password and sent to yourself by email. After reinstalling Windows, the archive will remain in the mail.
What to copy from old Windows? Check out the following places:
- Desktop, My Documents, drive C.
- Bookmarks in the browser.
- Browser and torrent download folders.
- Save games.
- ICQ/Skype correspondence.
Additionally, you can take a screenshot of all installed programs (Start > Control Panel > Programs and Features) so that after installing a clean OS you can easily remember all your favorite programs. Upload the screenshot to VKontakte or Facebook, then it won’t be lost.
We save a list of installed programs to quickly restore them.