What to do if the Windows 10 volume icon has disappeared
If the volume icon disappears, it’s not scary at all. And this can be resolved by doing a few things with your computer. After completing them, the volume icon will appear in your tray again. So, let's begin.
How to show hidden icons
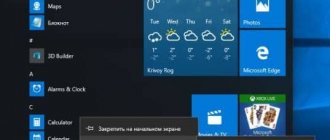
If you don't find the volume icon in the notification area. First, click on the up arrow (show hidden icons) in the taskbar and look for it there. If you see the volume icon in the list that appears, you can leave it there and use it as needed, or drag it to the taskbar.
The volume icon has disappeared from the taskbar
The volume icon has disappeared from the taskbar in Windows 7, 8, 10, what should I do?
Unless you have a setting configured to force the notification area to display absolutely all icons, most of them are minimized. To see them, you need to click on the triangle located to the left of the clock (or slightly higher if the taskbar is vertical). In the sliding frame (bottom) there is a “Customize” command, which you need to click on.
The Control Panel applet will open, from which you need to go further to the link “Enable... system icons” (bottom left). There you change the display parameters of all system elements of the notification area: clock, power, etc.
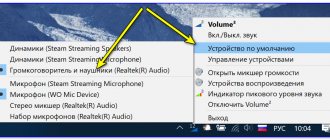
Opposite each element there is a button that allows you to turn it on or off. For “Volume” you need to set the value to “On” and save the changes by clicking “OK”. The volume control should appear in the correct place.
If it falls into the category of those that are hidden in a sliding window, and you need it to always be visible, then you need to find this element among all the notification icons and change the settings for its display.
Select the top value from the drop-down list that configures the display of the icon and notifications. If you check the checkbox located at the bottom of the window (on the left), next to the line “Always display...”, then absolutely all icons of launched applications (system elements too) will always be visible on the taskbar.
In Windows XP, the principle is the same, only the settings are made in a small dialog box in which parameters are configured for all elements: both system and regular. For XP, you must also open the Sounds and Audio Devices Control Panel applet. There you need to tick the corresponding checkbox responsible for displaying the volume control.
Enable volume icon in system settings
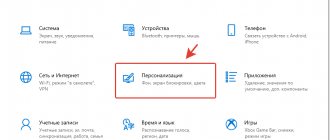
Open Settings using the keyboard shortcut WIN + I. Go to the Personalization section. On the left, select Taskbar.
In the Notification area section, click on Turn system icons on or off.
Enable volume icon in system settings
If the switch opposite Volume is in the Off position. — press it so that it is in the On position. If the switch is in the On position. - turn it off and turn it on again.
Windows 10 volume icon has disappeared
The volume icon disappeared; direct launch
If the above operations do not help, do not despair. There is another option to open the volume control. It can be launched directly using the application shortcut.
Select the “New → Shortcut” command from the desktop context menu.
And paste the following path into the field: C:\Windows\System32\SndVol.exe.
By clicking “OK” in this and the next dialog, you will receive a shortcut on your desktop with which you will open the volume control.
For convenience, you can pin this element to the taskbar by selecting the corresponding command in the shortcut context menu.
I hope my tips will be useful to you. But if the volume control does not start even from Explorer, it means that the application file itself is damaged. To restore it, you will have to restore the entire system.
Reset notification area icons
In some cases, the notification area icon cache may become corrupted, causing them to display incorrectly or cause the icons of uninstalled applications to appear in the notification area icon settings. When this happens, you need to delete the icons in the registry so that they are automatically restored.
To do this, press the WIN + R hotkeys and enter regedit to open the Registry Editor.
Follow the path
Computer\HKEYCURRENTUSER\SOFTWARE\Classes\Local Settings\Software\Microsoft\Windows\CurrentVersion\TrayNotify.
On the right, find the IconStreams and remove it. If you also have the PastIconsStream , then remove it too.
Windows 10 volume icon has disappeared
Then restart Explorer.
Check local group policy restrictions
Press WIN + R and enter gpedit.msc to open the Local Group Policy Editor.
On the left, go to User Configuration - Administrative Templates - Start Menu and Taskbar.
On the right, double-click Remove the volume control icon and toggle the switch to Not configured or Disabled.
Universal methods
Unfortunately, the instructions above cannot always help restore the volume icon. For example, after some system failure, the settings may be set to “Enable” for the volume icon in the “Taskbar”, but the icon itself does not appear. In this case, you can try to restore using these methods.
Method 1: Restart your computer
Restarting the system sometimes helps to get rid of many failures that occurred while the system was running. It is recommended to reboot through the Start menu, but if for some reason it is inactive, you can use the button on the system unit. Before rebooting, be sure to close all programs you were using previously.
Laptops may not have a dedicated reset button. In this case, you just need to hold down the power button for a while.
Method 2: Restart Explorer
The standard explorer.exe process, which is responsible for the normal display of the operating system's graphical interface, can sometimes fail. The problem in such cases is usually solved by restarting it, which can be done using the following instructions:
- First, you need to open the “Task Manager”. In modern versions of Windows, it is called by the keyboard shortcut Ctrl+Sift+Esc. If this combination does not work, then use the combination Ctrl+Alt+Delete. Then a special menu will open where you can select “Task Manager”.
- In the manager window that opens, go to the “Processes” tab, if it was not open by default. In Windows 10, you need to go to the “Details” tab.
- Then you need to find the “explorer.exe” process. Sometimes this can be difficult, since Windows has many standard processes that are open by default, and the ability to search by name in the Task Manager is not implemented.
- When you find the process you need, right-click on it and select “End Process.” You can also simply select it with a mouse click and click on the “End task” button in the lower right part of the window.
- You may receive a warning that this is a system process and disabling it may affect Windows operation. Confirm disconnection.
- After this, the “Desktop” will turn completely black, and the “Taskbar” will disappear. Don't worry, that's how it should be. In the "Task Manager" window, click on "File" in the top menu. From the context menu, select “Run new task”.
- A line will appear where you need to enter the name of the process to be launched. Write "explorer.exe".
- Press the "OK" or Enter button on your keyboard. After launch, you will see the “Desktop” and “Taskbar” again. Check if the volume icon appears there.
You may be interested in: How to open hidden folders on Windows 8
Method 3: Editing Group Policy
This method is not suitable for all users, since some editions of Windows do not have an open Group Policy Editor, for example, the Home version. If you have Windows Professional, then this method will definitely suit you. However, you should understand that it is associated with editing system partitions, therefore, any incorrect action can seriously harm the system, so try not to deviate from the instructions:
- Launch the “Run” line by pressing the Win+R key combination.
- In it, enter the command to open the Group Policy Editor. The command looks like this: gpedit.msc. To start, press Enter or OK.
- The Group Policy editing window will open. Go to the “User Configuration” folder, which is located in the left menu.
- In the same place, open the “Administrative Templates” folder, and then “Start Menu and Taskbar”.
- In the “Status” column, which is located on the right side of the window, find the “Hide volume control icon” option. You need to double-click on it.
- Here, find the “Disable” item and check the box next to it.
- Click "Apply" and "OK".
- Restart your computer. After this, the volume icon should appear.
As you can see, there is nothing difficult about getting the volume icon back on the “Taskbar”. Almost all of the methods presented can be implemented by anyone.
Solution 10 – Try adjusting the volume using the equalizer
This solution can be followed if you have not arrived to resolve the issue. We recommend you Boom 3D, the top rated equalizer from Global Delight Apps. This equalizer not only allows you to adjust different sound frequencies, but also adapts your hearing to your environment.
You'll be able to choose between several types of headphones if you use them every day, and you'll have a range of effects to personalize your sound. However, the most important thing is that you can adjust the volume of your PC or laptop by reducing or increasing the equalizer frequencies in Boom 3D.
Disclaimer: This tool is designed to work on Windows 10. You can download it for free from the official website and try it out. However, if you are tech savvy, you can try it on a lower version of Windows.
Editor's Note: This post was originally published in August 2016 and has since been completely revised and updated for freshness, accuracy and completeness.
Solution 9: Make sure the required services are running
Many components of Windows rely on certain services to function properly, and if your PC is missing a volume icon, the problem may be that required services are not running. However, you can always resolve this issue by manually enabling the required services. To do this, simply follow these steps:
- Press Windows Key + R and enter services.msc. Now press Enter or click OK.
- A list of services will now appear. Double-click the Windows Audio service.
- When the Properties window opens, set the startup type to Automatic. If the service is not running, click the Start button to start it. Now click Apply and OK to save the changes.
- Now double click on the Windows Audio Endpoint Builder service and repeat everything from the previous step.
After doing this, the required services should be up and running properly and your problem should be resolved.
The missing volume icon in Windows 10 is a small issue that can be inconvenient, but we hope you have fixed the problem using one of our solutions.
Solution 6 – Add values to the registry
Adding values to the registry can be potentially dangerous and cause system instability, so it is recommended to back up the registry just in case. To add new values to the registry, do the following:
- Press Windows Key + X to open Power User Menu and select Command Prompt (Admin).
- When Command Prompt starts, enter the following lines:
- add "HKCUControl PanelDesktop" /v "HungAppTimeout" /t REG_SZ /d "10000" /f
- reg add "HKCUControl PanelDesktop" /v "WaitToKillAppTimeout" /t REG_SZ /d "20000" /f
- Close Command Prompt and check if the problem is resolved.
If you are still having problems on your PC or just want to avoid them in the future, we recommend that you download this tool (100% safe and tested by us) to fix various PC problems such as corrupted or missing files, crashing malware and hardware.
Solution 8 – Update your audio drivers
According to users, some of them were able to fix the missing volume icon issue by simply updating their audio driver. Sometimes outdated drivers can cause this and other problems, and it is recommended to update your drivers to fix them. This is a simple solution and you can do it by following these steps:
- Press Windows Key + X and select Device Manager from the list.
- When Device Manager opens, expand the Sound, Video, and Game Devices section, right-click your audio device, and select Update Driver.
- Select Search automatically to update your driver software and let Windows download the best driver for your device.
Additionally, you can also get the necessary drivers by simply downloading them directly from your sound card manufacturer. If you don't want to download drivers manually, there are also automated solutions that will update your drivers automatically.
Update drivers automatically (third party tool recommended)
Downloading drivers manually is a process that can result in the driver not being installed correctly, which can lead to serious problems. We strongly recommend that you update your driver automatically using the Tweakbit driver update tool. This tool is approved by Microsoft and Norton Antivirus, and after several tests, our team has concluded that it is the most automated solution. Here's how to use this software:
- Download and install TweakBit Driver Updater
- After installation, the program will begin scanning your computer for outdated drivers automatically. Driver Updater will check your installed driver versions against its cloud-based database of the latest versions and recommend the correct updates. All you have to do is wait for the scan to complete.
- Once the scan is complete, you will receive a report of all problematic drivers found on your PC. Review the list and see if you want to update each driver individually or all at once. To update one driver at a time, click the Update Driver link next to the driver name. Or simply click the Update All button below to automatically install all recommended updates.
Note.
Some drivers need to be installed in several steps, so you will have to click the Update button several times until all of its components are installed. Disclaimer: Some features of this tool are not free.
Method No. 5
Reinstall the OS . This is the most extreme method, which you should resort to only when none of the methods described above helped you.
One way or another, one of these methods will definitely help solve the problem with the volume icon. If you have any difficulties at any stage, re-read the instructions more carefully!
Note! In case nothing helps you, you can refer to the guide for reinstalling Windows.
Solution 3 – Change the text size to 125%
If the volume icon is missing in Windows 10, you can fix the problem by changing the text size to 125%. To do this, follow these steps:
- Right-click on your desktop and select Display Settings.
- When the Display Settings window opens, move the slider slightly to the right and set the text size to 125%. After that, move the slider back to the left and change the size to 100%.
- Close the window and the volume icon should appear.
Unfortunately, you may have to repeat these steps every time the volume icon disappears from Windows 10.
Method No. 1
Important! First, make sure the sound icon is not hidden.
- To do this, click on the “Show hidden icons” tab, which is located to the right of the language bar.