A hard drive is a kind of data storage, which is divided into compartments and clusters. Each cluster has its own amount of stored data. If the size of the file loaded into memory exceeds the cluster capacity, the system splits the file into fragments and distributes them to different clusters that have free space. Thus, fragmented parts of the file are recorded in different clusters and dispersed throughout the hard disk space. And when the system needs this file, it will search and collect all the fragments, which negatively affects the operation of the computer and hard drive.
Defragmentation is needed to improve computer performance and extend the life of the hard drive itself. This process allows you to organize and group all clusters whose fragments belong to the same file. This significantly increases the speed of searching and processing a file, while reducing the cost of system resources.
On outdated Windows XP, defragmentation had to be done by the user himself. Due to the fact that over time a lot of information accumulated on the hard drive, the computer began to freeze and stopped responding to user commands. And in the Windows 7 operating system, the developers themselves solved this problem by making defragmentation automatic. On this operating system, defragmentation occurs while the computer is running in the background. But even with the automatic process, the developers did not deprive the user of the ability to structure manually.
It is worth noting that the disk optimization process can last from several minutes to several hours. It is not advisable to load the computer during defragmentation, as this will significantly increase the time spent on structuring. Therefore, it is best to run defragmentation at night.
Methods of defragmentation using Windows
There are three ways to do self-defragmentation in Windows XP:
First way
You need to go to the “My Computer” folder, hover your mouse over the local drive you need, and click on it using the right mouse button.
In the pop-up window, select “Properties” and left-click on it.
A new window has appeared in which you need to select the “Service” tab.
Next, click on the “Perform defragmentation...” button. Then you need to select the required disk and click on the “Analyze disk” button. This is done in order to find out the degree of fragmentation of the disk drive and the need for its structuring.
Once the analysis is complete, you can click on the “Disk Defragmentation” button without any problems. After clicking this button, the data processing process will start. Once the application has finished running, the defragmentation process is completed.
Second way
You need to go to the Start menu, then click the “All Programs” button. Find the “Standard” folder and go to the “Service” subcategory. Where you will see the “Disk Defragmenter” file, you need to click on it.
After which you will be taken to the program itself, and then everything is as in the first method after clicking the “Defragmentation” button.
Third way
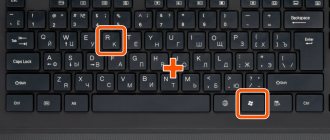
Go to the Start menu, click on the “Run” button or press the “Win + R” key combination. In the window that opens, enter the command dfrg.msc, and then everything is as in the first method.
If after analysis the fragmentation is less than 10%, then defragmentation may not be carried out yet. You can see noticeable changes in the quality of your computer if the degree of fragmentation was more than 30%. In this case, after completing the process and rebooting your computer, you will notice how much faster your machine starts to work.
Practical task for this lesson
In this lesson, we looked at the possibility of defragmenting disks using a standard Windows tool and a separate Defraggler program.
The task for this lesson is simple: you need to defragment all local drives on your computer.
If you have never used a standard defragmenter, you can try it first to consolidate what you have learned.
Well, then master the Defraggler program, as it is more convenient and does its job better.
After the standard defragmenter, you can then launch Defraggler - no big deal!
Automatic defragmentation mode in Windows 7
Also, the developers of Windows 7 have made a convenient interface for the user to configure automatic defragmentation. This allows you to customize the process to suit your needs. To do this, you need to get to the program using any of the three methods given above (although the “seven” has a slightly different interface, but in principle the process is no different).
After opening the program, you will see the “Set up schedule” button; after clicking on it, a new window will open. In this window you can select the frequency with which the defragmentation process will take place. The program has three periods available: daily, weekly, monthly.
For computers that the user uses to the maximum (plays games, installs large applications, etc.), it is recommended to set the frequency to weekly. This way, your hard drive will be structured every week. For office computers, it is best to set the frequency to monthly, since there is no heavy load on the system and the computer’s hard drive.
Next in the program, you can select the day of the week or month, as well as the local drive that you want to organize. This is done for your convenience, so that you can choose a time convenient for you and, if possible, do not use the computer. This will speed up the defragmentation process, and you will be able to continue working. The program has the ability to disable automatic mode, but this is not recommended, since people often forget to do this important process themselves.
Periodicity
Another important question is related to how often such a procedure should be carried out, if we are talking specifically about standard defragmentation in relation to HDD drives.
The frequency is directly related to the frequency of deleting various files, transferring them, copying them, installing new programs, etc. The more often the user does this, the shorter the interval between optimizations should be.
Experienced users, as well as experienced PC repair specialists, advise running this process once a month. This is the best option for those who do not abuse daily deletions and installations of data.
Defragmentation of an SSD drive: is it necessary or not?
SSDs are rapidly occupying their niche in the computer memory industry. Unlike a hard drive, solid-state drives do not need defragmentation at all. Since the data structuring function is built into the memory itself. And if you have automatic defragmentation enabled, you should disable it, as this leads to rapid wear and tear on the device.
When working on a computer running the Windows operating system, it is a good idea to periodically defragment the drives of its hard drive. Firstly, this function is free and provided by the operating system itself. Secondly, its implementation does not require the user to have extraordinary knowledge in the field of system optimization. Thirdly, it helps extend the life of the HDD and speeds up the operation of the computer. Read on to learn how the disk defragmentation procedure is performed in Windows 7, why it is needed, what it ultimately gives, and whether you even need to do it on your PC.
What is hard drive defragmentation
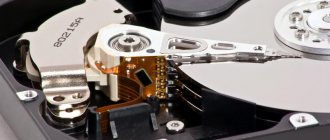
Before you find out why you need to periodically defragment your disks, you need to understand what lies behind this process. All information stored on a PC is recorded on hard magnetic disks of the hard drive. They are aluminum or glass plates coated with a layer of ferromagnetic material. In this case, as a rule, data is recorded not sequentially, but in fragments on different clusters of these same plates. As a result, when running any program, the read head of the hard drive has to access different areas of the drive plates, thereby reducing the performance of the computer.
The undesirable effect of fragmentation worsens as the hard drive fills up. The more fragmented information, the longer the process of reading it and the slower the computer. To correct such problems, a defragmentation procedure has been created. It is the process of organizing information recorded on the HDD. To put it in the correct language, when using it, the logical structure of the disk partition is optimized. At the same time, there is not only an increase in PC speed, but also optimization of disk space, that is, freeing up free space.
note
: if a solid-state SSD drive is used instead of a hard drive, then it does not need defragmentation, due to the absence of mechanically moving parts, that is, a read head, like standard hard drives.
How to defragment a disk in Windows 7 using its standard tools
So, we already understand why the hard drive defragmentation procedure is needed, but how to run it on the Windows 7 operating system? Everything is very simple. As mentioned above, this function is natively built into the OS and does not require any additional software. Although some will think, and in some ways they will be right, that third-party specialized programs are more efficient and easier to use.
To initiate disk defragmentation in Windows 7, you need to go to its properties. To do this, open “My Computer”, then select the desired local HDD volume and, by right-clicking on it, call up the context menu, where you will need to select the appropriate “Properties” item.
After that, in the “Service” tab, select the “Disk Defragmentation” section and click on “Run Defragmentation”.
The next step will again ask you to select the required logical volume and confirm the required action.
How long does the disk space optimization procedure take? There is no way to answer this question unequivocally, because this process is purely individual and depends on many factors. This includes the number of selected local volumes, the volume of each of them, the degree of their filling, fragmentation, etc.
How to run Windows 7 disk defragmentation through the command line
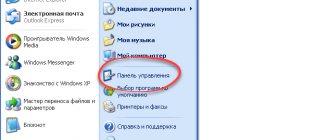
The next way to launch the described procedure using standard Windows tools is to use the command line. It is worth considering that in this case you should run it as an administrator. To do this, open the “Accessories” folder, which is located in the “Start” menu in the “All Programs” section, and run the required application as an administrator.
Then enter the command “defrag” and press “Enter”.
At the end of the procedure, the system will notify you that the work has been successfully completed and provide brief information about the defragmented volume.
In our case, defragmenting the system volume “C” on which Windows 7 is installed did not give any visible effect. The reason for this is the SSD solid state drive, on which the defragmented volume is located.
Defragmenting a Windows 7 disk using Defraggler
The third way to defragment disks in Windows 7, and in any other version of this operating system, is to use third-party specialized software, of which there is plenty today. We will show an example in the most popular program among users, Defraggler. Unlike the above-described methods for optimizing disk space, the Defraggler program displays this process more clearly with all the necessary explanations.
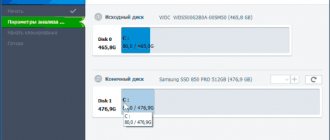
We launch the program and select the required logical volume to defragment it.
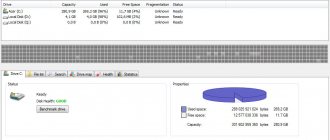
From the screenshot you can see that for the example we selected a logical volume located on the hard drive. At the same time, the program immediately checked its status.
As you can see from the screenshot, during the procedure, the program provides information about how long defragmentation of the selected disk will last. In fact, these are only approximate figures, which, as a rule, are inconsistent with real time. In our case, the whole process did not last 30 minutes, as the program assured us, but a whole hour.
In order to understand what the multi-colored flashing blocks are, you need to open the “Disk Map” tab.
Based on the data presented in it, it is clear that the information on the disk is initially highly fragmented, despite the fact that only one gaming application is installed on the disk. At the end of the process, the picture changes dramatically and the program makes it clear that the logical structure of the disk is optimized.
Just for fun, and to prove that SSD drives do not require defragmentation, we tried to run this process for the system volume “C”. To our surprise, the program produced the following information:
It follows from this that our statement regarding defragmentation of SSDs has been confirmed.
Many users have noticed that over time, opening files and applications is not as fast as it was in a “clean” system immediately after installation. With a large amount of accumulated information, the system spends more time searching for files, and the hard drive has to be defragmented. How to defragment a disk on Windows 7 will now be shown. There are several simple methods for this.
FRAGMENTATION IS ONE OF THE REASONS FOR THE SLOW DOWN OF THE HARDWARE
Let’s imagine a field on which different crops are planted scattered. Let's say that a farmer needs to harvest apples. Having finished with one tree, he moves on to another. But this other tree does not grow nearby, but 100 meters from the farmer’s current location. The third apple tree grows 50 meters from the second, and so on. Obviously, harvesting will require additional travel time. If apple trees grew nearby, then it would take less time to pick apples.
The hard drive (more precisely, the reading head) experiences approximately the same thing every time a computer user performs any operations with files - copies, moves, etc. The read head has to frequently move between clusters scattered across the disk surface, spending more time executing user commands.
But decreased hard drive performance is not the only consequence of data fragmentation. Due to the fact that the reading head moves more often, the resource of the driving mechanisms is consumed faster. Of course, wear is not so critical, but it is still present.
Defragmentation concept
First, let's figure out what defragmentation is and why it needs to be done. The essence of the question is that when writing new files, moving them on the hard drive or when installing programs, the objects are not saved somewhere in one specific place, but are scattered throughout the hard drive, and in fragments, and not entirely, although the user is in the structure the file system sees them in order. In fact, in order to access a file, the system collects its parts throughout the entire hard drive, which takes much more time than if all the components were nearby, which also affects its opening or the launch of an application.
A process called defragmentation is used to organize all the objects for quick access, but this moves the most frequently used programs or files to the fastest areas of the disk, which gives a significant performance boost in terms of reducing the time it takes to find and open the desired object.
Next, we'll look at how to defragment a hard drive. Windows 7 is taken as an example, although in all other versions of the system the procedures are similar. And it’s worth noting right away that in most cases the user does not need to manually start the process, since the developers took care of this by enabling the schedule by default.
General information
When recording to the HDD, each file is divided into separate pieces called clusters. As a result of numerous operations with data, for example, copying, deleting, changing a file, etc., clusters can end up quite far from each other. In this, the read head of the hard drive must make a huge number of movements across the surface in order to find all the components of just one file.
This does not in any way affect the safety of the data and its performance, but it seriously slows down the speed of reading and writing new information. Defragmentation allows you to sort clusters. All pieces of each file will be located next to each other, which will significantly increase the speed of the hard drive.
Of course, this process can take quite a long time, since the computer needs to check each cluster and move it into place, but the benefits you will receive will be significant. This operation can be compared to cleaning the house - if you periodically spend some time on it, you will find the right thing much faster when you need it.
How to defragment a disk on Windows 7 using standard tools?
Calling the appropriate system tool is quite simple. How to defragment a disk on Windows 7? First you need to use the disk properties context menu, called up by right-clicking on the selected partition in Explorer or by double-clicking on the computer icon. It has a service tab on which there is a button to start the defragmentation service, which you need to click on.
In the service window, the analysis launch is first used (to find out the degree of fragmentation of the partition), and when the diagnostic process is completed, the start button for the main process is used. Depending on the size of the hard drive and the degree of scattering of files on the disk, this can take quite a lot of time, not to mention the speed of accessing the disk itself.
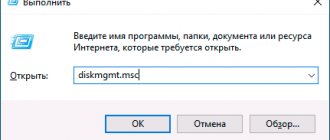
You can also access the toolkit through the “Run” console, in which you need to enter the defrag command, which refers to the executable EXE file of the same name, located in the System32 folder.
Scheduled work
To automate the process and not have to keep the computer turned on on Wednesday nights, let's change the schedule to a more convenient one.
Click the button highlighted in the screenshot to open the time settings.
Using the drop-down menus, set the frequency, day of the week and start time. Click “OK” to record the adjustments made.
In the main window, we make sure that the original schedule has changed to the manually specified one. We complete the utility by leaving the work to automation.
How to defragment a disk in Windows 7 via the command line?
Only one method was described above. If the user is used to working with the command line, the question of how to defragment a disk on Windows 7 can be solved in this way.
First, launch the console itself from the “Run” menu (Win + R) using the cmd combination, always on behalf of the administrator. Then the defrag C: command is written in it, and after adding the slash, additional parameters are set. For example, if you install with /U /V attributes, progress and detailed statistics will be displayed on the screen. However, you can look at examples of using additional characters, and only then choose which attribute should be set.
Using optimizer programs
Now let's see how to defragment a disk on Windows 7 using special utilities to maintain and increase system performance. You can find quite a lot of such programs, but let’s take Advanced SystemCare as an example.
The question of how to defragment a disk on Windows 7 using such a utility is much easier to solve than when using standard system tools. Firstly, this module can initially be included in the list of tools that will be used when running the program for verification and optimization. Secondly, the application builds its commands into the Windows context menu, and the defragmenter can be called immediately by right-clicking on the partition. Thirdly, the analysis and subsequent process are much faster, but defragmentation is somewhat different from the standard (this can be seen if you compare the moved clusters and the final partition structure). But most users and experts say that in this case, the ordering of fragments looks better and more preferable.
What to use?
In principle, the choice remains with the user, but based on practical considerations, it is better to install any optimizer program with the appropriate module, but only if the schedule for the process in the system itself is turned off. Otherwise, you can do without everything that was described above.
The computer hard drive is divided into small parts, clusters. Large files are written to several of these clusters. If the hard drive does not have an ordered sequence of clusters of the required size to record a large file, then the file is fragmented. In this case, the file is divided into small fragments and written to different clusters scattered throughout the hard drive. This fragmentation greatly reduces the speed of writing and reading a file from the disk.
Defragmentation
– this is the combination of clusters remote from each other with fragments of one file into an ordered sequence of clusters, which in turn will increase the speed of reading the file.
Disk Defragmenter
allows you to increase the speed of the entire system as a whole.
This is especially noticeable when downloading very large applications. Disk defragmentation
had to be carried out on the
Windows XP
, since over time, due to the heavy load on the hard drive, it felt like the computer was frozen, since it did not respond to user commands for some time.
On Windows 7
there is no need
to defragment the disk
, since
disk defragmentation
occurs in the background while the computer is running.
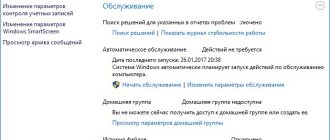
If you wish, you can always check the need to defragment the disk
.
To do this, go to the properties of the hard drive by right-clicking on it and selecting “Properties”
.
In the window that appears, go to the “Service”
and click the
“Run defragmentation…”
.
, the disk defragmenter program will start.
built into
Windows 7
.
In the program window you can see the disk defragmentation
disk defragmentation
program run for each hard drive partition.
If desired, you can change the schedule for running disk defragmentation
by clicking on the
“Set up schedule...”
.
As can be seen from the screenshot of the defragmenter program
, all hard disk partitions have 0% fragmentation.
This means that hard drives do not need to be defragmented. Let's verify this by analyzing one of the disks. For the experiment, select disk “D”
and click
“Analyze disk”
.
After the check we see the same result, “0% fragmented”
.
Windows 7
may not defragment the disk when fragmentation is 10%, as it considers this to be the norm.
When deleting a large amount of information from a disk, a large number of scattered free clusters will appear. Defragmenting your hard drive
can take considerable time, and if you urgently need to write the same large amount of information to this place, you can perform manual defragmentation.
In principle, this is not necessary, since if there is free space on the disk, Windows 7
will defragment itself in the background the next time you start the scheduler.
Manual defragmentation means completely deleting files from a selected disk partition, after copying them to a neighboring disk. After deletion, all clusters will be free, and all recorded information will be written in a strict sequence of clusters. In this case, the process of transferring, deleting and writing back files will take much less time than defragmenting this disk.
Observations by computer experts confirm that many users do not know how to properly defragment a disk on a computer. There are also those who are convinced that there is nothing complicated in this - a couple of clicks and everything is ready.
However, not everything is so simple; there are several subtleties in the settings and important points in this operation.
Let's look at the key points to understand how to properly defragment disks in Windows 7.
Standard Windows utility
In order to perform defragmentation, users do not necessarily need to download additional software - everything necessary is already pre-installed in Windows 7. To start this process, follow several steps described in the instructions:
Another way to open this utility is to type “Disk Defragmenter” in the search bar of the Start menu and press Enter.
You can also use the Windows console (CMD program). Launch the console and enter the command “defrag hard drive letter: /W /V”.
A hard drive is a kind of data storage, which is divided into compartments and clusters. Each cluster has its own amount of stored data. If the size of the file loaded into memory exceeds the cluster capacity, the system splits the file into fragments and distributes them to different clusters that have free space. Thus, fragmented parts of the file are recorded in different clusters and dispersed throughout the hard disk space. And when the system needs this file, it will search and collect all the fragments, which negatively affects the operation of the computer and hard drive.
Defragmentation is needed to improve computer performance and extend the life of the hard drive itself. This process allows you to organize and group all clusters whose fragments belong to the same file. This significantly increases the speed of searching and processing a file, while reducing the cost of system resources.
On outdated Windows XP, defragmentation had to be done by the user himself. Due to the fact that over time a lot of information accumulated on the hard drive, the computer began to freeze and stopped responding to user commands. And in the Windows 7 operating system, the developers themselves solved this problem by making defragmentation automatic. On this operating system, defragmentation occurs while the computer is running in the background. But even with the automatic process, the developers did not deprive the user of the ability to structure manually.
It is worth noting that the disk optimization process can last from several minutes to several hours. It is not advisable to load the computer during defragmentation, as this will significantly increase the time spent on structuring. Therefore, it is best to run defragmentation at night.
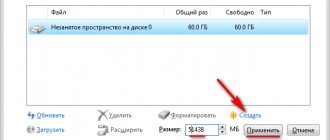
Setting up disk defragmentation in Windows 7
Open “My Computer”
The following window will open. In it you can see all the basic properties of the local disk.
To continue, click on the “Service” tab.
Next, click on the “Run defragmentation” button and launch the “Disk Defragmenter” application.
In the defragmentation application, you must select the desired local disk. Only after this the “Analyze disk” and “Disk defragmentation” buttons will become active.
Note.
Disable the "Scheduled defragmentation" option. This option raises conflicting opinions. The fact is that defragmentation will run in the background without the user's knowledge.
What does this mean?
While defragmentation is running, the computer may begin to freeze while performing the process, thereby interfering with normal operation. Moreover, if you use files and programs located on a maintained local drive, you can create significant interference with the system and cause some damage to the hard drive. P
Let's continue. If you click on the “Defragmentation” button without analysis, the disk will be analyzed automatically.
Important.
During analysis and defragmentation, do not, under any circumstances, use files that are located on the disk being serviced. You should also not open folders and view the list of files. If any data is being downloaded or distributed, it is also advisable to stop the Bit Torrent client.
After analyzing the status, the “Defragmentation” process will begin.