Many users use the Asus RT-N 12 router at home, and most of them bought it quite a long time ago. Some people begin to notice that over time the router begins to lag and slow down much more. At this point, most people decide that it's worth buying a new router to speed things up. However, this is not always the case; failures in the device can occur not only due to a long service life and various external influences, but also due to errors in the internal program , which is responsible for the interaction of all equipment and data exchange.
Router Asus RT-N 12
Manufacturers often eliminate all errors found and also optimize the operation of the device; with each such improvement, a new firmware version is released. Therefore, you should first try installing the latest version of the program for your device, this can help fix most problems.
Preparing for the update
Before updating, you need to make sure that the router is connected by cable to the device from which the update will be performed. You can also leave the cable connected to it, which comes from the provider. Still, it is better to pull out the extraneous cables. It would be a good idea to make sure that everything is in order with the electricity and there are no planned outages; turning off the router in the middle of installation can lead to dire consequences.
You can reset the device to factory settings; this will allow you to be completely sure that no changed parameters will prevent the firmware from installing properly. You can do this by pressing a special button, which is located on the back of the device; to do this you will have to use a toothpick or a needle, because it is recessed into the body.
Padavan firmware for Asus routers:
As far as I remember, this model is not in the list of supported ones.
I want to upload it to the router instead of the native one from Asus. Does this firmware have a repeater mode? router model asus rt 11p. if there is NO repeater mode! then the need will automatically disappear, I will sit on the buggy one, but it works from Asus. I bought a router of this model only because it can work in this mode. So it is a useless set of hardware and plastic, not worth the money. And the choice, come and buy, is not great. I don’t speak Russian very well, quarrel for mistakes. Thank you.
Unfortunately, I can’t look at it now - there is no device on the stand. In general, the situation with ASUS is such that one revision has a repeater mode, while the other does not.
Good afternoon Is there padavan firmware for the Asus Rt-n15u router?
Hello. This router is not on the list of supported ones.
Is the firmware suitable for the rt-ac 53 model?
For this model, the padawan is questionable.
Is there firmware for rt-n12vp? I downloaded it from 4pda but the router says it’s not suitable
Didn’t you look at the Padawan himself on the bitbucket website?
Yesterday I wrote about how to configure the Asus RT-N12 Wi-Fi router to work with Beeline, but today we will talk about changing the firmware on this wireless router.
It may be necessary to flash a router in cases where there are suspicions that problems with the connection and operation of the device are caused precisely by problems with the firmware. In some cases, installing a newer version may help resolve such issues.
Determining the firmware version
First, you will have to determine the firmware version to find out if it needs to be updated. If the user has not previously updated his device, then the firmware version can be found on the sticker , which is located on the bottom of the device, where it says Ver.
Connecting a laptop to the Internet
If the update has already been carried out previously, but the user does not remember which version was installed, this can be found out in the router management program or in the web interface . To enter it, enter 192.168.1.1 , after which you will only have to enter your login and password (standard admin/admin or custom ones). In the main menu in the top line the necessary information will be presented.
Preparatory stage
It doesn’t matter for what purpose the router is being interfered with – updating the firmware, reinstalling it, or restoring the device’s functionality – to quickly and successfully carry out any operation, several preparatory steps should be performed.
Hardware revisions, downloading files from software
The technical characteristics of network equipment are not developing at such a rapid pace as other devices from the computer world, so manufacturers are not able to frequently release new models of routers. At the same time, development and improvement still occur, which leads to the emergence of new hardware revisions of essentially the same device.
ASUS routers of the model in question were produced in two versions: “RT-N12_VP” and “RT-N12 VP B1”. It is in this way that hardware versions are indicated on the manufacturer’s website, which is an important factor when choosing and downloading firmware for a specific device.
The methods of manipulating the firmware and the tools used for this are identical for both revisions. By the way, the instructions described below can be used for other versions of RT-N12 from Asus (“D1”, “C1”, “N12E”, “LX”, “N12+ B1”, “N12E C1”, “N12E B1”, “N12HP” "), it is only important to choose the right firmware package to write to the device.
To find out the hardware revision of the ASUS RT-N12 VP, turn the router over and look at the sticker located on the bottom of its case.
The value of the “H/W Ver:” item will tell you which version of the device we have in front of us, which means for which modification we need to look for the firmware package:
- “VP” - further look for “RT-N12_VP” on the manufacturer’s website;
- “B1” - download the package for “RT-N12 VP B1” from the ASUS technical support page.
Downloading firmware:
- Let's go to the official ASUS website:
- In the search field, enter your router model in the form as found above, that is, according to the hardware revision. Press "Enter".
- Click the “Support” link located under the model search result.
- Go to the “Drivers and Utilities” section on the page that opens, then select “BIOS and Software”.
As a result, we get access to the “DOWNLOAD” button to download the latest version of the firmware for the Internet center.
If you need previous firmware builds, click “SHOW ALL +” and download one of the older versions of the system software.
- *.trx image file ready for writing to the device.
Administrative panel
All manipulations with the software of the router of the model in question are generally performed through the web interface (admin panel). This convenient tool makes it easy to configure the router according to the user's needs and also perform firmware maintenance.
- To access the “settings page,” you should launch any browser and go to one of the addresses:
https://router.asus.com192.168.1.1
- Next, the system will require you to enter your username and password (by default – admin, admin).
After authorization, the admin interface, called ASUSWRT, will be displayed, and it will be possible to access the configuration of parameters and control of the device’s functions.
- If there is such a need, and to make it comfortable to navigate among the functions, you can switch the web interface language to Russian by selecting the appropriate item from the drop-down list in the upper right corner of the page.
- Without going anywhere from the ASUSWRT main page, it is possible to find out the firmware version of the router. The build number is indicated next to the “Firmware Version:” item. By comparing this indicator with the versions of packages available for download from the manufacturer's website, you can find out whether a firmware update is necessary.
Backup and restoration of settings
As you know, out of the box the router will not function as the basis for building a home network; you need to first configure a number of parameters. At the same time, once you have configured the ASUS RT-N12 VP, you can save the state of the device in a special configuration file and use it later to restore the parameters to the values in effect at a certain point in time. Since during the process of flashing the router it is possible that the need to reset the settings to factory settings may arise, we create a backup copy of them.
- We go to the router’s web interface and open the “Administration” section.
- Switch to the “Manage Settings” tab.
- Click the “Save” button located next to the name of the “Saving settings” option. As a result, the file “Settings_RT-N12 VP.CFG” will be downloaded to the PC disk - this is a backup copy of the parameters of our device.
To restore router parameter values from a file in the future, use the same section and tab in the admin panel as for creating a backup.
- Click “Select file” and specify the path to the previously saved backup.
- Once the “Settings_RT-N12 VP.CFG” file is loaded, its name will appear next to the selection button. Click “Send”.
- We are waiting for the parameter values to be downloaded from the backup and then the router to reboot.
Reset settings
During the process of configuring a router for specific purposes and under certain operating conditions, errors and incorrect/inappropriate parameter values cannot be excluded by the user. If the purpose of interfering with the operation of the RT-N12 VP ASUS is to correct the device’s incorrect performance of one or more functions, perhaps resetting the parameters to factory values and performing setup from scratch will help correct the situation.
- Open the settings panel, go to the “Administration” section - the “Manage Settings” tab.
- Click the “Restore” button located opposite the “Factory settings” item.
- We confirm the intention to return the router settings to the request below.
- We are waiting for the procedure to restore parameters to complete and then reboot the router.
In situations where the login and/or password for accessing the web interface is forgotten, or the IP address of the admin panel was changed in the settings and then lost, it is necessary to restore the settings to the factory settings using a hardware key.
- We turn on the device, find the “WPS/RESET” button near the connectors for connecting cables on the case.
- While observing the LED indicators, press the key marked in the photo above and hold it for about 10 seconds until the “Power” light starts flashing, then release “WPS/RESET”.
- We wait for the device to reboot – the “Wi-Fi” indicator will light up, among others.
- This completes the return of the router to its factory state. We go to the admin panel by going to the standard address in the browser, log in using the word “admin” as the login and password and configure the settings, or restore the settings from the backup.
Recommendations
The experience gained by many users who have flashed routers has allowed us to formulate several tips that can be used to minimize the risks that arise during the process of reinstalling the firmware.
- Carry out all operations that involve interfering with the operation of the router’s system software by connecting the router to the computer using a patch cord, but not via a wireless connection!
- Ensure uninterrupted power supply to the router and PC used for manipulation. It is advisable to connect both devices to the UPS!
- While performing operations with the router software, limit its use by other users and devices. Before carrying out the manipulations according to the instructions described below “Method 2” and “Method 3”, remove the cable through which the Internet is supplied from the provider from the “WAN” port of the router.
Where to download the latest firmware version
It is best to download the program from the official website of the router manufacturer. After the user enters it, you will need to find the routers section (“Products” - “Network equipment” - “ Wireless routers ”) and select your device model there or follow the link https://www.asus.com/ua /Networking/RTN12_D1/HelpDesk_Download. Next, a window will open in which you will need to click on Support , and then on the “ Drivers and Utilities ” section. After this, all that remains is to open the software section, in which you should find the firmware that is newer than the one installed by the user. After it is found at the bottom of the window, click on the “ Global ” section.
This will begin downloading to your device.
Where can I download the firmware?
If you don't want to install something top-notch like OpenWRT, there is no better place to look for firmware than the official website. But for this you need to find out the current revision of the router, because... They were produced in several types, and, unfortunately, only its firmware is suitable for each version.
First you need to find out this very revision, to do this we turn the router over and look for the sticker with the version:
In the photo above, pay attention to the right mark D1 - this is the version we are interested in. Those. the full request in case of searching for the firmware on your own in this case would be RT-N12 D1.
So:
Official pages for downloading firmware by revision: B1 C1 D1 VP
If your version is not on this list, don't worry! Just enter it into the search on the proposed site using any of the links above. This is the official ASUS website, and this is where you can easily find your model.
Next, click on the “BIOS and Software” tab (if it doesn’t open right away):
And here we select the latest current firmware version and download it:
How to update
Next you will need to go to the web interface, as described above. Depending on the firmware version, it may vary.
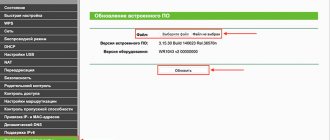
In any of them, you should find Administration , and then select “ Firmware Update ”.
Next you will need to select the downloaded file in the appropriate line. After this, the update process will begin. During this process, the router may display errors, the network may disappear, or the process may freeze . At least that's what it will seem like to the user. However, in most cases this is not the case and all these steps are necessary during the update process. If the user thinks that something is wrong, then you still shouldn’t take any action for 10-15 minutes. Interrupting the update process may cause problems, so it's best to wait a little longer.
Weak or unstable Wi-Fi signal
After the process is completed, the connection will be restored and you will be able to access the interface. Here the firmware version should change.
Go to the router settings
In the address bar of the browser, enter the standard address - https://192.168.1.1.
In the window for entering the default username and password of the Asus Rt N12, enter “admin”, then they can be changed.
The user is greeted by the main settings page, which briefly describes the characteristics of the device. If the device is new, then selecting any function offers one solution - automatic setup. If you reset the router to factory settings, the user will again be prompted to start with automatic configuration.
If you go into the router settings after the initial settings, other functions will become available. Parental control, NAT, MAC address replacement, port forwarding.
Automatic setup
For quick setup, the white Asus Rt N12 offers several screens:
- On the description page (picture above), you need to click on the “Next” button.
- On the next page the user is prompted to change the login information for the admin panel.
- Depending on the firmware version, the username may not change, although the screen prompts you to change it.
- New screen - wireless network setup. You need to come up with an SSID network name (using it the router will be visible to all home devices) and a password if you don’t want your neighbor behind the wall to use your network.
- The next screen shows summary network settings, click “Next”.
- Wi-Fi is already working, but Internet access is not necessary. But you can configure it a little later. The new screen offers an easy way to check if everything is configured correctly - connect to the created network.
Since the reconnection occurs, the user will have access to the full settings of the Asus Rt N12 router. If a new network is not found or cannot be connected to it, the instructions recommend setting up Wi-Fi separately - manually.
Manual setting
After automatic setup and re-login, the user can configure additional functions of the router - access to the Internet (if the automatic settings did not catch the correct parameters), setting up a home network, IPTV, registering the necessary routes or enabling parental controls.
Often the router incorrectly detects Internet settings for Beeline, Rostelecom, and sometimes Dom ru.
Below are screenshots of the WAN settings for these providers.
Beeline connection
Here:
- Connection type - "L2TP".
- Obtain Wan IP address automatically - “Yes”.
- Connect to the DNS server automatically - “Yes”.
- VPN server - tp.internet.beeline.ru
- The username and password are taken from the agreement with the provider.
- The remaining parameters can be configured at your discretion.
Connecting Rostelecom, Dom ru
For Rostelecom and other providers that use PPPoE to access the Internet, the settings are slightly different.
The connection type is selected - PPPoE, the rest is according to the picture. The username and password are taken from the agreement.
Wi-Fi connection and settings
If automatic setup previously failed to raise your wireless network, now is the time to configure it. This is done on the “Wireless Network” page of the additional settings block in the left menu.
Here the network name and connection parameters are checked. Let's dwell on a few points:
- Hide SSID - allows you to remove the router’s network from the list of visible ones on devices. Those who connected earlier will still be able to connect to the Internet, but the grid will not be visible to new users or neighbors. This option is enabled at the discretion of the owner.
- Wireless network mode. All modern devices work well in n mode, however if the user has an older device, it may not find the network in n mode. Its connection is configured here, we set the operating mode in all available options. Auto mode - as in the picture, gives the router the opportunity to decide for itself which mode to use when connecting to a client device.
To modify the Rt N12 VB, the manual recommends that the user configure a number of parameters collected on the “Professional” tab
The user is reminded that it is better not to touch anything here - everything is already configured, you need to change anything here only if you understand what it will lead to.
2 Interesting settings:
- Turn on the radio module. Set it to “No” and the network will turn off and no one will be able to connect.
- Enable wireless scheduler. Setting it to “yes” makes several more settings active. A kind of parental control - network uptime. Customizable down to minutes. Interestingly, you can select the range separately for weekends and weekdays. Or disable the grid completely by unchecking one of the seven checkboxes.
Installing DD-WRT firmware
This is an alternative firmware that the manufacturer has nothing to do with. Installing it can fix many problems, but in some cases, on the contrary, it will lead to crashes and freezes. If everything works well with the new factory firmware, then there is no need to experiment with this one.
Where to download and how to update
First, the user will need an original program for the router, which can be taken from their website. You will also need special firmware files ; you can get them from specialized forums or the official website (https://www.dd-wrt.com/wiki/index.php/Asus_RT-N12):
- dd-wrt.v24-14896_NEWD-2_K2.6_mini_RT-N12.trx
- dd-wrt.v24-18774_NEWD-2_K2.6_mini.bin
You need to download a utility called Firmware Restoration and located on the Asus manufacturer’s page (https://www.asus.com/ru/Networking/RTN12_D1/HelpDesk_Download/).
First, you need to connect the device from which the update will be performed to the router through the first port. It is better to remove the remaining cables. Next you will need to log into the web interface through your browser again.
After this, you should go to administration , and then to update, as before. Here you will first need to specify the path to the first file. Then send it and wait for the procedure to complete.
Next, you should install the downloaded utility on your computer. After this, you will have to launch it, and in it you will need to specify the path to the bin of the firmware of the Asus RT-N12 router. There is no need to rush to send the file; first you need to restart the router. To do this, you will need to pull out the power supply, after which you will need to hold the reset button and plug it into the outlet. At the same time, the router should blink slowly, this will indicate that it is in recovery mode . When it just starts to launch, you can send the file for installation.
The further process may take quite a long time, so be patient. Eventually the connection will be restored and the user will be able to get into the new firmware.
ASUS router settings
New firmware settings
This firmware is intended for many different devices, so a little confusion during installation is inevitable; in this case, the wan and lan4 ports will be mixed up. It is worth addressing it first.
The first step is to launch the command line on your system. Next you will need to enter the following operator: telnet X. X. X. X (here you need to specify the router address, for example 192.168.1.1). After this, you will need to enter authorization data, by default the login is root and the password is admin . After this, the user will be in the router interface. the following operators should be entered in turn :
- nvramset vlan0ports=”0 1 2 3 5*”
- nvramset vlan1ports=”4 5”
- nvramcommit
- reboot
After this, the device will restart and everything will be in its place.
Update via settings
You can do without downloading files to your PC.
- Go to the ASUS RT-N12 web interface. Same as when viewing device information.
- Open the “Administration” tab.
- If the manufacturer has a software update for your model, at the top there will be the inscription “A ne Firmware now available”.
- Click on it. An information window will open. Confirm installation.
- The download will begin. Wait for it to finish.
- It is recommended to reset the settings of the ASUS RT-N12 router.
Firmware recovery in case of update failure
In this case, the official program, which was discussed in the previous paragraphs, will be useful. Next you will need to put the router into recovery mode . To do this, you will need to pull out the power supply, after which you will need to hold the reset button and plug it into the outlet. At the same time, the router should blink slowly, this will indicate that it is in recovery mode.
Next you need to use the Firmware Restoration . In it you will need to specify the path to the firmware that needs to be installed and click send after the router goes into recovery mode. When the router stops blinking and turns solid, the process is complete. If errors occur, you should try again.
This completes all the secrets of the router firmware and now the user knows what to do in a given situation. He also knows how to restore the router if something goes wrong.
Installation from file
If the new firmware does not “appear” in the settings, it can be installed from a file.
- Go to the “Administration” section, as shown in the previous chapter of the instructions.
- “Update” tab (“Firmware Upgrade”).
- “Choose file” button.
- Specify the path to the software folder.
- Click the “Upload” button. The installation will begin.
If your network is not working well with the ASUS RT-N12 router and your gadgets “cannot” connect to the Internet through it, try updating the firmware. It may not be the provider or the broken cable. After installing the new Firmware, the device will work much better.
Enabling and setting
At the next stage, we apply voltage to the ASUS RT-N12 router (press the “Power” button) and turn on the personal computer. Then we wait until both the PC and the router finish loading (the “Power” LED should stop blinking and start glowing continuously). Then we launch any of the browsers that are available on the computer. You need to dial 192.168.1.1 and then press the “Enter” key. In response, a request will appear asking you to enter your login and password. Enter admin in both the first and second fields and click “Login.” In the right part of the window that opens, set the wireless network parameters:
- SSID (we choose this name of our wireless network at our discretion).
- “Verification method” (it is recommended to choose those with the WPA2 prefix - they provide the maximum degree of protection for the wireless network from hacking).
- "Encryption".
- Set the key to gain access to the network.
After that, click the “Save” button. Next in the left column we find the WAN item. Next, in the window that opens, select the type of connection to the provider’s equipment and set the parameters necessary for its operation. All this information is specified in the service agreement. As a last resort, if something is not clear, you can call the provider’s hotline and find out the information you need. Finally, click the “Apply” button. Then close the browser window and turn off the PC and router. Then you need to disassemble the temporary circuit.