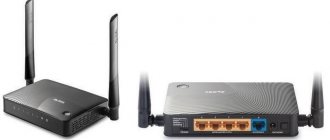
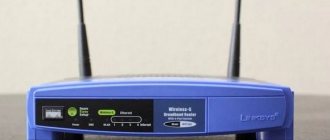
Keenetic GIGA 2 is a router from the new line of products from Zyxel, specifically for which a completely new NDMS V2 platform was developed. This model is distinguished by its versatility and impressive hardware “stuffing”, capable of coping with high loads.
This is especially true for those users who daily exchange large amounts of information for work or entertainment purposes, for example, using file-sharing networks.
Other features of Keenetic GIGA 2 include:
- the ability to download files at speeds of up to 1 Gbit/s (if the provider and connected package allows it);
- works as a 3G/4G router if you connect a USB modem to the device;
- support for removable drives;
- support for a torrent client already built into the software shell;
- significantly increased overall data transfer speed.
Next, we will look at the details of connecting and setting up this router.
Setting up Wi-Fi on the router
At the bottom of the page, select the Wi-Fi .
- In the window that appears, in the Network name (SSID) , enter the name of your network (any)
- In the Use connection security , select WPA-PSK + WPA2-PSK
- In the Network Key , enter your password to access the network (any)
- In the Channel: select Auto
- After filling in all fields, click the Apply .
Repeater mode
To increase the wireless network coverage area, two routers can be used. One of them operates in repeater (signal amplifier) mode. In this case, the user does not notice how he switches between the router and the repeater. This happens automatically.
To use the Giga II as a repeater, on the System page, find the Mode tab. Here you need to select the item “Amplifier - Wi-Fi zone extension”.
As in the previous case, it may turn out that you do not have the required tab. Again, go to the “Components” menu and install the one you need.
After you switch the operating mode, the device will reboot and turn on as a repeater. The final stage is connecting to the main router, whose network needs to be strengthened. To do this, activate WPS on both devices. With Zuxel Kinetic Giga 2, this is done by briefly pressing the large button on the top of the case. Some devices do not have such a button, and WPS is activated via the web interface. Check these details for your main router.
It will take a few seconds for the router and repeater to establish a Wi-Fi connection. Now only the SSID of the main router will be in the list of available networks.
To return Giga 2 to normal mode, you need to select “Access Point” on the same tab. Only now your router has a different IP address. You can find it out on the main router by looking at the list of connected devices.
NAT when automatically obtaining an IP address (DHCP)
- At the bottom of the page, select the Internet
- In the window that appears, click on Broadband connection (ISP)
- In the Configure IP settings , select Automatic
- In the MTU Size , enter 1400
- After filling out these fields, click the Apply .
Changing the factory password
After installing and configuring the router, we strongly recommend that you change the default password, which will help avoid unwanted connections from outside. So:
- go to the “System” tab, then “Password”;
- here we come up with and enter a new password twice;
- save the changes by clicking “Apply”.
We remind you that the standard login and password for this model is “admin” for both cases.
As you can see, the setup of this model is somewhat different from its predecessors. Keenetic GIGA 2 is becoming increasingly popular among users who are choosing the optimal combination of device price and power. Setting up and getting ready for work will take you very little time - just follow the instructions above or ask questions in the comments to the article.
Setting up an Internet connection
At the top of the page, select the Authorization .
- In the Type (protocol used) , select PPTP
- In the Connect via , select Broadband connection (ISP)
- In the Server Address , enter the name or address of the server (check with your provider)
- In the Username , enter your login from the contract
- In the Password , enter your password from the agreement
- In the Authentication Method , select Auto
- Service name, Hub name, Description - may be left blank
- After filling in all fields, click the Apply .
Reset settings to default
If your Kinetic has already been used before, then most likely you will need to reset its settings first. For a new device, you can skip this paragraph of the instructions and immediately proceed to the next one.
The algorithm of actions consists of just the following few steps:
- Arm yourself with a thin tool and press the button recessed under the surface of the plastic labeled “Reset”;
- Hold it down without releasing it until the device starts to restart (about 10 seconds). The success of the operation will be indicated by light indicators blinking on the front of the device;
- Wait for the reboot process to complete (about 2-3 minutes);
- Ready.
Setting up a PPPoE connection (Rostelecom, Dom.ru)
In the router interface, you need to select the “ Internet ” tab on the left; in the list that opens, select “ Authorization ”
- Internet Access Protocol : PPPoE
- Username : Your login according to the agreement
- Password: Your password according to the agreement
- Save the settings with the “Apply” button.
Procedure for logging into the web interface
with the index “Two” they provide the possibility of simple configuration, which will seem uncomplicated even to a novice user.
To open the parameter entry menu, you will need to do the following:
- Launch any Internet browser familiar to the computer owner and try to open one of the pages on the global network, for example, from the “Favorites” folder. In this case, the Quick Settings menu is usually immediately displayed.
If the user is a beginner, then he can simply click “Quick setup” and the wizard will quickly guide him through all stages of entering the basic parameters that are copied from the contract with the provider.
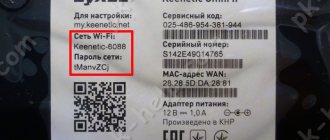
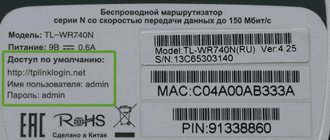
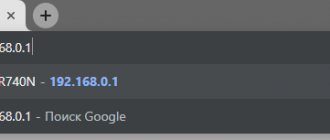
Or, to enter the interface, you can type “192.168.1.1” in the browser and press “Enter”;- Then, for authorization, enter the name and key, which are usually written on a sticker at the bottom of the device or in the accompanying documentation.
Setting up an L2TP connection (Beeline)
In the router interface, you need to select the “ Internet ” tab on the left; in the list that opens, select “ Authorization ”
- Internet Access Protocol : L2TP
- Description : connection name
- Server address : name or address of the server (specified in the contract)
- Username : Your login according to the agreement
- Password: Your password according to the agreement
- Authentication Method: Auto
- Save the settings with the “Apply” button.
How to connect?
Experienced users know that it is more advisable to initially connect the device to a PC via a wired connection. The procedure is no different from previous models and is completely standard, but for people performing these steps for the first time, a description of each step is given below.
You need to do the following:
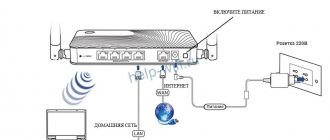
- The connector marked in blue and labeled “Internet” requires a cable from your communication service provider to be inserted;
- Install one patch cord plug into the first yellow socket marked “Home Network” (it comes with the Zyxel Keenetic Giga II). Connect the second plug of this cable to the PC network card socket;
- Using the supplied power supply, connect the device to the mains and press the “Power” button.
Specifications
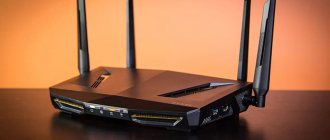
In terms of its technical parameters, the router is more like an entire multifunctional communication center. Zyxel? Nothing could be easier! With its help, you can connect not only wired, but also wireless devices that must support the WPS format. There are no particular problems with this, since many such devices have this support.
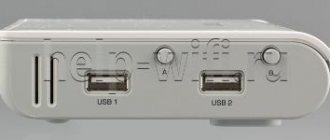
But what is most valuable is the speed - 1 Gbps (wired connection) and 300 Mbps (Wi-Fi). If necessary, you can create something like a network storage or FTP server from the router. Or distribute something via torrent. For this purpose, the router has two USB 2.0 ports for connecting to a flash drive or hard drive.
The Zyxel series includes both complex devices and simple devices. Therefore, any user will be able to choose an option according to their preferences.
Technical characteristics of Keenetic Extra
- Unit: 1 piece
- Dimensions (mm): 160x110x35
- Weight (kg): 0.25
- Main features:
- Link Duo technology for simultaneous work on the Internet via PPTP/L2TP/PPPoE and with regional network server resources
- Ability to connect to Internet providers providing VLAN-based services (IEEE 802.1Q)
- Possibility of assigning several additional physical WAN interfaces to the ports of the built-in Ethernet switch (Multiple WAN)
- Redundant Internet connection via 3G/4G USB modems and additionally assignable WAN interfaces
- Hardware support for IP-TV TVport for watching TV shows on IPTV receivers and computers, including via Wi-Fi
- SPI Firewall with DDoS Protection
- Wireless IEEE 802.11n MIMO 2×2 300 Mbps*
- Multifunctional USB host controller for 3G/4G modems, network use of USB printers and USB disks
- Built-in BitTorrent client Transmission
- Built-in Internet filter Yandex.DNS
- SkyDNS Parental Control
- Supported functions and protocols:
- IPoE/PPPoE/PPTP/L2TP/802.1X
- Supports multiple PPP tunnels for Internet access and virtual private networks (VPN) connections
- PAP/CHAP/MS-CHAP/MS-CHAP v2
- MPPE (Auto/40/56/128)
- Fully functional VLAN implementation based on IEEE 802.1Q
- TVport technology
- Link Duo technology
- DHCP (client/server)
- Working with a Static IP Address
- Dual stack IPv4 + IPv6, working without additional settings. 6in4 tunnel for IPv6 access from IPv4 networks
- Address translation mechanism (Full feature NAT) with support for several external IP addresses; ; reassignment of network interface roles.
- Route Table (DHCP/Manual)
- Firewall with connection control and a flexible system of filtering rules
- Port forwarding with the ability to select the destination port on the local network
- Reassigning Network Interface Roles
- Automatic Port Forwarding (UPnP)
- Block Internet access based on MAC address, IP address, TCP/UDP ports
- IGMPv1/IGMPv2 (IGMP proxy, IGMP snooping)
- Transit of VPN connections (PPTP or L2TP)
- DynDNS and NO-IP Services Client
- USB Applications:
- Multifunctional USB host controller with the ability to operate multiple devices simultaneously via a USB hub
- Over 60 models of 3G and 4G (LTE) USB modems for mobile Internet are supported
- Network use of USB drives with FAT/FAT32/EXT2/EXT3/NTFS/HFS+ file systems:
- Microsoft Windows Network Sharing
- FTP server with Internet access, passive mode, up to 10 simultaneous connections
- BitTorrent client Transmission
- Managing access rights to information on USB drives at the directory level
- Network printing to a compatible USB printer (except GDI printers)
- Wireless Wi-Fi network:
- IEEE 802.11a
- IEEE 802.11b/g I
- EEE 802.11n (auto 20/40 MHz, 2x2 configuration, up to 300 Mbps*)
- Frequency bands – 2.4 GHz and 5 GHz
- Network protection WEP/WPA-PSK/WPA2-PSK, access control by MAC addresses
- Organization of up to four independent wireless networks on a Wi-Fi access point (Multiple SSID)
- Quick WPS setup
- Wi-Fi Multimedia (WMM)
- Design features:
- MediaTek MT7620A 600 MHz processor with network hardware accelerator
- Memory DDR2 SDRAM 128 MB
- 5 RJ-45 connectors (10BASE‑T/100BASE‑T/1000BASE-T) with automatic cable type detection
- 1 x USB 2.0 Type A
- 2 external Wi-Fi antennas (3 dBi)
- 9 status indicators
- Wi-Fi control button
- Flexible Button (FN)
- Power off button
- Reset user settings button
- Physical parameters:
- Dimensions - 160 x 110 x 35 mm excluding antennas
- Weight - 0.25 kg without power adapter
- Terms of Use:
- Operating temperature range: from 0 to +40 °C
- Relative humidity: 20 to 95% non-condensing
- Power supply voltage: AC 100-240 V, 50/60 Hz
- Diagnostics and management:
- Web configurator in Russian
- Professional configuration interface via command line (Cisco like CLI)
- Configuration text file
- Ability to control from an external network (web configurator/CLI)
- Configuration Backup and Restore
- Software feature update
- System log
- Requirements:
- Availability of Internet access
- A computer equipped with an Ethernet network adapter
- Equipment:
- Internet center
- Power adapter
- Gigabit Ethernet cable
- Instructions for use
- Warranty card
- 1 year warranty.