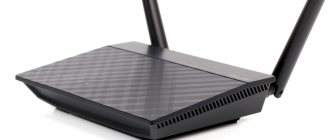
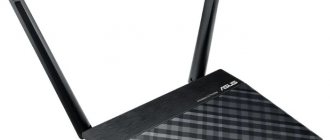
This is an excellent device that will be able to distribute Wi-Fi both at home and in a small office for many years. The Asus RT-N12 VP Wi-Fi router is most often used at home, but I have also seen small office networks based on this router. In terms of convenience, quality and cheapness, this router is the most popular in the Russian Federation for 2017 and 2022.
The speed of information distribution on the network is up to 150 Mbit/s. But if the Internet speed is higher, it will be reduced - this must be taken into account for larger networks. Suitable for normal operation of up to 10 devices using wireless distribution technology. Average operating frequency is 2.4 GHz. For twisted pair connection there are standard 4 ports for local connection.
NOTE! If you encounter any problems or questions during the setup process, feel free to write them in the comments at the bottom of the article, and I will answer them immediately.
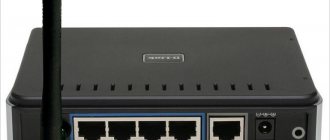
Front end
Let's take a look at the front of the device. You will see 7 lights, which are indicators of the operation of a certain state of the router.
- Indicates power mode: Off – off.
- Flashing slowly – system startup.
- Flashing quickly - automation.
- Constantly lit - the system is ready for operation.
- Off – wireless network distribution mode is disabled.
- Lights up – there is internet.
- On – the port is connected, but there is no information exchange.
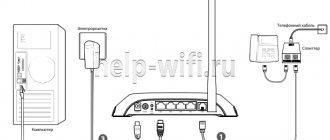
How to install
- We place the router on a flat, dry surface near a 220 Volt outlet and an Internet cable.
- We connect the twisted pair wire that your provider provided to you into the connector for the Internet cable.
- Next, take a network cable, and insert one end into a PC or laptop, and the other into one of the connectors for a LAN connection. We designated them as number 3.
- Next, connect the power to the router - number 4.
- Now turn it on - number 5.
Now you need to wait silently until the system boots. Compared to older models, when you had to wait 2-3 minutes, this device loads almost at lightning speed.
How to setup
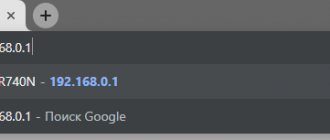
- We launch any browser: Chrome, Internet Explorer, Mozilla, etc.
- At the very top, enter the IP – 192.168.1.1 default router address to enter the settings (you can change it a little later).
- Next, a quick setup page will appear. If this does not happen, and someone has used the device before, then it needs to be reset to factory settings. To do this, take a paper clip or a needle and press the button that was previously number 6 in the picture of the back panel. Hold this for about 9 seconds until the router starts to overload. After that, go to the same address again.
- Click the “GO” button.
- Now you need to come up with a password that will be used to enter the router settings. We kindly ask you to come up with something original, but remember it. You can write the password down on a piece of paper or write it into notes on your phone.
- The next step involves automatic authentication on the Internet. All connection data is written there, but sometimes it happens that the data is entered incorrectly - in this case, you will have to configure it manually. You may also need a login and password to log in - it is located in the settings sheet from the provider.
NOTE! If the router failed to automatically configure the Internet, then proceed to the next chapter.
- If everything went well, then you need to enter the name of the Wi-Fi network in the destination SSID network name field. In the “Network key” , enter the Wi-Fi password. Click “Apply”.
- At the final stage, the settings have been applied and you will see the connection details window.
- Click next, and you will again be asked to enter your login (admin) and password (the one you specified in step 5).
Now the Internet is working, and you can safely use it while simultaneously connecting a personal computer, TV with Smart TV, tablets and smartphones. If there is no Internet, then most likely your provider uses PPPoE, L2TP, PPTP distribution technology - here we just do manual configuration.
Repeater mode
When there is no access to the Internet or you need to strengthen a weak signal, it is recommended to connect the Asus Rt N12 in repeater mode.
This is done on the same administration page, the “Operation Mode” tab.
Here you select one of the proposed router operation options. There are 4 options, but 3 are indicated - one is already in use.
In a new window, select one of the networks found by the router. A password may be required to connect. In the next window, check (if necessary, select) the “Use default settings” checkbox. After clicking “apply” and successful connection, a window with three warnings will appear;
- The SSID address has changed;
- Reminder that the cable from the WAN port can now be removed;
- The IP address has changed.
The first two are not of interest, but the third requires explanation. After successfully connecting to another network, the router’s address changes, because now it receives it from there. Therefore, when you need to return the router to normal mode or make additional settings on it, the admin panel will not work.
This can be solved in three ways:
- Enter the address of the home page of routers from asus.com in your browser. According to company representatives, the system will try to find the user’s router and get into its settings. The option is not very reliable.
- Download “Discovery” - a special utility from the manufacturer. It works on the same principle, but searches from the local network. You need to look for the program.
- The connected repeater is among the clients of the main router - all connection parameters and the issued address can be found there.
Manual connection
If you made a mistake with the type of connection you selected, you can make the settings manually.
- To do this, go to 192.168.1.1 in the same way.
- Enter your password and login.
- In the left menu, click on the “Internet” tab.
- Look at the connection settings in your contract with your provider or check with technical support for this information. The picture below shows the Internet setup from Beeline.
Setting up PPTP (VPN) when automatically obtaining a local IP address
- WAN connection type: PPTP
- Enable WAN, Enable NAT, Enable UPnP - set everything to YES
- Get an IP address and connect to DNS automatically - put an end to YES
- Username: Your login according to the contract
- Password: Your password according to the agreement
- Heart-Beat or PPTP/L2TP(VPN) server: enter the IP address or name of the VPN server according to the contract
- Save the settings with the Apply .
No Internet
This happens when the MAC address specified in the router does not match the MAC address to which the provider is trying to connect. To change go to:
- On the main page, click on “Internet”.
- At the very bottom you will see the treasured field.
- First, try to specify the MAC address of your PC or laptop, sometimes this solves the problem. Just click “Clone MAC” and then “Apply” .
- Otherwise, we will find out this data from the contract or by calling the provider’s technical support.
Setting up PPTP (VPN) with a static local IP address
- WAN connection type: PPTP
- Obtain an IP address and connect to DNS automatically - set the dot to No
- IP address: We enter your IP address according to the contract
- Subnet mask: Enter the mask according to the agreement
- Main gateway: We drive in the gateway according to the contract
- DNS server 1: and DNS server 2: enter the servers of your provider (Rostelecom Omsk DNS 1: 195.162.32.5 DNS 2: 195.162.41.8)
- Username: Your login according to the contract
- Password: Your password according to the agreement
- Heart-Beat or PPTP/L2TP(VPN) server: enter the IP address or name of the VPN server according to the contract
- Save the settings with the Apply .
Virtual server and setting up FTP or HTTP port forwarding
- Go to the “Internet” .
- Next, go to the section “Port Forwarding” .
- In the line “List of favorite servers ” we indicate FTP or HTTP.
- Enter the local IP of your server and port range.
- Click “Apply”.
If everything went well, then access to files from another computer to the server will be open.
Computer settings
Let's move on. Before you start setting up the Asus router, you need to make changes to the configuration of the network card of your computer or laptop. This is necessary in order to be able to access the board panel.
Namely, in the section “Network and Sharing Center - Changing adapter settings”
Here we find either an “Ethernet” connection or a “Wireless connection” - depending on how you are going to connect your PC to the router, via wifi or cable. Right-click on the desired type and go to “Properties”.
Next, open “Internet Protocol Version 4” and set all parameters to “Automatic acquisition”. If some data has already been registered here, then transfer it to paper - it will be useful for further setting up the router using the “Static IP” type.
Then we save the changes.
How to flash
- First, we need to download the software from the official page - https://www.asus.com/ru/support/.
- We enter the name of our model without the brand name - RT-N12 or RT-N12 VP.
- We search and click on “Drivers and Utilities”.
- We indicate the operating system and download it to the computer.
- Unpack the archive.
- We log into our router - enter 192.168.1.1 in the address bar of the browser, and then enter the login information: login and password.
- Now click on the numbers that are to the right of “Firmware Version”.
- Click “Select file” , go to the unpacked folder and click on the only file.
- Click “Send”.
- We wait for a while.
- Once everything is completed, be sure to reset your router. And then configure it again.
How to set up IPTV television
- Let's go to the device settings.
- Go to the section "Local network" . Next, select the IPTV tab at the top.
- To begin, indicate your provider profile. Next, take the wire and connect it from the IPTV STB module to this router to the LAN port. Remember the port number.
- Specify the DHCP type routes to be used.
- You can enable IGMP or multicast routing. This also enables RTSP and RTP.
- Specify the IPTV application port. Click "Apply" . Next, enter the following address in the address bar:
IPTV: https://:[The port you specified]/[protocol]/:[channel port]
Setting up Wi-Fi on the router
In the router interface, you need to go to the tab on the left Additional settings , in the list that opens, select Wireless network .
We set the parameters as follows:
- SSID field : enter the name of the wireless network. The value in this field cannot be changed.
- Authentication Method: WPA2-Personal
- WPA encryption: TKIP or AES
- WPA Preshared Key: You must enter any set of numbers between 8 and 63. They also need to be remembered so that you can specify them when connecting to the network.
- Click the Apply
Internet setup via 3G, 4G, USB modem
- We turn on the Asus RT-N12HP router or a similar model/
- We insert the cable into the LAN input, and connect the other end to the computer/
- We insert our modem into a special connector.
- Launch any browser and enter www.asusnetwork.net in the address bar.
- You will be redirected to the automatic setup page.
- In the Location field we indicate the country.
- In the drop-down menu we indicate ISP.
- Click Connect.
- Next comes a similar setup of the Wi-Fi network, where you need to specify the network name and password for it.
Changing the password to log into the admin panel
All system settings of the router, including changing the password, are collected on the “Administration” page of the additional settings block. Here, on separate tabs, you can change the password, update the skin, and select one of three operating modes.
The “System” tab makes it possible to change the password, set the router time, and configure the ability to remotely control (useful when you need to manage your home router from work or configure a device located in one office from another).
The behavior of the WPS button is also configured here. Under normal conditions, it enables the router to automatically configure the client device for access via Wi-Fi, but here you can reconfigure the button.
Separately, it is worth mentioning the clock setting. Since some functions are time-based, it is recommended to use the same settings as on home network computers. In some cases, the router can serve as an exact time server. To do this, you need to provide a link to such a server on the Internet.
Technical characteristics and components of Asus RT
| Operating modes | Wireless router |
| Repeater | |
| Access point | |
| Network data transmission standards | IPv6 |
| IEEE 802.11b | |
| IPv4 | |
| IEEE 802.3 | |
| IEEE 802.11g | |
| IEEE 802.3u | |
| IEEE 802.11n | |
| Network speed | Up to 300 Mbps |
| Two antennas | External 5 dBi |
| Special abilities | Parental control |
| Multiple WI-FI networks | |
| Frequency | 2.4 or 5 GHz |
| Equipment | 1 Power cable |
| 1 Router | |
| 1 Cable with RJ45 connector | |
| 1 Warranty card | |
| Nutrition standards | AC Input : 110V~240V(50~60Hz) |
| DC Output: 12 V with max. 0.5A current | |
| Weight | 0.275 KG |
| Size | Width: 128 cm |
| Height: 28 | |
| Length: 179 cm | |
| Working with operating systems | Windows XP |
| Windows 2000 | |
| Windows 7 | |
| Windows 8 | |
| Windows 10 | |
| Windows Vista | |
| Mac OS X | |
| Linux | |
| Similar models | Router: T-N12, RT-N12 (VER.D1), RT-N12 B1, RT-N12 C1, RT-N12_VP, RT-N12E, RT-N12HP, RT-N12LX, RN-NT-N12 |