Author of the article
Dmitry Eliseev
IT engineer 1st category. Experience in the field - 6 years.
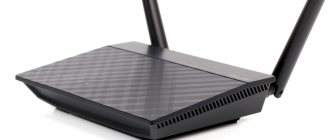
One of the popular models of routers from Asus is the RT-N12 VP B1. Let's look at the characteristics of the device, its configuration in several modes and firmware.
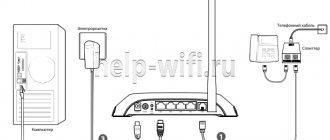
Connecting to a computer
To configure the router, we need to connect it first. To do this, first of all, we connect the router to an outlet, then we connect the provider’s “twisted pair” cable to the WAN port.
You can connect the device in one of two ways.
Via wifi
A wireless method that is suitable for connecting from any device with a wi-fi module: laptop, tablet, smartphone. You need to connect to the wi-fi network of the Asus RT-N12 VP B1 router with the name ASUS_FC.
When connecting, we will be redirected to a page where we must change the password that we will use to log into the admin panel.
Further setup will occur below in the “Quick setup” section.
By wire
Most often used when connecting to a personal computer without a WIFI module. For this method we need a patchcord. We connect the router to our computer - we connect one end of the patch cord to any LAN port, and the other to the PC connector.
The next step is to log into the settings using your router account.
To log into the admin panel we need any browser. Open it and type 192.168.1.1 or router.asus.com in the address bar and go to the address by pressing the “Enter” button.
After this step, we are taken to the password change page, as in the screenshot above.
Resetting your router to factory settings
I always advise that before you start setting up your router, reset it to factory default settings. You never know, maybe you bought a used router, or after checking at the factory they were not reset.
To reset the settings, you need to press the hidden “Reset” button; this may require a match, a pin, or pen paste. After pressing the button, hold it for 10 seconds and wait until all the lights on the front panel light up at the same time. Wait a couple of minutes until the router completely reboots. That's it, now the WiFi router settings are reset to factory settings.
Authorization
If you were unable to log in following the instructions above, log in using your username and password.
To log into the admin panel we need any browser. Open it and type 192.168.1.1 or router.asus.com in the address bar and go to the address by pressing the “Enter” button.
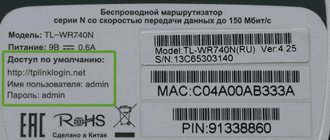
Next we need to enter your username and password. The default login is admin, password is admin. You can also see them on the sticker on the back of the router.
Manual setting (for older models)
To set up the Internet, take a sheet with settings or an agreement from your provider. Select the desired type in the “WAN connection type” field. Next, look at your subchapter.
Internet (L2TP/PPTP)
The first settings will be the same for both “L2TP” and “PPTP”. Select “Yes” next to the fields “Enable WAN”, “Enable NAT”, “Enable UPnP”, “Obtain a WAN IP address automatically” and “Connect to a DNS server automatically”.
Next, enter your username and password.
Scroll below and find the line “VPN server” - enter for L2TP connection:
tp.internet.beeline.ru
And for PPTP:
vpn.internet.beeline.ru
At the end, click “Apply”.
Internet (Dynamic IP)
Simply select “Automatic IP” and the “Apply” button.
Quick setup
After we have come up with and written down a password to enter the admin area, click the “Next” button. The router will try to connect to the Internet on its own. If this does not happen, you will have to manually configure the connection. How to do this will be written in the “Manual configuration” section.
If the connection is successful, you will need to specify the name of the wi-fi network and its password. Next, click the “Apply” button.
Please pay attention! To prevent unnecessary people from using your Internet and creating a load on the network, we recommend that you come up with a complex password!
The network is configured; to complete, click the “Done” button.
Setting up ASUS RT N12VP router for IPTV
An important feature of the RT N12VP model is the ability to work with an IPTV set-top box. This function is presented rather limitedly even in the latest firmware.
That is why preparation for work is carried out extremely quickly:
- perform authorization in the WEB interface;
- go to the “LAN” section;
- in the item called “Selecting an IPTV-STB port” we indicate the port to which the device was connected;
- Click on the “Accept” button.
This completes the process. If, to work with a set-top box of the type in question, you need to specify a VLAN ID, then this router model will not work. Since it is simply not possible to make a choice due to the absence of this item.
Video: connection and setup
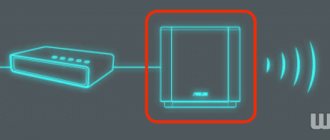
Configuration in repeater (repeater) mode
Repeater mode is needed to strengthen the main network signal. For example, in one of the rooms the network reception is poor and for better coverage you can install a second router in repeater mode.
It doesn’t matter what brand of router creates the main network, a device of any brand is suitable for repeater mode. As a result, one WIFI network will work, and the ASUS router will copy the settings of the main network. The devices will switch between the main router and the repeater.
To connect the asus rt n12 vp b1 router as a repeater you need:
- Log in to the admin panel of our router.
- On the left, click on the “Administration” menu, then select “Repeater mode” and save.
- Next we need to select the main network that we will repeat. Select it, enter the password and click the “Connect” button.
- In the new window, specify the settings and click “Next”.
- Check the box next to “Use default settings” and click “Apply”.
- We are waiting for connection.
- The setup is complete.
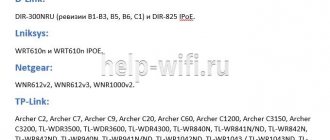
Manual Wi-Fi settings
Go to “Wireless Network”. On models that support the “Smart Connect” mode, the two networks will be paired. If you want, you can turn this feature off to configure 2.4 and 5 GHz separately from each other. If you have an older model without this function, you will have to enter your own settings for each “Range” - to do this, select the one you need in this field.
The most important thing is that you need to specify the “Network Name (SSID)”, select the “Authentication Method” in the “WPA2-Personal” mode and specify the Wi-Fi password in the “WPA Pre-Shared Key” line.
For some routers with “AX” support, you can enable a channel width of 160 MHz in the 5GHz network - this will significantly increase the speed in the wireless space.
Firmware
You can update the firmware if the Asus RT-N12 VP B1 router greatly “cuts” the Internet speed via WI-FI. To do this, you need to log in to the administrator panel and select the “Administration” tab in the left menu and go to “Firmware Update”.
Next, in the “Firmware Version” item, click the “Check” button. If you have the latest firmware, the following message will appear:
Great, we found the latest firmware version, to install, click the “Firmware Update” button.
Important! If you turn off the power during an update, there is a chance that your router will turn into a “brick” and it will stop working.
Next, the firmware will be downloaded and installed.
You can also go to the manufacturer’s website and download the required firmware. Next, go to the “Firmware Update” menu and download it manually.
Overview of all bulbs and connectors
The front part contains 7 indicators that will let you know the state of the device at this moment.
We denote the number 1 This is the power indicator. The indicator can have several configurations:
- The light is off. This means that there is no power, or the device is simply turned off.
- The light flashes with a large amplitude. This means that the router is just starting up.
- The light flashes with a small amplitude, quickly. This means automation is happening.
- The light stays on without blinking. This means that the system is loaded and can be used.
By number 2 we denote the indicator that determines the current state of the ASUS RT N12 D1 Wi-Fi router. It has three configurations:
1. The light is not on. There is no power or wireless mode may be disabled.
2. The light flashes. This means that information is being transferred.
3. The light just stays on. The device is ready to transmit data, but no packets are being exchanged at the moment.
number 3 to indicate the indicator that determines the router’s connection to the Internet. There are only two configurations:
1. Off – no internet. This may be due to non-payment, due to communication problems, or due to disconnection from the Internet in equipment installations.
2. Lights up – everything should work properly.
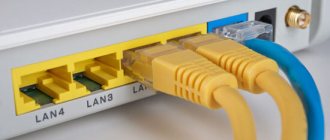
Numbers 4-7 indicate status indicators of local ports. Each has three configurations:
1. Off – the cord is disconnected.
2. Light flashes – information is being exchanged.
3. The light just lights up - this is a sign that the port is occupied by the cable connecting the PC to the network.
The rear panel contains connectors and switches. There are no indicators on it.
1. WPS button (starting from the right side), which is used to quickly log into the network.
2. WAN port, it is designed to connect the Internet cable to the router.
3. Four network ports, which are needed to directly connect the PC to the router via cables.
4. Micro connector for power cord.
5. On/off key.
6. Reset key. It is inside the hole; press it for seven seconds to reset to factory settings. The factory settings are set to a standard password and login.