"Basket" and its purpose
Let's start by looking at the tool itself, which in any operating system is usually called the “Trash”. In the English version, this is a standard program for deleting Recycle Bin files.
But what is a “Basket” in its essence? This is a tool that allows you to get rid of unnecessary files and folders not immediately, but by storing them in a specific location. In other words, the system reserves dedicated space on the hard drive and stores deleted objects there. If necessary, they can be restored without using special applications. Here it is immediately worth paying attention to the fact that when deleting files specifically to the Recycle Bin, space on the hard drive is not freed up, as in theory it should have been. It can only be released after the Trash has been completely cleared.
However, that's not all. The point here is that the standard program seems to allow you to delete files. But, if the sectors were not overwritten, restoring the information is as easy as shelling pears. The principle is that when objects are deleted, they are physically still on the hard drive, but their names are changed by replacing the first character in the name with a “$” character that is unreadable by the system. The system ignores files with such names, but recovery programs search for all objects with such symbols at the beginning of the name.
How to erase deleted files from an SSD drive
Solid state drives (SSDs) are different in design from traditional hard drives. Therefore, the mentioned rewriting programs are not suitable for them. In principle, some applications may still begin to overwrite the SSD without warning, but this will shorten its lifespan, so this method is definitely not recommended.
Use other methods.
Special utilities from the SSD manufacturer
Some SSD manufacturers offer their own programs for caring for the drive, which can also safely erase data. For example, such as Memory and Storage Tool from Intel, Magician from Samsung, Seatools from Seagate or Dashboard from SanDisk.
Google “SSD manufacturer + erase tool” and see if the manufacturer of your drive has a tool available on their website.
Motherboard Secure Erase Option
Sometimes the motherboard may have a built-in tool to securely erase the SSD. Restart your computer and enter the BIOS, then look for the Secure Erase option. Please note that this is not available on all models.
How to remove deleted files from the Recycle Bin: standard Windows settings
But let's look at the standard system settings. If anyone has noticed, even immediately after its installation, files are deleted from the Recycle Bin without the user’s consent when he selects normal cleaning. What if this storage contains objects that the user accidentally deleted and need to be restored? In this case, you need to use the properties bar through the RMB menu and check the box next to confirming the deletion of content.
The same applies to the free space reserved on the hard drive. By default, the system sets its own storage size for any disk or logical partition, but you can change it simply. If the allocated volume is exceeded, cleaning will be performed automatically.
Applications for permanently deleting data
Unlike the software tools described above, which destroy data on a magnetic medium (computer hard drive) by repeatedly rewriting information, a degausser does not rewrite any information, but simply destroys the magnetic field, or weakens it to such an extent that it is impossible to read the information recorded on the magnetic field. carrier becomes almost impossible.
It should be noted that the demagnetization process, as a rule, disables the hard drive, since it destroys the low-level formatting produced during the manufacture of the disk. Therefore, after demagnetization, it will be impossible to use the hard drive for its intended purpose and you will have to throw it away.
Easy removal
Now directly about how to remove deleted files from the Recycle Bin. Most users know that this is done using the RMB menu on the storage icon in which cleaning is selected. But in this way, absolutely all objects located there are deleted.
But if you enter the “Trash” by opening it with a double click or through the same RMB menu, you can perform selective deletion by marking the desired files and directories by clicking the left mouse button while holding down the Ctrl key. If complete cleaning is required in this mode, you can use the Ctrl+A combination to select all objects and use the delete command (or the easiest way is to press the Del key).
Deleting files without using the Recycle Bin
Now a few words about another universal tool. It’s clear how to delete files from the Recycle Bin. How can I make sure that the cleaning is done without using this storage?
As it turns out, there is a universal solution here too. It boils down to using the combination Shift+Del in a regular “Explorer” after selecting the objects to be deleted. In this case, files and directories will be deleted without placing them in temporary storage. Again, they will still be physically present on the disk, but with changed names that are unreadable by the operating system. In this case, there is no need to use third-party utilities to destroy files.
Recovering Deleted Files
There shouldn’t be any difficulties with the question of how to remove deleted files from the Recycle Bin. Now let's look at the problems of data recovery.
The most primitive way is to use such a function in the “Trash” itself, if it has not been emptied.
On the other hand, after deleting all objects and overwriting sectors on a hard drive, it will be much more difficult to restore information, not to mention quickly or completely formatting a disk or virtual partition. But it can be done. Some people recommend using programs like Recuva, but the way it works, you won't get much out of it.
Russian developments in the form of R.Saver and R-Studio applications look much more advanced. They are the ones that allow you to recover any data even after formatting, and on any media, including removable memory cards. This, of course, takes a lot of time, but the result is one hundred percent guaranteed. Judging by user reviews, sometimes even those files and folders that the user forgot about a long time ago are restored.
1. What to do if an important file or folder is deleted?
Well first of all, don't panic. When you throw out garbage, you don’t immediately send it to a landfill. First a trash can, then a container, and only then a landfill. This happens in Windows too. Using the Del key, you first send the file to the Trash. Then, after emptying the recycle bin, the file can be found on disk in unused clusters for some time (this is analogous to our container from the example). And only after the area on the disk in which there were still traces of the file is occupied by other data, then the file is hopelessly lost (this is already a landfill).
1.1 Search in the Cart
It may sound trivial, but the Recycle Bin is the first means of protecting data from accidental deletion. At the same time, many Windows users automatically clean it immediately after placing files in it. Although, by and large, the Recycle Bin does not need to be emptied at all, because it does it automatically.
Searching for files in it is not at all difficult. Find its icon on your desktop and open it. If the file name is known, then simply write it in the search box. You can also sort files in the Recycle Bin by deletion date and immediately find the file you need that was just deleted.
The next time you think about using some utility that cleans out the Recycle Bin in the background to free up disk space, think carefully about whether you should trust this important process to an automatic machine. It may be easier to do it yourself and at a time when you are sure that there is nothing valuable in it.
1.2 Searching among shadow copies
It is not necessary to use any paid programs for this purpose. The standard backup tool in Windows 7 is quite suitable and this system is turned on automatically when you install the operating system.
If “System Protection” is not disabled manually (which is often recommended by would-be optimizers), then restoring a deleted file from a shadow copy in Windows 7 is quite simple.
- In Explorer, find the folder where the deleted file was (not the Recycle Bin).
- Right-click on the name of this folder and select “ Properties ”
- Go to the " Previous Versions " tab (see image below).
It contains information about all versions of files that were in this folder at different times.
We select the closest one by date and try to search for our file in it. If it is not there, we turn to an earlier version. And so on until you find the desired file.
This way, you can not only recover an accidentally deleted file, but also return to one of the previous versions of a document that was changed and saved on disk, and then its previous version was needed.
Shadow copies of user files are created automatically by the operating system during reboots and installation of various programs at system restore points. Therefore, you don’t need to do anything separately to create them. The main thing is not to disable “System Protection,” since some “experts” recommend disabling it to save resources, keeping silent about the fact that the security of the system as a whole will decrease.
If regular remedies don't help
2.1 Use a third-party file recovery utility
You can use a specialized data recovery utility, which, after analyzing the disk, will display a list of files and folders that you can try to recover. One of these programs can be kept on disk in case of fire.
The chances that the file will be recovered without loss are not so great, but there can be luck. Here, a very important point that influences the “success of the concession” is the minimum number of disk operations from the moment the file is deleted. Some sources even tell us to urgently turn off the computer and boot from a flash drive or disk. To me, this is pure paranoia. It is much easier to follow the simple rules that I will give below and not needlessly risk your nerves.
I will immediately upset the happy owners of SSD drives - they do not have this chance of salvation! The fact is that the system regularly performs the TRIM function for such disks, which resets sectors with deleted files.
2.2 Don't forget about the professionals
There are people who can help with recovering deleted files on a disk. There is a chance of running into a charlatan or an inexperienced specialist, as in any other type of service. But if the file is really valuable, then it may make sense to pay professionals.
3. What can I do to prevent files from disappearing without a trace?
3.1 Do not disable standard protection measures - they are very effective
The operating system developers have come up with a multi-level protection system against problems associated with accidental data deletion. Do not neglect them and disable them, as well as empty the Recycle Bin every time immediately after deleting a document. Make sure that “System Protection” is activated and that the Recycle Bin is working properly. With these system components, it is possible to lose a file irretrievably unless on purpose. To prevent data loss due to disk failure, use the recommendations in the following paragraphs.
3.2 Use cloud storage
Despite the chance of information disclosure, synchronize your folder of important documents with cloud storage. I have not seen a user whose documents would take up 10 GB, which is how much cloud disks are willing to offer for free. They also offer their own applications that will synchronize your document folder with the cloud. For example, I use SkyDrive. But there are also such products as Google Drive, Yandex.Disk and of course the famous Dropbox.
Yes, it is very important that cloud storages also have their own basket! Don't forget to look there too if your local copy of the file is irretrievably lost.
3.3 Make regular backups
If you have an operating system other than Windows 7, 8 or 10 installed, we advise you to make backup copies using a special utility.
Windows 7
Windows 7 has its own utility for backing up versions of important files, “Backup or Restore,” which is located in the “Control Panel.”
To create backup copies, you will need a separate hard drive (external or internal) that has enough free space to accommodate an image of the entire system disk, as well as to create backup copies of user files.
Windows 8/10
This version of the operating system has a more advanced feature called File History, which is turned off by default. If you have really important documents, take the trouble to enable version control for them. Just type “res” in the control panel search box, as shown in the picture.
Then, in the “File History” window, make the necessary settings. By default, the system suggests storing versions of all documents and drawings. If you have large folders with home photos in your documents, then it is better to make backup copies of them yourself, as I described in the article about freeing up disk space. And in “File History” it is better to place these folders in “excluded” folders.
Now you will have copies of the document for each change option. Your dissertation or thesis will be safe. Even if you deleted an entire chapter by mistake and wrote down the document.
File History requires the use of a removable storage device. This is in case the main hard drive fails. So don’t spare money and buy a flash drive for a hundred or two rubles (for example, 8 GB), so that you don’t have to shell out a thousand or two later to restore files bit by bit from the body of a dead hard drive.
Do you want to know about the functions, parameters and purpose of the shopping cart? Don’t know how to recover files from it after cleaning it or how to hide the recycle bin shortcut? Below we will talk about all the features of working with this interface element.
Universal recovery programs
There are many utilities that promise to quickly return lost data, but not all provide advanced functionality and an intuitive interface. We will discuss the four best programs that recover basic types of information (photos, videos, documents, etc.).
Disk Digger Pro
DiskDigger Pro File Recovery is the best application for Android devices. Recovers deleted videos , photos, music, documents, recordings, archives . Supports most common formats such as GIF, MP3, PDF, DOC, DOCX, PDF, ZIP. The recovered data can be saved in cloud storage, a file manager, or immediately sent by email.
This tool is suitable for those who do not want to carry out the procedure via a PC. Everything is as simple and fast as possible. But there are two significant disadvantages: the application is paid (about $2), and for full functionality it requires activated Superuser mode. If your device is not rooted, you will only be able to return low-quality photos or thumbnails.
Undeleter (ROOT)
A free application that recovers deleted SMS , images, videos, documents, archives, e-books and correspondence from instant messengers . Most formats do not require additional payment, but ROOT is required. Unfortunately, almost all universal utilities only work on rooted phones.
You can download Undeleter from Google Play and immediately begin recovery without a computer. The search for lost data is carried out both on the internal memory of the smartphone and on the SD card.
The application also offers permanent removal of materials, which is suitable for confidential information.
Recuva for PC (SD only)
This is the most popular shareware utility for Windows that does not require root access. Recuva works not only with your computer, but also recovers materials from third-party drives . If you have lost important information that was stored on a memory card, simply insert the SD card into the card reader or connect the device via USB, and the program will find the necessary files.
A cache is a collection of data for applications to run. Temporary files are downloaded from the Internet without warning. You can clear the cache of each application individually, or you can globally clear all files.
Content:
The Recycle Bin is an integral feature of the Windows GUI that is found in almost all versions of the Microsoft operating system. Its key purpose is to store files and data that were deleted by the user if he used the right mouse button and the “Delete” or simply the “Delete” .
After performing a normal deletion, the file is sent to the trash, the shortcut of which is located on the desktop. Such deletion does not clear hard disk space, since the recycle bin uses a certain amount of storage space reserved by the system for its needs. The Recycle Bin itself is essentially a hidden directory on the hard drive where the operating system is installed.
To completely delete data from the Recycle Bin and clean up disk space, you should use the “Empty Recycle Bin” . To do this, just go to the trash can and right-click on an empty space, and then select the appropriate item.
It is worth noting that above the item “Empty Trash” , you can find the column “Mark deletion” . This action will move the file from the Recycle Bin back to the location from which it was deleted.
Delete "Other Files"
There is more than one way to clear “Other files” in Xiaomi memory, each of which should be applied when characteristic “symptoms” appear:
Clearing cache
The user can independently clear the memory both from the cache generated by a separate utility, and from all of them together. To do this you need:
- go to the “All applications” tab in the “Settings” section;
- mark the program whose data needs to be erased;
- Click the “Clear cache” button.
To delete temporary data on the operation of an array of programs installed on your smartphone, you need to go to “Settings” - “Storage” - “Cleaning”. MIUI will automatically determine what you can safely get rid of and display the results on the screen.
After that, click on the “Gallery” shortcut on the desktop, go into settings, select “Cloud”, check all files and delete them. This procedure will allow you to remove photos only from the cloud service; everything on the phone will remain unchanged.
There are several ways to clean Mi Cloud:
- via a mobile device;
- via browser.
The simplest and most convenient option is cleaning via a tablet or smartphone. To do this, you need to open “Settings”, go to the “System applications” section and find the button to go to cloud storage.
Then you need to go to the “Memory” tab, where an infogram will appear showing which groups of files are stored in the service and how much space they take up.
To delete, you need to click on the section label, for example, “Recordings”, and check all the items that can be sent to the trash. We repeat the procedure with each section. To prevent virtual memory from becoming clogged, you need to disable a number of items in the synchronization settings and leave only important applications.
In a new tab, open the official English-language website of the service, enter your username and password. For verification, the server will request a code from SMS and, after verification, will transfer the user to the storage profile.
The icons of all saved data will be displayed on a blue background:
- Messages;
- Contacts;
- Gallery;
- Notes;
- Find device;
- Recordings.
You need to select any section, view and mark unnecessary files and then click “Clean”.
How to delete photos from Mi Cloud but leave them on your phone
After that, click on the “Gallery” shortcut on the desktop, go into settings, select “Cloud”, check all files and delete them. This procedure will allow you to remove photos only from the cloud service; everything on the phone will remain unchanged.
Photos and videos take up the lion's share of the device's memory. To avoid cluttering it and preserve important memories, it is recommended to periodically transfer multimedia to a desktop computer and free up space for new pictures.
Xiaomi has built-in support for its own Mi cloud, which includes all photos taken on the phone, of course, if you have specified this in the settings. However, only 5 GB of data is stored in Mi cloud for free; you have to pay for additional space, which most of us, of course, don’t do.
How to set up a cart?
Having understood the principle of operation and the main functions of the shopping cart, you should learn how to configure it correctly, as well as what additional functions you can use in it.
To call the Recycle Bin settings menu, just go to the shortcut on the desktop , and while inside, right- on an empty space, after which in the window that appears, select “Properties” .
The window that opens is the Recycle Bin settings menu , where you can specify the allocated disk space where deleted files will be placed, select the drive from which space will be allocated for the Recycle Bin, and also configure the operating mode of the Recycle Bin (the item “Destroy files immediately after deleting...” is equivalent to disabling the Recycle Bin) .
For example, let’s change the place where the basket is stored, and also reduce its volume. For these purposes, just select the hard drive in the top column, check the box next to “Set size” , and then indicate the required size in megabytes. These actions require confirmation, so before closing the window you should click the “Apply” .
Where is the basket in a Xiaomi smartphone?
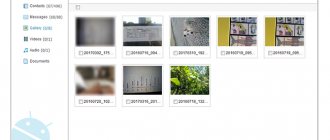
By deleting unnecessary files, you can inadvertently send important data that will need to be recovered in the future. The recycle bin in a Xiaomi phone is not located on the gadget itself, but in the Mi Cloud cloud storage. You can find the gallery cloud cart as follows:
Open the Gallery app.
In the “Albums” tab, click the button in the upper corner with three dots - context menu.
The Xiaomi smartphone recycle bin stores deleted files for free in a limited amount. If necessary, the developers offer to purchase additional space so that more data can fit in the basket.
Important! Only users with a registered Mi account have access to the cloud shopping cart. Deleted files are stored for 60 days, after which the Recycle Bin is self-emptied and the data cannot be recovered.
To prevent your smartphone from being cluttered with unnecessary information, it is recommended to regularly clear the phone’s memory, for which you can use one of the popular methods.
How to remove the Recycle Bin from the desktop and how to get it back?
In the Recycle Bin settings, the user can disable it by checking the box next to “Destroy files immediately after deletion, without placing them in the Recycle Bin . This method will disable the Recycle Bin functionality, but its shortcut will still remain on the desktop. To hide a useless shortcut that clogs up your desktop space, you should use the system personalization settings .
To do this you can follow these steps:
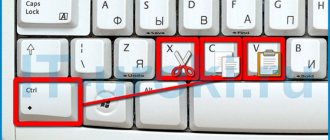
Step 1. Right an empty space on the desktop and select “Personalization” .
Step 2. In the window that opens, in the left column, go to the “Themes” , then lower the slider on the right to the very bottom, where the column “Desktop icon settings” .
Step 3. In the options menu, just uncheck the box next to “Trash” and confirm the action with the “Apply” .
In the same way, you can return the Recycle Bin shortcut back to the desktop.
How to empty the trash can on a Samsung phone?
Samsung Gallery has a shopping cart. Open the menu (three dots above each other on the right) and select the picture in the attachment. Photos are stored there for 30 days. To delete, click “Clear”.
Interesting materials:
How to stop ping on Cisco? How to stop OneDrive syncing? How is compensation for moral damage caused to an employee carried out? How is cargo moved for which slinging schemes have not been developed? How to free up space on Samsung? How to free up space on Google? How to thank for help? How to report to the Pension Fund? How to report for insurance premiums of an individual entrepreneur? How are we relaxing on December 31, 2022?