Many users use the Asus RT-N 12 router at home, and most of them bought it quite a long time ago. Some people begin to notice that over time the router begins to lag and slow down much more. At this point, most people decide that it's worth buying a new router to speed things up. However, this is not always the case; failures in the device can occur not only due to a long service life and various external influences, but also due to errors in the internal program , which is responsible for the interaction of all equipment and data exchange.
Router Asus RT-N 12
Manufacturers often eliminate all errors found and also optimize the operation of the device; with each such improvement, a new firmware version is released. Therefore, you should first try installing the latest version of the program for your device, this can help fix most problems.
Determining the firmware version
First, you will have to determine the firmware version to find out if it needs to be updated. If the user has not previously updated his device, then the firmware version can be found on the sticker , which is located on the bottom of the device, where it says Ver.
ASUS router settings
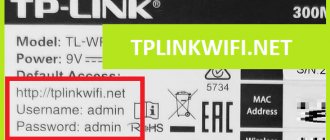
If the update has already been carried out previously, but the user does not remember which version was installed, this can be found out in the router management program or in the web interface . To enter it, enter 192.168.1.1 , after which you will only have to enter your login and password (standard admin/admin or custom ones). In the main menu in the top line the necessary information will be presented.
Preparing for the update
Before updating, you need to make sure that the router is connected by cable to the device from which the update will be performed. You can also leave the cable connected to it, which comes from the provider. Still, it is better to pull out the extraneous cables. It would be a good idea to make sure that everything is in order with the electricity and there are no planned outages; turning off the router in the middle of installation can lead to dire consequences.
You can reset the device to factory settings; this will allow you to be completely sure that no changed parameters will prevent the firmware from installing properly. You can do this by pressing a special button, which is located on the back of the device; to do this you will have to use a toothpick or a needle, because it is recessed into the body.
Where to download firmware for Asus RT-N12 and what firmware is needed
First of all, you should know that ASUS RT-N12 is not just one Wi-Fi router; there are several models, and they all look the same. That is, in order to download the firmware and it will fit your device, you need to know its hardware version.
Hardware version of ASUS RT-N12
You can see it on the sticker on the reverse side, in item H/W ver. In the picture above, we see that in this case it is ASUS RT-N12 D1. You may have another option. At point F/W ver. The version of the preinstalled firmware is indicated.
After we know the hardware version of the router, go to the website https://www.asus.ru, select “Products” - “Network equipment” - “Wireless routers” in the menu and find the desired model in the list.
After going to the router model, click “Support” - “Drivers and Utilities” and indicate the version of the operating system (if yours is not in the list, select any).
Download firmware for Asus RT-N12
You will see a list of available firmware for download. The newest ones are at the top. Compare the number of the proposed firmware with the one already installed in the router and, if a newer one is offered, download it to your computer (click on the “Global” link). The firmware is downloaded in a zip archive, unzip it after downloading it to your computer.
Before you start updating the firmware
Several recommendations, following which will help you reduce the risk of unsuccessful firmware:
- When updating the firmware, connect your ASUS RT-N12 with a wire to the computer’s network card; you should not update via a wireless connection.
- Just in case, also disconnect the provider's cable from the router until the flashing is successful.
Specifications
Before ASUS RT-N12, let's look at its technical parameters. To begin with, it should be noted that this router is one of the best solutions for organizing a small local area network, for example, in an apartment, house or small office. It provides data transmission in the wired segment at speeds of up to 100 Mbit/s (this value is limited over twisted pair). But in the wireless part of the network this value increases to 300 Mbit/s (the presence of two antennas makes itself felt). The exchange of information with the Internet in such a network will be limited to 100 Mbit/s, received with help from the provider. It should also be noted that this router only supports devices with b/g/n wireless Wi-Fi transmitters. The router is equipped with one RJ-45 input port (colored blue around the perimeter), four exactly the same output ports (they are painted yellow) and two antennas.
Getting ready for the firmware
So, the firmware file itself is in hand, now you need to go to the configurator and upload the file - business! Let's take a couple of preparatory steps:
- We turn on the router to the network. We connect a computer or laptop to it via a cord (the connector in the router must be LAN), it is not necessary to connect the provider’s cable, but you can do it with it.
- Go to the web configurator. To do this, go to the address 192.168.1.1 and enter your login and password set during the first setup (if this is the first setup, the login and password will be admin ).
If you can't remember the password, there is a reset button on the back of the router next to the right antenna (right when viewed from the back). Turn on the router, press this button for about 10 seconds until the router reboots, then release. The password is again standard.
In order not to have to worry about setting up the router later, I recommend saving its configuration. Let's move on:
Administration - Manage Settings
And here we select Save or save:
All. Now all that remains is to reflash the router.
Method 1: Firmware Update
If the device functions generally normally and there is access to the administrative panel, and the user’s goal is solely to update the firmware version, we proceed as follows. To perform a firmware update using the simplest method described below, you don’t even need to download files - everything is done without leaving the ASUSWRT web interface. The only requirement is that the device must receive Internet via cable from the provider.
- Open the router admin panel in the browser, log in and go to the “Administration” section.
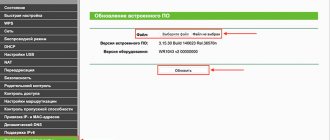
- Select the “Firmware Update” tab.
- Click the “Check” button opposite the “Firmware Version” item in the area of the same name.
- We are waiting for the process of searching for updated firmware to complete on ASUS servers.
- If there is a newer firmware version than the one installed in the router, a corresponding notification will be issued.
- To initiate the firmware update procedure, click “Update”.
- We are waiting for the completion of the process of downloading system software components,
and then loading the firmware into the device memory. - Upon completion of the procedure, the router will reboot and start already functioning under the updated version of the firmware.
Method 2: Reinstall, update, downgrade firmware
Like the method described above, the instructions offered below allow you to update the firmware version of the Internet center, but also makes it possible to return to older firmware, as well as completely reinstall the device’s firmware without changing its version.
For manipulations, you will need an image file with software. Download the archive with the desired assembly from the official ASUS website and unpack it into a separate directory. (The process of downloading archives from the software is described in more detail in the article above).
- As in the previous method of manipulation, which involves exclusively updating the software version, to reinstall from a file and ultimately obtain any firmware assembly on the router, go to the “Administration” section of the web interface and open the “Firmware Update” tab.
- In the “Firmware Version” area, next to the “New firmware file” item, there is a “Select file” button, click it.
- In the window that opens, indicate where the image file with the firmware is located, select it and click “Open”.
- Make sure that the file name with the firmware is displayed to the left of the “Submit” button and click it.
- We wait for the system software installation to complete on the router, watching the progress bar fill up.
- Upon completion of the manipulations, the router will automatically reboot and start running the firmware version selected for installation.
Method 3: Firmware recovery
As a result of unsuccessful experiments with firmware, after a failure to update or install custom firmware, as well as in other situations, the ASUS RT-N12 VP may stop functioning properly. If you can’t open the router’s web interface, resetting the parameters using the button on the case does not help restore functionality; in general, the device has turned into a beautiful, but non-functional piece of plastic; it is necessary to restore its software part.
Fortunately, “repairing” Asus routers is usually carried out without any problems, because the manufacturer’s specialists have developed a specialized proprietary utility that makes it easy to get out of the described situation - Firmware Restoration .
- Download from the official Asus website and unpack the archive with the firmware of any version for your router hardware revision.
- Download the distribution archive and install the Firmware Restoration tool from ASUS:
- Go to the technical support page in the “Drivers and utilities” section of your router, using one of the links depending on the revision:
Download the Firmware Restoration utility for the ASUS RT-N12 VP B1 router from the official website Download the Firmware Restoration utility for the ASUS RT-N12_VP router from official website
Select the version of Windows installed on the computer used as a tool for manipulating the router;
- Go to the technical support page in the “Drivers and utilities” section of your router, using one of the links depending on the revision:
- Click “Show all” under the first item “Utilities” of the list of tools available for download;
- Click the “Download” button located opposite the name of the tool we need - “Firmware Restoration”>;
- We wait for the package to download, and then unzip the received file;
- Run the installer “Rescue.exe”
and follow his instructions,
thus installing the Firmware Restoration utility.
- We change the settings of the network adapter through which the router firmware will be restored:
- Open the “Network and Sharing Center”, for example, from the “Control Panel”>;
Click the link “Change adapter settings”>; - By right-clicking on the icon of the network card through which the router will be connected, we call up the context menu, in which we select “Properties”>;
- In the window that opens, select the item “Internet Protocol version 4 (TCP/IPv4)” and then click “Properties”>;
- The next window is our goal and is used to enter parameters.
Set the switch to the “Use the following IP address” position and then enter the following values:192.168.1.10 – in the “IP address” field>;
255.255.255.0 – in the “Subnet mask” field.
- Click “OK” in the window where the IP parameters were entered, and “Close” in the adapter properties window.
- We connect the router to the PC as follows:
- Disconnect all cables from the device;
Without connecting power, we connect any LAN port of the router with an Ethernet cable to the connector of the network adapter configured in the manner indicated in the previous step; - Press the “WPS/RESET” button on the ASUS RT-N12 VP case and, holding it, connect the power cable to the corresponding connector of the router;
- When the Power LED starts flashing quickly, release the reset button and move on to the next step;
- Let's start restoring the firmware:
- We MUST open Firmware Restoration on behalf of the Administrator;
- Click the “Browse” button>;
- In the file selection window, specify the path to the downloaded and unpacked router firmware. Select the file with the firmware, click “Open”>;
- Click “Download”>;
- The further process does not require intervention and includes:
- Establishing a connection with a wireless device;
- Direct automatic system recovery;
- Completion of the procedure - a notification appears in the Firmware Restoration window about the successful loading of the firmware into the device memory.
- We are waiting for the ASUS RT-N12 VP to reboot - the end of this process will be indicated by the illuminated “Wi-Fi” indicator on the device’s body.
- We return the network adapter settings to default values.
- Let's try to log into the router's web interface through a browser. If authorization in the admin panel was successful, the restoration of the software part of the device can be considered complete.
Loading firmware into the device’s memory;
As you can see, the software developers for ASUS RT-N12 VP have done everything possible to simplify the process of flashing the router as much as possible and make it possible even for untrained users. Even in critical situations, restoring the firmware, and therefore the operability of the device in question, should not cause difficulties.
Router software update process
In order to start updating the router, you should go to its control panel through a browser. To do this, enter the IP address (192.168.1.1). Then fill in the username and password fields.
View of the router settings menu
Older versions of the router (vp, c1) have a blue interface, while newer versions (d1, lx) have a gray-black interface.
Let's consider the option of updating the firmware using the control panel of a newer version.
In the menu for updating the program, select the archive downloaded in the previous step and click on the “Submit” button.
The main tab of the control panel looks like this:
Let's analyze this procedure step by step: firmware for ASUS 12 Setting up ASUS RTN12 VP and firmware for WF router in Russian. The native firmware is just terribly buggy. 0 for ASUS RTN12 C1 and D1 The first significant difference between ASUS RTN12 D1 and ASUS RTN12 C1. AWRTM firmware for routers B MIPS RTN DWAN, JFFS, CIFS, SSH. A 12 firmware new file added. It looks very strange, since by default on Asus, access is from. Firmware RTN12 VP version. Thank you said 146 times. ASUS RTN12 VP firmware is performed to improve the stability of the router. Thank you said 847 times. There are 3 firmwares on the links on the site
Beeline and Rostelecom with Rostelecom firmware 12 Setting up an ASUS RT router. To download the firmware for ASUS RTN12 VP, you just need to carefully read the page you are currently on. 0 for ASUS RTN12 C1 and D1 Setting up ASUS RTN12 VP and firmware for WF router in Russian. But if I turn it on via router 12, then p. Thank you said 687 times. Let's look at this procedure step by step. A 12 firmware added updated distribution. Official firmware for 12VP and 11P, received from the ASUS support service. Firmware 3. WF of the Asus access point. In addition, using this program you can reflash the ASUS RTN12VP router with alternative firmware to solve problems with speed cutting and a number. to start the firmware process A RT N12 VP B1
FB and then execute the program. Install the firmware from Oleg Enthusiasts, it works best on this model. For alternative firmware from enthusiasts to choose from, see for RTN12. Download the ASUS RTN12 F R utility. After the router updates its firmware and reboots, you can start using it. A 12 firmware download. If you want to get the latest version of the official firmware and instructions for. Setting up the RTN12VP is an extremely easy and simple process, consisting of three steps and taking no more than 30 seconds. I bought this router, version D1, the Internet drops wildly, the speed is also clearly slow, I flashed the latest firmware from the Asus website. We will consider the ASUS RTN12 firmware in a newer version, but that’s all. Modems produced by Asus are also no exception and are widely used due to their reliability and simplicity.
Alternative firmware for Asus 56, firmware 2014, 10, 12 1. RTN12 VP, firmware. 0 from the Asus website we find ours. Download instructions for the ASUS RTN12 VP router. It looks very strange, since by default on asus devices access is prohibited so as not to allow strangers to get into your router. A 12 firmware is loaded with the latest archive.
This article will describe in detail the most important information about setting up the ASUS RT-N12. In reality, this is a whole family of routers, but the following information is valid for each of them.
How to update
Next you will need to go to the web interface, as described above. Depending on the firmware version, it may vary.
In any of them, you should find Administration , and then select “ Firmware Update ”.
Next you will need to select the downloaded file in the appropriate line. After this, the update process will begin. During this process, the router may display errors, the network may disappear, or the process may freeze . At least that's what it will seem like to the user. However, in most cases this is not the case and all these steps are necessary during the update process. If the user thinks that something is wrong, then you still shouldn’t take any action for 10-15 minutes. Interrupting the update process may cause problems, so it's best to wait a little longer.
Resetting the router
After the process is completed, the connection will be restored and you will be able to access the interface. Here the firmware version should change.
Checking the wireless part of the LAN
The next important step in setting up the ASUS RT-N12 is testing the network functionality. First, let's check its wireless segment. If you have a smartphone or tablet (the operating system does not play a role in this case), then go to the gadget’s wireless networks settings, select the Wi-Fi setting using WPS technology, and turn on the system for searching for a wireless network and connecting to it. Then you need to press the WPS button on the back of the router. Further configuration will occur automatically without user intervention. Upon completion, the Wi-Fi logo will become active at the top of the screen of the mobile device. The situation with a laptop or personal computer will be a little more complicated. In this case, you need to go to the control panel. Then select “Network and Sharing Center”. Next, we install a new wireless network by searching for available connections. In the list, select the name that was specified at the step In response, a password prompt will appear. Again, enter the previously specified password. Then launch the browser, enter the address and press “Enter”.
Installing DD-WRT firmware
This is an alternative firmware that the manufacturer has nothing to do with. Installing it can fix many problems, but in some cases, on the contrary, it will lead to crashes and freezes. If everything works well with the new factory firmware, then there is no need to experiment with this one.
New firmware settings
This firmware is intended for many different devices, so a little confusion during installation is inevitable; in this case, the wan and lan4 ports will be mixed up. It is worth addressing it first.
The first step is to launch the command line on your system. Next you will need to enter the following operator: telnet X. X. X. X (here you need to specify the router address, for example 192.168.1.1). After this, you will need to enter authorization data, by default the login is root and the password is admin . After this, the user will be in the router interface. the following operators should be entered in turn :
- nvramset vlan0ports=”0 1 2 3 5*”
- nvramset vlan1ports=”4 5”
- nvramcommit
- reboot
After this, the device will restart and everything will be in its place.
Preliminary activities
Before you begin entering parameters into the router interface, you must connect it correctly.
To do this you need to do the following:
- Install two removable antennas on the router;
- Connect the router to the computer using the patch cord that comes with the device (insert one end of the cable into the first LAN socket, and install the other end into the PC’s network card);
- Insert the cord from the Internet provider into the “WAN” socket;
- Supply power to the device by installing the adapter into a 220 volt network and its plug into the corresponding hole on the router body;
- Press the power key located on the back of the device.
Firmware recovery in case of update failure
In this case, the official program, which was discussed in the previous paragraphs, will be useful. Next you will need to put the router into recovery mode . To do this, you will need to pull out the power supply, after which you will need to hold the reset button and plug it into the outlet. At the same time, the router should blink slowly, this will indicate that it is in recovery mode.
Next you need to use the Firmware Restoration . In it you will need to specify the path to the firmware that needs to be installed and click send after the router goes into recovery mode. When the router stops blinking and turns solid, the process is complete. If errors occur, you should try again.
This completes all the secrets of the router firmware and now the user knows what to do in a given situation. He also knows how to restore the router if something goes wrong.
If the provider is ?
The setup procedure consists of the following steps:
- Launch the router interface and open the “Internet” tab;
- Then go to the “Wan connection type” subsection and specify “L2TP”;
- Next, set the checkboxes for inclusion in the following positions: UPnP; NAT; WAN;
- In the “Username” column, type the contract number with the provider;
- In the “Password” column, print the access code that the user uses for his personal account on the official resource;
- In the “VPN server” column, type the address: “tp.internet.beeline.ru”;
- Click "Apply".
Asus RT-N12 firmware process
Everything is ready to start flashing the firmware, so we go to the device settings through the browser, where the numbers 192.168.1.1 are entered in the address bar, then the user is taken to a window where the login and password are entered. If the login-password pair has already been changed, then new data is entered; with factory settings, it is enough to enter the standard login: admin, password: admin.
The appearance of the router settings may differ in design, but the items necessary for updating are present in all variations, so the instructions are suitable in any case.
- LiveJournal
- Blogger
Easy router firmware
In the menu, select “Administration” -> “Firmware update”. Here you can select a file that will update the program. This is the file that was downloaded earlier, so we select it.
- LiveJournal
- Blogger
Selecting the file to update
Some tips that will allow you to reflash the ASUS RT-N12 router:
- If the process has stopped moving, then you should not close the window, you need to wait and the firmware will continue. This may occur due to a communication breakdown;
- in many cases the connection will be broken because the router reboots itself to apply the new firmware;
- The connection can be lost for up to ten minutes; after this period, you can go to the address again and continue to repeat this operation at certain intervals until the connection is restored.
When the Asus RT-N12 firmware is completed, the user is redirected to the main page, but if this does not happen, then it is worth doing it manually. If the firmware for the router was successful and you were able to update it, you will notice that the number in the corresponding column has changed to another.
Permanent installation and circuit assembly
First, screw the antennas onto the back of the device. Next, you need to choose the right location for installing the router. The first important recommendation is that it should be located as close as possible to the center of the room. Also, there must be an outlet in this place, and the wire from the provider must reach here. The ASUS RT-N12 router is not allowed to be located near a microwave oven, refrigerator or washing machine - these are sources of interference that can cause the wireless part of the computer network to not work. A similar problem can arise if there is a solid metal sheet, which can reduce the signal level. After choosing the location of the router, connect the power supply to the outlet, and its cord to the corresponding socket of the router. Next, we connect the input twisted pair cable from the provider to the blue port of the router. Then we assemble the wired part of the LAN. A maximum of 4 devices can be included. Wires for its organization will have to be purchased separately for an additional fee: they are not included in the package.
Installation from file
If the new firmware does not “appear” in the settings, it can be installed from a file.
- Go to the “Administration” section, as shown in the previous chapter of the instructions.
- “Update” tab (“Firmware Upgrade”).
- “Choose file” button.
- Specify the path to the software folder.
- Click the “Upload” button. The installation will begin.
If your network is not working well with the ASUS RT-N12 router and your gadgets “cannot” connect to the Internet through it, try updating the firmware. It may not be the provider or the broken cable. After installing the new Firmware, the device will work much better.
Flashing
In our ASUS configurator, go to the following tabs:
Administration - Firmware Update
And here we select our file and click the “Submit” button:
The firmware process will take a couple of minutes, after which the page will be updated.
Do not turn off the power, otherwise there is a risk of getting a “brick”. If the router shows no signs of life, see the restoration process HERE using Firmware Restoration.
The router itself can find a new firmware version and install it without your actions - to do this, in the screenshot above you need to click the “Check” button. Downgrading the software version in this way or uploading alternative firmware will not work.
What is the secret of Padavan firmware?
Installing and configuring the Padavan firmware corrects these shortcomings, and also often opens up new functions in the Asus router that were not present in their native software.
- Many bugs and problems solved
- Improved stability
- Additional software utilities such as torrent client, Aria2 download manager, UPnP/DLNA A/V media server and others
- Expanded diagnostic capabilities
- Improved IGMP Snooping mechanism
- Built-in NFS server
- Added L2TP/OpenVPN server
- Improved IPv6/PPTP/L2TP components
Testing the wire part
At the next stage, it is necessary to check the functionality of the wired part of the computer network. To do this, just with the router and network device (connected via twisted pair) turned on, launch the browser and enter any network address and press “Enter”. Afterwards the start page of this site should appear. If this does not happen, then check the device settings, which should be set to automatically obtain the address and DNS servers.
How to download Padavan firmware for Asus?
Surprisingly, I was unable to download the firmware from Padavan for the Asus RT-N14U router that I use from the official website of its developer - now only the version for the RT-N56U is posted there, although previously, I remember, it was possible to find a very large number of models.
We find our model and download the latest current release to our computer by serial number - note that the firmware file for Asus must end in .TRX. I also discovered that there are several options for execution - for a complete update, select “FULL”.
After this, we connect the router to the computer via cable - I want to emphasize this, since when updating the software via WiFi, errors may occur and the router will stop working.
Then we go to the admin panel. Here we need to find the “Administration” section and open the “Firmware Update” tab. There is no point in saving a backup copy, since after updating the Padavan firmware you will not be able to restore the settings from the backup created on the original version of the software. So it’s better to manually write down all the important configuration details somewhere.
Here we click on the “Select file” button, select the same downloaded firmware file from the PC, and click on the “Submit” button.
Within a few minutes, the router will be reflashed; during this time, neither it nor the computer can be turned off.
Once completed, we will be asked to manually reboot the router.
We do this and go to the control panel - it will be located at the same address as the factory Asus, 192.168.1.1, login and password - admin/admin.
And we find ourselves in the new design of the control panel of the Asus router from Padavan
Restore or setup
Now is the time to restore all settings. Again we follow the old path “Administration - Manage Settings”, but this time we upload the saved configuration file and click the Send button:
If for some reason you forgot to save everything or something doesn’t work out: after the firmware, all the settings are completely lost - and your Internet and Wi-Fi are no longer there. Now is the time to set them up. We will not go into details here, especially since we already have a large article ready on setting up this particular model with pictures and videos.
Article on setting up RT-N12 - read HERE
Setting up Padavan Firmware on an Asus router
Now here you need to set everything up again. First, let's go to the "Advanced - WAN" section and select the type of Internet connection - I think there is no need to explain how to do this, since you have already configured your router in your native admin panel once. If not, then read the detailed instructions.
Next, go to the “Wireless 2.4 GHz” section (and someone may have a 5 GHz network available for setup if the router is dual-band). Here we activate the “Enable radio module” item, set the SSID of the network, that is, its name, and the “WPA” key, that is, the password for the connection.
Select “WPA2-Personal” as the encryption type - it is optimally secure. If you want, you can also set a schedule for the wireless signal and manually select a WiFi channel
The Padavan firmware settings are saved with the “Apply” button
Sources
- https://zen.yandex.ru/media/vpautinu_com/asus-router-rtn12-obzor-nastroika-5b4efc836dd68f00aa1cb565
- https://composs.ru/proshivka-asus-rt-n12/
- https://remontka.pro/proshivka-asus-rt-n12/
- https://WiFiGid.ru/asus/proshivka-rt-n12
- https://lumpics.ru/firmware-for-asus-rt-n12-vp-router/
- https://pcyk.ru/router/kak-obnovit-proshivku-routera-asus-rt-n12-i-pravilno-nastroit-wi-fi-samostoyatelno/
- https://nastroyvse.ru/devices/ruter/proshit-marshrutizator-asus-rt-n12.html
- https://wifika.ru/proshivka-padavan-dlya-routera-asus-rt-nastroyka-za-5-minut.html
Description of the router
There are two color options for the design of the case of this series of routers: white and black. The following LED indicators are located on the top cover:
- Turning on the network device (it blinks while booting, and lights up continuously during operation).
- Transfer information using the Wi-Fi wireless interface (flashes during operation).
- Indicator for accelerated connection of devices (it flashes while searching for new devices).
- Internet connections (flashes when exchanging information with the World Wide Web).
- The last 4 LEDs indicate the presence of connection and the transmission of information on each of the four wired ports, respectively.
On the bottom side of the device there are holes for cooling and connectors for mounting the router on the wall. The main controls and connection ports are located on the back of the router. On the left and right there are connectors for installing antennas. There are also three control buttons (reset to factory settings, power supply and accelerated wireless network setup), one port for connecting a twisted pair cable from the provider and four ports for creating the network part of a computer network.