FAT32 is an outdated and limited file system. It supports data storage within a single file weight of no more than 4 GB. It is poorly protected from failures and is prone to fragmentation. The use of FAT32 may be dictated by necessity, as, for example, in cases of creating an installation flash drive compatible with BIOS UEFI. But if a regular disk partition is formatted to this file system for storing data on an internal or external hard drive, FAT32 can be converted to NTFS .
A more productive modern Windows file system.
How to do this without losing data?
Let's look at two ways to convert FAT32 to NTFS .
Both of these methods do not affect the data stored on the converted partitions. The data will remain safe and sound after the operation.
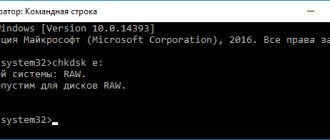
How to restore RAW file system to NTFS?
Microsoft Solution: Convert RAW to NTFS using Command Prompt (cmd) Restore RAW file system to NTFS
- Open Command Prompt > click Run as Administrator; ...
- Type: convert X(drive letter): /fs:ntfs and press Enter;
21 Jun
2022 Interesting materials:
How long can peeled mushrooms be stored in the refrigerator? How long can boiled frozen mushrooms be stored? How long can fresh mushrooms be stored without processing? How long can fresh mushrooms be stored? How long can you store boiled mushrooms without refrigeration? How long can boiled frozen mushrooms be stored in the freezer? How long should you boil mushrooms? How long should you boil mushrooms? How long should you cook mushrooms for pickling? How long should you cook Obabka mushrooms?
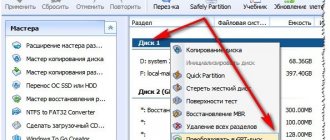
Change with complete cleaning of the flash drive
There are two ways. The first - with the complete deletion of all content and the second - with the preservation of all data on the flash drive.
Looking ahead, we immediately note that, if possible, it is better to use the first method, which will be described below. Since during conversion without deleting data, errors and even complete deterioration of all content are possible.
Attention! This method will delete everything that is on the flash drive and in the end it will be clean. Take this into account and, if necessary, copy all the contents to your hard drive and return it back after conversion.
- Insert the flash drive into the USB port of your computer or laptop;
- In the “My Computer” window, where all local and removable drives are displayed, find your flash drive, right-click on it and select “Format”.
Start formatting the flash drive
- In the window that opens, opposite the “File system” line, select NTFS;
Changing FAT32 to NTFS via formatting
- Please note that the “Quick (Clearing table of contents)” checkbox is checked;
- Click on the “Start” button.
The formatting process will start and will be completed in just a few seconds. As a result, your flash drive will be completely cleaned and converted to the NTFS file system.
Formatting a flash drive via the console
The method is extremely simple and is performed in one step, so the ease of use is higher than that of the previous method.
- Click Start, where select “Accessories”;
- Here, find “Command Prompt” and open it;
- Enter the command format /FS:NTFS E: /q – just change the drive letter E to your flash drive;
- Alternatively, enter convert h: /fs:ntfs /nosecurity /x, where h is the partition letter.
The latter option even allows you to format the media without deleting information on it, but it’s still better not to take risks.
This is where the standard tools end, but there are special utilities that perform the task just as well.
Adviсe
- NTFS has a number of distinctive features. For example, if you remove a flash drive without Safely Removing it, recently copied and modified files will be deleted from it. Therefore, either use Safe Removal (icon near the clock), or disable the need to use Safe Removal: open Control Panel - System and Security - Device Manager , in the window that appears, in the Disk devices , find your flash drive, double-click on it and select Policy - Quick deletion - OK . Then it will be possible to remove the flash drive without Safe Removal. , there is usually a checkmark on Quick removal Optimal performance, so you need to check.
- If you cannot copy files to a flash drive formatted in NTFS (a window appears with the text “ No access ” or “ Insufficient rights ”), simply format it again. This is due to the features of access rights that are present in NTFS, but were not present in FAT.
- I do not recommend formatting SDHC, MicroSD and other memory cards in NTFS for one simple reason - most devices (phones, cameras, camcorders, etc.) cannot work with this file system. So if you use a phone flash drive to transfer files, you will have to put up with FAT.
- When using NTFS on a flash drive, the memory cells wear out more actively, so the service life of the flash drive will decrease . How much - it all depends on the model of the flash drive and how you use it. I advise you not to write hundreds of small files to a flash drive with NTFS. You can also disable logging - the recipe is given here. Primarily use NTFS when storing large files is required.
- checking the box Use compression in the HP USB Disk Storage Format Tool - data compression in NTFS really allows you to save some disk space, but it loads the processor quite heavily and slows down reading/writing data from a flash drive (tested it from my own experience). Gaining a couple of tens of megabytes is not worth it. In addition, point 4 begins to manifest itself even more actively - wear and tear of memory cells.
Other recovery utilities
In addition to the programs described, you can use a number of others for data recovery, with a similar operating principle:
- R.Saver
- GetDataBack
- PC Inspector File Recovery
- Mini Tool Power Data Recovery, etc.
If one or another utility is not suitable for a particular flash drive, you can try installing another one. Sometimes for certain media manufacturers there are special programs with which correct file recovery is highly likely.
As you can see, changing the file system of a flash drive or restoring faulty media is quite simple if you correctly use the standard capabilities of the operating system in combination with additional specialized programs.
Checking the created drive
http-equiv=”Content-Type” content=”text/html;″>c http-equiv=”Content-Type” content=”text/html;charset=UTF-8″>lass=”remon-after-2nd -h2″ id=”remon-488637884″>
On my computer (GIGABYTE G1.Sniper Z87 motherboard), booting from a flash drive in UEFI mode was successful, the rest looked like this:
- After the standard “Copying files”, a window with the WinSetupFromUSB icon and the status “Initializing USB disk” was displayed on the Windows installation screen. The status is updated every few seconds.
- As a result, the message “Failed to initialize the USB disk. Try disconnecting and connecting again after 5 seconds. If you are using USB 3.0, try a USB 2.0 port."
I was unable to carry out further actions on this PC: I can’t click “Ok” in the message because the mouse and keyboard refuse to work (I tried different options), and I can’t connect a USB flash drive to USB 2.0 and boot up, since I only have one such port , extremely poorly located (the flash drive does not fit).
Be that as it may, I think that this information will be useful to those interested in the issue, and the bugs will definitely be corrected in future versions of the program.
And maybe this will be interesting:
- Programs for SSD - configuration, optimization, testing
- How to change Windows 10 system icons
- How to recover data from an external hard drive
- How to transfer photos from iPhone to Windows and Mac computer, via cable and Wi-Fi
- Location inaccessible, access denied when opening flash drive - how to fix
- Error “This device is already in use by another application” when outputting audio via HDMI - how to fix it
Determining the cluster size
When performing formatting operations, you can specify not only the file system, but also the required cluster size. Because of this, most users wonder what cluster size should be set when formatting.
The cluster size must be selected taking into account what files will be stored on the flash drive.
If the files that will be stored on the flash drive are small (text documents, photographs, etc.), then you should choose a small cluster volume. If the disk is intended to store large volumes of files (music, video), then it is best to choose a large cluster size.
A cluster is a minimum unit of capacity that is allocated on a flash drive for storing data. The main feature of filling clusters when placing data on them is the creation of a mark indicating that the cell is full (this occurs even if the cell is not completely filled).
If the cluster size is 256 bytes, and the file stored in it is only 1 byte in size, the cell becomes unsuitable for writing and storing other files. The cluster size also affects the speed of data exchange between the PC and the flash drive.
File systems have different ranges of cluster sizes:
- FAT – cluster size is 64 kilobytes (65536 bytes).
- FAT32 – cluster size ranges from 1 to 32 kilobytes (1024–32768 bytes).
- NTFS – cluster size ranges from 0.5 kilobytes to 32 kilobytes (512–65536 bytes).
- exFAT – cluster size ranges from 0.5 kilobytes to 32 megabytes (512–33554432 bytes).
Formatting
We understood the concepts, pointed out the main differences, and highlighted the advantages and disadvantages. It's time to proceed directly to the procedure of reformatting removable media. There are two main methods:
- Changing the format from the menu of the media itself;
- Using the command line.
Both methods are quite easy to learn and do not require special skills. The only thing you need to know for sure before starting the reformatting procedure is that fat32 or ntfs for a flash drive will be a better solution. The remaining questions will be answered by the step-by-step instructions below. No special programs are needed for this either - Windows developers have provided all the possibilities for simply changing the format.
Other recording formats
We looked at the most popular file systems, as well as the possibilities of reformatting removable media. But technology continues to develop. New formats appear, and with them other questions arise. For example, use exfat or ntfs for a flash drive? To answer, you must first understand what the exFAT system is.
exFAT
This is a new file system developed by Microsoft specialists. It is intended for removable storage devices. Roughly speaking, this is FAT32, but with no restrictions on the number and size of files. When thinking about how to quickly reformat a flash drive to ntfs, do not lose sight of this new format.
But the new system has a serious drawback - it is not supported by many household devices and cannot be read on computers with Windows XP without a special patch. Users of more modern versions of Windows, as well as Mac OS, can take full advantage of the capabilities of exFAT. Here lies the answer to the question of what is more convenient to use - exfat or ntfs for your flash drive.
If you and your surroundings use the latest Windows operating systems and do not intend to use a flash drive to connect to other household appliances, then you can completely switch to the exFAT format.
If Windows XP will not cease to be your favorite system or the power of the existing hardware is not enough for an update, then the ideal option would be to use the NTFS or even FAT32 format, which still does not want to give up ground.
Formatting using the HP USB Disk Storage Format Tool
An extremely simple, intuitive utility that allows you to format storage and does not require any additional manipulations with it. The program can also create a bootable USB flash drive; you can use the function to burn any Live CD of an application or Windows.
- Download the utility;
- After launch, indicate the path to your drive in the first column;
- Set the “File System” to the NTFS system we need;
- If desired, install “Quick Format”;
- Agree to the warning window about data deletion;
- Wait for it to finish.
Now your flash drive will use the entire capacity to the maximum, without any restrictions.
How to reformat a flash drive to NTFS?
- Go to “My Computer”;
- Make a RMB on the flash drive and select “Format”;
- The main thing is to install NTFS in the “File system” section. You can also check the box next to “Quick Format”;
- At the end of the process, make sure everything works as it should. Then do the opposite of the first procedure. In the “Policy” tab, set the value to “Optimize for quick removal.”
Now we have found out how to format a flash drive in NTFS in xp, and any other systems, manually, but this is not the only method that may interest you.
Restoring a drive's file system from RAW format
In the event of a technical or software malfunction of the flash drive, errors may occur related to the correct determination of the disk file system. The operating system cannot correctly recognize the file system type and access data on the media. In this case, we can see that the RAW format appears in the disk properties, which indicates the absence of any file system.
When connecting a damaged flash drive to a computer, the user sees a message about the need to format the disk. The disk itself cannot be opened. You can restore the file system of a flash drive using standard formatting, selecting FAT32 or NTFS. In this case, the drive's memory will become accessible, but all data will be deleted.
To save information on a flash drive, you will have to turn to additional programs and utilities.
iCare Data Recovery Utility
The iCare Data Recovery utility has a special Beep Scan Recovery tool for saving data from a damaged flash drive.
- Download and run the program (the disk must be connected to the PC).
- Launch the Deep Scan Recovery tool and select the disk with the RAW file system from the list.
- Click "Recover" to start scanning.
- After the process is completed, the program will provide a report on the information found. The files required for saving must be selected and click “Save Files”, then specify the location to save them.
After saving the files, you can format the disk to restore its functionality.
RecoverRx program
Another fairly simple program that allows you to save files from a damaged device.
- After installing and launching the program, a list of available disks will open. You need to select a disk to restore.
- Next, specify the path where all found files will be saved (you cannot specify the same flash drive that will be formatted).
- Next, you can select the necessary file formats that you want to save and exclude unnecessary ones.
- After launch, the process of recovering files will begin, which will be available in the folder specified in step 2.
Be prepared that the recovery process may take a long time, from one to several hours. This depends on the volume and type of information being recovered.
Magic NTFS Recovery recovery of NTFS partitions
offers a fast and easy way to reliably recover information from severely damaged, corrupted and inaccessible drives. The program can perform any data recovery work: from simple data recovery to restoring damaged structures of system disks. Using algorithms, supporting "fast" and "full scan" modes, Magic NTFS Recovery remains a winner in the data recovery market.
For only half the price, the program supports all the features of the Magic Partition Recovery product, with the exception of the ability to recover FAT media. All modern Windows operating systems (XP, Vista, Windows 10, 8, 7) format disks for NTFS.
Reformatting a flash drive from FAT32 to NTFS via CMD
You can also reformat from FAT32 and NTFS using the Command Line. To do this, first press the Win+R key combination and execute the “CMD” command. This will open Command Prompt.
After opening the Command Prompt, you need to run the command in it to reformat the flash drive. This command looks something like this:
- format N: /FS:NTFS /Q /V:MyFlash
Where
- N: - the letter that is assigned to your flash drive;
- /FS:NTFS - file system;
- /Q – quick formatting;
- /V:MyFlash – volume label (name of your flash drive);
The screenshot below shows what this command looks like in the Command Prompt.
After executing this command, the system will ask you to press the ENTER key on your keyboard to confirm the formatting.
After pressing ENTER, the system will begin the process of reformatting the flash drive from FAT32 and NTFS.