How to boot an HP Pavillion laptop from a flash drive or disk? Hello admin! I suffered all day today with the HP Pavillion laptop, I want to install the Windows 7 operating system on it instead of the currently installed Windows 8. I connect a proven bootable Windows 7 flash drive to the USB 2.0 port, then I reboot the laptop and often press the ESC key,
I get to the “start menu”, now I press F-9 Boot Device Options (change boot settings),
I get to the boot menu, but my Kingston flash drive is not there, although it is already connected to the laptop (the flash drive is definitely bootable).
The same thing happens with the Windows 7 boot disk. So I think “a miracle of hostile technology”, then I’ll do it differently, change the boot priority directly in the UEFI BIOS, reboot the laptop, then press ESC again when booting, I’ll get to the “start menu”, now I'm already pressing F-10 BIOS Setup
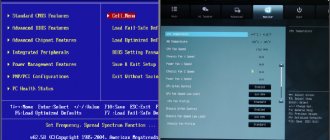
And I enter the UEFI BIOS and select the System Configuration option, and in it the Boot Options tab, I go into it.
As you can see, the Secure Boot option in the BIOS is enabled,
I disable it, set it to the “Disabled” position, and set the “Legacy support” option to the “Enabled” position, a warning appears, select Yes,
Then I press F-10 (I save the settings, press Yes and reboot),
After the reboot, this window appears with the message A change to the operating system secure boot mode is pending. Please enter the pass code displayed below to complete the change. If you did not initiate this request, press the ESC key to continue without accepting the pending change
I pressed ESC, Enter, and other keys, everything is useless, the laptop reboots and loads the Windows 8 operating system. And if you enter the UEFI BIOS again, then everything is unchanged there, the Secure Boot option is Enabled, and “Legacy” support" is disabled Disabled, that is, as if I did not change anything.
I ask you to explain to me, a simple user, why I cannot boot an HP Pavillion laptop from a flash drive
, why don’t the UEFI BIOS settings change, what am I doing wrong? And most importantly, why you can only install Windows 8 on a laptop with a UEFI BIOS, and no other operating system, you have to “knock yourself out” like this and waste your “nervous” cells. Tolyanych from Vitebsk.
How to install Windows 7 on an HP laptop via BIOS
Instructions for restoring Windows via BIOS
For an HP laptop model 15N211, 15N221, the instructions for restoring Windows via BIOS from a hidden Recovery hard drive partition will be as follows.
Turn on the laptop and press the F10 key to enter the BIOS.
When the BIOS boots, go to the System Configuration tab and go to Boot Options
A warning will appear with Yes-No options, select Yes.
On the System Configuration page, in the POST Hotkey Dely (sec) item, set the value 10 instead of zero.
Show more
Then exit the System Configuration section by pressing Esc.
And go to the Exit tab.
Here we select the Exit Saving Chandes item. When asked if we want to save, click Yes.
After this, the laptop reboots and displays a digital command code to go to the menu for working with the Recovery section. Type this code on your keyboard and press Inter.
After that, press the Esc key and you should see a menu. In which there will be a command F11 - System Recovery.
Attention.
If you press F11 from this point, Windows will be reinstalled from the hidden partition through the BIOS. In this case, the old system will be deleted, the disk will be formatted, and all data on it will be destroyed.
Video Review: How to run Windows System Restore on an HP laptop.
This is how, starting with the F10 key, you can reinstall Windows from a hidden partition of your hard drive through the BIOS. If for some reason you were unable to do this, then you can leave a request for computer repair and setup in the city of Moscow through the website lanstroy.ru.
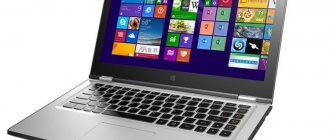
Greetings, my dear readers. The other day they brought me an interesting laptop: an HP 255 G2 with Windows 8.1 pre-installed (as it should be now), but its owner did not want to retrain and tearfully asked to install the usual seven. As they say: the master is the master, and it was decided to demolish Windows 8.1, which came with the kit, and install Windows 7. However, everything turned out to be not as simple as I thought at first glance!
How to install Windows 7 on an HP laptop in pictures
So how can we install Windows 7 on an HP 255 G2 laptop, even if the standard delete or f2 does not allow us to get into the usual BIOS of the laptop? (which puzzled me quite a bit). It was then that I remembered a clever phrase: if all else fails, then finally read the instructions!
The instructions included were very sparse: it showed how to insert the battery and what to press to turn it on... well, and a couple of pages on how to use Windows 8.1. As you can imagine, such reading was of little use to me and I had to go to the official website for answers, and I found them!
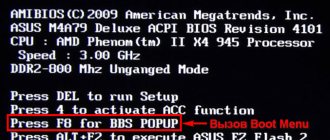
This is the information... to get into the BIOS!
to set the boot device, we need to press when starting the laptop first
and then
, after that you will be taken to the BIOS, where you can make settings.
You can’t do without theory: BIOS and UEFI, MBR and GPT
To reinstall the operating system, as a rule, you should start by going to the BIOS. But in the case of an HP laptop, we will have to deal not with a traditional BIOS, but with BIOS UEFI - a new, more modern interface between the system and equipment.
Among the many new functions of the “Extensible Firmware Interface”, this is how the abbreviation “Unified Extensible Firmware Interface” is translated, we want to note only one - the ability to work with disk space of 9,000,000,000 TB. This is achieved through the use of GPT - a partition table that replaced the usual MBR. For comparison: MBR provides access to disk space of no more than 2 TB.
Reinstalling Windows 10
In the example below, Windows will be reinstalled on the same disk (though on a completely formatted and partitioned slightly differently).
If you have configured the BIOS correctly and burned the USB flash drive, then after selecting the boot device (F9 button (photo 5)) you should see a welcome window and offers to install Windows (as in photo 6).
We agree with the installation - click the “Install” button.
Photo 6. Welcome window for installing Windows 10.
Next, when you get to the installation type, you need to select “Custom: Windows installation only (for advanced users).” In this case, you can format the disk as needed and completely remove all old files and OS.
Photo 7. Custom: Windows installation only (for advanced users)
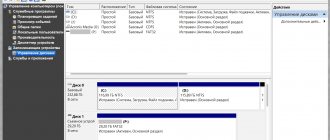
The next window will open a (sort of) disk manager. If the laptop is new (and no one has “commanded” it yet), then most likely you will have several partitions (including backup ones, for backups that will be needed to restore the OS).
My personal opinion is that in most cases, these sections are not needed (and even the OS that comes with the laptop is not the best, I would say “stripped down”). It is not always possible to restore Windows OS using them; it is impossible to remove some types of viruses, etc. And a backup on the same disk as your documents is also not the best option.
In my case, I simply selected them and deleted them (every single one. How to delete - see photo 8).
Important! In some cases, removing the software that comes with the device is a reason for refusing warranty service. Although, as a rule, software is never covered by a warranty, and yet, if in doubt, check this point (before deleting everything)…
Photo 8. Deleting old partitions on the disk (which were on it when the device was purchased).
Next, I created one partition of 100GB (approximately) for Windows OS and programs (see photo 9).
Photo 9. Everything was deleted - there was only one unallocated disk left.
Then all that remains is to select this partition (97.2GB), click the “Next” button and install Windows into it.
Remark! By the way, the rest of the space on your hard drive doesn’t need to be formatted at all for now. After Windows is installed, go to Disk Management (through the Windows Control Panel, for example) and format the remaining disk space. Usually, they just make another partition (with all the free space) for media files.
Photo 10. One section created
100GB for installing Windows on it.
Actually, then, if everything is done correctly, the installation of the OS should begin: copying files, preparing them for installation, updating components, etc.
Photo 11. Installation process (you just need to wait :)).
There is no point in commenting on further steps. The laptop will reboot 1-2 times, you will need to enter the computer name and the name of your account (can be anything, but I recommend entering them in Latin), you can set the Wi-Fi network settings and other parameters, and then you will see the usual desktop ...
1) After installing Windows 10, virtually no further action was required. All devices were identified, drivers were installed, etc. That is, everything worked the same as after the purchase (only the OS was no longer “stripped down”, and the number of slowdowns decreased by an order of magnitude).
2) I noticed that when the hard drive was actively operating, a slight “crackling” sound was heard (nothing criminal, some drives are noisy like that). I had to reduce its noise a little - how to do this, see this article: https://pcpro100.info/shumit-ili-treshhit-zhestkiy-disk-chto-delat/.
That's all for now, if you have anything to add about reinstalling Windows on an HP laptop, thanks in advance. Good luck!
Source
If GPT is not suitable
After you have reinstalled licensed Windows 7, all you have to do is deal with the drivers. But what to do if you do not have the ability to quickly activate the operating system? The boot partition created by GPT will be locked as soon as the activation period of Windows 7 expires, the system will go into an inoperative state and you will have to reinstall it again. You can solve this problem by converting a GPT disk to MBR.
Convert to MBR with data deletion
Converting a GPT disk to MBR is performed using the DiskPart utility from the Windows 7 distribution and entails complete deletion of data on the disk. This option is suitable for users who decide to reinstall the operating system immediately after purchasing an HP laptop. For everyone else, be sure to back up your drive before converting.
- We boot from the Windows 7 installation disk and reach the stage of selecting the OS installation partition.
- In command line mode, launch the DiskPart utility using the key combination +F10: diskpart
- We get a list of hard drives installed on the computer and find the one we need: list disk
- To select a disk, use the command select disk N, where N is the serial number of the disk. Disk numbering starts from zero. Our laptop only has one hard drive, so the disk selection command looks like this: select dick 0
- Deleting data: clean
- Convert the disk: convert mbr
- Finish working with the command line: exit
- We continue installing Windows.
Convert to MBR without data loss
Converting a GPT disk to MBR without data loss is done using the Paragon Manager utility, which can be found on multiboot disks (Live CD). We will use the Lex Live CD (build from Lexa 2011).
- Boot from Live CD.
- We launch Paragon Manager and select our hard drive, which Paragon recognized as Basic GPT.
- We start the conversion process by selecting the Convert to basic MBR disk option (Hard disk command of the top menu).
When you buy a new computer or laptop, you want it to work long and reliably. Before purchasing, check its serviceability, functionality and the presence of Windows installed on it.
But over time, the new system becomes cluttered with different programs and begins to slow down and freeze. It needs to be reinstalled. But how to do that? How to reinstall the OS, because there was no DVD included with the laptop.
In fact, to restore the system and cleanly install it on your computer, a DVD is not required. The ISO image of the operating system is located inside the computer, in a hidden partition of the Recovery hard drive.
How to install the system from a hidden HDD partition of an HP Pavilion laptop will be written below.
How to reinstall windows 7 on hp pavilion 15N211, 15N221 via BIOS.
Connecting a flash drive
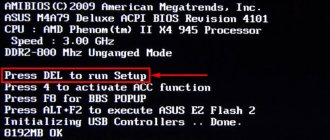
First of all, you should know that different developers set different hot keys for entering the BIOS. On HP laptops this is the “F9” key. While starting or restarting your laptop, press this key continuously until you see a menu with a blue or gray background.
You may have a model that uses a different button to enter the BIOS. To recognize this button, you just need to constantly press the “Esc” button when restarting the laptop. A menu with the title “Startup Menu” will appear in front of you. In it you can find out which key you need to use to enter the BIOS. Next to this key there should be the inscription “Boot Device Options”.
When you go directly to the BIOS itself, you will see a list of boot options. The operating principle is such that the system boots from the top media in the list. Your task is to place the bootable USB flash drive in the first position. To boot from a flash drive on an HP laptop in BIOS, select it in the list of available media and press Enter, thereby changing its priority to the highest.
After these steps, the laptop should automatically restart, and you should make sure that it is the flash drive that has started.
Now you know how to set the HP BIOS to boot from a flash drive. Please comment below for details so we can answer all your questions.
Welcome everyone to another article! First of all, I would like to inform you that starting today, I am starting to publish answers to your frequently asked questions, primarily related to malfunctions or unsatisfactory operation of your computer, laptop or tablet. To date, I have received and continue to receive over 350 letters from you. In short, the majority of people are mainly interested in issues that directly relate to eliminating various types of errors, both in computers themselves and on mobile devices.
Therefore, if you had to be in a similar situation, when strange things began to happen on the screen of your computer, laptop, tablet, and even on your phone: such as strange pop-up errors, spontaneous rebooting of the device, freezing, then in this case, eliminate such incidents on your device you can do it yourself. To do this, go to my website and, using the site search, you can find the answer to your question. Otherwise, write to me via the feedback form. I will try to help you as soon as possible.
In today’s article I publish another question that was asked to me by Sergey Vasilyevich from Chelyabinsk.
Hello Dmitry. I have been mastering my laptop for about two years, so you can call me an advanced teapot. But today I had a question: how can I boot from a flash drive on an HP brand laptop? There was a desire to install a second system on my laptop. I read your other articles in which you suggest logging into the BIOS using the DEL or F2 buttons, but unfortunately I can’t log into the BIOS this way. Help me please.
Well, Sergey Vasilyevich, so that you don’t waste money on calling a technician, I’ll tell you how to boot from a flash drive on an HP laptop to install the operating system. In fact, the process is quite simple, so any novice user can handle it. Just follow my instructions and you will succeed. Typically, the user needs to boot from an external drive to install or change operating system settings. It should be noted that on some laptop computers, loading from a flash drive may differ from the same process on a stationary “machine”.
Important
! The instructions described in this article are suitable for all HP laptops. The only thing that may differ is the keys to launch the boot menu when you start the computer. A small section in the material is devoted to this point.
For successful work, we will need a flash drive with installation files and a charged or connected laptop. As a rule, an Internet connection is not required here. If you have no problems with the flash drive, and you are sure that it was written correctly, you can immediately proceed to the step-by-step instructions for launching files from a bootable flash drive.
Creating a bootable USB flash drive
If you came to this article, most likely you already have a bootable drive on hand. But if you don’t know how to make such a flash drive, read the simple instructions. I will not describe several methods, we will get by with one, since the article is devoted to a different issue. We will create a bootable USB flash drive using a simple and, most importantly, free UltraISO program.
Download the application from here https://ultraiso-ezb.ru/
If necessary, you can use another application to create bootable drives. I believe that Ultra ISO is the best option - it is as simple as possible and does not require an investment of money. What else does the average computer user need?
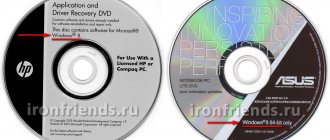
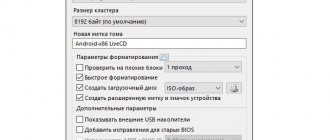
I have already discussed this question in one of the articles, well, perhaps I will repeat it in this article on how to write an image to a flash drive. So, it is desirable that the flash drive is empty and formatted in NTFS. Run the Ultra ISO program as administrator. After opening the application window, you need to click on the “Open” button, which is located in the top toolbar of Ultra ISO. In the screenshot below, the button we need is circled:
In the window that opens, you must specify an image of the operating system or other software for subsequent recording to an external drive. The easiest way to work with images is to select the desired file in the “Open ISO file” window, and then click on the “Open” button. For example, I chose a Windows 8 Pro system image.
After these steps, on the right side of the program window you will see an image of the operating system, in my case it is Windows 8 Pro. The screenshot shows all the files that are required to create a bootable drive:
Now insert the flash drive into the laptop. Please note that recording modern operating systems requires a drive with at least 4 GB of storage capacity. I already said about formatting. You can perform this procedure directly in Ultra ISO. Don't forget to copy the important data that is present on the flash drive. During the formatting process, all files and folders will be deleted from the flash drive.
So, the flash drive is ready, now in the application window click on the “Boot” button, and then select the “Burn hard disk image...” item in the context menu.
After this, the process of creating a bootable flash drive will begin. The speed of the procedure depends on the power of your computer and the features of the flash drive. After a while, you will see a message indicating that the recording was completed successfully. We close the Ultra ISO program, we have completed the first stage. Now you can move on to the main process that this material is devoted to - how to enter the BIOS on an HP laptop.