05/30/2020 windows | data recovery | programs
One of the problems that users of Windows 10, 8.1 and Windows 7 face is the hard drive (HDD and SSD) or disk partition with the RAW file system, the same thing happens with a flash drive or external drive. This is usually accompanied by the messages “To use the disk, first format it” and “The volume file system is not recognized,” and when you try to check such a disk using standard Windows tools, you will see the message “CHKDSK is not valid for RAW disks.”
The RAW disk format is a kind of “lack of format,” or rather a file system on the disk: this happens with new or faulty hard drives, and in situations where for no reason the disk has become a RAW format - more often due to system failures , improper shutdown of the computer or power problems, while in the latter case the information on the disk usually remains intact. Important Note: Sometimes a drive will appear as RAW if the file system is not supported by the current OS, in which case steps should be taken to open the partition in an OS that can handle that file system. This instruction provides details on how to fix a disk with a RAW file system in different situations: when there is data on it, the system and you need to restore the previous file system from RAW, or when there is no important data on the HDD or SSD and formatting disk is not a problem.
- Correcting file system errors on disk
- Easy partition formatting
- Recovering NTFS from RAW to DMDE (also suitable for FAT32)
- Fixing a RAW disk in TestDisk
- How to restore a disk from RAW to a system disk
- Video instruction
Checking the disk for errors and fixing file system errors
This option is the first thing to try in all cases where a RAW partition or disk appears. It does not always work, but it is safe and applicable both in cases where a problem has arisen with a disk or data partition, and in cases where the RAW disk is a system disk with Windows and the OS does not boot.
In case the operating system is running, just follow these steps:
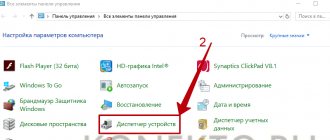
- Run Command Prompt as Administrator. In Windows 10, the easiest way to do this is to use the search in the taskbar: enter “Command Prompt”, right-click on the result found, select “Run as administrator”. Other ways to run Command Prompt as an administrator.
- Type the command chkdsk D: /f and press Enter (in this command, D: is the letter of the RAW drive that you want to fix). If the drive letter is missing, you can assign it in Disk Management through the drive's context menu (shown in the video below).
After this, two scenarios are possible: if the disk has become RAW due to a simple file system failure, the scan will begin and, with a high probability, you will see your disk in the desired format (usually NTFS) when it is completed. If the matter is more serious, the command will display “CHKDSK is not valid for RAW disks.” This means that this method is not suitable for you to restore the disk.
In situations where the operating system does not start, you can use a Windows 10, 8 or Windows 7 recovery disk or a distribution kit with the operating system, for example, a bootable USB flash drive (I will give an example for the second case):
- We boot from the distribution kit (its bitness must match the bitness of the installed OS).
- Next, either on the screen after selecting the language at the bottom left, select “System Restore” and then open the Command Prompt, or simply press Shift+F10 to open it (on some laptops Shift+Fn+F10).
- On the command line we use the commands in order
- diskpart
- list volume (as a result of executing this command, we look at what letter the problematic disk, or, more precisely, partition, is currently located under, since this letter may differ from the one that was in the working system).
- exit
- chkdsk D: /f (where D: is the letter of the problem drive, which we found out in step 5).
Here the possible scenarios are the same as those described earlier: either everything will be fixed and after a reboot the system will start as usual, or you will see a message stating that you cannot use chkdsk with a RAW disk, then look at the following methods.
Removing write protection of a flash drive through the Group Policy Editor
Another method that allows you to format a flash drive even if it is write-protected. It is based on using the capabilities of the Local Group Policy Editor:
- Press the Win+R keys. In the line of the window that appears, write “gpedit.msc”. Click “Ok”.
- The editor menu will open. Here you need to go to the left along the “Configuration” - “Administrative Templates” - “System” branch. Next, select “Access to removable storage devices.”
- Now look at the right side of the menu. Find the option “Removable drives: disable writing”. Most likely, the value opposite it will be “Enabled”. Naturally, we change it to “Disabled”.
Easily format a disk or RAW partition when there is no important data on it
The first case is the simplest: it is suitable in situations where you see the RAW file system on a newly purchased disk (this is normal) or if an existing disk or partition on it has this file system, but does not have important data, that is, restore the previous one No disk format required.
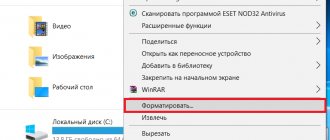
In such a scenario, we can simply format this disk or partition using standard Windows tools (in fact, we can simply agree to the formatting suggestion in Explorer “To use the disk, first format it):
- Launch the Windows Disk Management utility. To do this, press the Win+R keys on your keyboard and type diskmgmt.msc, then press Enter.
- The Disk Management utility will open. In it, right-click on the RAW partition or disk, and then select “Format”. If the action is inactive, and we are talking about a new disk, then right-click on its name (on the left) and select “Initialize disk”, and after initialization, also format the RAW partition.
- When formatting, you only need to specify the volume label and the desired file system, usually NTFS.
If for some reason you cannot format the disk in this way, try also by right-clicking on the RAW partition (disk), first “Delete volume”, and then click on the area of the disk that is not allocated and “Create a simple volume”. The Volume Creation Wizard will prompt you to specify a drive letter and format it with the desired file system.
Note: All methods for recovering a RAW partition or disk use the partition structure shown in the screenshot below: a GPT system disk with Windows 10, an EFI boot partition, a recovery environment, a system partition, and an E: partition that is defined as having a RAW file system (this information , I assume, will help to better understand the steps outlined below).
First thing
First, we recommend that you take a close look at the media itself. Some USB flash drives and memory cards have a special switch. It has two positions: one activates the write lock, and the other removes it.
This means that all you have to do is move the lever to remove the protection. At the same time, it will be possible to write any information onto the flash drive again. True, you first need to format the drive using standard Windows tools.
If there is no switch on the flash drive, then just check it with antivirus software. The removable drive may be infected with malware, which forces it to be write-protected and prevents it from being formatted.
For reference! If you use a card reader, it's worth checking that too. Sometimes, due to a malfunction of this device, the system writes that “the disk is write protected.”
Recovering an NTFS partition from RAW to DMDE
It’s much more unpleasant if the disk that became RAW contained important data and you need to not only format it, but return the partition with this data.
In this situation, first I recommend trying a free program for data recovery and lost partitions (and not only for this) DMDE, the official website of which is dmde.ru (this guide uses the GUI version of the program for Windows). Details on using the program: Data recovery in DMDE.
The process of restoring a partition from RAW in a program will generally consist of the following steps:
- Select the physical disk where the RAW partition is located (leave it enabled).
- If a lost partition appears in the list of DMDE partitions (can be determined by the file system, size and strikethrough on the icon), select it and click “Open Volume”. If it is not displayed, perform a full scan to find it.
- Check the contents of the section to see if this is what you need. If yes, click the “Show Partitions” button in the program menu (at the top of the screenshot).
- Make sure the desired partition is highlighted and click "Recover". Confirm the recovery of the boot sector, and then click the “Apply” button at the bottom and save the rollback data to a file in a convenient location.
- After a short time, the changes will be applied and the RAW disk will be accessible again and have the desired file system. You can exit the program.
- Some other nuances of using the program, for example, in the absence of a “Restore” button, are shown in the video instructions below.
Note: in my experiments, when fixing a RAW disk in Windows 10 (UEFI + GPT) using DMDE, immediately after the procedure the system reported disk errors (and the problem disk was accessible and contained all the data that was on it before) and suggested rebooting computer to fix them. After rebooting everything worked fine.
If you use DMDE to fix the system disk (for example, by connecting it to another computer), keep in mind that the following scenario is possible as a result: the RAW disk will return the original file system, but when connecting it to the “native” computer or laptop, the OS will not load. In this case, restore the bootloader, see Restoring the Windows 10 bootloader, Restoring the Windows 7 bootloader.
What else can help remove write protection on files?
If you have tried all the methods described above, but the flash drive still does not format, then most likely it has failed. This happens quite often. Taking the drive to a service center is not the most rational solution. Repairing a flash drive usually costs more than buying it. Therefore, it is best to purchase new removable media.
Recovering a RAW disk in TestDisk
Another way to effectively search and recover a disk partition from RAW is the free TestDisk program. It is more difficult to use than the previous option, but sometimes turns out to be more effective.
Warning: Only attempt what is described below if you know what you are doing, and even then, be prepared for something to go wrong. Save important data to a physical disk other than the one you are working on. Also stock up on a Windows recovery disk or a distribution kit with the OS (you may need to restore the bootloader, for which I provided instructions above, especially if the disk is GPT, even in cases where it is not the system partition that is being restored).
- Download the TestDisk program from the official website https://www.cgsecurity.org/wiki/TestDisk_Download (an archive will be downloaded, including TestDisk and the PhotoRec data recovery program, unzip this archive to a convenient place).
- Run TestDisk (file testdisk_win.exe).
- Select “Create”, and on the second screen select the disk that has become RAW or has a partition in this format (select the disk, not the partition itself).
- On the next screen you need to select a disk partition style. Usually it is determined automatically - Intel (for MBR) or EFI GPT (for GPT disks).
- Select "Analyze" and press Enter. On the next screen, press Enter (with Quick Search selected) again. Wait while the disk is analyzed.
- TestDisk will find several partitions, including the one that was turned into RAW. It can be determined by its size and file system (the size in megabytes is displayed at the bottom of the window when you select the appropriate partition). You can also view the contents of the section by pressing the Latin P; to exit viewing mode, press Q. Sections marked P (green) will be restored and recorded, those marked D will not. To change a mark, use the left-right keys. If you can't change it, then restoring this partition will break the structure of the disk (and it's probably not the partition you want). It may turn out that the currently present system partitions are designated for deletion (D) - change to (P) using the arrows. Press Enter to continue when the disk structure matches what it should be.
- Make sure that the partition table on the disk shown on the screen is correct (that is, as it should be, including partitions with bootloader, EFI, recovery environment). If you have doubts (you do not understand what is displayed), then it is better to do nothing. If in doubt, select “Write” and press Enter followed by Y to confirm. After this, you can close TestDisk and restart the computer, and then check whether the partition was restored from RAW.
- If the disk structure does not match what it should be, then select “Deeper Search” to “deep search” partitions. And just as in points 6-7, try to restore the correct partition structure (if you are not sure what you are doing, it is better not to continue, you may end up with a non-starting OS).
- More detailed instructions for the program: Recovering disk partitions in TestDisk.
If everything went well, the correct partition structure will be written, and after restarting the computer, the disk will be accessible as before. However, as mentioned above, you may need to repair the bootloader; Windows 10 has automatic boot repair that works well in the recovery environment.
What errors look like
Let me show you what the error looks like. On the first window for formatting a removable disk, you will see “The disk is write protected.”
By clicking ok, you will see another interesting warning:
If you open Disk Management, you will find that the media has a Read-Only status.
There is also a situation where the flash drive is visible and opens, but writing to it does not give anything, even if you take into account that write rights are present on the “Security” tab. Here you already see the message “ Remove protection or use another disk .”
We can easily cure all these symptoms.
RAW file system on Windows system partition
In cases where the file system problem has occurred on a partition with Windows 10, 8 or Windows 7, and a simple chkdsk in the recovery environment does not work, you can either connect this drive to another computer with a working system and fix the problem on it, or use LiveCD with tools for recovering partitions on disks.
- A list of LiveCDs containing TestDisk is available here: https://www.cgsecurity.org/wiki/TestDisk_Livecd
- To restore from RAW using DMDE, you can extract the program files to a WinPE-based bootable USB flash drive and, after booting from it, run the program executable file. The program's official website also has instructions for creating bootable DOS drives.
There are also third-party LiveCDs specifically designed for partition recovery. However, in my tests, only the paid Active Partition Recovery Boot Disk turned out to be workable in relation to RAW partitions; all the others only allow you to restore files, or find only those partitions that were deleted (unallocated space on the disk), ignoring RAW partitions (this is how the Partition function works Recovery in the bootable version of Minitool Partition Wizard).
At the same time, the Active Partition Recovery boot disk (if you decide to use it) may work with some features:
- Sometimes it shows a RAW disk as a regular NTFS, displaying all the files on it, and refuses to restore it (Recover menu item), reporting that the partition is already present on the disk.
- If what is described in the first paragraph does not happen, then after recovery using the specified menu item, the disk is displayed as NTFS in Partition Recovery, but remains RAW in Windows.
Another menu item solves the problem - Fix Boot Sector, even if it is not a system partition (in the next window, after selecting this item, you usually do not need to perform any actions). In this case, the file system of the partition begins to be perceived by the OS, but problems with the bootloader are possible (solved by standard Windows recovery tools), as well as the system being forced to start a disk check at the first start.
Disk is write protected, USB cannot be formatted
Good afternoon, dear readers and subscribers of the blog pyatilistnik.org. I'll tell you a short story about how people break USB flash drives and how to restore them later. My colleague gave one of the employees a flash drive to transfer data from one computer to another. The user completed the transfer and gave us the media. Next, my colleague inserted this flash drive and tried to write something on it and was very surprised that it was not visible at all, only a window immediately appeared that it needed to be formatted, we tried it and received the error “The disk is write protected .” Let me show you how to solve this problem and return the media to working condition.
Trancend flash drive won't format
There are also specific methods for USB drives from certain manufacturers, for example, for Trancend, there is a special JetFlash Online Recovery utility.
The utility itself is very simple, just run it and click Start.
The USB drive recovery process will begin.
As you can see, everything was completed successfully and the flash drive opened quietly.
Summary
As you can see, the error with the inability to read or format a flash drive can be solved very simply, for this there are both built-in utilities and utilities from manufacturers, choose the method that suits you and repair it, if you have questions, write them in the comments, I will try to answer them, thanks to all.
Useful advice from user Sergey (Fin)
Why is the format changing?
Among the reasons that cause the replacement of the desired format with an unreadable one, the main place is occupied by purposefully acting viruses, power surges, sudden power outages in the process of performing some system or user operations, etc.
It also happens that the system defines the hard drive as RAW, files and folders seem to be displayed, but it is impossible to do anything with them (copy, open, move, delete). In this case, you cannot even format the partition, change the volume label, or change its conditional or actual size.
Removing write protection from USB in the Windows Registry Editor
This method will help in 99 percent of cases when your flash drive is visible, but does not allow you to write anything on it. The whole problem here is in one registry key that needs to be corrected or recreated. And so, press the Win and R buttons at the same time, and in the “Run” window that opens, write regedit.
Go to the section:
If there is no such section, then you will have to create it via right-click and give it the name StorageDevicePolicies
In the StorageDevicePolicies section, you need to create a registry key "QWORD Value (64-bit)" named WriteProtect and give it a value of 0.
If the WriteProtect key was already in your registry and had a value of 1, then it prohibited formatting the flash drive and wrote that the disk is write protected, change it to zero.
After making changes to the registry, you need to restart your computer, otherwise the settings will not take effect.