Personal computers can be controlled by mouse keyboards and other input peripherals. Laptops, instead of a mouse, use touchpads - special touch surfaces on which you need to move your finger. They easily replace mice familiar to PC users and allow you to easily connect them together. But sometimes after reinstalling or installing Windows 10, not all drivers are installed, and the touchpad may not work. Moreover, its functioning may be impaired by third-party programs. It is necessary to consider how the touchpad is configured on a Windows 10 laptop.
How to invert the touchpad?
Go to Control Panel as Browning IT said, but instead of clicking on the "Mouse" option, click on "Asus Smart Gesture" instead. In the two-finger column, select the "Content moves backwards" checkbox.
Interesting materials:
How much is maternity capital in Russia? How much alcohol can you bring to Germany? How much alcohol can be exported from Russia? How much alcoholic beverages can be imported into Russia? How long does it take to wash a baby's clothes? How much do gerberas cost in water? How much is 737,800 worth? How much does a private jet cost? How much does rough finishing cost in a new building? How much does it cost to completely renovate a room?
Disable precision touchpad gestures in Windows 10
Microsoft has not yet provided an official way to disable gestures, but advanced users have still found a method to do this using the Registry Editor. It is worth noting that this guide disables gestures only for a specific computer user. For other accounts you will have to do the same steps.
Warning : all actions in the instructions must be performed as an administrator.
- Press Win + R.
- Enter the command regedit and press Enter.
- Go to: HKEY_CURRENT_USER\Software\Microsoft\Windows\CurrentVersion\PrecisionTouchPad
- Find the option on the right EnableEdgy and double-click on it.
- Change its value to 0 and press OK.
- Reboot your device.
Windows 10 Creators Update adds more advanced gesture settings. You can find them in the Settings app - Devices - Touchpad . You may find that personalizing gestures is preferable to disabling them entirely, as it will allow you to customize the touchpad specifically to your needs or habits.
Synaptics touchpads
Devices in the budget and mid-price range usually have built-in cheaper panels from Synaptics (however, this occurs even in top-end devices, like the HP Specter x360). If this is your case, then you won't find Touchpad settings in the Settings , and the solution above for disabling gestures won't work. To personalize the panel, you need to use the proprietary Synaptics utility:
- Press Win + R.
- Type the following command and press Enter: control mouse
- Go to the Touchpad or ClickPad Settings .
- Find the Settings or Options , and in the new window find the options you need.
The interface of these windows is quite different depending on the driver version, touchpad firmware and the panel itself. For example, this is how they look in the HP ProBook 450 G1 and HP Specter x360 G2:
HP Probook 450 G1
HP Specter x360 G2
Detailed instructions on this can usually be found on the device manufacturer's website.
Reinstall the touchpad driver.
Touchpad gestures may not work on your PC if the touchpad driver is corrupted or one of its files is missing. Reinstalling the touchpad driver is the best way to fix the problem. To reinstall the touchpad driver:
Step 1: Open Device Manager. Expand "Mice and other pointing devices" to see an entry for your touchpad.
Step 2: Right-click on the touchpad tab, and then click the “Remove device” button.
Step 3: At the next prompt, select "Uninstall driver " for this device, and then click the "Uninstall" to remove the driver.
Step 4: Restart your computer.
Step 5: Download the latest driver for your touchpad from your PC manufacturer's website and then install it.
Step 6: Restart your computer again.
Three finger gestures
Three-finger gestures in Windows 10 have both tap and swipe features. Three-finger gestures are where you start to see the full spectrum of swipe gestures.
Three-finger tap: A three-finger tap gesture will open Cortana.
Three-finger swipe gestures let you switch between apps and view your home screen.
Swipe up with three fingers: Enter multitasking mode, i.e. it will simulate pressing the multitasking button next to Cortana's search bar in Windows 10. This gesture also has the additional function of a three-finger swipe down gesture.
Swipe down with three fingers: Minimize all windows and go to the desktop. If you swipe up with three fingers immediately after using this gesture to minimize all windows, you can maximize them again. However, if you click anywhere on the desktop or switch to another app, a three-finger swipe up gesture will open the task view.
Swipe left with three fingers: This will take you to the last app you used. This gesture mimics the Alt+Tab shortcut, which allows you to cycle through all open application windows.
Three-finger swipe right: This works the same as the left swipe gesture, and is more useful when you're actually switching apps. It allows you to move to the next window or application window, while the left gesture allows you to move to the previous application.
One finger gestures
There are no swipe gestures that can be performed with one finger. This is how you control the cursor on the screen.
One-finger tap: The one-finger tap gesture acts like the left mouse button on a regular mouse.
Double-tap with one finger: If you double-tap and drag an item with one finger, you can select and move it. This works for files and folders as well as web elements. For example, you can double-tap a link and drag it to the new tab button in Chrome to open it on a new tap.
Enabling the touchpad
The touchpad is activated via the keyboard. But if this method does not work, then you will have to check the system settings.
Via keyboard
First of all, look at the icons on the F1, F2, F3, etc. keys. One of these buttons should be responsible for turning the touchpad on and off. If possible, review the instructions that came with the laptop; they usually describe the functions of the main shortcut keys.
Click on the hotkey to enable or disable the touchpad
On some models, key combinations are used: the Fn button + any button from the F list, which is responsible for turning the touchpad on and off. For example, Fn+F7, Fn+F9, Fn+F5, etc.
Press and hold the desired combination to enable or disable the touchpad
Some laptop models have a separate button located near the touchpad.
To enable or disable the touchpad, click on the dedicated button
- How to set up the touchpad in Windows 10
To turn off the touchpad, press the button that turns it on again.
Through system settings
Go to "Control Panel".
Open Control Panel
Select the "Mouse" section.
Open the "Mouse" section
Switch to the touchpad tab. If the touchpad is disabled, click on the “Enable” button. Done, check if touch controls work. If not, then read the troubleshooting points described below in the article. To turn off the touchpad, click on the “Disable” button.
Click on the “Enable” button
Video: how to enable/disable the touchpad on a laptop
Disable gesture or touch
You can disable a gesture, gesture group, and touch. Open the Settings app and select Device > Touchpad.
To disable an entire group of gestures, open the drop-down list for the gesture and select "None" from the list of actions. To turn off a tap gesture, open the dropdown below it and select the “None” option.
If you want to disable a specific gesture, such as the three-finger swipe up, click the Advanced Gesture Configuration button in the top right corner. Open the drop-down list below the gesture you want to disable and select "None" from the listed options.
Disable touch screen gestures in Windows 10
Owners of tablets or convertibles running Windows 10 are luckier. Microsoft developers have provided for disabling screen gestures, so the method below should definitely work.
How to disable screen gestures using the Local Group Policy Editor
This method only works on Windows 10 Pro and higher (including Windows 10 S), since lower editions of Windows do not have a Local Group Policy Editor.
- Click Win+R. Enter the command gpedit.msc and press Enter.
- Go to User Configuration - Administrative Templates - Windows Components - Boundaries User Interface .
- Find the option on the right Allow scrolling from edges and double-click on it.
- Select position Disabled, press Apply And OK.
- Reboot your device.
Changes will only work for the current user. If you want to apply them to all computer accounts, change the same setting under Computer Configuration - Administrative Templates - Windows Components - Boundaries User Interface .
How to disable screen gestures using Registry Editor
This method is intended for Windows 10 Home and Home SL users.
- Click Win+R. Enter the command regedit and press Enter.
- Go to HKEY_CURRENT_USER\SOFTWARE\Policies\Microsoft\Windows .
- Click on the folder Windows right mouse button and select Create - Section.
- Name the new directory EdgeUI and go to it.
- Right-click on the right side of the Registry Editor and select New - DWORD Value (32 bits).
- Give the new key a name AllowEdgeSwipe. By default its value will be equal to 0.
- Reboot your device.
Changes will only affect the current user. If you want to apply them to all accounts, work under the HKEY_LOCAL_MACHINE rather than the HKEY_CURRENT_USER category .
Now you can disable gestures on touchscreens or precision touchpads.
How to set up a touchpad on a Windows 10 laptop
Not everyone knows, but the touchpad on laptops sometimes tends to turn off. This may be due to various reasons: sometimes this happens due to simple deactivation of the device, and sometimes it is disabled at the system level. It is possible that the device simply failed or its operation was blocked as a result of viruses and other malware entering the computer. You need to figure out how to configure Windows 10 touchpad gestures and enable it after installing the system.
Appearance of a laptop touchpad
Enabling the touchpad in BIOS
Sometimes the touchpad is simply disabled in the BIOS due to a computer malfunction. This can happen due to viruses entering the operating system or as a result of incorrect user actions.
Step-by-step instructions for activating the touchpad via BIOS or UEFI are as follows:
- Perform a reboot.
- During its activation, press a key that puts the PC into BIOS boot mode (usually F2, F5, F8 or F10).
- Wait for the BIOS/UEFI screen to appear.
- Use the left/right keys (arrows) to go to the “Advanced” tab.
- Find the “Internal Pointing Device” item there and activate it by setting the value to “Enabled”.
- Exit the BIOS and save the settings by pressing the F10 key and selecting “Yes”.
Activation in BIOS
How to enable the touchpad on a laptop
Very often, the Touch Pad turns off not due to system failures, but due to incorrect actions and negligence of an inexperienced user. In addition to the basic functional keyboard buttons on laptops and netbooks, there is a special Fn key, which, in combination with other buttons, allows you to control the device:
- change the screen brightness level and speaker volume,
- put the laptop into sleep mode (hibernation),
- turn off its display and turn it on,
- restrict access to the Internet.
Among these functions there is also an option to disable the touchpad. It was created so that in some situations the cursor manipulation device does not interfere with the owner of the laptop, and he cannot accidentally press it, using only the keys while typing text or watching a movie.
All laptop manufacturers have the above steps in a different order on the function buttons, and there is no standardization or model according to which devices are assembled. This was done to create an individual style and increase comfort. On one model, for example Asus, it will be more convenient to turn off the sound by pressing F2, and on another - on F5, so developers are transferring functions to ensure maximum user comfort.
Finding the touchpad on and off button is easy. It is assigned to one of the twelve buttons from F1 to F12. It is enough to find the touchpad icon, which cannot be confused with sound, brightness or other functions. Usually it is located in the interval F4 - F8, that is, in the middle of the keyboard at the top.
Adjusting touchpad sensitivity on Windows 10
In order to configure the sensitivity of the sensors of this device, you need to use the same tools as when configuring the parameters of a computer mouse. There is no need to download anything, since everything you need is in the Windows operating system. The step-by-step instructions are as follows:
- Go to the Start menu.
- Enter the phrase “Mouse Settings” or simply the word “Mouse” in the search bar.
- Find the mouse (pointer) parameters in the search results and select them.
- After waiting for the settings dialog to launch, select the “Pointer Options” tab.
- By moving the slider left and right, you set the speed of its movement, and, consequently, the sensitivity of the touchpad or regular mouse.
- View additional settings that allow you to configure cursor movement, visibility, display, folder opening speed, and much more.
Important! There is another way to get to the touchpad and mouse settings menu, but it is longer. You should go to the Control Panel through the Start menu or otherwise, and then search for settings in the Control Utility itself.
Checking the touchpad name to download driver software
What is a touchpad
You can only move the arrow-shaped pointer on the screen of desktop computers using the mouse. However, a portable computer (laptop) is equipped with another control device - a non-removable touch panel. Its other name is touchpad from the English word touchpad.
The touchpad is rectangular, often with rounded edges, and is located under the laptop keyboard. At the bottom of the touchpad there are always two buttons, similar to the keys of a regular computer mouse.
The touchpad on a laptop is located under the keyboard and looks like a rectangle
The arrow is controlled by various types of taps, clicks and finger movements. As a result, the PC user performs actions on the computer that would seem impossible without a mouse: launching utilities, folders, menus, services; work on the programs themselves; close them and turn off the PC.
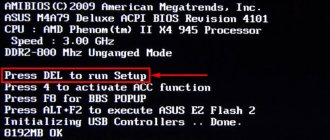
Activating the touchpad in BIOS
Often the culprit for a touchpad not working is an option in the BIOS. To enable it via BIOS, you will need to follow the following instructions.
- We restart the computer and when it starts, press the DEL or F2 button several times (your laptop will tell you what to press when starting the OS).
- After opening the blue BIOS menu, go to the Advanced tab, find the Internal Pointing Device parameter and enable the touchpad, changing Disabled to Enabled.
- Then be sure to save the settings before exiting by finding the Save & Exit tab and pressing Y on the keyboard.
Advanced tab with touchpad "switch" in BIOS
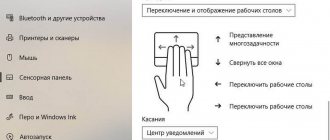
Four finger gestures
Four-finger gestures support a full range of swipe and tap gestures.
Four-finger tap: Open Action Cneter.
Four-finger swipe gestures let you switch between virtual desktops and go to the desktop.
Four-finger swipe up: Enter multitasking mode.
Swipe down with four fingers: Minimize all windows and show the desktop. If you swipe up with four fingers immediately after swiping down, you can maximize all windows. This is literally the same as the three-finger swipe down gesture.
Swipe left with four fingers: Go to the previous virtual desktop.
Swipe right with four fingers: Move to the next virtual desktop.