Today there are fewer and fewer computers with disk drives on sale; users give preference to USB devices. They are compact, versatile, more convenient to use and practical. To eliminate errors when copying, it is advisable to purchase high-quality and proven products from a reliable supplier - if a store purchases USB flash drives in bulk without intermediaries, this guarantees high quality products. You just need to choose the right model for the job.
Every user should be able to burn a Windows image to an ISO - this option works; errors almost never occur when copying. In addition, it is impossible to load data from Windows folders directly onto USB drives, since the flash drive will not become bootable and the computer simply will not see it when reinstalling the OS. To do this, you will need to mount the ISO image using a special UltraISO program for working with such formats.
Preparation
Before you get started, you need to prepare your computer - for this you will need to download UltraISO. Both a paid version and a freely available program are available on the Internet. It is recommended to go to the developer’s website and download a proven program that will work correctly and will not fail at a crucial moment.
The algorithm of actions is quite simple:
- find UltraISO on the website and click “download”;
- then open the folder on the computer, finding the icon of the same name in the downloads;
- by clicking on the icon, select “install”, specifying the path to the file.
Once the installation is complete, an UltraISO icon will appear on the desktop, which will be required for further work. The program can be used immediately when you need a USB Flash.
Flash drive or CD?
Of course, it is much easier to burn the system onto a laser disk, and such media will work 100% on any PC with a disk drive installed. To record such discs, Windows even has a built-in disc burning function.
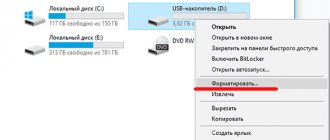
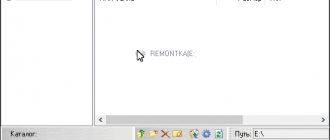
To do this, after inserting the disc into the drive, select the type of use of the disc “With a CD/DVD player.” After that, in Explorer, select the desired ISO image on the HDD and right-click on it. In the context menu you need to select “Burn disk image”.
If this line is not in the context menu, then you have some kind of utility installed for working with images, for example, Daemon Tool, and it has replaced this entry. To put everything back in place, you will have to remove Daemon Tool from the system. After that everything should be seen. In the window that opens, select the laser disk drive and click OK. The process of mounting the image and burning the DVD will begin. If this was an installation image of the system, then this disk will be recorded as bootable.
But what if your PC does not have a DVD writer or no drive at all? This situation is a common occurrence for modern laptops, which do not install a drive for the sake of a thin body. There is only one way out - use a USB flash drive as bootable media. But, in this case, you will not find utilities built into the system and you will have to use a third-party tool, for example, UltraISO.
The program is paid, but it can be used in test mode for 1 month. This should be enough to record the required number of images. Below we will tell you about ultraiso and how to create a bootable USB flash drive.
Mounting the disk image
To perform these actions, follow a simple algorithm:
- find the program by the UltraISO icon;
- then click “File” and open it;
- find “Bootboot” in the pop-up window and save the image by selecting the name;
- do not forget to specify the path by selecting the installation flash drive;
- We complete the procedure by clicking “Burn” and agreeing to the preliminary formatting of the flash drive.
Sometimes problems arise during this procedure - the computer may simply not see the working media. To do this, it must be removed from the socket and reinserted, sometimes the procedure must be repeated several times.
How to make a bootable ISO disk with Windows 10?
Now let's return to the question of how to make a bootable disk with an ISO extension for storing it on a computer and then being able to write it to a flash drive or DVD. In the previous chapter, we were faced with choosing a media type. To create a Windows 10 image file, you need to select “ISO file” at this step
What is your opinion: is WiFi harmful?
Yes
22.92%
No
77.08%
Voted: 36456
After which the disk image will be saved to the selected folder, which can then be mounted into a virtual drive or written to a flash drive.
We write data to media from the Windows folder
This option is suitable if it is not possible to download from the Internet, but there is a folder on the computer with files for installing the operating system. To do this, you need to go to UltraISO and follow the simple step-by-step instructions.
Recommendations for recording:
- select the combination “File – New – Bootstrap”;
- After these steps, a window will pop up, fill out the menu and enter the necessary files;
- in the Windows operating system this is the bootfix.bin folder;
- select a folder, but copy only the contents;
- We complete the procedure by selecting the “Boot” icon and follow the recommendations from the previous section.
How can I create a bootable USB flash drive using UltraISO?
You just need to follow the following instructions:
- Launch the program (you need to run it as an administrator).
- Next, you need to open the image of the Windows installation file that you want to burn. To do this, select File – Open (or you can press Ctrl + O).
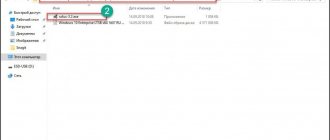
- Specify the folder in which the Windows image is located, select it and click the “Open” button.
- If you did everything correctly, it should look like this:
- Now let's start recording. To do this, in the top menu you need to select the following items: Bootstrap – Burn hard disk image.
Select "Burn Hard Disk Image" - Next, select your flash drive, leave the recording method the same – USB-HDD+ and press the “Record” button. IMPORTANT! This will delete all your data on the USB flash drive. Therefore, before performing step 6, it is recommended to save all files (for example, to a computer).
- Actually, the program will warn you about this. If you have saved all the data (or you do not need it), agree and click the “Yes” button.
- The recording can last from a couple of minutes to an hour (or even more). It depends on the power of your PC or laptop.
- After the recording is completed, the program will inform you that the process has been successfully completed.
Transferring information from a CD
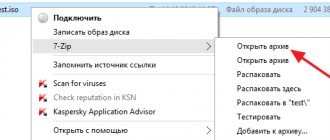
Using the UltraISO program, you can quickly load working data directly from the disk on which the operating system is located. This option is suitable in cases where the computer does not have a disk drive. To do this, find a suitable file, click “Open CD/DVD” and specify the path to the drive.
Further instructions are the same as in the previous method: we burn the image with a similar combination, after the procedure we get a copy of the bootable CD media. The flash drive can then be used to reinstall the system on the computer.
Creating a bootable USB flash drive using an ISO distribution
To create a boot image on a Flash drive, you must do the following:
- Burn UltraISO to your computer (there are Russian versions).
- Download the operating system distribution.
- Open the CMS client and open the distribution image through it.
- Insert the drive into the USB connector.
- Select the required settings and click on the appropriate button.
Now it’s worth considering each stage in more detail.
Video - Creating a bootable USB flash drive in UltraISO
Editing and recording
UltraISO allows you to burn bootable media of various types. The program can be used to create installation flash drives or DVDs.
To work with the UltraISO distribution image, you must run it in elevated privilege mode. Right-click on the program icon on the desktop. In the context menu that opens, click on the line marked with a two in the screenshot.
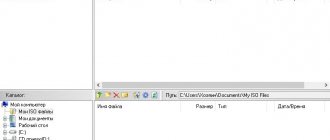
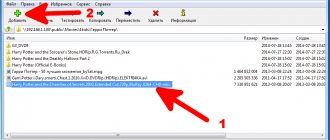
The program window has four sectors. By default, the bottom two are for moving around computer disks, and the top ones are for working with the image. In the area marked with one, go to the folder with the saved ISO file. Its contents will be displayed in the lower right sector. Double click to open the image. The upper left sector shows the directory structure, and the right sector shows their contents.
To add additional information to the image, right-click in the upper right sector. Having expanded the context menu, click on the line indicated by two. As an example, our experts created the “driver” folder. In the picture it is shown as number “3” in the directory tree and in the root directory of the image.
We use the lower sectors to search for files that we want to add. In the upper left, select the “driver” folder. Move the files intended to complement the image to the upper right sector.
To burn a flash drive, click the “Boot” area in the top panel. In the drop-down list, select the line indicated by two in the screenshot.
In the recording dialog box, pay attention to the parameters marked with one. The image file and destination drive are displayed in the notification area and placed in the fields highlighted below with a green marker. Make sure that the correct flash drive and ISO file with the distribution are selected. Press the button indicated by two.
The recording process is accompanied by the filling of the indicator bar. When completed, a notification is displayed, highlighted with a marker and indicated by an arrow. We close the wizard window and can use the flash drive for its intended purpose.
Burn DVD
The steps to prepare a bootable DVD up to step five are exactly the same as those described above.
Instead of the “Bootup” area, click the button highlighted in a circle in the toolbar.
The wizard dialog box is identical to the one displayed when writing a flash drive. Select the destination DVD drive in the field indicated by one and set the speed. For older PCs with 32-bit processors, it can be reduced from the maximum to the minimum possible. Reducing the write speed will avoid errors when reading the disc using basic device drivers.
Program interface
The UltraISO working window is divided into 4 areas, which display the contents of the image, the directory structure on the hard drive, and the files located in the folder specified by the user. The main menu is at the top of the main window. Below are the hotkeys to which the developers assigned the main functionality of the program.
By default, the working window areas are empty. Open the ISO file and the relevant data will appear. Click on any folder to view the attached files in the window opposite. The UltraISO interface is extremely simple and will not cause any difficulties even for beginners.
Before you start
Before you start working with the utility, you need to download it in Russian or any other language convenient for you from the official website by clicking on the green “Download” button. In most cases, the free option is sufficient.
I do not recommend downloading the utility from torrents, file hosting sites and other dubious services. Because there is a chance of catching a virus that can not only destroy your current system, but will also be installed by default with a new ISO image.
Once the download is complete, run the downloaded “EXE” file and complete the installation.
Also, first download the required ISO distribution of the operating system.
What you need to burn Windows to a USB drive
The user will need the following recording tools:
- USB drive with a capacity of 4 to 16 GB. For basic and home versions, a drive with a capacity of 4 to 8 GB is suitable. If you need to install a professional edition, then there must be at least 12 GB of free space on the flash drive.
- An official Windows disk or ISO image downloaded from the Internet.
- Computer support for USB 2.0 and 3.0 standards.
- You also need to update the USB controller drivers.
Burning OS to a USB flash drive via UltraISO
Important! For Windows XP, Vista and 7, the flash drive must be connected to a port that has a 2.0 standard.
What problems might you encounter?
Usually the process of working with the UltraISO utility goes smoothly, but in some cases problems and additional questions may arise. Let's look at the main ones.
- Cannot create a bootable USB flash drive with Windows XP distribution. The solution would be to use the WinSetupFromUSB utility or roll back the current date in the BIOS to 10 years ago. After installation, you can return the current date.
- The capacity of the USB storage device has decreased or it is recognized as a CD-ROM. In this case, formatting using the “ImageUSB” utility, which I discussed at the very end of the article about Memtest86, will help.
- Some users try to record several distributions at once; unfortunately, this is impossible to do.
- The program freezes or the recording process freezes. Most likely the problem is on the side of the USB drive, check its functionality.
- Sometimes there is a need to create a multiboot USB flash drive with a large set of utilities. In UltraISO, there is only one way to make such a drive - to burn a ready-made multiboot image. But you won’t be able to create it yourself. The WinSetupFromUSB utility can help here.
Sources
- https://it-tehnik.ru/software/cd-dvd-blu-ray/ultraiso-to-flash.html
- https://ichip.ru/sovety/ekspluataciya/kak-sdelat-zagruzochnuyu-fleshku-s-pomoschyu-utility-ultraiso-629062
- https://public-pc.com/ultraiso-kak-zapisat-obraz-windows-na-fleshku/
- https://ultraiso.su/kak-pol-zovat-sya-ultraiso/
- https://laptop-info.ru/usb-boot-windows-10/
- https://pcsch.pro/os/windows-7/sozdanie-zagruzochnoj-fleshki-v-ultraiso.html
- https://pc-consultant.ru/soft/kak-cherez-ultraiso-sdelat-zagruzochnuyu-fleshku/
- https://ultraiso-info.ru/kak-polzovatsya/
- https://pchelp.one/nastrojka/sozdaniya-zagruzochnoj-fleshki.html
- https://neumeka.ru/bootable_usb.html
- https://public-pc.com/ultraiso-kak-zapisat-obraz-na-fleshku/
- https://ssecond-life.ru/kak-zapisat-obraz-na-fleshku-ili-disk-cherez-ultraiso.html
- https://onoutbukax.ru/bootable-flash-drive-ultraiso/
[collapse]
Setting the flash drive to boot into BIOS
When you turn on the computer, you must enter the BIOS using the Delete (Del), Esc or F2 buttons on the keyboard to set boot priorities. Be sure to insert the flash drive before turning it on, since there are cases that some equipment does not detect this type of media and may simply not see it if it is inserted after turning it on.
After you have entered the BIOS, go to the Boot tab and set the startup priority of USB-HDD first. As a rule, everything is changed using the F5 and F6 buttons, but it can be different (on the right it will be indicated how you can change).
After this, you need to save the settings and exit; to do this, you need to find the item called Save and Exit Setup. Confirm saving the change by clicking Yes.