Welcome to the Info-Comp.ru website! Today I will talk in detail about how to install the Linux Ubuntu distribution on a computer next to Windows 10, in this case we will consider the case when the computer uses the UEFI system and disk layout in GPT format.
Introductory information
In this material, I will probably consider the standard case when on a computer with UEFI (most modern computers and laptops use UEFI to boot the operating system), for example, on a laptop, the Windows 10 operating system is installed, which has two partitions, i.e. e. drive C and D, and the owner of this laptop, i.e. You have a desire to try Linux, in particular the Ubuntu distribution, and you want to install it on your computer as a second operating system. At the same time, you need to be able to select the system you want to boot into when you turn on your computer.
I would like to say right away that in order to install Ubuntu next to Windows 10 on a computer with UEFI, you do not need to perform any special preliminary actions with the existing computer settings, in particular, there is no need to disable UEFI Secure Boot or enable Legacy mode, Ubuntu at the moment can work with UEFI.
Note!
Everyone's computer configuration is different, as well as their experience in administering operating systems, so I cannot guarantee that everything described in this article will help you install Ubuntu, so I strongly recommend that you back up all important data before proceeding with the installation of Ubuntu, in order to avoid the loss of this data in case of unforeseen situations.
On the other hand, the process of installing Ubuntu on a Windows 10 computer is very simple and in my case there was no data loss.
Some may probably think that UEFI complicates the process of installing Ubuntu on a computer with a second system, but in fact, in my opinion, with UEFI the process of installing Ubuntu is even easier, since in this case you do not need to think about the boot partition, because it is already exists (Windows 10 creates it) and we just need to install the bootloader on this partition.
Useful
Download the image
The Ubuntu 20.04 image can be downloaded from the official website. For faster downloading, I recommend downloading it using a torrent.
Every two years, the April release of Ubuntu receives a long period of support, abbreviated LTS (Long Term Support). The LTS release support period is 5 years. Other versions of Ubuntu are supported for 9 months. In LTS releases, developers try not to include new unfinished components so that the version is as stable as possible. Therefore, all important innovations receive regular releases and then it is finalized to the new LTS. So, non-LTS releases can be called experimental to some extent.
Step-by-step installation of Ubuntu next to Windows 10
Now I will show all the steps that need to be taken in order to install Linux Ubuntu on a computer next to Windows 10, given that the computer uses UEFI.
On a note! For beginner Linux users, I recommend reading my book “Linux for Regular Users” - in it I talk about the basics of Linux in as simple a language as possible and how to use this operating system without the command line
Step 1 – Download the installation image
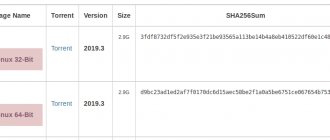
In order to install the Linux Ubuntu distribution, you need an installation ISO image, so you first need to download this installation ISO file. This can be done, of course, from the official Ubuntu website, here is the download page - https://www.ubuntu.com/download/desktop
This page always contains links to current versions of Linux Ubuntu (both regular versions and LTS versions, i.e. with long-term support). At the time of writing, the current version is Ubuntu 19.04, which is what I will download and install.
After going to the page, simply click on the “Download” button next to the desired version.
Step 2 – Create installation media
After you have downloaded the Linux Ubuntu installation ISO image, you need to burn it to a DVD or USB flash drive in order to create a bootable installation media from which the installation will be carried out.
There are many different programs for this, for example, in our case, the Rufus program is perfect. For an example of how you can burn an ISO image to a flash drive using this program, you can see the article - Creating a bootable USB flash drive in Windows using Rufus.
Step 3 – Back up your data and prepare the space for Ubuntu
In order to install Linux Ubuntu, you need free space on your hard drive, and the best option here is to create a separate partition for Ubuntu.
If you have the configuration that I described above, i.e. You have two drives: C and D, then you need to free up free space of sufficient size on drive D. If you do not plan to use Ubuntu as your main system and store a lot of data there, then 50 gigabytes will be enough.
However, it is better to first save all the data (important!) that is on drive D, for example, on a flash drive or on an external hard drive. Since to create a separate partition for Ubuntu it is necessary to “disconnect” drive D, sometimes this procedure is called “cutting off” free unallocated space, so to speak, you need to physically reduce drive D and create unallocated space, and it is this procedure that can lead to data loss .
After you have made a backup copy of all important data, you can proceed to the procedure of compressing disk D. This can be done either by the standard Disk Management program or by third-party applications for working with hard drives that have such functionality (Acronis, etc.). d.). If you have experience compressing disks with such programs, then you can immediately shrink drive D and create unallocated space.
However, in this article I will show a method that involves compressing the D drive using the standard tools of the Ubuntu installer itself, in other words, we will not use any third-party programs.
Thus, at the moment I have a copy of important data and free disk space, and I am not doing anything with disk D yet.
The only thing is that you definitely need to remember the size of disk D, since although the system seems to have two partitions, there are actually more hidden partitions that are not displayed in the system, so in order not to confuse anything, we remember the total size of disk D in order to clearly identify its in the process of creating partitions for Ubuntu.
Step 4 – Boot from Installation Media
We have the installation media, we have free space on the D drive, and we also have a backup copy of the data, with this all the preparatory activities are completed, now we can move on to the installation process itself.
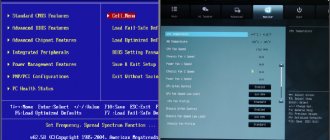
First, we boot from the installation media and get into the menu. Select “Install Ubuntu”.
Step 5 – Run the installer, select the language
As a result, the Ubuntu installer will launch, first we need to select the language, select it and click “Continue”.
Step 6 – Selecting a Keyboard Layout
Here we need to select the keyboard layout, by default it is already selected. Click “Continue”.
Step 7 – Application and Update Installation Options
In this step we need to select the applications that we want to install, for this we select the software installation mode:
- A typical installation is an installation of a system with a standard set of applications. Recommended for ordinary PC users, since in this case all the programs necessary for operation will be automatically installed;
- A minimal installation is an installation of a system with a minimal set of applications. You can use this mode if you need a clean system with only basic utilities; you will install all applications yourself. This mode is for those who like to customize the system for themselves, i.e. install only those applications that he needs.
If you want to install Ubuntu in standard form, then leave it as default, i.e. "Normal installation".
It is better to check the “Download updates during Ubuntu installation” and “Install third-party software for graphics and Wi-Fi hardware...” checkboxes; the first checkbox during the Ubuntu installation process will download and install all necessary updates, and the second will install applications necessary for the operation of some equipment (Wi-Fi, etc.), as well as to support additional media formats.
Click “Continue”.
Step 8 – Hard Drive Partitioning
And now we have come, probably for many, to the most interesting part, since now we need to partition the hard drive for Ubuntu.
The installation program offers us several options, select “Other option” and click “Continue”.
After this, a list of existing partitions will be displayed, there will be a partition for EFI boot, a system partition for Windows recovery, and other partitions.
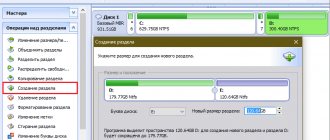
We need to find drive D, as I said earlier, this can be done based on the size of the partitions, after you find the desired partition, select it and click “Change” (do not confuse it with drive C!).
Then we need to compress this section in order to create unallocated space, i.e. free space for Ubuntu. If you have prepared a separate partition in advance, then you do not need to compress this partition again, just look in the list for the free space that you have prepared and proceed to creating partitions for Ubuntu.
In the size field, indicate the size that you want to have left on disk D, for example, the total size of D minus 50 gigabytes. Just remember that it should not be less than the space already occupied on the disk, in other words, if there is about 100 gigabytes of data on D, there is no need to try to compress it to 50 gigabytes.
My D drive is small, so I give 35 gigabytes under Ubuntu, and leave 30 gigabytes on D.
After this, you can immediately click “OK,” but if you want drive D to be accessible from Linux Ubuntu (and all the files on it), then you can immediately mount this partition.
To do this, specify:
- Use as – NTFS journaled file system (if the disk is NTFS);
- Mount point – for example, /windows, this is how this disk will appear in the Ubuntu file system;
Do not check the “Format partition” checkbox! Because if you install it, you will format the D drive and all data will be erased.
Click "OK".
Next, click “Continue” and wait for the disk compression process to complete.
After this, “Free space” will be displayed in the list of partitions, which we can use to create partitions for Linux Ubuntu.
To do this, select free space and click on “Plus (+)”.
In this case, we need to create exactly the same partitions as if we were installing Ubuntu on a blank disk, these include: the root partition for the system and the home partition for user data. There is no need to create a partition for SWAP swap since the swap file is now used.
First we create the root partition:
- Size – for the root partition you need to specify at least 10-15 gigabytes, but it is better to specify more;
- Type of new partition – indicate “Primary”;
- The location of the new section – indicate “The beginning of this space”;
- Use as – select the journaled file system Ext4, this file system is best suited for the root partition;
- Mount point – for the root partition we specify “/”.
Click "OK".
The root partition has been created, let's move on to the home partition. To do this, select an empty space in the same way and click on the plus sign.
To create a home partition, we specify almost the same thing, only we set “/home” as the mount point, and the maximum size possible, in other words, you can specify all the remaining space.
Click "OK".
The disk partitioning is complete, now we just need to specify the device for installing the Linux boot loader, i.e. partition with EFI (ESP partition). This partition is with the FAT32 file system; Windows 10 creates it with a size of about 100 megabytes, so identifying it is not difficult; for me it is sda2, and it is called “Windows Boot Manager”.
After the necessary partitions for Ubuntu have been created and the device for installing the bootloader has been specified, click the “Install Now” button.
We agree to making changes to the disk and click “Continue”.
Step 9 – Selecting a Time Zone
Then, in order to set the time zone, indicate your location, you can simply click on the desired location.
Click “Continue”.
Step 10 – Create a User Account
All we have to do is create a user account under which we will work; to do this, enter the name, login, computer name and password with its confirmation. If you want to log in automatically without entering a password, check the “Log in automatically” checkbox.
After entering the data, click the “Continue” button.
The installation has begun, this process will last about 10 minutes.
Step 11 – Completing the Installation
The installation is complete when a message appears. Click “Reboot”.
Selecting a distribution
It is most convenient to download the current version of the distribution from your home project. By following the link provided, go to the “Download” tab, marked with one in the screenshot. In the “Ubuntu Desktop” block, the arrow indicates two buttons for downloading the distribution. LTS indicates a version with a five-year support period. The second link leads to the regular distribution, released every six months. Its support period is nine months.
Our experts chose the LTS version for installation. In the dialog box, move the radio button to the “Save” position. Click “OK” to begin downloading the distribution kit in ISO format to your PC.
To record the resulting image, we will use the Rufus program, taking its latest version from the official one. We connect a flash drive with a capacity of at least 8 GB to the computer. The USB drive should appear in the field indicated by the arrow. Click the “Select” button and indicate the location of the downloaded ISO with the Ubuntu distribution.
After the name of the image is displayed in the field indicated by one, we check the partition scheme. Select MBR from the drop-down menu marked with a two. Click “Start” to start the recording procedure.
We agree to use the recommended format by selecting it in the pop-up window with a radio button.
We wait until the progress bar indicated by the arrow is completely filled. Close the program and remove the USB drive that is ready for use.
Booting the system and initial setup of Ubuntu
Now, when the computer boots, you will see the GRUB boot loader window, in which you can choose which operating system you need to boot into.
In my case:
- Ubuntu is just the Linux Ubuntu operating system;
- Windows Boot Manager (on /dev/sda2) is Windows 10.
If you don't select anything for a few seconds, Ubuntu will boot by default. However, you can make it so that Windows 10 boots by default, and even rename the menu items for convenience, but I will talk about this in the following materials, so subscribe to our groups on all popular social networks and stay tuned for the release of new materials.
VKontakte, Facebook, Odnoklassniki, Twitter
Now let's boot into Ubuntu and perform the initial system setup.
At the first launch, we can connect network accounts, but if you do not want this, then immediately click “Skip”.
Then if you want the system to send some system information to the company that develops Ubuntu, then oh, if you don’t want, then the second item, and click “Next”.
Next, if you want Ubuntu to automatically detect your location, you can enable the corresponding service, click “Next”.
Everything is ready to go! Click the “Finish” button.
If we open the computer’s file system, we will see that our D drive, which we mounted as “Windows”, is available to us and we can use it.
If you need to boot into Windows 10, then turn off the computer and boot again, only select the item corresponding to Windows 10 in the menu.
So we looked at the process of installing Linux Ubuntu on a computer next to Windows 10, taking into account UEFI.
Is it possible to install on a MacBook?
How to install Kali Linux on a USB flash drive - step-by-step instructions
There is such a possibility. But it is not recommended to demolish the standard OS, because this is a feature of the MacBook. There is an easy way to solve the problem - use the VirtualBox program:
- First you need to install the virtual machine and also download the latest version of the distribution.
- In VirtualBox, click on the button to create a new emulation.
- Next you need to enter the data: the name of the virtual machine, select Linux from the list, check the box next to “Create a new hard drive”.
- Select dynamic type.
- Press the “Create” button.
When the download is complete, you need to open the virtual machine and select the downloaded image. Further instructions are identical to the previous one.
Virtual machine with Linux on Mac OS
This way it is possible to install Linux as a second operating system. The main thing is to correctly distribute the size on the disk and configure the BIOS. The installation process itself is simple, you just need to follow the instructions.
Creating an installation flash drive
The disk partition for Linux is ready. But to install the OS, you need to prepare bootable media, which we will use to install Linux on one computer with Windows.
We look for the official Ubuntu website in a search engine, go there and look for the OS distribution in the form of an ISO image, download the Rufus utility (also on the official website of the program), install it, launch it.
We insert the flash drive into the connector, it will appear in the “Device” window, click the “Select” button, indicate the location where the Ubuntu installation image is located. If our HDD is marked under MBR, we will record this in the “Partition scheme” (or, accordingly, GPT) column; in the “File system” column there must be FAT32. Using the “Start” button, we start creating a bootable flash drive.
Starting a computer
After pressing the computer's power button, when Ubuntu starts loading from the installation media, an icon will appear at the bottom of the screen:
At this moment, press any key on the keyboard to select the installer language and press “Enter”:
The bootloader menu will appear:
Since we need to install Ubuntu, select the item “Install Ubuntu" and then the download will begin:
When you start a computer with UEFI, the first thing that appears will be the GRUB boot loader menu:
Disk partitioning
Before any manipulations with the hard drive, make a copy of important data to another medium so that in case of errors you do not lose it.
The markup program will start:
We see that now the entire disk is divided into three ntfs partitions, these are Windows volumes:
For Ubuntu we will create two partitions:
Freeing up space for Ubuntu
First you need to make room for future partitions. We will do this by reducing the size of disk D. Select the sda3 partition and click the “Change” button:
The “Edit Partition” window will open:
After selecting the file system, the “Format partition” item became active and the “Mount point” field appeared.
A warning window will appear, which means that if you continue, all changes will be made without the possibility of cancellation:
Click “Continue” and see that 33 GB of free space has appeared and the label / windows has appeared next to the sda3 partition:
Root partition
Let's create a root partition. Select an empty space and click the plus sign below it:
The partition creation dialog will appear:
Click OK. The operation will be completed.
Home directory
To create a home directory, follow the same steps and set the following settings:
Click OK. As a result, we ended up with five sections:
A window will appear to confirm the changes:
Click “Continue” and the files will begin copying. At this time you will need to provide additional information.