[article updated October 27, 2020]
Install Ubuntu, mint, Elementary, MX, Zorin, Pop! and other distributions for Linux on computers with other operating systems or without them at all, quite simply. The main thing is to know the correct sequence of all actions.
Linux is interesting in many ways. At least because it has access to tasks that Windows itself has never even dreamed of. Let's say you have a computer of an antediluvian model and, of course, new versions of Windows are not available for older units. In addition, by choosing free Linux, you save on OS installation.
To install the lightest Linux, no special skills are required. However, you should initially decide on a specific version. Arch is not recommended for beginners because its installation is more complicated than other distributions. But most others install easily and quickly; even Windows cannot compare with the ease and speed of installing Linux.
Note! Before installing Linux, it is important to backup important information on your computer. During installation, the hard drive may lose necessary files. Therefore, it would be useful to save data to a portable device. Although, if you strictly follow the instructions below, data loss should not occur. But insurance, in any case, will not hurt.
If operating systems such as Windows, macOS, or even a bare PC are installed on your computer, then you can safely install Linux. Linux is recorded as the main OS, as well as for parallel operation with another system. In general, it’s up to you to decide how to use it.
Download Linux version
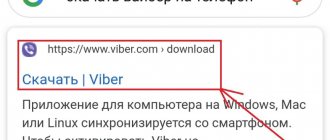
You don't know which distribution is right for you? Read how to choose here.
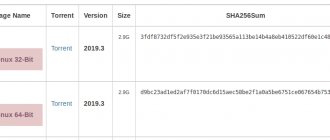
Once you have decided on the desired option, you should go to the official website of the selected distribution, where you go to the downloads section and select the version that is suitable for the bit size of your processor.
link to the official Ubuntu website.
Download Linux mint - official website.
Typically, official Linux sources offer downloading according to two principles to choose from:
- standard loading;
- via P2P (torrent).
Of course, the last method is the fastest.
Strategy
In order to install Linux Mint and remove Windows 7 without losing the data partition, we will use the following plan:
- Let's make a backup copy of all partitions
- Download Linux Mint
- Let's create a bootable USB flash drive with Linux Mint
- Let's boot from Linux Mint
- Let's run the installer
- We select the option that allows us to adjust the disk layout and set the Linux Mint partitions to be installed only on the Windows partition (and also delete the recovery partition, which is 100 MB in size)
- Let's complete the installation
- Let's check that everything worked out
Burning Linux Version to a Portable Device
When downloading Linux in ISO format, it must be mounted on removable media (CD disk, flash drive). Transferring information to removable media is simple - regular recording. To do this, you need to right-click on the selected element and select the appropriate item in the window that opens, the function is “Burn disk image”.
See also: How to promote a website to the top yourself? Yandex & Google.
To burn ISO to a flash drive, then:
- Windows - Rufus;
- macOS - Unetbootin.
The programs listed above are incredibly easy to understand.
Preparing a disk partition
This procedure is necessary if you want to use several systems simultaneously. But, if Linux is the only working system, then this step can be skipped.
Windows
- open the “Disk Management Tool”, where we select the disk or a separate partition where we plan to write the future operating system. 10 GB is a sufficient amount of memory. If your plans include downloading other files, then you need to select “Shrink Volume” with the same right mouse button, then “OK”;
- the process is very long. When finished, a void will appear on the media, highlighted in black. This is where Linux needs to be placed. If you ever get tired of Linux, you can replace it with another operating system in the same way that we suggested for Linux.
macOS
If you have macOS, you can find space for Linux using the Disk Utility function. We select our disk and click on “+”, thus creating a partition for Linux. As in the previous version, the process will be long.
Preparing the bootloader
Windows
Now the conversation concerns exclusively new PCs on which Windows of the following series is installed: 8; 8.1 or 10. The trick of these computers is that they use a UEFI boot loader, which does not load any operating system, with the exception of “native” Windows.
But we know how to outwit this principle. We go into BIOS, disable the Secure Boot function and reboot. All! The computer is now ready to download and install new operating systems. You can place these operating systems next to your Windows.
macOS
Here you will have to work a little harder, since macOS requires much more steps to install Linux paired with macOS.
The sequence of actions is as follows: turn off SIP, reboot the system, press Cmd + R. After which the Recovery menu will appear, in which you need to select “Terminal” and enter “csrutil disable” without quotes. We reboot again. SIP is now disabled.
By default, you have built-in Boot Camp, which is designed exclusively for installing Windows. Therefore, we need to download and install rEFlnd. Thanks to this application, you can download the OS that you need, including Linux.
See also: How to make a paraffin hand bath at home
Then you need to unpack the downloaded file. To open it after unpacking, you need to open “Terminal” and enter “diskutil list” without quotes. In the window that appears, you need to find the required EFI bootloader. Typically it is named /dev/disk0s1. Enter “mount /dev/disk0s1” and run rEFlnd by moving install.sh from the unpacked folder to the “Terminal” menu.
Startup at boot using systemd using NTP and SSH as an example
Since our system will communicate with other computers, we will need to synchronize the time.
If the time on the server and client is different, then there is a high probability that they will not be able to connect to each other at all. In turn, sudo may start asking for a password after each action, thinking that the authorization timeout has long expired. And who knows what we still have to face? Let's play it safe. To synchronize time with servers over the Internet using the NTP protocol, we need to install the missing packages. You can use arch-root, but we will make do with the keys that will tell the package manager the new installation location:
pacman —root $root —dbpath $root/var/lib/pacman -S ntp Let’s set up receiving exact time from Russian servers: mv $root/etc/ntp.conf $root/etc/ntp.conf.old && cat $root/ etc/ntp.conf.old | sed 's/\([0-9]\).*\(.pool.ntp.org\)/\1.ru\2/g' | tee $root/etc/ntp.conf
We only need to synchronize the time once upon boot. Previously, we would have recorded the launch of the time service in the rc.local file, but now the system and service manager systemd has appeared, which tries to launch services (in the original they are called units) in parallel to reduce system boot time. Naturally, the performance of one service may depend on the functioning of another. For example, it is useless for us to try to synchronize time over the Internet before we have a network working on our computer. To describe all these relationships, simply specifying the name of the executable file is no longer enough, so launching through systemd has become a very non-trivial task. For this purpose, special files with the extension “.service” were created. They indicate dependencies, executable file names, and other parameters that must be taken into account for a successful launch. In particular, to manage boot stages, systemd uses targets, which are similar to runlevels in terms of the tasks assigned to them. Read more on the wiki.
To the delight of beginners, a ready-made ntpdate.service is supplied with the ntp package. All files that describe starting services are located in the $root/usr/lib/systemd/system/ folder, and they can be opened in any text editor or viewed in the usual way. For example, $root/usr/lib/systemd/system/ntpdate.service:
[Unit] Description=One-Shot Network Time Service After=network.target nss-lookup.target Before=ntpd.service [Service] Type=oneshot PrivateTmp=true ExecStart=/usr/bin/ntpd -q -n -g - u ntp:ntp [Install] WantedBy=multi-user.target In the [Unit] block in the Description line, a brief description of the service is indicated, and under what conditions it should be launched (in this case, after the network is started, but before the NTP server is started , which we do not plan to launch at all). The exact time request occurs only once during loading, and this is the responsibility of the Type=oneshot line from the [Service] block. In the same block, the ExecStart line indicates the actions that must be performed to start the service. The [Install] block in our case indicates that starting our service is necessary to achieve the multi-user.target goal. It is recommended to use the same contents of the [Install] block to launch homemade services.
As a first practical example, we will slightly extend the functionality of ntpdate.service by asking it to additionally correct the time on the hardware clock. If after this, on the same computer you boot into Windows, you will see the time in Greenwich Mean Time, so don’t be alarmed.
Changing the standard behavior of any systemd service is done as follows: first, in the /etc/systemd/system/ folder, a new directory is created with the full name of the service and the “.d” extension, where a file with an arbitrary name and the “.conf” extension is added, and there necessary modifications are made. Let's get started:
mkdir -p $root/etc/systemd/system/ntpdate.service.d && echo -e '[Service]\nExecStart=/usr/bin/hwclock -w' > $root/etc/systemd/system/ntpdate.service .d/hwclock.conf This simply says that immediately after starting the service, run the command “/usr/bin/hwclock -w”, which will change the hardware clock.
Add the ntpdate service to startup (the syntax is standard for all services):
arch-chroot $root systemctl enable ntpdate Created symlink from /etc/systemd/system/multi-user.target.wants/ntpdate.service to /usr/lib/systemd/system/ntpdate.service. As you can see, an ordinary symbolic link to the ntpdate.service file was created in the multi-user.target.wants directory, and we saw a mention of the multi-user.target target in the [Install] block of this very file. It turns out that in order for the system to achieve the multi-user.target goal, all services from the multi-user.target.wants directory must be started.
Now install the SSH package in a similar way (in ArchLinux it is called openssh):
pacman —root $root —dbpath $root/var/lib/pacman -S openssh But this time we will use a socket for autostart so that the SSH server starts only after a connection request is received, and does not hang as a dead weight in RAM: arch -chroot $root systemctl enable sshd.socket We did not change the standard port 22 and did not enable the forced use of Protocol 2 - let this remain on my conscience.
Starting Linux Installation
Let's look at processes using Ubuntu as an example. It should be added that most versions of Linux (openSUSE, Mint, Debian, Fedora, Manjaro and many others) install in the same way as Ubuntu. Some versions require a pseudo-graphical installer. The difference in the installer’s actions is that with the pseudo-graphic version it is necessary to select functions using keys. Other manipulations are performed in a similar way.
So, select the system language and click “Install”. After which, oh, thus, our brand new Linux will be able to use proprietary drivers. Next, select “Download updates during installation”, which can be left enabled, but this does not apply to a fast Internet connection.
Disk partitioning
Now you need to be as careful as possible, since you can erase the disk on which the old operating system is saved. What happens next depends on whether Linux will be the only working system or an additional one.
Installing Linux as the main operating system
There are two ways to install Linux as your only operating system.
auto
creates new partitions and installs the system, deleting all previous data from the disk. The advantages of this method are obvious, because you don’t have to rack your brains over manual steps. For this method, you need to select “Erase disk and install Linux”. It is recommended to first save the information to another hard drive;
manual
This option is better than the previous one in that you independently determine the sizes for the partitions. To select manual installation mode, you must click “Other option”, then “Continue”.
Linux will show you all the partitions on your computer. They can be deleted and used at your own discretion. However, under no circumstances should you touch those sections where the information you need is stored.
See also: 36 wallpapers for your iPhone
To install Linux as the main operating system, select the partition with the installed OS and delete it using the “-” key. After that, in the vacant places we create the following sections:
- root - for storing system files of the operating system. Why choose – Ext4 and /;
- swap or paging is needed as additional RAM. You just need to select “Swap Partition” in the file systems menu;
- home – storage for your files. To select this particular partition, click on Ext4 and /home.
Upon completion, click “Continue” and confirm the actions. The program erases the partitions you specify and creates new ones in their place.
How to install Linux on a laptop, computer or netbook
The process of completing the task is divided into several stages, each of which is important to consider in detail. Much depends on the chosen method of installing the operating system. The following will present the most common ways to boot Linux.
From a USB drive
After creating a bootable USB flash drive, you can begin installing Linux. There is a universal install algorithm:
- Prepare a bootable USB flash drive. How to do this has already been described above.
- Go into the BIOS and boot from the media on which the ISO image of the system is located.
- Start loading the OS. After rebooting the PC from the USB flash drive, the Linux installer should appear on the monitor. Here the user will need to perform several actions depending on the selected distribution.
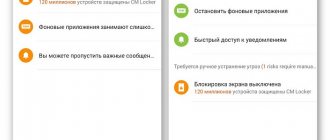
- Specify the language of the operating system, and also check the box next to the line “Install additional software.”
- Click on the “Continue” button and wait for the installation to complete. During this procedure, the computer may restart several times. In this case, after the first reboot of the PC, you need to have time to unplug the flash drive from the USB connector, otherwise the OS Linux installation process will begin again.
Linux operating system installer
Additional Information! During the Linux boot process, the user will also need to partition the disk, i.e. divide the internal drive into several partitions, specifying the appropriate size for each.
Installing Linux as a Second Operating System
Linux as a neighboring operating system with another OS, just like the previous version, is installed automatically and manually.
auto
As for automatic configuration, Linux installers almost always see systems loaded on the computer, of course, if they were created. If not created, then select “Install next to Windows”. Then everything happens automatically.
Manual
Manual installation is required in the case when you yourself want to allocate the number of places that you consider necessary. To do this, select “Other option”, then “Continue”. After which, the system will show the empty space you prepared for Linux. A root partition is immediately created. The Home section is not necessary in this situation.
Click “Continue”. The program does not touch your documents, leaving them in their original places. At the same time, it creates new ones in the vacated space. You decide which OS to boot at startup.
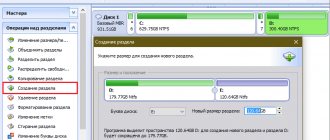
Settings
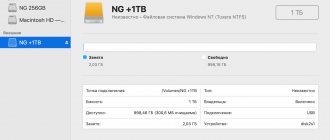
This picture shows my hard drive partitioning before installing Linux Mint. I have one hard drive with a size of 700 GB.
The disk is divided into three sections:
- Recovery partition - 100 MB
- Windows partition - 356 GB
- Data partition - 342 GB
The recovery partition is not actually a recovery partition. This was a mistake I made when I installed Windows 7 in the first place, but - ttttsss, if we keep quiet, no one will know about it.
The data section does contain some important files.
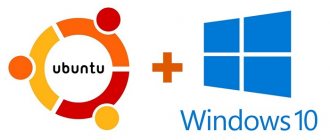
This picture shows that I have a catalog of photographs taken on my recent trip to New York.
For confirmation, below is a photo of the Freedom Tower taken from above from the Empire State Building skyscraper.
Now, of course, I could just download this image from Google Images, but let's be honest...
This photo was taken using my Samsung Galaxy S4 smartphone and there is an inset in the frame that would hardly be in any other photo
Anyway, now we know what I have to lose if the installation goes wrong.
Final stage
A program to determine your time zone may ask about your location, and will also ask you to choose a language, give your name and come up with a password.
Now wait for the installation to finish. Once the installation process is complete, the system will prompt you to remove the installation disk and reboot. Be sure to disable BIOS if it was enabled.
After the reboot, you will see the desktop of the installed system. You can perform all the same actions as on another OS.