The “WinSxS” folder is located in the “Windows” system folder located on the computer’s system drive. Some users have a question: what is this WinSxS folder? This is a service folder - a repository of system components necessary for the normal functioning of the Windows operating system.
The WinSxS folder stores backup copies of operating system components previously installed on the computer, files and other information necessary for system recovery.
Many users are interested: is it possible to delete the “WinSxS” folder from the computer? Users believe that the WinSxS folder takes up a lot of space on the PC hard drive, so it needs to be deleted or completely cleared to save space.
The WinSxS folder is located at the path: “C:\Windows\WinSxS” on the disk with the installed operating system.
Thanks to the WinSxS folder, it is possible to return the system to a previous state to the old version of the update. In Windows 10, the WinSxS folder stores the data necessary to reset the system to the original settings of the Windows operating system. Therefore, it is not recommended to delete the WinSxS folder from your computer manually or using programs.
If the WinSxS folder is deleted on the computer, or necessary files are deleted from it, problems or failures in the operating system may occur, and Windows may not load. It will be impossible to perform a system restore due to missing required files.
In order to look at the size of the WinSxS folder, you should enter the Windows folder, and then right-click on the WinSxS folder. In the context menu, select “Properties”, in the “Properties: WinSxS” window that opens, in the “General” tab information will be displayed on how much disk space the files in the WinSxS folder occupy.
Please note that the folder size in Explorer does not take into account the fact that most of the files in the WinSxS folder are “hard links”, and the files themselves are located in other directories of the operating system. Therefore, the true size of the WinSxS folder is smaller than what Explorer or other file manager shows, because they add up the size of files from two places.
Due to the fact that the operating system is constantly updated, old versions of updated system files accumulate in the WinSxS folder, so the folder size increases.
If the WinSxS folder takes up a lot of space on your hard drive, then clearing the WinSxS folder of unnecessary files will free up some disk space from data. To do this, you need to use the built-in tools of the Windows operating system.
How to shrink the WinSxS folder? To clean the WinSxS folder, system tools are used:
- Disk Cleanup utility (cleanmgr.exe).
- Commands executed from the command line.
- DISM.exe utility.
- Task Scheduler.
In this article we will look at instructions on how to clean the WinSxS folder in the operating systems Windows 10, Windows 8.1, Windows 8, Windows 7.
Cleaning the WinSxS folder in Windows 10
In Windows 10, the WinSxS folder stores not only backup copies of system components and updates, but also other important operating system data, so emptying the folder unless absolutely necessary is not recommended. This method can be used on Windows 8.1 and Windows 8 operating systems.
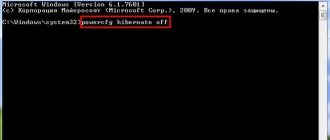
Run Command Prompt as Administrator. Read about how to do this in Windows 10 here.
In the command line interpreter window, enter the command that analyzes the system component store, and after entering the command, press “Enter”:
Dism /online /cleanup-image /AnalyzeComponentStore
After the analysis is completed, the command line window will display information about the state of the storage: files compatible with Windows and files that can be deleted (backups and disabled components, cache and temporary data) from the operating system.
To run WinSxS cleanup on Windows 10, enter the command:
Dism /online /cleanup-image /StartComponentCleanup
Running this command with the additional “/ResetBase” switch removes outdated versions of components:
Dism /online /Cleanup-Image /StartComponentCleanup /ResetBase
After the operation is completed successfully, restart your computer.
Difficulties and solutions
There may be some difficulties during the data cleaning process. These include the absence of a “Clean up system files” button. The problem is rare and typical for Windows 7, or, to be more precise, for its earlier versions. You can embed the button yourself by downloading and installing the KB2852386 update from Microsoft. You can download it either from the official page or through the standard Windows Update service.
In addition, if the user deleted some necessary file and after that the computer began to slow down, there is no need to panic. You need to restore the system using the same restore points in the Restore menu, which can be found in the Control Panel.
Cleaning system folders is a task that must be approached with all responsibility, because deleting an object can lead to disruption of the system. It is still recommended to trust the built-in cleaning utilities, as well as use additional programs from reliable manufacturers.
How to clean up the WinSxS folder in Windows using the Disk Cleanup utility (cleanmgr.exe)
Cleaning the WinSxS folder in Windows is carried out using the Disk Cleanup system utility (cleanmgr.exe). This method works on Windows 7, Windows 8, Windows 8.1, Windows 10 operating systems.
If on your computer running Windows 7, the Disk Cleanup utility does not have an option to clean up updates, install the optional update “KB2852386”, which adds this item to the system application.
Run the Disk Cleanup utility and follow these steps:
- Press "Win" + "R" on your keyboard.
- In the Run window, enter the command: “cleanmgr” (without quotes), click OK.
- Select the drive to clean. By default, the system drive is selected.
- In the “Disk Cleanup (C:)” window that opens, click on the “Clean up system files” button.
- Select the drive to clean again.
- In the “Disk Cleanup (C:)” window, check the boxes next to “Windows Update Cleanup” and click the “OK” button.
- In the warning window, agree to delete the files.
- Wait for the data deletion process to complete, and when the WinSxS folder in Windows is cleared, restart your computer.
This will slightly reduce the size of the WinSxS folder on the computer disk.
Discussion
I have about the same questions for you as after the publication of a similar article about Windows 8. But given the high percentage of Windows 7 owners, I expect to see more answers
Please write in the comments
:
- Did you manage to optimize the WinSxS folder?
- How much space did you save (you can convert bytes to gigabytes like this)
- How long ago did you install the system?
- Have your files in WinSxS subfolders been compressed as part of the cleanup (if they are compressed, show a screenshot of TreeSize)
If you have any questions, I will try to answer them in the comments and/or add to the article.
Cleaning the WinSxS folder in Windows 8.1
In Windows 8.1 (Windows), the WinSxS folder can be cleaned up using the Task Scheduler. This method also works in the Windows 10 operating system.
You may also be interested in:
- How to delete temporary files in Windows 10
- Windows 10 Cleanup: Automatically and manually remove unnecessary files
To clean the WinSxS folder, follow these steps:
- Start Task Scheduler using one of these methods.
- In the left column, open the “Task Scheduler Library”, and then alternately go to the “Microsoft” section and then to the “Windows” section.
- Click on the “Servicing” section, the “StartComponentCleanup” component, which is responsible for cleaning the component store, is ready to perform the task.
- In the right column, under Selected Item, click Run.
Wait until the removal of unnecessary files from the system folder is completed, and then restart your PC.
To automatically run a job to clean up the WinSxS folder, do the following:
- In the “StartComponentCleanup” component window, in the right column, in the “Selected Element” section, click on “Properties”.
- In the “StartComponentCleanup (local computer)” window, open the “Triggers” tab and click on the “Create” button.
- In the Create Trigger window, set up a schedule to automatically run the task at the desired frequency at a specific time.
Which files and folders are best not to touch?
System folders are different from user folders. Operations with them must be carried out with extreme caution. This especially applies to those sections that are initially not visible to the user by default. The system itself wants to protect the user from rash actions.
You cannot manually delete files in such storages as DriverStore, Microsoft in AppData, as well as in System32 and System Volume Information. As for AppData, here you can only delete directories of software that has not been on your PC for a long time.
If cleaning a particular system folder using software tools is possible, then it is better to use it so as not to lose important components. Of course, this will not be intentional, but this excuse will not save the system. However, manual cleaning is more than possible if the user has practical experience and knowledge.
"WinSxS" cleaning methods
“WinSxS” is a system directory, the contents of which in Windows 7 are located in the following path:
The named directory stores versions of all updates for various Windows components, and these updates are constantly accumulated, which leads to a regular increase in its size. In case of various system failures, using the “WinSxS” content, rollbacks are made to a stable state of the OS. Therefore, it is absolutely impossible to delete or completely clear this directory, since at the slightest failure you risk ending up with a dead system. But you can clean some components in the specified directory, although Microsoft recommends doing this only as a last resort if you are critically short of disk space. Therefore, we recommend that before performing any procedures that will be described below, make a backup copy of the OS and save it on a separate medium.
Installing update KB2852386
It should be noted that, unlike the Windows 8 operating system and later operating systems, the “seven” initially did not have a built-in tool for cleaning the “WinSxS” folder, and using manual deletion, as mentioned above, is unacceptable. But, fortunately, an update KB2852386 was later released, which contains a patch for the Cleanmgr utility and helps solve this problem. Therefore, first of all, you need to make sure that this update is installed on your PC or install it if it is missing.
- Click Start. Go to the “Control Panel”.
Click "System and Security".
Go to Windows Update.
A window opens with a list of updates installed on the computer. We need to find the KB2852386 update in the “Microsoft Windows” section of this list.
But the problem is that there can be a lot of items in the list, and therefore you risk spending a significant amount of time searching. To make the task easier, place the cursor in the search field located to the right of the address bar of the current window. Enter the following expression there:
After this, only the element with the above code should remain in the list. If you see it, then everything is in order, the required update is installed and you can immediately move on to ways to clean up the “WinSxS” folder.
If the element is not displayed in the current window, this means that in order to achieve the goals set in this article, you should perform the update procedure.
Return to Update Center. This can be done quickly if you followed exactly the algorithm described above by clicking the arrow pointing to the left at the top of the current window to the left of the address bar.
To make sure that your computer sees the required update, click on “Search for updates” on the left side of the window. This is especially important if you do not have auto-updates enabled.
The system will search for updates that are not installed on your PC.
After completing the procedure, click on the words “Important updates available”.
A list of important updates that are not installed on your PC will open. You can choose which of them to install by checking the checkboxes to the left of the names. Check the box next to the name “Update for Windows 7 (KB2852386)”. Next, click “OK”.
Returning to the Update Center window, click Install Updates.
The installation process of the selected updates will begin.
- After it finishes, restart your PC. Now you will have the necessary tool to clean up the “WinSxS” directory.
- Next, the Cleanmgr utility will clean the “WinSxS” folder of unnecessary files and then automatically close.
Next, we will look at various ways to clean the “WinSxS” directory using the Cleanmgr utility.
Method 1: "Command Line"
The procedure we need can be performed using the “Command Line”, through which the Cleanmgr utility is launched.
Go to the "Standard" folder.
Find “Command Prompt” in the list. Click on the name with the right mouse button (RMB). Select the “Run as administrator” option.
The Command Line is activated. Enter the following command:
A window opens asking you to select the disk to be cleaned. The default should be partition C. Leave it if your operating system has a standard layout. If, for some reason, it is installed on another disk, then select it. Click "OK".
After this, the utility estimates the amount of space that it can clear during the corresponding operation. This may take some time, so be patient.
A list of system objects that need to be cleaned will open. Among them, be sure to find the position “Windows update cleanup” (or “Update package backup files”) and put a checkmark next to it. It is this position that is responsible for cleaning the “WinSxS” folder. Opposite the remaining items, place checkboxes at your discretion. You can remove all other marks if you do not want to clean anything else, or mark those components where you also want to remove “garbage”. After that, click “OK”.
Attention! The Disk Cleanup window may not have the Windows Update Cleanup option. This means that there are no elements in the “WinSxS” directory that could be deleted without negative consequences for the system.
Method 2: Windows GUI
Not every user is comfortable running utilities via the Command Line. Most users prefer to do this using the OS graphical interface. This is quite doable for the Cleanmgr tool as well. This method, of course, is more understandable for the average user, but, as you will see, it will take longer.
- Click “Start” and go to “Computer”.
In the Explorer window that opens, in the list of hard drives, find the name of the partition where the current Windows OS is installed. In the vast majority of cases, this is drive C. Right-click on it. Select "Properties".
In the window that appears, click “Disk Cleanup”.
The exact same procedure for assessing the cleared space that we saw when using the previous method will be launched.
In the window that opens, do not pay attention to the list of items to be cleaned, but click “Clean up system files.”
The freed up space on the drive will be re-evaluated, but this time taking into account system elements.
Helpful information
Before you start cleaning out one of the most important folders in Windows 10, create a system backup.
If possible, use an external hard drive for this. We wrote in detail about the methods of backing up the “tens” in a separate article. To easily monitor the cleaning results, you can use disk space analyzers. They clearly show in one window how much space each directory takes up in the Windows folder. Using the TreeSize Free program as an example, it looks like this:
- Install the application, right-click on the shortcut and run it as administrator.
On the system drive, find the “Windows” folder and click “Select folder”.
When the application analyzes the directory, it will show the total volume and how much disk space each subfolder occupies.
To rescan the folder, click “Refresh”.
Although you can delete files using TreeSize Free, you shouldn't do so in this case. The program simply does not have permission to clear most system data, and some folders cannot be cleaned without special OS tools.
Where does free space go in Remote Desktop Services?
I am describing a classic situation. There is an RDS farm, which consists of two intermediaries ( RD Connection Broker ) and 15-20 RDSH hosts, to which remote users directly connect. In most cases, users have roaming profiles. Everything is fine, everything works, but sometimes a couple of hundred more users appear, for example, due to the expansion of a company or the acquisition of another, it doesn’t matter. There is a catastrophic lack of free space on your nodes. If you have virtual machines, then it’s easier to expand resources if there is space on the datastores; in the case of physical servers, it’s more difficult, since expanding existing RAID arrays is a very hemorrhoids thing, and there may also not be enough space on the storage system. And you can’t expand indefinitely. Plus, due to the fact that profiles are relocatable, you must multiply the new disk space by the number of your nodes, that’s the math.
Let's see what you can do to optimize without expanding your disk space. First of all, we will use utilities that will allow you to see what exactly your hard drives are doing. There are many utilities here, I can highlight the free WinDirStat or the paid TreeSize.
Download the WinDirStat utility https://windirstat.net/download.html or from my cloud
Installing WinDirStat is very trivial, I won’t give it here. After installation, launch the utility. On the first screen, WinDirStat will ask you to select a local drive or directory to scan files. In my example, on the Remote Desktop Session Host, there is one drive C:\, which is what I select.
You will begin scanning your local disk to see what it is doing. You will see funny pacmen.
As you can see, my largest folder is the Users folder, the second Windows folder is 45 GB. On the right side you will see a column for formats, where you can immediately select MP4 or MSI, you can see how much they take up. Below are multi-colored squares, this is what all types of files on the hard drive look like in this utility.
Having opened the profiles folder, you immediately see the most voluminous of them, see what they are doing and clean up, with squeals and yells from users. But there is nothing more here.
Deleting recovery checkpoints
The default feature of the computer operating system is to create checkpoints to restore previous states. They are vitally important when a crash occurs accidentally, or a necessary program with a driver is deleted by mistake, or when downloading some free utility, the computer picks up a virus.
Thanks to checkpoints, you can restore the previous state of the computer from service data recorded by the operating system on the hard drive (C:), without losing important documents.
Depending on the settings, control points can be created with enviable regularity: from once to several times a day. Over time, this leads to the disk becoming clogged with irrelevant information. That is, if your PC is already 5 years old, there is no point in storing unnecessary files about the state of the computer from five years ago. The operating system only needs the points it has made over the last 1-2 months or 1-2 days, as desired. Feel free to delete the rest, as the information sometimes takes up more than 14 GB.
To perform the operation and free your PC from garbage, except for the very last points, you need to do the following: 1. Start 2. My Computer 3. Properties 4. System Protection 5. Configure 6. Delete 7. Yes
Procedure for clearing "temp" in Windows 7
To clear this directory you need to complete the following steps:
- Click “Start” and enter “Computer”;
- Then go to the system volume “C”;
- Open the “Windows” folder;
- Next, find the “Temp” directory and by entering it manually delete all files and folders stored there;
- Ready!
Result:
As you can see, there is nothing complicated about this. We tested all the options described above and found them to be quite effective and efficient. But the most important thing is that our actions did not lead to any negative consequences for the operating system.
Anything that remains in the WinSxS folder should not be deleted. And one moment. Do not use random utilities found on the Internet to clean out this folder.
Experience has shown that the use of such “cleaners” often led to a complete reinstallation of the system. And also pay attention to the fact that in none of the known optimizers you will not find a function for cleaning the WinSxS directory.
Removing unnecessary programs and components
The method is suitable for experienced users, but since the computer can be restored from the last save point, a less experienced PC user can try it.
Removing unused programs or games will free up a huge amount of space.
You need to select: 1. Start, 2. Control Panel, 3. Programs, remove programs.
A list of programs will appear. You need to analyze the programs and remove all that you have not used for a long time.
Not all programs remove their components when uninstalled, so you will have to manually go through the list and remove everything.
When analyzing each program, many are guided by the size of the files, deleting only large ones. Some programs do not show the size. This creates the false impression that it weighs zero kb and is not particularly in the way. It's better to remove it if you don't use it, because it can weigh several GB, or just slow down your computer.
It is advisable to immediately save a checkpoint after each deleted program and components. This will help you in case of removal of the necessary component - to return the state of the computer that was before, but not long ago. Otherwise, several hours of work on removing programs may go down the drain.
Method 1: Third party software
One of the easiest and fastest ways to reduce the size of the Windows folder and other directories on the system drive is special software. Let's look at how to do this using the CCleaner program as an example:
- Launch the application, go to the “Standard cleaning” block and open the “Windows” tab. The types of files that are recommended to be deleted are already marked here. Click "Analysis".
Additionally, other points can be noted, but usually they do not free up much space, but they significantly increase the cleaning time.
Click “Cleanup” and wait for the application to finish.
SeaCleaner is primarily a system optimization tool, so it removes only the most unnecessary files. It will not go deep into the “Windows” folder. Therefore, when you need to free up disk space, this method is more effective when used together with the next two.