It would seem that two large articles on optimizing the WinSxS folder in Windows 8 should have exhausted the topic. But Microsoft suddenly decided to please the owners of Windows 7, for whom I am publishing this story.
Despite numerous warnings, owners of Windows 7 with a little you-know-what do not give up trying to clean the WinSxS folder using crooked methods. Here's a fresh example of Windows 7 being killed by a participant at the OSZone conference under the nickname... xaker 7
. I hope that after the release of this recording there will be an order of magnitude less such horrors.
[+] Today on the program
- How to empty the WinSxS folder in Windows 7
- Advice before cleaning
- Instructions
- Will the WinSxS folder be deleted after cleaning?
- What exactly is being removed?
- How much space will be freed up? Why did others lose 6GB, but nothing for me???
- How to determine if files in the WinSxS folder are compressed during the optimization process
- Why doesn't the DISM /Online /Cleanup-Image /StartComponentCleanup command work?
How to empty the WinSxS folder in Windows 7
On October 8, 2013, a recommended
Update KB2852386 is only for all authenticated editions of Windows 7 SP1. It adds a long-awaited feature to the Disk Cleanup utility.
Advice before cleaning
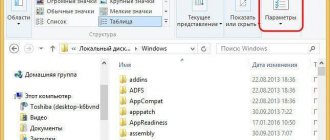
I think you'll want to know how much space the cleanup saved. So now open
(not winsxs folders) and write down the amount of free space (in bytes) or just take a screenshot.
Instructions
They are extremely simple:
- Install the KB2852386 update via Windows Update ( I recommend ) or download
the package from the knowledge base article in IE - Run cleanmgr
in a command prompt running as administrator (this will be faster). - Find the "Windows Update Cleanup" option in the list.
Note
: The update cleanup option is only available if there are files that can be deleted. - Click OK
and be patient because the operation will take some time. - Once the cleaning is complete, reboot and look in the disk properties to see how much space has been freed up.
Before cleaning
Before clearing WinSxS, you need to download one update (if it is not already installed).
- Go to Start - Programs - Update Center.
Windows Update
- Click on "Optional Updates". If such an item is not there, it means that all services are already loaded.
- In the list, find the update with the number “KB2852386”.
- Check the box and confirm installation.
Without this update, WinSxS cleaning will not be available. It can also be downloaded from the official Microsoft website.
- Go to com.
- In the search bar at the top right, enter “KB2852386.”
- Select the update that is suitable for your system: 32-bit or 64-bit.
- To find out information about the OS, right-click on the “My Computer” icon, then on “Properties”. The “Type” line will indicate the Windows bit depth.
How cleaning out the WinSxS folder works in Windows 7
I am very
I analyzed the entire process in detail in relation to Windows 8 and 8.1, so I will not repeat myself, but will just note a few points.
Implementation
The KB2852386 update replaces just one file - Scavengeui.dll, which does all the cleanup work. In fact, a call to the DISM function has been added to the Disk Cleanup utility, which is available in newer operating systems when using the /StartComponentCleanup
(but not the additional /ResetBase key).
So, every time you run the Disk Cleanup utility, for some reason the contents of the %WinDir%\System32\DISM folder are copied to the %LocalAppData%\Temp\{GUID} folder (and the temporary folder is not deleted after the operation is completed). Then, using the updated DLL, a programmatic call to the deep cleaning function is made directly from the utility. However, copying of the DISM folder was observed even before the release of KB2852386.
Ambiguities
There is reason to believe that the cleaning algorithm in Windows 7 is not exactly the same as in Windows 8 and higher with the /StartComponentCleanup key. In particular, I and my readers have not yet discovered file compression , despite the identity of the text description in the cleanmgr utility. Check it out for yourself and write in the comments!
Another incomprehensible nuance is a mysterious phrase in the knowledge base article (translation is mine):
Therefore, after you run the Disk Cleanup wizard, you may be unable to roll back to a superseded update. After wiping your disk, you may not be able to roll back to an update that has been replaced by a more recent one.
And nowhere is it explained what this feature depends on. In my experiment, all updates retained the ability to remove them, as it should be when using the /StartComponentCleanup key in Windows 8 and newer. Perhaps over time, specifics will appear...
Finally, it is not entirely clear what prevented this from being implemented earlier, and why the update appeared now. By the way, there are no plans yet to transfer cleaning to the DISM.exe utility of Windows 7, which does not allow processing offline images. Perhaps such a transfer reveals a whole layer of support issues related to image maintenance.
More about the folder
WinSxS is located in the root directory of the OS (usually C:Windows) in all modern Win, starting from version 7. The files and directories that are located there are necessary for the operation of the operating system. If they are removed, changed, moved or renamed, serious problems can arise. At best there will be errors. At worst, Windows will no longer start. And we will have to restore it. Therefore, before you clean out any system directory, make sure that it will not damage the OS or cause critical failures. And to understand whether it is possible to remove WinSxS, you need to understand why it is needed.
How to automate cleaning of the WinSxS folder
In Windows 8, cleaning is assigned to a separate scheduled task, and as a last resort, you can use the command line utility DISM.exe. In Windows 7, the only method currently available is to create a customized configuration for the Disk Cleanup utility and add the resulting command to the scheduler.
On the command line, as an administrator, run:
:: setting up cleaning the winsxs folder REG ADD "HKEY_LOCAL_MACHINE\SOFTWARE\Microsoft\Windows\CurrentVersion\Explorer\VolumeCaches\Update Cleanup" /v StateFlags0088 /t REG_DWORD /d 2 /f :: (optional) setting up cleaning up temporary files (in particular clears temporary folder dism) REG ADD "HKEY_LOCAL_MACHINE\SOFTWARE\Microsoft\Windows\CurrentVersion\Explorer\VolumeCaches\Temporary Files" /v StateFlags0088 /t REG_DWORD /d 2 /f :: creating a scheduled task "CleanupWinSxS" schtasks /Create /TN CleanupWinSxS / RL Highest /SC monthly /TR “cleanmgr /sagerun:88”
The "CleanupWinSxS" scheduled task will run on the 1st of each month, removing files superseded by the update released on the second Tuesday of the previous month. You can change the start date and time in the task scheduler library (taskschd.msc). To successfully complete the task, the user must have administrator rights.
How do I know if SP1 is installed?
It was in Windows 7 SP1 that access to Win SxS appeared. In previous versions of Win, cleaning this folder was not possible. To see if this package is in the OS:
- Go to the “Control Panel” (for example, through the “Start” menu).
- Open the System option under the System and Security category.
- The “Edition” field should contain information: OS version, Microsoft copyright, year of creation. If there is a line “Service Pack 1”, then everything is in order and the directory can be edited.
Service Pack 1 on Windows 7
Questions and answers
The first day of discussion outlined the range of issues. The answers to most of them can be found by studying previous articles about the WinSxS folder, which I actively referenced. But the material requires attention and a certain level of technical training. Therefore, I will try to break them down as simply as possible here.
Unable to download update KB2852386. What to do?
Download using Windows Update , as I immediately advise in the article. The update will be on the recommended list.
If you try to download in a browser and receive the error “This version of the Windows Geniune Advantage Scan Tool is no longer supported...”, make sure that:
- Internet Explorer is used for downloading
- Internet Explorer allows installation of add-ons/ActiveX controls
If these two conditions are met, the authenticator is not downloaded to the PC, but rather installed as a browser add-on and performs the validation.
These are all official ways to obtain the update, and others will not be considered or discussed here.
Will the WinSxS folder be deleted after cleaning?
No, but the number of subfolders and files in it will decrease, and therefore its size.
What exactly is being removed?
Unused update files. These files do not participate in the operation of the system, because files from more recent updates are already used instead.
How much space will be freed up? Why did others lose 6GB, but nothing for me???
The volume of deleted files depends on a combination of three factors:
- Installation date of SP 1 or Windows 7 with SP1
, from which in any case installed updates are recorded. The longer the system is installed, the greater the number and size of previous versions of files in WinSxS. - Component update frequency
. For example, waves of error 0xc0000005 are due to the fact that the kernel files have been updated for three months in a row. Moreover, after each update, WinSxS saved the previous versions of the files. - Regularity of installation of updates
. Continuing with the example, if automatic updating was just turned on after a three-month break, only one set of files would end up in winsxs, not three.
I will try to explain it in layman's terms, simplifying the technical details as much as possible and making some assumptions. Imagine that Microsoft releases an update to the asdf.dll file every two months. Consider three users:
- Mikhail
installed Windows 7 with SP1 (immediately after its release)
in February 2011
and
enabled automatic installation of updates
. By October 2013, 15 updates had been released to replace the asdf.dll file. Disk Cleanup removed 14 unnecessary files and left one from the previous update, maintaining the ability to rollback. - Andrey
installed it
on the same day as Mikhail
, but
immediately turned off the automatic installation of updates
. He set them manually, guided by the horoscope, and by October 2013 he had done this only 4 times. Disk Cleanup removed 3 unnecessary previous versions of the file. - Alexey
regularly reinstalls the system, and the last time he did this was
in August 2013
. By October of the same year, only one update had been released for the asdf.dll file. Disk Cleanup didn't remove anything because there is no previous update to roll back to.
All three optimized the WinSxS folder in one day. Obviously, Mikhail had the largest one, and cleaning freed up the most significant amount of disk space.
Is it clear now?
How to determine if files in the WinSxS folder are compressed during the optimization process
Judging by the questions and some screenshots of the TreeSize utility, there were not enough analysis examples. Everything is very simple: in the Scan menu – Select Directory and select C:\Windows\WinSxS.
Folders with compressed files are marked in blue. So far I have not seen a single fact of compression in Windows 7.
Why doesn't the DISM /Online /Cleanup-Image /StartComponentCleanup command work?
Because it is for Windows 8 and newer. On Windows 7, use Disk Cleanup following the instructions in this article.
To be continued…
Removing Windows components
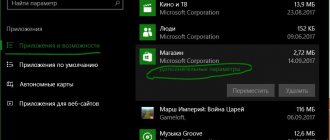
Windows 8, 10 allow you to enable or disable Windows OS components. These functions are located in the control panel in the "programs" section.
All Windows components are stored in the winsxs folder, regardless of whether they are enabled or not, and take up space. There is a way to help remove these components from winsxs entirely, thereby freeing up space. In the future, you will be able to download removed components as needed.
Run cmd with admin privileges. Type the command below, then press Enter:
DISM.exe /Online /English /Get-Features /Format:Table
The command line will build a table of component names, as well as their states. Remember the name of the component to be removed and use the following command:
DISM.exe /Online /Disable-Feature /featurename:NAME /Remove
In this command you need to replace NAME with the name of your component. In the example we will remove DirectPlay.
This will change the status to Disabled with Payload Removed. These are the ways you can clean up the winsxs folder in Windows.
That's all, now you know winsxs - what kind of folder Windows 7, 8, 10 is and how to clean it. It is recommended to use the first three methods first, although you don’t have to resort to the task scheduler method, since it is duplicated, but everything is at your discretion. Removing components is not recommended because it will not free up much space and the removed components may be needed in the future. You can also clear the temp folder in Windows to free up additional space on the HDD.
One of the most massive folders in Windows 7, which takes up significant space on drive C, is the “WinSxS” system directory. In addition, it has a tendency to constantly increase. Therefore, many users are tempted to clean out this directory in order to free up space on the hard drive. Let's figure out what data is stored in “WinSxS” and whether it is possible to clean this folder without negative consequences for the system.
Discussion
I have about the same questions for you as after the publication of a similar article about Windows 8. But given the high percentage of Windows 7 owners, I expect to see more answers
Please write in the comments
:
- Did you manage to optimize the WinSxS folder?
- How much space did you save (you can convert bytes to gigabytes like this)
- How long ago did you install the system?
- Have your files in WinSxS subfolders been compressed as part of the cleanup (if they are compressed, show a screenshot of TreeSize)
If you have any questions, I will try to answer them in the comments and/or add to the article.
Is it possible to remove WinSxS
WinSxS is part of the Windows operating system and cannot be easily removed. If you do this, the system will stop booting and you will have to restore it or do a complete reinstallation of Windows.
However, you can clean up the WinSxS folder, significantly reducing its size and freeing up memory on the system drive. But, the cleaning process will be slightly different depending on what version of the operating system is installed. Below we will talk about how to empty the WinSxS folder on Windows 7 and Windows 10 operating systems.