With the release of Android 6.0 Marshmallow, a truly necessary feature became available to users - automatic backup of user application data to the Google Drive service. But even though Google took care of users by adding this feature, not all developers are in a particular hurry to update their products and add a similar function to them. So after changing the device or resetting to factory settings, you have to play through the games again, change program settings to your taste, etc. Of course, having root rights on the device can help you out of such a situation. But what if it is not possible to get them? In addition, to do this you will often need to unlock the bootloader, which automatically leads to the loss of all information on the device. In this case, ADB comes to the rescue.
Few Android device users know that it is possible to make a backup copy of all installed applications and their data without additional manipulations with their device. And in today’s article we will tell you how to make a backup of the entire system, without unlocking the bootloader and obtaining superuser rights.
How to create a full backup of an Android phone without root
Android includes a built-in feature to create a full backup of your Android phone without root, as well as a tool to restore it. All you need is a computer and a device running Android 4.0 (Ice Cream Sandwich).
You can also create and restore a backup of your Android device using the Titanium Backup utility. Titanium Backup is perhaps one of the best backup solutions, but it requires root access.
Installing the Android SDK
To create and restore a backup, we will use ADB (Android Debug Bridge) commands. This utility is included in the Google Android SDK, which you can download for free.
First, you need to install the Java Development Kit (if not installed), since the Android SDK requires it. Download and install the 32-bit version of the Java Development Kit (Android SDK requires the 32-bit version, even if you have a 64-bit version of Windows).
Next, download and install the Android SDK. If the SDK says it can't find Java, then you may have installed a 64-bit version, in which case install the 32-bit version.
After you have successfully installed the SDK, launch Android SDK Manager from the Start menu. Check the box next to Android SDK Platform-tools and click the install button to install the platform tools package that contains ADB. If you see an error, run SDK Manager as Administrator (click on the SDK Manager icon in the Start menu and select “Run as Administrator”).
System backup using Titanium Backup program
data-lazy-type=”image” data-src=”https://androidkak.ru/wp-content/uploads/2015/09/Titanium-Backup.png” alt=”Titanium-Backup” width=”112″ height=”112″ srcset=”” data-srcset=”https://androidkak.ru/wp-content/uploads/2015/09/Titanium-Backup..png 150w, https://androidkak.ru/wp- content/uploads/2015/09/Titanium-Backup-300×300.png 300w" sizes="(max-width: 112px) 100vw, 112px">
To create a complete copy of the device system, the program will need from a few minutes to half an hour. After the copying procedure is complete, in the “backups” menu, check the application lists for the presence of a triangle with an exclamation point inside. If there are no such triangles, then everything went great.
The backup copy of your device is now on the SD card; it is better to copy it to a computer or some other external storage device. When the time comes to restore the entire system and settings of your gadget, the backup copy will be completely safe and secure and you can easily restore the system through it.
To start working with Helium you will have to not only install the application on your mobile device, but also the desktop version of the program on your PC. You also need to find in this list the drivers corresponding to your smartphone model and install them on your computer. Only after completing these operations will you be ready to start working in the application.
Connect your smartphone to your computer via USB. Launch the application and follow Helium's simple and clear instructions. The program will first direct you to Settings to launch USB Debugging
.
You don’t have to delve into the menu yourself - Helium will immediately open the desired directory, all you have to do is select the desired item in the list. Next, the same procedure will be done to switch the connected device to camera mode (PTP)
.
Next, Helium will search for the desktop application on your computer. Since we have already installed it, and also did not forget about the drivers for the smartphone, this step will be short, and you will immediately see the following window: the application will report that the backup has been successfully enabled (backup, as I understand it) and the ability to disconnect the gadget from the PC. Now you can work with the program essentially, no longer needing to connect to a computer.
This is where the technical formalities end. Next, you create backup copies of application information, saving them either on a memory card or in a cloud storage of your choice. Helium will also allow you to synchronize several of your devices, even if they are on different networks - your Google account will be used here. The second tab of the main application window is Data Recovery from Backups
. Helium will detect all archives of this type and restore them. But be sure that you remember the password with which these archives were locked when they were created (if, of course, you locked them at all).
Well, for those who are constantly worried about the security of vital data in applications, Helium has acquired such a function as scheduled backup
: Your smartphone will back up your data at the set time.
Regular saving of such archives guarantees that in case of an unforeseen situation, you will return to the most up-to-date information and settings. Happy backup! download the Helium application (Backup (Backup) without root rights) for Android
using the link below.
Android includes a built-in feature to create a full backup of your Android phone without root, as well as a tool to restore it. All you need is a computer and a device running Android 4.0 (Ice Cream Sandwich).
You can also create and restore a backup of your Android device using the Titanium Backup utility. Titanium Backup is perhaps one of the best backup solutions, but it requires root access.
To create and restore a backup, we will use ADB (Android Debug Bridge) commands. This utility is included in the Google Android SDK, which you can download for free.
First, you need to install the Java Development Kit (if not installed), since the Android SDK requires it. Download and install the 32-bit version of the Java Development Kit (Android SDK requires the 32-bit version, even if you have a 64-bit version of Windows).
Next, download and install the Android SDK. If the SDK says it can't find Java, then you may have installed a 64-bit version, in which case install the 32-bit version.
After you have successfully installed the SDK, launch Android SDK Manager from the Start menu. Check the box next to Android SDK Platform-tools and click the install button to install the platform tools package that contains ADB. If you see an error, run SDK Manager as Administrator (click on the SDK Manager icon in the Start menu and select “Run as Administrator”).
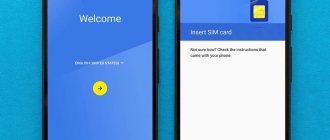
You must enable USB debugging on your device. You can do this from the developer tools in Android settings.
Now connect your PC and your device using a USB cable. You must have drivers installed for your smartphone; usually they can be downloaded from the manufacturer’s website. Install Google USB Driver via Android SDK Manager (Extras subfolder), it might work.
Remember the path where Android SDK is installed. It appears at the very top of the Android SDK Manager window next to SDK Path.
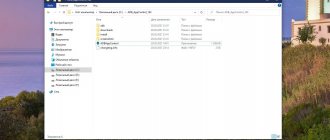
You need to find the adb.exe file in the platform-tools folder. It is usually located at C:\Users\NAME\AppData\Local\Android\Android-sdk\platform-tools.
Go to this folder and, holding down the Shift button, right-click on an empty space, select “Open command window” in the context menu that opens. To check the adb connection to your device, run the adb devices command.
Your device should appear in the list. If it is not there, then the driver is installed incorrectly.
Now you can use adb commands to create a backup copy of your device files. For a full backup, run the following command: adb backup -apk -shared -all -f C:\Users\NAME\backup.ab The command will create a backup copy of all installed applications (apk files) and data on the SD card to the file C:\Users\ NAME\backup.ab on your computer. Replace NAME in the command with your computer's username or specify a different location.
When you run the command on your phone, you must confirm the creation of the backup. You can also protect your backup with a password.
Depending on the amount of data, the process may take some time.
To restore a backup, you must run the following command: adb restore C:\Users\NAME\backup.ab A confirmation will appear, which contains information that the backup will replace all data on the device. If a password is set for the backup, you will need to enter it.
To create a full backup of an Android phone without root rights, you need to be an average user who understands the peculiarities of Android, but with the help of our instructions, even a beginner can do this. We hope this feature will be available in the Android interface in the future.
Modern smartphones store a huge amount of necessary and important information, and each user customizes the phone individually. And so, when switching to a new device, the Android owner is faced with a situation where the operating system needs to be configured again. The ideal solution here is a deep or partial backup
. But not everyone knows how to make a full Android backup quickly and safely using a tablet or phone without losing important data.
Preparing the device
You must enable USB debugging on your device. You can do this from the developer tools in Android settings.
Now connect your PC and your device using a USB cable. You must have drivers installed for your smartphone; usually they can be downloaded from the manufacturer’s website. Install Google USB Driver via Android SDK Manager (Extras subfolder), it might work.
ADB check
Remember the path where Android SDK is installed. It appears at the very top of the Android SDK Manager window next to SDK Path.
You need to find the adb.exe file in the platform-tools folder. It is usually located at C:\Users\NAME\AppData\Local\Android\Android-sdk\platform-tools.
Your device should appear in the list. If it is not there, then the driver is installed incorrectly.
Restoring a backup
To restore a backup, you must run the following command: adb restore C:\Users\NAME\backup.ab A confirmation will appear, which contains information that the backup will replace all data on the device. If a password is set for the backup, you will need to enter it.
To create a full backup of an Android phone without root rights, you need to be an average user who understands the peculiarities of Android, but with the help of our instructions, even a beginner can do this. We hope this feature will be available in the Android interface in the future.
Source
Saving photos and videos
Even if apps with data are deleted, you can download them again. However, this cannot be done with personal photos and videos. If certain steps are not taken in advance, if the device is deleted or stolen, it will be impossible to recover multimedia files. To reserve videos and photos, you can use applications that are available in the Play Store.
Google+
This application is most often already installed on many devices with the Android operating system. It can automatically save created photos to cloud storage. This action can also be performed manually. Thanks to this function, files are synchronized on all devices that use the same account.
Since the user, one might say, opens his personal information to Google, it provides the ability to create collages from several photos, GIFs, as well as automatic adjustments to pictures. However, cloud storage can hold no more than 5 GB.
It can be accessed from any computer or device; all you need to do is log in to the system with your username and password.
Backup of all device software
All new smartphone models have NAND memory. Thanks to this, the user can reserve his firmware, including all programs and settings in them. You can make backups using TWRP and CWM or use other software.
ROM Manager - recovery for smartphone
The program is very easy to use.
To perform certain actions with personal data, you need to download ROM Manager, which will have the ClockworkMod function. Depending on the type and model of the device, you can use other applications with similar properties. Attention! If you want the backup or restore process to run smoothly, please charge the battery to 100%.
To create a backup, follow these steps:
- Turn off your smartphone or tablet and wait a few seconds for the battery to go into passive mode.
- Hold down the power and volume down buttons at the same time.
- After that, you will see the ClockworkMod Recovery menu on the screen. In it you need to select the “backup & restore” item. To switch to it, use the volume keys.
- Now you need to determine how the backup will be created. If you simply select “backup”, the entire system will be saved. If you use “advanced backup”, you can save not only space in the SD card memory, but also the time it takes to create an archive.
- Now click “backup to /sdcard” and in a few minutes the process will be completed.
To restore archived files and information, you need to run ClockworkMod Recovery again, select the “backup & restore” menu item, click on “restore”, select a backup copy and start recovery. After this, you should reboot the device using the reboot now option.
Top 10 Apps to Backup Android Phone Without Root
Backup is required. You love it or hate it; backup is essential.
Sometimes when we get updates, factory reset the device or even update a custom ROM, or in the worst case the phone gets lost, then backup becomes a savior in case something goes wrong.
If you back up your data, you won't have to cry tomorrow. It is also true that data backup will not be done with a simple click of the mouse.
Read below to know the 10 best apps to backup your Android phone without root.
So, we have come up with a step-by-step guide on how to back up the data on your device.
This is a universal guide for Android phone or tablet.
Selective backup
This article will only consider those tools that are rated positively by the majority of users. The first program worthy of attention is Titanium Backup.
Titanium Backup (root)
With this program you can:
- create backups and restore data;
- carry out complete deletion of all information or freeze it for some time;
- transfer to the SD card memory those programs that cannot be moved by default.
In addition, with Titanium Backup you can easily work with several copies of the same program at once, and many processes are fully automated. However, for the utility to work smoothly, you must obtain root rights. If you do not receive them, it will show an error when logging in: “ Failed to obtain superuser rights. The application will not work. Make sure you are rooted and try again ."
If everything is fine with this point, then the problem lies in one of the two reasons described below (open the spoiler to read). 2 more reasons why this error may occur
1. The Superuser Permissions program is not installed in the firmware. To control third-party programs that read and write to the specified folders, the su file is modified in the firmware, which is controlled by the Superuser Permissions program. Find the program with a small ninja in the list of your programs:
When launched, Titanium Backup will request root access, Superuser Permissions will automatically launch and prompt you to allow Titanium Backup administrative access to system folders. All you can find out by opening it yourself is a list of applications that you have allowed direct access to system folders.
2. The BusyBox set of utilities in your firmware is outdated. There is no easy way to check the freshness of the set, so in any case, click the “Problems?” button. and be sure to download about 2 MB of the latest BusyBox build.
If everything is fine, the installation is successful, you will see green checkmarks next to each item (as in the image).
With this application you will quickly establish synchronization with cloud storage. The utility also supports information about WI-FI access points, an address book, data from the calendar, from SMS and MMS, as well as call history.
But most importantly, with Titanium Backup you can transfer personal data and settings from one device to another and from one firmware to another.
To save a backup on your Android device, you must follow these steps:
- Prepare enough space in SD memory to accommodate the backup.
- Get root rights.
- In some cases, you also need to enable USB debugging.
- In the upper right corner there will be an icon that you need to click on to bring up an additional menu and find the “Group Actions” section.
- After which you will see a list of actions that you can perform. This includes creating a backup copy of all information, saving a copy of the software with all previously made settings, uninstalling backups, updating the backup copy after additional information has been added to it, making changes to system applications, and much more.
- Having selected the desired action, click on the “Start” button. Next, you can select from the list the programs or personal data that you want to reserve.
- There will be a checkmark in the upper right corner that you should click to start archiving. In the “Batch Actions” menu, you can not only create a backup copy, but also restore information. Here you can easily roll back some programs, restore all information about applications, restore information only about some system programs, and replace new versions of applications with those saved in the archive.
Working with backups
Titanium Backup can backup:
— All installed programs (simple and protected); — All data and settings of these programs — Almost all data and settings of the communicator itself (SMS/MMS/APN/playlists/contacts/call history/calendar memory/account settings and synchronization settings/wallpapers and their settings/browser bookmarks/user dictionaries/widgets ;
Titanium Backup cannot create backup copies of system applications that make up the firmware (in the “Backups” list they are marked in red). You can only copy the settings of such services.
The main scenario for using Titanium Backup is this: you select programs and OS services that you want to copy to the archive, carry out the backup operation, then carry out any experiments up to replacing the firmware with a new one, download the latest Titanium Backup from the Android Market and restore all programs with their settings back.
Titanium Backup is indispensable if you have changed your phone, but do not have the time or desire to download and configure all the programs you need in life from the Android Market. Make copies of everything you can, move the SD card to a new device, install Titanium Backup and restore everything back.
All operations with backup copies are carried out in two ways:
- Through a dialog box. Go to the “Backups” tab, tap on the line with the desired program and use the “Start backup” button. in the dialog box that appears. There you can also use the “Freeze” function (saves the program in a backup copy, hides it from the list of programs and does not allow updating from the Market). You can “unfreeze” programs in the same way as “freeze” - by calling a dialog box on a program from the list.
- By starting processing. Processings are ready-made sets of commands executed for a specific purpose in the BusyBox environment (that's why this component is needed!). Managing them is very simple - click the “Start” button opposite the task you need and execution will begin immediately. Using processing you can perform the following actions:
a). Create backup copies, including:
— check backup copies for integrity (it is always recommended to do this before restoring programs and data from the archive); — perform backups of all programs, or system services, or programs and system services simultaneously; — create new versions of archives for all existing backups; — carry out backups of programs with backup copies that are 3 days or more out of date; — archive only new programs or add to processing tasks for creating backup copies of programs that have archives, but the version has been updated.
b). Restore from backup copies: - programs and their data; — programs + system services with data; — only new versions of installed software; - in general, all programs at once (the most frequently called function).
c). Delete backup copies of: - those programs that you have already deleted, and the backup copies are lying around in the Titanium Backup archives - in general, the entire archive with backup copies.
Starting any processing brings up a simple dialog box that displays the programs affected (you can manage the list) and also brings up the important "stop/don't process" switch for programs currently active in RAM.
Working with schedules is easy. Schedules are automatically performed Titanium Backup processing with configured parameters. Scheduled processing is launched on a set day and time of day (remember that AM is the first 12 hours of the day, and PM is the rest, that is, the hours from 13 to 24 in our tradition). The list of tasks to be added to the schedule is small, but covers all the necessary areas.
Features of TB operation
To successfully use Titanium Backup, pay attention to a few tips:
- Check the integrity of backup copies before restoring programs back.
- After restoring system data (especially Contacts, SMS, APN settings, etc.), be sure to restart the device for the changes to take effect.
- It is much more convenient to use Titanium Backup together with Apps Organizer. Install it, assign shortcuts to programs, and managing backups will take you much less time.
- After restoring a program from a backup, check it with Google Play Protect. If it reports that everything is fine, but the program still does not appear in the “My downloads” list in the Android Market, search for the program in the Market manually. The connection between the program and the list of downloads in the Market is probably working properly when the status of the found program is marked as “Installed”. If the program is still not visible, but when searching it is “installed”, download and install any program to update the status of installed programs in the “My Downloads” section.
- To remove a system service, first “freeze” it and see if the device works normally after that.
Titanium review on YouTube
Backup and reset
If you do not want to spend money on a donation, to get the “PRO: Titanium Backup” version, use the standard tool that is found in all devices running on the Android operating system.
To create a backup, find the “Backup/Reset” section in the settings. The user only needs to mark certain items in the settings. After the configuration or firmware is reset, all the necessary information will be easily restored when you log into your Google account. In it you can manually or automatically save not only all your applications and files, but also a list of available WI-FI connections and passwords for them.
All information will be saved on the service; in order to restore it on the device, you will have to connect to the Internet.
However, the automatic mode does not make it possible to save used passwords, connected WI-FI points and some other information. Therefore, you should use other tools for backup.
After the user changes the firmware and resets all information, the operating system itself will offer to download the saved copy from the service.
Helium - App Sync and Backup
The main difference between this program and other analogues is the ability to use it without obtaining root rights. To do this, you need to download the application not only on your mobile device, but also on your computer (the PC program is called Helium Desktop: github.com/koush/support-wiki/wiki/Helium-Desktop-Installer-and-Android-App). If you have root rights, then this is not necessary.
The utility is able to identify and distinguish between devices on which the backup was saved. But, unfortunately, it cannot archive all programs.
To make a backup of a gadget running Android OS, you need to follow these steps:
- In the settings of the device itself, in the “Features for Developers” section, activate the “USB Storage” item.
- Now you should run the same program on your computer and connect the devices (if all steps are completed correctly, a green check mark will appear on the screen).
- Next, you need to click on the “Reservation” tab.
- If you want to copy not only information, but also applications, then you should deactivate the “Application data only” item.
- Use the checkbox to indicate which programs need to be backed up.
- Next, you should select the location where the copy will be stored.
- Now clicks the button located in the lower right corner “Back up data”.
- We wait a few minutes while the archiving process is completed.
To restore all saved data and synchronize it, click on the “Recovery and Synchronization” tab in the program. Then select the device where the archive was saved and begin recovery.
Backup & Share Pro app
App Backup & Share Pro is a decent app to backup your Android device data without the need to root your smartphone.
This app offers you all the features like management/backup/restore/sharing software etc.
In addition, this application allows you to backup any data from the SD card or internal memory of the device. Moreover, you can backup files from USB drives via OTG or any cloud storage.
One of the best features of this app is that it allows you to share any regular as well as system apps from your device through other sharing sources to other devices.
It also supports app sharing between supported apps like Facebook Messenger, WhatsApp, etc. You can save your data to cloud storage like Google Drive, OneDrive, Dropbox, etc. without any hassle.
In addition, this application allows you to automatically save all data or one at a time. You can also uninstall an app on your device without going into the app manager, and it also gives you the option to rate or review any app directly from the Play Store.
How to make a backup on Android with and without Ruth rights, all methods and programs
Good afternoon, dear readers. Read the article on how to make a backup on Android without root rights, or with them, what a backup is. Useful programs to help you make a backup copy.
The Android operating system is fraught with a lot of possibilities. The most useful of them is backup. Or backup - this function is also called that. If a failure occurs or you lose your smartphone, you can restore almost all the information. You just need to remember to regularly backup your Android system. How exactly? This article will try to answer this question.
Answers to popular questions
How to make a backup on a tablet, are there any differences from the above tips?
No, if your tablet runs the Android operating system, everything is identical. There may be minor differences, but they are not significant and are resolved during the backup itself.
How to save data from Viber?
This messenger supports its own personal backup function, just like WhatsApp. Or you can use special applications. There is not much difference with WhatsApp.
How can I restore a copy made in Restore?
To do this, go to the application, open the “Archive” , find the necessary materials, and after checking the box, click “Restore” .
Is Super Backup free?
There are two versions of this tool: basic, that is, having small but useful functionality, and extended premium.
In the first option, no payment is required, but for the second you will have to pay. Both versions are freely available on Google Play. As you can see, on Android it’s quite easy to make a backup; you can save firmware, instant messengers, applications, and always have the necessary information at hand. The most important thing is to be attentive and strictly follow the instructions. Good luck!
Types of backup
First, let's figure out what exactly is meant by the word “backup”. This is usually the name for copying certain files for their subsequent recovery. You can copy data to the following places:
What exactly can you copy? This is a more serious question. The operating system itself by default uploads data about your contacts, call logs, messages and much more to Google servers. Usually this is enough for any user.
Third-party applications can copy all kinds of media content. For example, this could be downloaded videos or music. In this case, you often specify the folders with the necessary files yourself, so there can be no mistakes - absolutely everything will be copied.
There is also a backup on Android of application settings. It works correctly, however, not on all smartphones. And not all programs allow you to copy their settings. But you need to know about this possibility.
Finally, there is a full backup on Android. This is when the current state of the firmware is copied - completely, from settings to some files hidden from the user. This is done in the most difficult way and often in a special way. And this is required only for those who regularly experiment with their device.
Backup on Android: Do you need root rights?
Copying some files cannot be done without obtaining root rights
. The fact is that the most serious operating system settings are hidden deep in hidden folders. As such, the user does not have access to read them. It is root rights that solve the problem - they provide access to copy absolutely any files.
But most often, no root rights are required. For example, you can back up your messages, contact book, and other aspects of the Android operating system without them. Moreover, this process is often carried out automatically - you may not even know about it.
Backup using the operating system
Android, almost from its first versions, learned to copy user information to Google servers. But at the same time, only basic information is copied - messages, call logs, content of services from the Google Play series, calendar, contacts and documents. If this is enough for you, then get ready to do the following:
Don't forget that you need a Google account for this sync to work. However, without it you can only implement an Android backup to a computer. For other actions, special applications are required, and they need to be downloaded from Google Play, which cannot be accessed without the appropriate account. Of course, there are all sorts of tricks like downloading programs from third-party resources, but this is a topic for a separate article.
Branded programs for backup on Android
Nowadays, many smartphones come with proprietary shells created by the manufacturer. They can implement additional backup - the data is sent to the device manufacturer’s server. For example, let's look at how to make a backup on Android installed on a Samsung smartphone or tablet:
The best backup programs for Android
Not all people are satisfied with the standard features of the operating system. Some users are looking for information on how to make a backup on Android using special utilities. They seem to trust them more. In addition, such programs allow you to send a backup to your favorite “cloud,” while the operating system only offers servers from Google and some other companies involved in the production of smartphones.
Without root rights, third-party programs do approximately the same thing as Android itself. They are able to copy contacts and messages, but nothing more. But if you give such a program superuser rights, then everything will change. The breadth of its capabilities will increase significantly. The most popular backup applications and tools are the following:
Titanium Backup
So, what does Titanium Backup copy? It seems like absolutely everything! If you give the application superuser rights (without them it simply does not work), you will get a bunch of possibilities.
How exactly to use Titanium Backup?
The backup copy will be in the form of a separate file. In the application settings you can specify where exactly to save the backup. The safest way is to save it to a memory card. The PRO version allows you to use Box, Dropbox and Google Drive. You can also set up an automatic backup - it will be created according to a schedule. The paid version of the program can also compress files - in this case, they will take up less space in your cloud storage or on your memory card.
Backup of all Android firmware
And even Titanium Backup does not copy the entire state of the operating system. In this case it simply doesn't make sense. If you experience a system crash and Android won't boot, you won't be able to use the recovery because you won't be able to launch the app itself. Then how to make a backup of Android firmware?
Developers from Google have implemented another method that works using the Recovery Menu
.
Make sure the battery is at least 50% charged before proceeding further. Otherwise, there is minimal risk of the device turning into a “brick”.
Different smartphones and tablets may use different ways to visit the Recovery menu. In any case, you will need to completely turn off the device. Then the following actions are usually performed:
Some devices use different buttons. For example, Samsung devices can also use the Home button. Please note that all buttons are released after a green robot with an exclamation mark appears on the screen. Otherwise, a normal reboot will occur. Well, in the Recovery Menu you need to find the “Backup and Restore” item. Navigate through the menu using the volume buttons (the touch screen does not work here) and press the appropriate item using the power button. Next, click on “Backup” in the same way. Then all that remains is to wait for the process to complete.
How to make a backup of Android using Titanium Backup
Popular Graphic key - how to unlock it on Android if you forgot it
Android - what is it on a phone: Details
How to open and configure the engineering menu on Android - instructions and secret codes
Can't connect Android to WI-FI network?
“Phone memory is full” on Android: reasons and solutions
Commented by Zheim Happer 02/02/2021 18:52 Deleted Stk.apk, no problems :-)… Removing system APKs
James Happer 02/02/2021 18:50 Deleted Stk.apk, everything works as it should. I even noticed a certain article... Removing system APKs
Maksim 01/26/2021 11:50 Smart Launcher is essentially a third-party shell for Android... How to hide applications on Android
Tahir 01/23/2021 06:23 Cash. Memory... Solving the problem with files on the...
Arayka 01/17/2021 19:52 How can you hide an application in a smart launcher? You can or... How to hide applications on Android
fans-android.com › Android
August 29, 2012
Author: Maxim
With such tasks as creating a backup copy of all applications (including system programs) available on your Android phone or tablet, saving all mobile network and WiFi settings, as well as interface and application settings, with subsequent restoration of your phone or tablet to its original position, a program such as Titanium Backup can do the best job.
That is why today we will talk about how you can use this amazing program to create a backup copy of your tablet or phone.
- 1 What is the value
- 2 Why do you need root access rights, what are they and how to get them
- 3 How to install
- 4 How to restore from a backup copy
What is the value
Android is characterized by certain backup capabilities that are built into the system itself. And it’s no secret that if you want to change your Android phone or do a full reset of the device to factory settings, then to do this you need to log into your Google account after the reset operation, then all the information about your contacts will immediately be displayed on your phone. But here another problem arises - all the games and applications previously available on the phone now need to be reinstalled and configured. In addition, you will have to enter all the information regarding WiFi networks, mobile Internet settings, as well as all other system settings in a new way. All this is not so difficult if you only had a couple of games and applications on your phone, but what to do if there were several dozen of them (which is most often the case)?
This is where Titanium Backup, a software for backing up Android devices, comes to the rescue.
So here we need two things to start with:
- Root rights on the device
- Availability of the Titanium Backup (download from the market)
Why do we need root rights? Well, everything is extremely simple here, since the Android system does not by default provide its users and programs with access to all system folders and programs, and it is in them that all device settings and program data are stored. The Titanium Backup program will help you copy all the necessary information with the subsequent restoration of all programs and data, but for this it must have access rights to write to all system folders. This feature can only be implemented if you have root rights on the phone.
Root rights are a wide range of possibilities for owners of an Android device; you can learn more about all this by gleaning the necessary information in this article:
Why do you need root permissions, what are they and how to get them
First, let's talk directly about the Titanium Backup . There are only 2 versions of this program: one of them is provided on a paid basis, and the other is free. To create a backup copy of your tablet or Android phone, as well as restore this copy, the free version of the program is quite suitable. In addition, using the free version, you can create weekly copies of all applications (or selectively), manage backup copies, move programs to a memory card and return them, etc.
The paid version has a much wider range of features. You will be able to “freeze” programs without completely deleting them from the device, create backup copies of the application at different times (this function allows you to restore the game, saving certain settings, and also restore this game, which will include the settings of other players, members your family), convert system applications into user applications, restore and store backups on the Internet using Dropbox (this will greatly help you if the SD card is lost or damaged) and much more.
How to install
It has already been said that we will need root rights for the program to work. Before installing the program, you need to activate the ability to install applications in the settings of your tablet or phone in the “Applications” section; to do this, use the “Unknown Sources” market.
After all programs are installed, the first time you launch Titanium Backup you will be prompted for superuser rights. To grant rights, you need to click the “Allow” button. We do not uncheck the “Remember” item, this is necessary so that in the future this window does not pop up every time the program is launched.
OK it's all over Now. Your program is already installed. However, before you start using it, take your time to press all the buttons in the program, going to all menu items. Since Titanium Backup is quite a powerful program, having full access to the system. This means that in order to avoid harmful actions, you need to carefully read each menu item and the labels on the button, and think carefully before taking any action.
How to backup an Android device using Titanium Backup?
First you need to make sure that your device has an SD card and there is enough free space. Since a certain reserve will be needed when the program copies data to the card.
After starting Titanium Backup, the main program window will open. Here it is important not to forget that the rule “do not do anything until you are sure that your actions are completely correct” is unquestioning. Then you can proceed to creating a backup copy of the device.
1. Find the “Backups” button, which is located at the top of the program screen
2. Click on the “menu” button on your phone, finding the “Processing” item in the menu that appears (located at the bottom of the screen)
3. Then in the window that opens, go to the “Backup” section, find “Make r.k. all user software and system data" and activate the "START" button, which is located opposite this item
4. Next, a window will open in which the program prompts you to select all applications, as well as close running applications. You can select the applications that will be copied, but we still need a complete copy of the system, so we shouldn’t touch anything.
5. Let’s start the backup process; to do this, click the “Start batch processing” button. Next will be the process of creating a backup copy. The process may take a long time (from a couple of minutes to several tens), it will depend on how many applications you have installed on your device.
6. After copying is complete, you go back to the “Backups” menu. But in front of each application there will no longer be ordinary triangles, but multi-colored checkmarks and emoticons. To find out what they mean, you need to find the “Designations” item in the menu.
The operation was successful if there are no triangles with an exclamation point in front of you.
Next, you can go to the /TitaniumBackup folder on your SD card, where there are many different backup files. This folder must be copied to a computer or another location, so that if you suddenly lose the SD card or it simply fails, you can restore everything (both the settings and all the information located on your phone or tablet).
Now we can congratulate you! You have created your first backup. Now click the “Schedules” button, which will help with setting the frequency of automatic backups.
In addition, backups can be created and restored separately for each specific program, then you just need to click on it in the list of applications in the “Backups” section.
How to restore from a backup
If you need to restore all the content on your Android device, there are several methods you can use. You can completely restore all information, including all applications and settings. In this case, you need to go to the “Processing” item in the menu, find the “Recovery” section among the proposed list of operations, selecting the “Restore all software with data” item.
You can also restore only certain applications and information about them. For example, you need to restore completed levels in the game Angry Birds. Then you simply select the desired application from the general list in the “Backups” section and activate the “restore” button.
Do not forget that after the system data is restored (this includes SMS, system settings, contact data, etc.), you must reboot the device, only then will all changes take effect.
In more complex situations, if, say, you reflash your phone or tablet, it is better to restore all system data first, and only then proceed to restoring new versions of user software.
Titanium Backup provides a large selection of different methods for restoring Android devices, so you can always, if necessary, return your Android phone or tablet to its original position (during backup).
tell friends
Similar posts How to return the old Android firmware - options for rolling back to the old version
Pro tip: Prepare your Android for Lollipop
Are root rights really necessary on Android?
How to transfer data from Android to Android everything: TOP ways
Comments - 0:
Leave a comment Cancel
How to make a full backup of Android
Modern smartphones store a huge amount of necessary and important information, and each user customizes the phone individually. And so, when switching to a new device, the Android owner is faced with a situation where the operating system needs to be configured again. The ideal solution here is a deep or partial backup . But not everyone knows how to make a full Android backup quickly and safely using a tablet or phone without losing important data.
Backing up instant messengers
Messengers for the modern user are simply a necessary thing, helping both to communicate with friends and, for example, to send a photo of completed work to the boss. Let's look at the example of WhatsApp . It stores a huge amount of necessary information: important messages, images, phone numbers. And the ideal way not to lose such materials is to make a backup. How to do it on WhatsApp?
Built-in backup option
All popular instant messengers have their own backup function, which allows you to save the necessary materials directly from the application itself. WhatsApp is no exception.
Begin:
- Find the application, open the menu;
- Click “Settings” , now go to the “Chats” and click “Backup” .
- Select saving to Google Drive and configure the frequency of saving.
- If you have several Google accounts, select the desired one in the window that appears. Haven't registered or logged in to your account yet? Then click “Add account” .
- And in the last column we select the network under which the copying will take place. Don't forget that using mobile Internet may result in additional charges for the megabytes used. Therefore, we recommend assigning a Wi-Fi network.
Backup using Super Backup
Super Backup is a special program for backing up individual applications, so it is an ideal option for the first point of our article. To save WhatsApp itself, root rights are not required, but if you need to copy its contents, then you cannot do without the “Superuser” mode.
QR Code
Super backup
Developer: MobileIdea Studio
Price: Free
The way to work with this application is very simple: after installation, go into it, click “Applications” , check the box next to “WhatsApp” - “Save”. The backup made, or rather the path to save it, can be found in the “Archived” .
Backup using Restore Transfer
Another worthy application created by the developer Trustlool Apps. Fully translated into Russian, the interface is simple and clear. In addition, there is a huge plus for beginners and inexperienced users - root rights are not needed.
QR Code
App Backup Restore Transfer
Developer: Trustlook Security Lab
Price: Free
Immediately after launching the utility, we see a list of programs and games installed on the device. We look for our messenger, put a checkmark next to it and click on the large gray button located at the bottom - “Backup” . If the backup procedure was successful, we receive a notification with the word “Agreed” .
How to backup individual applications on Android
It is not always necessary to copy the entire system, and the process is quite painstaking. If you need to save only specific programs, we recommend using this method. And here the ideal option is the Helium application.
This tool can be freely downloaded from Google Play. It works on two “bases”: either providing root rights and all manipulations are carried out only on the smartphone, or connecting a USB cable and access to a PC, if you do not have “Superuser” mode.
The application allows you to save copies on an SD card and in cloud storages, namely Drobox, Google Drive and Box, which is very convenient.
She can:
The application works perfectly on the latest versions of the operating system, mainly Android 7.0, 7.1 and 8.0. Now let’s look at what actions we will perform in it:
How to make a proper backup of your entire Android system
But here things are a little more complicated, since we need a complete saved copy of Android. Of course, it will take up more space, and there are several different ways to create it. For preventive purposes, we recommend performing such a backup once every few weeks, but before flashing firmware or carrying out other important system processes, it is simply necessary here and now.
Backup via system option (No Root)
The easiest and most comfortable option, suitable for beginners and simply users who did not want to waste their time. Open “Settings” , go to “System” - “Backup” Google Drive in the location Made. The following information will be saved:
Unfortunately, failures during the backup process are possible, which is why many users complain about the insufficient amount of stored information. And on some devices, such a system function refuses to work at all; this may affect phones with an operating system lower than Android 6.0.
Backup Android using FlashTool (No Root)
This is a more serious and difficult procedure that allows you to back up the entire firmware. There will be many stages, and we do not recommend this option for users who are not confident in their abilities and technical knowledge! But if you are an experienced Android expert, then you can safely get started.
To begin with, we prepare all the necessary materials so that during the backup process we do not have to be distracted by them.
After the backup is completed, the files can be moved to any cloud storage, because if some major trouble happens to your computer or hard drive, the saved information will be lost, don’t risk it!
Backup via Titanium Backup (Root)
Quite an easy and comfortable option using the special Titanium Backup program. You can download it without any problems from Google Play and install it in the standard way.
Source
How to backup Android firmware via Recovery without root rights
Another decent option that works on all devices, but from experience I will say that it is much easier than the FlashTool method . For this we need recovery mode. Of course, the most popular and most functional is TWRP , which allows you to install custom firmware and various kernels, but stock is also quite suitable for backup . Begin:
- Make sure your smartphone has more than 60% charge.
- Turn off the phone, after about 30 seconds press the power button and the volume rocker down or up, differently on different models.
- Next, an image of an Android robot with an exclamation mark may appear. If this happens, press the same key combination, but do not hold it. Did you immediately go to recovery? Then we skip this point.
- Now we find ourselves in the recovery menu itself, only here touch input no longer works. We will switch with keys: the volume up rocker, respectively, is the “up” , the volume down rocker is “down” , the on/off button is “Okay” .
- Go down to the item “backup/restore ” , click “backup”. The copying procedure begins, which takes on average up to 10 minutes. During this period of time, we don’t press anything, we don’t turn on the smartphone, we just wait.
- When the operation ends, we reboot the smartphone. That's all, ready, the backup of the Android firmware is done.
Safe Backup
Developer: Promwad Mobile
Price: free
Tested on: LG G2 16 Gb
Link to: Google Play
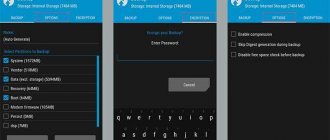
Let's simplify the task. Let's abolish it, one might say. To a minimum. Why frighten the user with possibilities if you can present everything gradually, slowly, with taste, so to speak? In the end, a sophisticated person is unlikely to fool around with such simple programs, and has long been walking around with access to root, a voided warranty for this reason, and Titanium Backup behind him. What we need now is a simple, reliable and gradual application, well executed and functional to the required extent. Safe Backup fits this role perfectly.
Remember my flattering words about the menu in Super Backup? Forget, there are only TWO items in Safe Backup. Save and, accordingly, restore. True, the further into the forest, the wider the partisans, as people say, but the first impression is made great. After you decide where to go, the so-called. templates These are the paths where backups are made. And I recommend that you consider the options more closely. There is a memory card/internal memory, an FTP server, Box, Dropbox, and even a connection to Windows!
After selecting a place template, we proceed to selecting an action template. You need to decide on the location where the files will go. In the case of phone memory, which is what interests us, the file path is indicated. Or a folder is selected thanks to a very stylish file manager. After this, you need to specify the backup objects. There are about a dozen of them, including applications, calendars/events, music, pictures, notifications (!) and podcasts (!!).
Once you think that every detail has been taken into account, I recommend looking at the top right, where several icons are located. The first locks the newly created backup with a password (!), and the second compresses the data using a ZIP archive. By the way, the action template is saved in the application memory, which saves time in working with it. To create a new template, you need to click the cross at the top on the selection screen. And in the settings you can specify a schedule for automatically creating backups.