What is cache
Cache (or cache ) are temporary files that the computer stores in memory, because. they can be used later. This “memory” system helps PCs and laptops run faster, especially when their performance is low. However, there is an important nuance here - the cache takes up part of the hard drive, and if the volume of the latter is small, this can become a problem, because There may not be enough space to store personal data. And this is the main reason for deleting the cache.
You can use special programs for cleaning, such as CCleaner . Detailed information regarding its installation and use is provided in our publication “Where temporary files are stored in Windows 10: how to delete.”
We will further consider only the tools built into Windows 10.
Why you shouldn't use memory optimization programs
On many computer-related websites there will certainly be links to programs that promise to improve the performance of our computer in one click and turn an old, slow computer into a high-speed “spacecraft”. We have already written that such “one-click” optimizers are at least useless, and that the issue of optimization needs to be approached completely differently - more thoughtfully and certainly not with a “one-click” tool. There are also RAM optimizers, which rank particularly high in the list of useless utilities, because they not only do not bring any benefit, but also reduce the speed of your computer. And now I will explain why.
Clearing the system update cache
See also: “How to disable automatic updates in Windows 10: permanently (completely), temporarily”
Windows saves update files just in case they are needed again. Such data can take up too much space, and deleting it in some cases can result in up to several free gigabytes.
So, the algorithm of actions is as follows:
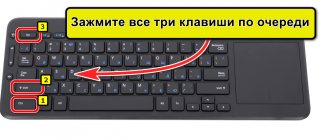
- Launch Command Prompt as administrator. This can be done in different ways, for example, through the Start context menu (opened by right-clicking on Start or using the Win+X key combination).
- In the window that opens, enter the command “net stop wuauserv” and press Enter to execute it.
- We wait a while until “Windows Update” is stopped and a corresponding message appears.
- Open Explorer (you can use the Win+E key combination for this) and go to the address: “C:\Windows\SoftwareDistribution\Download”. Select the contents of the folder (for example, using the hot keys Ctrl+A), then delete everything.
There is an important point here - if we simply press the Del key or use the “Delete” command in the context menu, the selected files and folders will be sent to the trash, where they will also take up space (except when their total size is greater than the volume of the trash). To permanently delete selected objects bypassing the trash can, press the key combination Shift+Del. - When the uninstallation is successful, you need to reactivate the Update Center. To do this, return to the Command Line, enter the command “net start wuauserv” and press Enter.
Deleting temporary files
See also: “What unnecessary services can be disabled in Windows 10 for performance”
In Windows 10, there is a special folder in which temporary files are stored, most of which, in fact, are system “garbage” that need to be deleted from time to time, which will have a beneficial effect on the operation of the computer. This is done like this:
- We go to the Start menu, where we expand the contents of the “Administrative Tools” section and select “Disk Cleanup”. Or open “This is a computer”, right-click on the system drive and select “Properties” in the context menu that appears.
Next, in the window that opens, click the “Disk Cleanup” button. - In both cases, after the scan is completed, the cleanup utility will open. Here we leave a checkmark only opposite the “Temporary files” item and click OK.
- We confirm the operation and wait for it to complete.
Removing thumbnail images
Windows 10 creates thumbnail previews of images in folders. And they can also be deleted from time to time. This can also be done using the Disk Cleanup utility, but this time we check the box next to the “Sketches” item.
Note: This action can be combined with deleting temporary files.
Deleting the system restore cache
If something goes wrong in the operating system, it can always be restored, which is certainly a huge advantage of the “ten”. To do this, the system caches all settings and data that will be used for recovery, and this can take up a decent amount of disk space.
Here we have several options:
- deleting restore points;
- reducing the space allocated for OS restoration (it is important that there is enough space for the function to work correctly);
- disabling the recovery function.
To implement these measures, we perform the following actions:
- Open the Control Panel, for example, through the Search panel.
- In the “Large Icons” (or small) view mode, click on the “Recovery” applet.
- In the window that opens, click on the “System recovery settings” item.
- In the small window that opens, in the “System Protection” tab, click the “Configure” button.
- A window with system recovery options will appear on the screen. Here we can choose one of two options: enable or disable protection. In the first case, you need to set the percentage of disk space (minimum - 1%) that will be used by the system protection (recovery) function. It is not advisable to choose the second option (disabling).
At the bottom of the window there is a button to delete all restore points. If you perform this action, it is advisable to create a restore point after it in order to be able to roll back the system to a normal state if something goes wrong in the future.
Resetting the Windows Store cache
The operating system also stores downloads made from the Windows Store, which not only eat up space on your hard drive, but can also cause problems with the operation of applications. In such cases, clearing the store cache can help. Here's what we do:
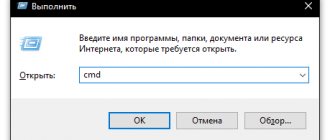
- Using the Win+R key combination, open the “Run” window, in which we write the command “wsreset.exe” and press OK (or Enter).
- A black window will appear on the screen, which is similar to the Command Prompt window, only empty.
- Next, you might think that nothing is happening, but this is not the case - we just need to wait a while until the required actions are completed, after which the window will automatically close and the Windows Store will open. This means that the store cache was successfully deleted.
Method 2: ATM
The next method to clear the RAM cache is to use third-party solutions, one of which is the ATM program.
- Download the application using the "Download ATM" link.
It does not need to be installed on your computer - just unpack the ZIP archive. There are two folders, “x64” and “x86”, use the latter since the 64-bit version is unstable.
Run the executable file named ATM.exe.
The considered utility solves our problem well, but has a rather cumbersome interface and is not localized into Russian.
Removing the DNS cache
The DNS cache is a database that contains information about all the websites you visit. This allows you to speed up your work on the Internet. But in some cases, such data can cause problems (for example, if the site’s IP address has changed, and the old route to it is stored in the computer’s memory), and they need to be deleted.
- Launch Command Prompt as administrator. How to do this is described in the first section of this publication.
- We write the command “ipconfig /flushdns” and start its execution by pressing the Enter key.
High RAM usage on Windows file server
The problem manifests itself as follows: in the Task Manager we see that the RAM on the server is occupied by 95-99%.
By going to the processes tab, you will not be able to find some leaked process with abnormally high memory consumption. Additionally, if you add up the memory occupied by all the processes shown in the task manager, it doesn't even come close to 50% of the physical memory installed on the server. So who ate all the memory?
The RAMMap utility (by Mark Russinovich) can give you a real breakdown of RAM usage.
Download the archive with the utility and run the RAMMap.exe file from the archive with administrator rights. On the Use Counts Metafile object uses the most physical memory (in our case, it accounts for 11 of the 25 GB of server RAM).
Erase web browser history
When you visit pages on the Internet, the browser caches data so that when you open them again, they load faster. Removing such information can help not only to free up additional space on your computer, but also to get rid of a number of problems associated with working in the browser. Let's look at the procedure using Google Chrome as an example, however, in other browsers it is approximately the same (go to the settings and look for the parameter responsible for deleting history/cache):
- Click on the vertical ellipsis in the upper right corner of the browser window. In the menu that opens, expand the contents of the “Additional tools” group and select “Delete data about viewed pages.”
- A clear history window will appear. Here we set the time range (in our case, all the time), check the box next to “Images and other files saved in the cache” and click the “Delete data” button.
- We wait for the operation to complete, after which we can close the settings tab.
Increasing the system cache
The best way to increase the system cache is to edit the registry. It is worth warning in advance that working with the registry is potentially dangerous and can lead to system failures, so we definitely do not recommend changing or deleting third-party parameters.
How to increase your computer's cache memory:
- Press Win + R, enter the name of the file regedit and click on “Ok”.
- Open the “Computer” directory, and then “HKEY_LOCAL_MACHINE”.
- Next we follow this path \SYSTEM\CurrentControlSet\Control\Session Manager\Memory Management.
- We look for the “DisablePagingExecutive” parameter, open it and set the value to “1”.
- Double-click on the “LargeSystemCache” element and also set it to “1”.
- Save the settings and restart the computer.
After the procedure, instead of the preset amount of memory, the system will be able to use unlimited storage space (until 4 MB remains). If the system cache is 100% clogged, this should help.
Important! The cache is usually a small piece of the fastest memory in the device. Its increase within small limits is useful, but with significant expansion the effect is the opposite. The abundance of data in the cache forces the computer to search for the necessary information for a long time, which affects the performance of the system as a whole.