The latest operating system from the corporation created by Bill Gates and his friend differs from its predecessors in an incredible number of innovations regarding its appearance.
The number of options that allow you to change the appearance of the OS has also increased. Today we’ll look at how to change the welcome screen for Windows 10, which the user sees every time the operating system starts.
In the top ten, Microsoft finally allows you to change the background of the welcome screen in Windows using built-in tools, which was not the case before. Now this process is carried out very quickly, and it does not require the use of third-party software. Although we will also touch on that.
Disabling through the Local Group Policy Editor
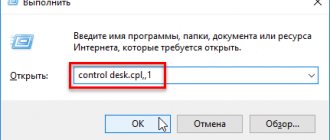
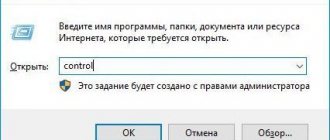
In the first case, you will need to open the Local Group Policy Editor through the Run command. To do this, press Win + R and enter gpedit.msc in the window that appears, or right-click on the “Start” button and click on “Run”. In the Local Group Policy Editor window that opens, go to the Administrative Templates → Control Panel → Personalization menu.
Double-click on “Prohibit display of lock screen” and check the “Enabled” option. Click on the OK button. To check if the method worked, enter Win + L on your keyboard. If you immediately see the password entry screen, then everything worked out.
Disabling via Registry Editor
If the first method did not work, then try disabling the welcome screen through the registry editor. Open it again using the “Run” command, as shown in the first method, and enter regedit in the window that appears. In the left menu, navigate to HKEY_LOCAL_MACHINE → SOFTWARE → Policies → Microsoft → Windows. On the right - move the cursor to an empty field and click on the right mouse button. Select New DWORD 32 Value. Rename the setting to NoLockScreen. Double-click on it and enter one as the value. Click on OK.
Check if this method works by using the Win + L keys.
If you want to remove not only the welcome screen, but also set up automatic login without any passwords, then you will need to disable the lock screen. To do this, you need to remove your account password. Don't forget to also remove your PIN if you have one. To do this, go to “Your PC Settings”, select “Sign-in Options” and remove the existing PIN.
Well, if you want to leave the password in place, but still skip the lock screen, then disable automatic login to your account. Now, every time you turn on your computer, it will immediately load your desktop without any other distracting elements!
Summarizing
The standard computer welcome screen can be annoying to the owner of the device, sometimes even annoying the person. It is worth noting that such a statement is a proven, scientific method, a fact: scientists have confirmed the relationship between distracting elements on a computer screen and an unfavorable emotional and psychological state of a person.
Modern solutions allow you to eliminate or modify the Windows welcome screen both through intervention in the system and using third-party programs, which makes it possible to change the boot background on the monitor.
Windows 10: How to change the Welcome (Lock) screen
Question from a user
I used to have Windows 7, but then in the corner of the screen, next to the clock, a notification appeared to update it to Windows 10. Of course, after the update, my picture from the welcome screen simply disappeared.
How can I now change the picture on the welcome (lock) screen, i.e. the eye where the password is entered?
In general, I would like to note that in the latest versions of Windows 10, you can now change the picture on the welcome screen without any third-party utilities and programs (for which special thanks to the developers, because this has never happened before, as far as I remember). Moreover, you can choose not only a specific photo, but also put on a slide show!
Why might it not work out?
The tricks work on versions of Windows Vista and 7 SP1 for sure. I haven't tried it on others. If you have not yet received the SP1 update package, try disabling one of the Windows components in the Add or Remove Programs console: we are talking about the Windows Gadget Platform (you need to uncheck the box). As you understand, after some major updates the system can return everything to its place. Yes. And one more thing: after the console command sfc /scannow, the changes we have made will be lost. And the most important assumption is that all such tweaks are rolled only on the Legacy installation. If Windows is installed in UEFI mode, you don’t have to try.
We read carefully, practice on a copy of the file, saving the original file in an accessible place. If the system crashes, replace it back.
Setting up the lock screen
STEP 1
First you need to open Windows Settings. You can do this through the START menu (see screenshot below), or simply press the button combination Win+i .
Next, open the “Personalization” section.
Open the personalization section
STEP 2
Afterwards, open the “Lock Screen” subsection in the menu on the left, and in the “Background” tab, change the “Windows: Interesting” option to “Photos” or “Slideshow” (this is if you want to show not one picture on the welcome screen, but several ) .
In my example below, I'll show you how to set one specific picture (i.e. selecting the "Photo" option).
Lock screen - select a photo
STEP 3
After you set “Photo” in the “Background” tab, you can specify a specific picture for the lock (welcome) screen: either select one of those offered by Windows by default, or load your own from your hard drive.
Selecting a specific photo
STEP 4
Further in the same subsection (“Lock screen”), just below, I recommend turning off the display of jokes and facts, and enabling the option “Show the lock screen background on the login screen.” Actually, after that, that’s all that needed to be done!
What to display on the screen
STEP 5
To check what the installed background looks like, it is not necessary to restart your computer (laptop), just press the Win+L (see example below, the lock screen is now with the selected landscape).
Picture on the lock screen // Check, everything works! (photo of lock screen)
This is how easy it is to change the background of the lock screen, no extras. There is no need to use utilities for modern Windows 10.
How to change lock screen background in Windows 10?
The lock screen should be distinguished from the welcome screen. The first is activated when the device is locked, when the system reboots or exits sleep mode. It is a kind of prototype of the lock screen that we often use on touch phones. In Windows 10, you can change the background of this lock screen. To do this, just follow these steps:
- Click “Start” and select “Settings”. Here we select the “Personalization” section.
- In the left menu, select the “Lock Screen” subsection.
- Here you can choose either a standard Windows theme or your own photo or picture as a screensaver.
- You can also specify the activation time for the lock screen.
How to disable the background image on the lock screen?
If you want to turn off the background on the login screen, you need to edit a registry key to do so.
- The Registry Editor will open. Go to the branch “HKEY_LOCAL_MACHINE Software Policies Microsoft Windows System”. Here you need to create a DWORD value with the name “DisableLogonBackgroundImage” and the value “00000001”. To do this, right-click on the “System” section and select “New”, then “DWORD Value”.
- Setting this option to 0 will revert to the previously set lock screen background.
It is worth noting that the background will still be displayed, only the standard one from Windows 10.
How to change the welcome picture on Windows 10?
Changing the welcome picture in Windows 10 is quite difficult. This is primarily due to the fact that Microsoft developers do not provide such a function. However, there are two programs for this purpose:
- Windows 10 BG Logon Changer;
- Windows 10 Logon ChangerLogin Background Changer.
Let's consider the principle of operation of each separately.
How does Windows 10 BG Logon Changer work?
Windows 10 BG Logon Changer allows any user to change the Windows 10 welcome screen without much effort.
- Download and unpack the program. Launch the exe file. The program window will open immediately. There are three main buttons worth noting here: about the program, Windows 10 lock and the welcome screen design menu.
- To change the welcome screen, go to the “Edit Background” section and click “browse”.
- Explorer will open. Specify the path to the desired image. After making your selection, click “Save selection.”
- After selecting and saving the picture, you just need to restart your PC for the changes to take effect.
How does Windows 10 Logon ChangerLogin Background Changer work?
To disable an unnecessary picture or remove it from the welcome screen, just download and run the Windows 10 Logon ChangerLogin Background Changer program on your computer, which will help you quickly change the design of the OS home screen.
- After downloading and launching the program, its initial screen will appear. Click “Select image”.
How to use the utility
You need to find and download this application to your device. Preferably from trusted sources to avoid infecting your computer with viruses. After this, the downloaded archive is unpacked into a convenient directory.
Important! Using the utility can lead to errors in the operating system, as it changes the original parameters. Although the probability is small, it is worth considering.
To launch the application, you need to find the GUI folder in the selected directory and open it. It contains the W10 Logon BG Changer executable file. It is necessary to launch the utility and work with it. For it to work correctly, you need to use administrator rights.
As soon as you launch the program, a warning information box will appear. If you agree to take the risk, just click on Yes and continue working.
So, we come to the most important thing - directly changing the image on the welcome screen. After starting the program, a gray window will appear on the right. You need to select the file that will serve as the new background screensaver, which can be done by clicking on “Background file name” (in the Russian and English versions it is in the same place). There you find your file and then apply the changes.
Important! First find out what your screen resolution is and adjust the corresponding image to the size. Otherwise, problems may occur. However, remember that too light an image will not allow you to see what username is written. Of course, for a PC with one owner this is not critical, but for multi-profile devices it is very important.
After the procedure is completed, a notification will appear that the utility was able to replace the image in the background. And now it can be seen every time you turn on Windows 10.
windowsprofi.ru
How to remove the welcome screen in Windows 10
Microsoft releases new versions of the operating system, but some innovations are useless. For example, we can easily do without a welcome screen and a lock screen if you don't have any information to hide from your family.
Thus, many users want to get rid of unnecessary screens in order to increase the system loading speed.
Speed up system boot
Disabling the lock screen
Method 1: Change Group Policy settings
Important! Unfortunately, this method is not available in Windows Home. If you have this particular version, proceed to the next method.
- Press the combination “Win” + “R”. Enter gpedit.msc and “OK” into the line.
When you want to return this screen, just follow the same path and set it to “Disabled”.
Method 2. Open the registry
- The combination “Win” + “R” and enter regedit in the line.
We reboot the device and we no longer see the lock screen.
Method 3. For versions higher than 1607
- In the Start menu, type “information” in the search, select “System Information” and press Enter.
Add a message when the computer boots in the local security policy
1. In the search bar or in the Run menu (Run is called with the Win+R keys), write the command secpol.msc and press Enter.
2. Go to “Local Policies” => “Security Settings” => on the right side, open “Interactive logon: message header for users when logging in”.
3. Write a title for the message and click “OK”.
4. In the same place, in “Security Settings”, open “Interactive logon: message text for users when logging in”.
5. Write the desired message and click on “OK”.
Restart your computer and you will see the message you wrote.
Disable the password entry screen
It often happens that you forget your password and try to remember it. But sometimes you can't remember. So, most often, a password is of no use, unless, of course, you hide secret data there.
- Right-click on “Start” and click “Run” (or the standard “Win” + “R”).
From this moment on, the password request will not appear, the system will automatically boot.
On a note! You can use this method to reset your password.
Removing the greeting after the update
Often, after updates, unnecessary advertisements or unnecessary windows pop up.
You can easily deal with this problem:
- In the menu, open the “Options” section.
Personal safety
If you often use your device in public places (for example, a cafe), then you run the risk of allowing passers-by to find out your E-mail. After all, on the login screen you enter your data. You can protect yourself by removing your name and email.
Removing email and username
- Again the combination “Win” + “R” and the regedit function in the input line. Next “OK”.
Note! These steps can also be applied to Windows 8/8.1.
Finding and changing the background of the welcome screen
Method 1. The simplest
- Launch “Settings” through the menu or “Win” + “l”. Open "Personalization".
You can see what your window with a new photo will look like by pressing “Win” + “L”.
Method 2. Use tweaks.com Logon Changer snail
It is not advisable to use third-party snails, this may lead to crashes or various problems. Think carefully before doing the following:
- Install the application and launch it (through the installer window).
If you need to cancel everything, there is a button (second from the top) - “Revert Wallpaper”.
Method 3: Registry Editor
This method allows you to return everything to factory settings.
- Execute the combination “Win” + “R” and enter regedit in the line.
Video - How to remove the Welcome screen in Windows 10
Did you like the article? Save so you don't lose!
I did everything correctly, but not a single method helped
How to set your own sound to start Windows?
Click the program event “Login to Windows”; Using the browse button, select your WAV audio file; Uncheck the option to play the startup melody; Click “Apply”.
Interesting materials:
How to fix upside down screen on laptop? If your laptop freezes, how do you restart it? Where is the apostrophe on the laptop keyboard? Where is the battery on an Acer laptop? Where to look for a screenshot on a laptop? Where to look for a screenshot on a laptop? Where is the camera on the laptop? Where are photos stored on a laptop? Where are passwords stored on a laptop? Where is all the information stored on a laptop?
How to change the Windows 10 Welcome screen without programs, using Logon Changer and through the registry
Good afternoon friends. This OS Windows 10, unlike its predecessors, has quite a lot of different innovations in appearance. There are also more functions that allow you to change the appearance of Windows 10. In this post we will look at how to change the Windows 10 welcome screen that we see every time we start the OS.
In Windows 10, Microsoft for once allows you to change the background of the system welcome display with functions embedded in it. This has never happened before. Now such an operation can be completed in a few minutes, and to accomplish this you do not need to use third-party software. Although, we will still consider a third-party program.
Installing a third-party application as an option to change the screensaver
The question of how to change the welcome screen also implies a less complicated solution, using a third-party utility. In this case, there is no need to intervene in the computer’s operating system: you can change the welcome screen of a system running on Windows 7 by specifying subjective preferences.
The Logon Background Changer program is the most popular utility among applications of this class. To use it, just download the application and you can start working with it.
The application has an interesting and at the same time concise interface, where the following options are available for implementation:
- Ability to view the picture set as the background of the welcome screen.
- Images available for changing the screen.
- Utility settings in which the user can specify the parameters of interest, screen design style, tone and quality indicators of pictures.
- Specify the path to the folder from which the pictures will be used.
- Key to confirm the changes made.
- Using full screen format.
As wallpaper, you can set both the graphic images available to the program, and use a third-party picture or photo downloaded to a folder on your computer, specifying the path to it using the Choose a folder option. After the user selects the picture he likes, all he needs to do is confirm the action and restart the PC.
By installing this application, you can solve not only the issue of changing the welcome screen on Windows 7, but also replace the background image on later versions of the OS, including 8, 8.1 and even 10, which by default do not have audio when turning on the computer.
On the seven, you can also replace the welcome screen using applications such as Tweakslogon Changer, Logon Screen Rotator, but these utilities do not always allow you to change the boot screen on the latest versions of Windows.
If you need to change the greeting sound, this can be done in parallel with changing the image of the welcome screen that appears when the computer boots. To change the audio when you turn on your computer, you will also need to download a special application - Startup Sound Changer. This is a small utility with a narrow specialization, used to replace the computer startup sound on both Windows 7 systems and the latest versions. The utility allows you to set any file loaded into the program as sound, provided that the audio file format is WAV.
You can also change the input music using system settings. To do this, you will need to go through the “Sound” settings, to the “Default” item, where in the “Sound scheme” section, select for each of the modes, namely PC startup, shutdown and other processes, a melody from those available in the system. You can select a ringtone not from the list of standard ones in the “Sounds” line, which is located at the bottom of the window that opens: enter the downloaded WAV file, and confirm the command by pressing the “Apply” key. In the same window, you can completely remove the sound from the taskbar when you boot the computer by removing the checkbox next to the “Play Windows startup ringtone” item.
Only by system means
So, let's first change the background of the OS login display using the built-in utility developed by Microsoft. We'll do this for just a few minutes.
- Open Windows “Settings” (Win+I);
- Now we need to go to the personalization item;
- Click on the “Lock Screen” (Lock Screen) section;
- In the “Background” tab, select “Photo”.
For your information, ten makes it possible to show data of interest to a person on the “Lock Screen” and conduct slide shows on the screen, which consist of regular images or those selected by the user.
Now we need to specify the image that the system selected. Also, you can choose a photo at the user’s request in a resolution suitable for your display.
To see how the background image now looks, you can use the Win+L button combination.
Change the display name for your Microsoft account
To change the display name on the login screen for users with a Microsoft account, you need to go to your account settings on the Microsoft website and make changes to it. Here's how to do it.
Open the Settings app by pressing Windows key + I and click on Accounts.
Below your picture and display name, click Manage your Microsoft account to open your account settings page in your browser.
Once the browser opens and the page loads, click "More Actions" in the drop-down list and then click "Edit Profile" in the options below.
Under your name, click Change Name.
In the fields, enter your first and last name, enter the captcha challenge, and then click “Save” to update your name.
When your Microsoft profile page reloads, this time it will update with the name you entered on the previous screen.
When you change your Microsoft account name, it changes on all devices you use for that account.
In order for your new name to appear on the Windows 10 login screen, you will have to sign out of your account. Therefore, if you have unsaved work or applications open, save your progress before logging out.
Third party Logon Changer program
This program can be downloaded from the resource...
- Before this action, it is advisable to create a restore point;
- Download the program from the link above;
- Install the program;
- Now we need to run it;
- Then, we need to click on the logo on top of the program and indicate the address to the image that you intend to change the background of the EB;
- After our actions, the image will be the one we chose;
- If you are tired of your new wallpaper, you can return everything as it was using 2 buttons: “Revert Wallpaper”.
As you can see for yourself, the program is simple even in English.
How to add a uniform background instead of a picture?
Windows 10 makes it possible to remove the background image when the computer boots using the registry. A background will appear in place of the image, filled with a uniform color that you select.
- regedit in the input line ;
- Next, we need to go to: ComputerHKLM LOCAL MACHINE Software PoliciesMicrosoftWindowsSystem
- In this section you need to create a DWORD ;
- To do this, we right-click on the empty field and select “Create” from the drop-down menu, then the DWORD parameter;
- So we need to name this parameter. It will be called " DisableLogonBackgroundImage ";
- After that, right-click on the new line and enter 1 in the “Value” line (in the hexadecimal system);
- If you delete this key or change its value to 0, everything will return to normal.
Conclusion : I told you in three ways how to change the Windows 10 welcome screen. Which of the 3 methods suits you best, choose for yourself. Good luck!
additional information
Windows 10 allows you to disable the background image during account authorization by editing the corresponding system registry key. Instead of a photo or other raster file, the background will be filled with the primary color selected in personalization (see the first section).
1. Run regedit in the search bar.
2. Open the HKLM branch.
3. Go to the Software section.
4. Next we follow the path: “Microsoft Windows Policies”.
5. In the “System” subsection, create a DWORD key with the name “DisableLogonBackgroundImage” and the value 1 (one in hexadecimal).
Removing the key or changing its value to zero will return everything to its place.
windows10i.ru