Content
Not all routers provide the user with sufficient wireless network coverage for comfortable work. In this case, it is necessary to use additional equipment that can expand the range of Wi-Fi. One good way to increase the stable Wi-Fi reception range of your basic router is to use an inexpensive and reliable TP-Link repeater. You can connect the Internet to your dacha in the Moscow region on our website.
Download firmware for the router
To download the firmware for TP-LINK TL-WA860RE you just need to carefully read the page you are currently on. Don't forget to leave your reviews (the form for adding reviews is at the bottom of the page). If you don't mind, you can share the link to the firmware with your friends. Also, if you have not found the answer to your question, you can ask it using the form at the bottom of the site.
Here you will find the latest drivers for wireless devices. To download the new driver, you need to follow the “Download firmware” link, which is located just below.
| Russian Internet providers | Ukrainian Internet providers |
|
|
Video instructions on how to set up TP-LINK TL-WA860RE
Blog about technology, technocracy and methods of dealing with rakes
Setting up a TP-Link router in repeater mode
The TP-Link universal router is equipped with factory firmware that does not allow it to be switched to repeater mode. Only after flashing the device will the user be able to strengthen the wireless Wi-Fi network of the base router. Changing the firmware voids the warranty, and the owner must be clearly aware of this. The TP-Link TL WR841N wireless router can operate as a repeater only after installing third-party DD-WRT firmware; the “native” firmware does not support its operation in repeater mode. But the TP-Link repeater model TL-WA850RE is capable of increasing the area of stable Wi-Fi signal reception even with basic firmware. Connecting and setting the operating parameters of this device is simple and understandable even for a beginner.
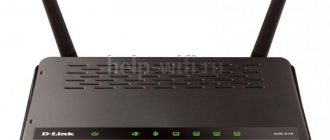
Buttons and indicators
Included with us is:
- The device itself.
- Installation disk.
- Network cable.
- Instructions and warranty.
On the side you can see three indicators:
- Wi-Fi signal.
- Local connection via wire.
- System – if it is on, the device is working, if it is blinking, then the system is loading.
There are three buttons on the side:
- Reset – to reset to the factory configuration, you need to press it for 10 seconds. The device must be working at this time.
- WPS – fast connection to a wireless network.
- ON/OFF – turn on and off.
At the bottom there is a LAN output for connecting local devices.
The device operates from the mains, but does not occupy an outlet itself, so you can connect any device here.
Instructions for setting up the TP-Link TL-WA850RE repeater
To connect the repeater to the base router, you need to press the button with the lock icon and wait for the RE light signal to activate. Having connected via a Wi-Fi channel, the repeater will begin distributing a basic Internet signal. Such relaying significantly increases the coverage area of the wireless Internet space. A special electronic scale shows the level of the transmitted signal. You can connect several repeaters to one basic router and increase your Wi-Fi zone many times over. The instructions supplied with the router will help you understand how to set up the TP-Link repeater.
In the absence of additional repeaters, the user can extend the signal range by activating the wireless bridge mode on the TP-Link device.
How to Set up a WiFi Repeater Repeater and Boost the Router Signal in 5 Minutes? — VaiFaika.RU
WiFi repeater (repeater, repeater, extender) is a device for strengthening the wireless signal of the router, expanding the reception area and improving the quality of the network. In this article we will look in detail at how to connect a TP-Link wifi repeater to a router and set up a wireless signal amplifier by relaying it.
How to install a wifi repeater to boost the router signal in an apartment?
The WiFi repeater installation scheme is very simple.
- First, we determine in which room the signal on the laptop is weakest or non-existent.
- After we have found out where we need to strengthen the wireless wifi signal, we find the place where the network receives, but not so well - by one or two divisions on the phone.
- This is where we put the repeater - its operating area is circular, which means that it will pick up the signal from the wifi router and transmit it further.
How to connect and configure a WiFi signal amplifier for a TP-Link router
There are three ways to connect and configure a TP-Link wifi repeater:
- Through automatic connection of the repeater via WPS
- Via WiFi using a smartphone, tablet or laptop
- Through a computer connected to it via twisted pair
Automatic connection of a TP-Link WiFi repeater to the router using the WPS button
Like most modern models of wireless network devices, the TP-Link TL-WA850RE wifi amplifier supports automatic tuning to the signal of an existing access point. To do this, the router must also have such a function - the “WPS” button (“QSS” on TP-LINK devices) is responsible for turning it on.
We press on it and on a similar large button on the amplifier, after which it should pick up wifi and start distributing it.
Connecting and setting up a router WiFi signal repeater from a smartphone using the example of TP-Link Extender
I prefer to keep the whole process under control, so I never use the automatic method of setting up the repeater, but do everything manually. To connect an amplifier from a phone or tablet:
- turn on WiFi on your smartphone,
- press the central button on the device,
- and on the phone we find in the list of available networks for connection a network called TP-LINK_Extender_7320BA - this is the SSID that is programmed into the device by default.
- Let's connect to it. In my case, a password is not needed, but if your model requires you to enter an authorization key, it will be indicated on a sticker on the device body.
Immediately after the connection, we will be redirected to the authorization page in the admin panel for the initial installation - a window will open to enter your login and password. By default in this model it is admin/admin - yours may have others, so look either at the instructions or at the sticker on the bottom of the repeater - it usually contains all the access data.
Setting up a wireless bridge
When working in bridge mode, 2 wireless networks are created with independent settings and connected to each other. The correct choice of operating parameters makes this technique invisible to connected client devices. To properly build a bridge, you should choose network equipment from one manufacturer. This will avoid compatibility issues.
On the main router, the signal of which requires amplification, you need to make the following changes:
- Log in to the administrative panel through a browser.
- In the main web menu of the device, go to the section with wireless network settings.
- In the channel selection field, remove the automatic mode, manually specify the same channel on both configured devices.
- Be sure to save the settings using the button.
If there is a quick network setup option on both devices, you can simultaneously press 2 WPS buttons. This technique starts the process of cloning the settings of the base router and transferring them to the repeater. This cloning allows you to create an additional wireless network that will operate on the same channel as the base router.
The location of the TP-Link repeater within the coverage area of the main signal will provide client devices with a wireless Internet space with identical parameters and access code.
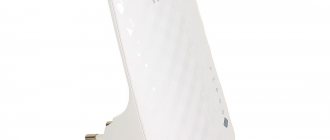
Review of TP-LINK TL-WA860RE: Wi-Fi without borders23.03.2015 16:01
We think there is no need to explain why a wireless signal amplifier is needed, since the name speaks for itself. It will be useful not only for those who live in a bunker with meter-high concrete walls or work in a huge office where Wi-Fi cannot reach everyone. TP-LINK TL-WA860RE will several times strengthen the Wi-Fi signal in any apartment where doors and walls contribute to the appearance of “dead zones”, eliminating the unstable signal and the hassle associated with laying an additional cable. The device's capabilities don't end there. Read about the rest in the review.
Specifications TP-LINK TL-WA860RE Wireless networks: IEEE 802.11 b/g/n Frequency range: 2.4–2.4835 GHz Signal speed: 802.11b up to 11 Mbps, 802.11g up to 54 Mbps, 802.11 n up to 300 Mbit/s. Wireless Signal Strength (EIRP):
The product package includes an Ethernet cable (RJ-45), a CD with materials, a quick setup guide, and a warranty card.
Appearance The device is a small white “block” with a round socket groove on one side and a protruding plug on the other.
The amplifier looks like a power supply from a game console, and in size and weight it can be compared to a piece of laundry soap (however, the soap will be heavier). The amplifier body is entirely made of plastic and has no detachable parts.
There are two antennas on the sides of the device. They are the same length as the body itself, so they do not protrude beyond its dimensions when folded. To bring them into working position, you need to rotate the antennas around the mounting point. The hinge on which the antennas are attached is quite tight and allows them to rotate through an angle of no more than 180 degrees and only in one plane.
There is a socket on the top of the front surface of the device.
In the lower right corner there are three LED indicators: the top one indicates the strength of the wireless signal, the middle one indicates the connected Ethernet cable, and the bottom one indicates the device status (on/off/rebooting).
There is a fork on the back surface. The device does not have a built-in battery, so it only works from the mains. However, it does not occupy an outlet, thanks to the presence of its own on the front panel.
On the right side there are three mechanical buttons: to turn on, to pair with the router and to reset settings.
At the bottom end there is an Ethernet connector for connecting external devices.
Setting up the connection and the device in operation There are two ways to configure the TL-WA860RE to work as a repeater, described in detail in the instructions. The first, fastest and easiest, is creating a WPS connection. You just need to press the WPS button on the router and on the repeater. The devices automatically pair and the repeater starts working almost immediately.
The second method - setting up via a web browser - is intended for more experienced users, as well as those who were unlucky enough to set up a connection using the first method. In this case, we either find the SSID of the repeater via Wi-Fi and connect to it, or connect the repeater and computer using an Ethernet cable and also create a connection. In the address bar we write the IP address specified in the instructions, then enter the login, password and click “next” three times until we see a list of networks (routers) to which the repeater can be connected. Select the desired router, and you're done. The second connection method is usually necessary for more complex manipulations, such as connecting an amplifier to an amplifier, i.e. to create a router-repeater-repeater chain. However, when using such a connection in real conditions, a serious loss of signal quality is possible. In practice, coverage areas often do not look like smooth circles in the picture, where Wi-Fi signals intersect and cover the same area.
Tests We conducted a series of tests and signal strength measurements using a Samsung Galaxy S3 smartphone and the Wi-Fi Analyzer application installed on it.
For tests, we used the first connection method (via WPS). There were no problems with it - the amplifier-repeater found the router within a few seconds and contacted it. During the initial connection, when the repeater was plugged into the outlet closest to the router, the status indicator was orange. This indicator, which shows the signal strength, has three states by which you can determine the ideal position of the repeater. If the indicator is green, the location is excellent; if it is orange, it is too close to the router; blinking orange is too far away.
Note that after connecting to the router (Router-A, red graph), the repeater becomes visible in the application with the same name, only displayed in a different color (Router-A, blue graph). At a distance of 20 meters from the router, through three walls, including one reinforced concrete wall, the repeater produced a signal of the same level as the router itself at the same distance from the measuring device: -75–85 dBm. At an equal distance from the router and repeater (about 10 meters), we received a signal with a level of about -60 dBm.
When two repeaters (Router-A, yellow and green graphs) are connected to one router (Router-A, red graph), they simply duplicate the signal rather than mutually amplify it. This is noticeable in the screenshots, where two repeaters have the same signal power, which decreases equally as the meter moves away from them by 1, 10 and 20 meters, respectively.
The following test was carried out with two devices: the first is a repeater (Router-A, yellow graph) connected to the router (Router-A, red graph), the second is a tablet (Xperia_TabletZ_ede9, yellow graph) working as a Wi-Fi access point, connected to the same router. After placing them at a distance of 20 meters from the router, measurements were taken with the measuring device moving away from them by the same 1, 10 and 20 meters (approaching the router). As can be seen in the graphs, the signal from the repeater weakened noticeably less than from the access point.
So that the power expressed in dBm does not seem like an abstract quantity, we will give specific examples. At the initially measured power level, the online video loads quickly near the tablet, and World of Tanks Blitz runs great, regardless of what Wi-Fi signal the smartphone is connected to.
Compared to the younger models in the line (TL-WA854RE and TL-WA850RE), the TP-LINK TL-WA860RE repeater has several advantages. Firstly, it does not take up an outlet (it has its own built-in one). Secondly, it is equipped with a connector for an Ethernet cable, which allows you to connect wired devices to the repeater, such as a game console or TV set-top box (such a connector is not available in the TL-WA854RE). Moreover, at the same time as distributing the Internet via a wired connection, the repeater continues to distribute it via Wi-Fi.
Summary TP-LINK TL-WA860RE does an excellent job of its main task - strengthening the wireless signal. It is very easy to configure (with the click of one button) and is compatible with all Wi-Fi networks of 802.11 b/g/n standards. You can connect wired devices to it and it doesn't take up an outlet. This thing can greatly simplify life and make Internet surfing and working on the local network equally comfortable in any part of the house or office. Note that if occupying a socket is not a problem for you, then you can, without losing other functions, purchase a more affordable model TL-WA850RE for 2250 rubles.
Pros:
additional socket; easy setup; Ethernet connector for connecting wired devices; Compatible with all 802.11 b/g/n devices. Minuses:
English-language setup interface. Text author: Mikhail Stepanov
Source: 4pda.ru
© 4PDA
Manual setting
To implement the manual method of setting up the repeater mode, you need to connect the connector of the network card of your personal computer to the LAN port of the repeater using a signal cable (twisted pair).
Next you need to do the following:
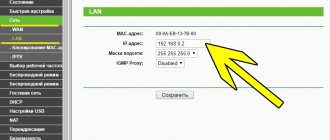
- In the address bar of your Internet browser, enter the address 192.168.0.1.
- Enter your login and password to access the admin panel on the authorization page. If you did not change the factory values, then you need to enter admin in both fields.
- On the start page, select the section with network settings, go to the LAN item.
- Assign a new IP address to a device located in the subnet of the main router. Save changes using the button.
Next, you need to reboot the equipment, go back to the web menu located at the new address and check the channel selection. It must necessarily match the broadcast channel of the main router. If the channels do not match, you need to disable WPS, specify the desired channel number and check the WDS box. After this, you should save the settings again by pressing the button.
These actions will generate new fields on the page. After this, you need to go into search mode and select the base router network from the provided list of Wi-Fi networks and connect to it.
Next perform the following steps:
- In the new window, manually enter the network name and location region corresponding to the base router.
- Specify an access password, select mixed mode, and do not forget to save the settings using a special button.
- Return to the main menu and open the section with wireless network security settings.
- Select the security type WPA/WPA2-PSK with AES encryption. Enter the repeater's access password and save the settings again.
- Go to the DHCP section and deactivate the DHCP server.
After saving the changes, the device starts an automatic reboot mode, followed by a notification that manual configuration of parameters has been successfully completed.
Checking the operation of WDS mode
The main purpose of WDS technology is to implement the connection of client devices within an expanded wireless Internet space.
For this technology to work, you must use:
- wireless bridge mode;
- signal repeater mode.
Check WDS activity using the repeater web menu. In the status parameters section, select the item with WDS performance indicators. The "Installed" value indicates active use of this technology. The status section contains information about the network name, broadcast channel, and MAC address. All parameters match the TP-Link settings.
Checking the connection to the TP-Link universal Wi-Fi repeater
When the base router and repeater are active, the user should check the connection to the signal amplifier network.
To do this you need:
- move to an area where the signal from the main device is guaranteed to be unavailable and it is the repeater network that must work;
- turn on the device;
- search for a wireless network;
- connect to the repeater network.
To confirm the connection, go to the signal amplifier menu, open the wireless mode operating parameters section and select the item with mode statistics. The page that opens will contain information about the MAC address of the client device. If there is no such parameter, the gadget has connected to the Wi-Fi of the base router.
Review and Feedback
- Quick connection and setup.
- It doesn't take up an outlet, and you can plug anything in there.
- 2 antennas - although in some cases they can interfere.
- It has a nice look and is suitable for any design.
- Doesn't consume much electricity.
- The body is thick, so if you plug something into a power outlet, the design looks very massive.
- It costs like a cheap full-fledged router.
An excellent device, it works well in an apartment building, as well as in country buildings. Worth purchasing for home use only. Even when connected through 2 walls, it amplifies the signal quite well.