The macOS operating system has a large number of built-in programs. Moreover, some of them have much more possibilities than it seems at first glance. In this article, we will talk about two standard macOS applications that allow you to record screen video on Mac.
♥ BY TOPIC: How to switch the language on the keyboard of a Macbook, iMac, Mac Pro or Mac Mini - 3 methods.
How to Record Mac Screen Video Using QuickTime Player
The screen recording feature in the QuickTime Player video player appeared on the Mac with the release of Apple's OS X Lion.
Recording video from a Mac screen using QTP is quite simple, to do this:
1. Open QuickTime Player. The program is located in the Finder → Programs path, and can also be easily opened through Launchpad (in the Others folder) or Spotlight search.
2. To start recording, you can use the keyboard shortcut ⌘Cmd + Control + N or simply select the appropriate item in the menu bar.
3. Immediately after activating the recording, you will see a black window in which you can configure some options.
Here you can select a microphone to record explanations for your video, and also enable the display of mouse clicks on the video.
4. If you enable the option to display mouse clicks, during recording, when you click on any object on the screen, a black circle will be displayed around the pointer.
5. After clicking the record button, you can choose to record the image from the entire screen or mark a specific area.
6. When you finish recording, click on the “ stop ” button on the menu bar.
7. To share the video, click the Share button that appears when you hover over the window. The option allows you to upload videos to YouTube , send by email, AirDrop, etc.
8. To save the video to your computer, go to the File menu and select Save. You can also use the keyboard shortcut ⌘Cmd + S.
9. To change the resolution (quality) of the video when saving, go to the File menu and select Export as.
♥ BY TOPIC: Stacks in macOS, or how to organize files on your desktop into neat groups.
Press Shift + Cmd + 5
Starting with macOS Mojave, the Mac has a built-in shortcut that lets you start recording your screen.
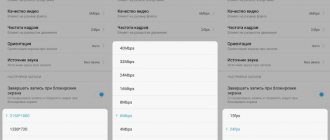
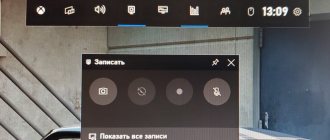
Press Shift + Cmd + 5 and you will get an OSD menu with different recording options. They allow you to choose whether you record the entire screen, just a portion of the screen, or capture a still image of the entire screen, a window, or a portion of the screen.
You'll also see a dotted box indicating what will be captured if you just want the image, and you can make it smaller or larger as needed. Press Esc to cancel recording before it starts.
How to choose a default save location for screen recordings in macOS Mojave and later
Although you can choose any location on your computer's disk for recordings once they are created, the new tool allows you to make a default selection.
1. Open the Screenshot program using any of the methods indicated above, for example, using the keyboard shortcut ⌘Cmd + ⇧Shift + 5.
2. Click Options.
3. Select "Desktop", "Documents", "Clipboard", "Mail", "Messages", etc. to set the save location.
Movavi Screen Recorder
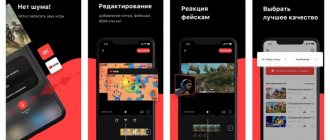
This is an advanced video capture tool. With its help, you can effectively record, process and edit any educational materials, game videos or video broadcasts.
The program offers all the necessary functions that allow you to conveniently record video clips (at a frequency of up to 60 frames per second) with an image of our desktop. You can capture images of various sizes (even custom ones) along with the audio track. The program has many interesting options, including allowing you to hide the cursor or mark clicks. In addition, we can also take screenshots.
Using Movavi Screen Recorder we can edit previously recorded videos. The user has at his disposal a built-in editor that allows you to trim video and unnecessary elements, add text, graphic effects to the project, as well as transition animations for more complex clips.
Recorded and properly processed video material will be available in the program itself or saved on disk in AVI, H.264 AVC, WMV, MPEG-2/4 and other formats, compatible with iPod, iPhone, iPad and DVD players. Movavi Screen Recorder has been optimized to run on Intel Core processors with Intel HD Graphics technology.
The trial version allows you to use the program only for 7 days. The duration of video recording is also limited: no more than 120 seconds, and a watermark is also applied to the output files.
How to show the mouse cursor in screenshots (macOS Mojave and later)
1. Open the Screenshot program using any of the methods indicated above.
2. Click Options.
3. Click Show Mouse Cursor.
When you enable the option to display the mouse pointer, while recording video from the screen, when you click on any object on the screen, a black circle will be displayed around the pointer.
♥ BY TOPIC: How to use the Photos application on Mac (macOS): how to apply filters and edit images.
Tools: ffmpeg + x11grab + Xvfb
In MacPorts, ffmpeg does not have the x11grab module at all. It didn’t work out to assemble it entirely from the source the first time, so I decided to patch the port file for ffmpeg-devel: /opt/local/var/macports/sources/rsync.macports.org/release/tarballs/ports/multimedia/ffmpeg-devel /Portfile There, in the nonfree configuration, I added the lines —enable-x11grab and —enable-shared to activate x11grab. Looking ahead, I will say that there is a flaw in this method, which is why I am not posting the Portfile with edits, but am describing it here only for information. When the X program is displayed in the session (display) :0.0 by default, video recording produces a low frame rate, mainly due to the screen size (2560x1440 on the iMac), but most likely also due to the graphics rendering, so I decided to redirect programs to a low-resolution virtual display. This is done through the Xvfb project, which installed from the ports without any problems.
It is launched quite simply through the terminal (size with a margin): Xvfb :1 -screen 0 1024x800x15 -shmem It is also easy to connect to this ffmpeg virtual display: ffmpeg -r 30 -s 1024×768 -f x11grab -i :1.0+0, 20 -vcodec qtrle target.mov At this stage I was faced with an error with Shared Memory overflow, which for some reason in OS X is set to an indecent value of 4mb. Temporarily increasing its size is described in Apple's recommendations for servers and in other sources: sudo sysctl -w kern.sysv.shmmax=67108864 sudo sysctl -w kern.sysv.shmall=67108864
Recording a VirtualBox session
The next step was to output something useful through the X server. The first thought was to build the X version of VirtualBox, and then show literally anything in a virtual machine, but VirtualBox for Macs had long since migrated to Cocoa, so it was a dead end. The second sensible idea was to connect via RDP to the virtual machine and record the rdesktop session, since it works under X. Activating RDP under VirtualBox is quite simple, but requires installing the Extension Pack from the official website. Connecting rdesktop with screen output: 0.1 DISPLAY=:1.0 rdesktop -xl localhost After these steps, ffmpeg begins to quite successfully write video to a .mov file. In my case, it was Android x86 that came to hand:
Unfortunately, the video turns out to be quite jerky, due to rdp compression, so it’s not very good to shoot animation this way. The next step I decided to move from RDP to VNC. VirtualBox has a built-in VNC server, but not in public builds, but in those assembled from ports or sources. I didn’t have to do any manipulations with the ports; after assembling the virtualbox port, I received version 4.1.14, which is quite possible to work with.
The only unpleasant thing was that VNC is not available through the interface, but only when launched in headless mode: VBoxHeadless -startvm 'Android x86' -v on —vnc You have to manage this mode either through a second VNC session, or again through RDP, which is not very comfortable, but overall tolerable. To capture the VNC stream, we used vncviewer redirected to the virtual X display: vncviewer localhost -ViewOnly -display :1.0 -PreferredEncoding raw -FullColor The result of all these delights was a 5-minute video with an honest 30 fps in a resolution of 1024x768:
(I apologize in advance for the quality of the content, I’m still not a professional player) If you look closely, at times you will notice pauses of several seconds. Unfortunately, this problem was never overcome, and the approach itself turned out to be quite cumbersome. For a simple demonstration of a game on Android, this is generally enough, so I switched to the next task - shooting a video of the iPhone simulator.
Full Screen VNC Capture
OS X has built-in remote access that works simultaneously under two protocols - ARD and VNC. Before the release of Lion 10.7, you could enable Screen Sharing in the system settings and connect to the current session with any VNC client. Starting from 10.7, serious changes began: all compression types were dropped, except ZRLE, not all clients can connect, and even after connecting we see a gray login screen, and only after entering the user password do we connect to the session. This is great for administrators, but for my task, on the contrary, it only created obstacles. The vncviewer program (aka RealVNC) in the latest versions can already connect to OS X, but cannot enter the user password, so this path also turned out to be a dead end.
As an alternative, I took a free VNC server from TestPlant (also known as osxvnc and also known as Vine). Version 3.0 from sourceforge is outdated, so you need to build a new one from the source code or take it from the TestPlant website. An insignificant bug of this server is that occasionally the client disappears with the error “unknown message type 131”. It can be cured by restarting the server. With the already established combination of ffmpeg+x11grab+Xvfb and vncviewer, it was possible to shoot a full-screen video of the current OS X session, where the iPhone simulator was running:
I chose the size of the virtual buffer to be deliberately smaller than the screen resolution in order to shoot the upper left corner. The result came out quite decent, but unfortunately, with low FPS - the animation in the game was frankly slow. Moreover, pauses, which were quite rare when using the circuit from VirtualBox, became much more pronounced. At this stage, I conducted several experiments, rebuilt the VNC server and client from source, set the minimum screen resolution, but did not achieve a good result. Within a few hours it became clear that the server itself was sending frames with some delay. After digging into the code, it turned out that the server deliberately pauses between screen updates: /* OK, now, to bandwidth save, wait a little while for more updates to come along. */ /* REDSTONE — Lets send it right away if no rfbDeferUpdateTime */ if (rfbDeferUpdateTime > 0 && !cl->immediateUpdate && !cl->needNewScreenSize) { pthread_mutex_unlock(&cl->updateMutex); usleep(rfbDeferUpdateTime * 1000); pthread_mutex_lock(&cl->updateMutex); } It turned out that the rfbDeferUpdateTime variable has an initial value of 40 ms, but it is quite manageable and is set via the command line. In Vine Server itself there is a separate field for this:
I set the value with a margin of 15, which gives a maximum frame rate of 66 fps. After this, the lags stopped, but noticeable pauses remained in the video. Theoretically, they could be cut out from such a video sequence and assembled into something acceptable, but I wanted a more universal solution.
QuickCast
If you don't need a heavy-duty screen recorder for your Mac, but just need something to record short, three to five minute screen recordings, you can use QuickCast.
It can also use your external microphone and webcam. This is an application that will be in the menu bar after installation. When you need it, just click on its icon. The recording is made with sound.
We couldn’t help but mention this program; based on our experience of using it, we don’t recommend it. Because there are much more convenient ways.
Ace in the hole: vnc2flv
Now I had a video stream in vnc format of excellent quality, all that was left was to write it to a file. I again suppressed the original programmer desire to write my own dumper and found the vnc2swf project in the depths of the Internet, and then its successor vnc2flv. Skepticism towards the Python grabber disappeared immediately after the first results - the program records a video stream in lossless quality and WQHD resolution with 15+ fps! I run it without any distortions from Xvfb, directly connecting to the VNC server: flvrec.py -r 30 127.0.0.1 To increase fps, just reduce the resolution to 1280x720. Interestingly, you can restart Vine VNC, it will pick up the current screen resolution, and then you can safely switch to the native resolution and enable recording. Installing vnc2flv is very simple and is described on the website, there are no special pitfalls here. The finished video can be processed in your favorite video editor, trimmed off the excess and converted to the desired format. I use VirtualDub running under wine, but this is a matter of habit.
Here is the result of this whole epic:
The video is quite clear, without jerks or lags. The animation was recorded normally. As for me, it can be used to record literally anything from the Mac OS screen. The only thing missing is literally the cursor, but you can survive that.
OBS (Open Broadcaster Software)
OBS for Mac OS is a free screen recording software that comes with tons of amazing features. But the highlight of them all is the ability to have multiple instances of recordings running independently of each other. You can then join them later to form a complete record. Simply put, you can record activities in a game, web browser, text editor, media player and other video sources at the same time.
Additionally, this app allows you to set up hotkeys that will help you switch between different scenes and perform other tasks such as starting/stopping recordings, muting audio, and many more. And that is not all. Multiple-view allows you to track eight different scenes and jump to any of them by clicking on it.
Once installed, the app gives you an automatic configuration pop-up. In it it asks how you want to configure it. It's primarily designed for video streaming, but it's also great for screen recording.
The audio mixer is also not short of customization options and comes with per-source filters such as noise reduction and denoising. You can also take more control over your audio using a VST plugin. The OBS user interface isn't complex at all, but you can still use the modular dock to change the layout to suit you.
pros:
- High quality streaming and recording.
- Unlimited video length.
- Several copies of the video.
- VST compatible.
- Recording with sound.
Flaws:
- Setup takes a long time.
OBS is free, open source and very customizable. However, it is initially difficult to understand all its settings. If you are not a geek, don't waste your time - move on to another program.
Screencast O Matic
Screencast-O-Matic is free to use, but it also offers a paid version for $15 per year. The price is quite reasonable based on its functionality. The free version allows you to record up to fifteen minutes. It also records screens and webcams. Allows you to publish to YouTube and saves your recordings as video files.
Quick Time Player
This, in fact, is the system’s built-in method for recording screens on your Mac. We talked about how to use it, as well as its disadvantages, advantages and customization of settings in this article. You can find out more details.
Overall, this is a good way to capture images on your screen. Suitable for most users. It does not have any extraordinary features, however, it is easy to use.
You can also use Quick Time to record audio by selecting New Audio Recording Feature. You will be able to record internal playback sounds and audio from either the internal or external microphone.