Description of the problem
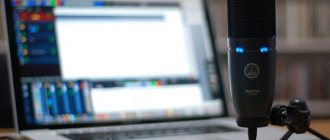
Every laptop has a built-in microphone, but its quality leaves much to be desired. Users have to buy external devices for high-quality voice transmission. They differ in connection type:
- USB;
- "Jack";
- Bluetooth.
Wired microphones are the most vulnerable, since over time the wires become unusable and cease to perform their function. Difficulties with connecting wireless devices can only arise at the setup stage. You can check the equipment through the standard Windows Voice Recorder program.
Problems with connecting a microphone can be divided into two groups: those that you can solve yourself, and those that can only be fixed in a service center.
You can fix the following on your own:
- Incorrect connection;
- Outdated drivers;
- Incorrect PC settings;
- Viruses on the computer.
Serious malfunctions that require the involvement of specialists:
- Damage to the USB port and microphone port;
- Malfunction of the device itself;
- Problems with the audio card.
How to enable the built-in microphone on a laptop
The built-in microphone on a laptop can be turned on or off using a special key on the keyboard or programmatically. Sometimes the user does not notice how he turns off the microphone (or a cat can do this by walking on the keyboard), and then it seems that the microphone or laptop is broken. Therefore, the first thing to do if the microphone on your laptop does not work is to check if it is disabled.
Most often, accidental disconnection of the microphone occurs precisely as a result of touching the corresponding function key, which will also help turn the microphone back on. If pressing the key with the corresponding icon (microphone image or mic inscription) does not produce results, try again, this time holding down Fn. If this does not help, then proceed to the tips below.
Mechanical setup of the device
If the microphone on the headphones connected to the laptop does not work, then most likely they also need to be configured separately. If your headset has a built-in microphone, it may simply be turned off by default.
Most headphone manufacturers equip their products with a special wheel, which is responsible for the microphone sensitivity level. If it is turned down to the minimum, the interlocutor will not hear you. Also, sometimes headsets have special buttons for quickly turning off the micro. Therefore, we recommend that you familiarize yourself with the specifications of your device on the official website. You may have accidentally turned off the microphone or reduced its sensitivity.
General recommendations
The first thing to check if the laptop does not see the microphone is whether it is connected correctly. USB models are inserted into a USB port and there are no problems with them. A device with a jack wire needs to be inserted into the connector on which the microphone is drawn, most often it is pink. Also, on wired models it would be a good idea to check the integrity of the wires. If they are interrupted in some place, the microphone will only work in a certain position. In half of the cases, these simple steps help to find the cause of the problem.
When connecting a Bluetooth headset, you need to enable data transfer to the PC. After that, go to the “Control Panel”, subsection “Hardware and Sound”. Click on “Add a new device”, find the desired model and connect.
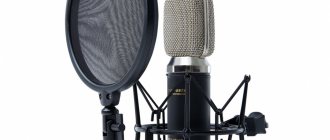
Connecting a studio microphone
A professional microphone requires additional external equipment, such as a high-quality microphone amplifier with a USB interface. It bypasses the built-in sound card.
An external audio interface can do the job if you are using a capacitor device that requires phantom power.
Audio equipment for professional musicians is expensive, so an alternative option is to purchase a high-quality USB microphone that is suitable for streaming on video hosting sites, hosting podcasts or online work conferences. They do not require line connectors or preamplifiers to operate.
The adapter must match the sound card when connected via a line input. Choose devices that can raise the sound level to a level that suits the built-in audio interface.
Fine-tuning the signal level
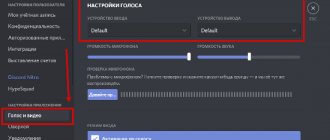
There is also a possibility that you have selected a different audio recording device. You can check this by typing the words “Control Panel” into the Start menu without quotes and selecting the corresponding menu from the results. This is the old system management menu, familiar to users from Windows 7. Select the “Hardware and Sound” category and then “Sound”.
In the window that opens, select the “Recording” tab and check if your microphone is selected as the default device. If it's not, select it and click Default. Then click “Properties” and in the next window, on the “Levels” tab, check the signal level from the sensor and the gain.
Now you know where in Windows you can select a device for recording audio and adjust the signal level, as well as set the gain if necessary. But if you couldn’t get the microphone to work here, then perhaps the reasons lie in incorrect installation of the drivers or they may be missing altogether.
Activating and setting up the microphone
The microphone has several parameters, the adjustment of which will change the quality of the recorded sound. If you change the values correctly, you can achieve a significant improvement in quality even on a cheap microphone. You can manage minimal settings using built-in Windows tools. If you want to do more professional sound tuning, you will need the help of third-party programs.
Using standard Windows tools
The tools built into Windows 10 allow you to make minimal microphone settings: change its recording volume, turn on sound amplification, select the desired microphone and test it.
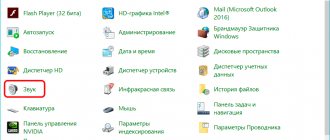
- Using the system search bar, expand the control panel. This is where the settings we need are located.
Opening the control panel - Go to the "Sound" block. If you can't find it, use the built-in search bar located in the upper right corner.
Open the “Sound” tab - A list of speakers will open. Go to the Recording tab to see all the microphones your computer has ever connected to. If the computer sees the device, a green arrow will appear next to the corresponding icon.
There is a list of microphones - In this case, the computer can see, but not use the microphone. Double-click on the desired microphone to open its properties. Indicate that you need to use this device. Also in the expanded window you can see the name of the microphone and the port to which it is connected.
We indicate that it is worth using this microphone - If you want to check how your voice will be heard on the recording or in the speakers of your interlocutor, go to the “Listen” tab. Specify the device to which the sound will be output and activate playback. When you say something into the microphone, you will hear the result.
Selecting a microphone and output device - The Levels tab allows you to control the microphone volume. The first slider controls the capabilities of the microphone itself, and the second slider controls the software amplification of the resulting sound. The higher the value of both sliders, the louder the recorded audio will be.
Specify sensitivity - In the additional tab you can select one of the proposed recording modes. Depending on the microphone, different options may be offered. When choosing the most suitable one, it is worth considering that an increase in hertz leads to both an improvement in quality and an increase in the volume of recorded data. In the same tab, you can select exclusive mode parameters, that is, allow or prohibit programs from taking the microphone for themselves without giving it to other applications until the work is completed.
Select a mode and turn on monopoly
This is where the settings that can be made using standard Windows capabilities end. If you are not going to record your voice professionally, then these should be sufficient.
Using third party programs
There are a huge number of third-party programs that allow you to control the microphone and apply various effects to the resulting sound. Perhaps the company that created your microphone has a proprietary application - you can find out about it on the manufacturer’s official website. Below are just some of the most convenient and well-known applications.
Audacity
Audacity is an audio recording program that allows you to create and manage multiple tracks separately. The official website where you can download the free version is https://www.audacityteam.org/download/. You can trim, speed up and slow down an audio track, overlay another track on top of it, or create an effect.
There is a large selection of effects
All functions are easy to use and intuitive. The main features are displayed on the main panel of the program: selection of microphone and speaker, start and end of recording, list of tracks, volume of sound and recording. Additional functions are located at the top of the window, which can be opened using various menus. You can also control the application without a mouse, using only hot keys, which significantly speeds up the recording and processing procedure.
Free MP3 Sound Recorder
This program is intended for those who need to record sound quickly and without any problems. It is as simple as possible and has a minimum of buttons that allow you to start, pause and end recording. The interface is designed so that you don't have to understand the program. You can download it for free on the developer’s official website - https://www.freesoundrecorder.net.
The simplest recording program
Sony Sound Forge
This program is a professional editor that allows you to work with sound at a studio level. The downside is that you won’t be able to work with it at the proper level right away—you’ll have to learn. It has many built-in functions that help you change the sound, process it and improve it. Don't be afraid of its interface, because after some time, having understood it, you will understand that there is nothing superfluous in it.
Sony Sound Forge has a lot of features
You can download the trial version or buy the full version on the official website - https://www.magix.com/int/music/sound-forge/.
Required drivers are missing
This is the most common cause of this problem. However, mainly in relation to a laptop, it is associated with another problem - the lack of sound from the speakers built into the device. A successful solution is to establish communication between the operating system and the laptop using a special utility, a driver. This is why it is so important to check for the latest drivers on your PC.
What do I need to do? Go to “Control Panel”, then “System”, “Device Manager”, “Sound, game and video devices”. Notice that there is an “Unknown device” menu under this menu? Or an icon with a yellow exclamation mark? If yes, then it's all about the drivers.
It is not difficult to correct the situation. To do this, just go to the official website of your computer manufacturer. Then, using the search, find the exact model of the laptop, indicate the OS version (and bit depth). In the drivers section you can download drivers for the microphone. Download the software to your laptop and install. After this, you must restart the device for the changes to take effect.
Correct Audio Drivers for Microphone
Windows treats the microphone like any other hardware device included in the PC's audio system. It can be part of the motherboard drivers or a separate sound card if it is used in the computer to improve sound quality. To control the correct operation of your audio system, you should make sure that the appropriate drivers are available in the OS.
If you use an external separate microphone or as part of a webcam or audio headset connected via a USB cable, then the driver must be included with the device. If you cannot find this disk, then it is better to download the driver from the manufacturer's website. All it takes is a simple Google search.
To find out what motherboard or audio card is installed in your PC, use the free Everest test program. In addition, you can use the modern successor to this utility, Aida64. After that, you can download the necessary drivers specifically for your model using the links in the program or searching on Google.
The microphone is not set up correctly
On a laptop with Windows 7, 8 or Windows 10, the microphone does not function well if its sensitivity level is incorrectly set. This is why it feels like the microphone is not working at all. How can I check this? Right-click on the speaker image. Then, from the context menu that opens, select “Recording Devices.”
Then select the microphone (right mouse button) and then go to “Properties” / “Levels”. If the sliders are at the lowest level, you need to move them to higher positions. After saving the changes, check if the microphone is working.
Disabling Monopoly
It is possible that the microphone refuses to record sound because it is already being used by some program. By default, monopoly is enabled, and you can disable it in the microphone properties described in the “Using Standard Windows Tools” section.
Close all applications that may be associated with the micron, and then open one. There is a chance that some program did not close completely, but went into the background, taking away the rights to the microphone. Therefore, it is better to restart your computer to ensure that all running applications are completed.
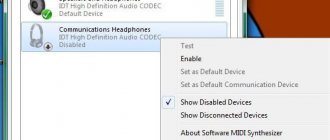
Microphone malfunctions
It is quite possible that the built-in microphone does not work due to various glitches. How to fix it? First, restart your computer. Then right-click on the speaker icon. In the menu that opens, select “Recording devices.” And then "Record". When working correctly, the microphone is reflected here. If it is not there, then in this window, click on any free area and check the “Show disconnected devices” checkbox in the pop-up window (sometimes the required item is reflected as “Show disconnected devices”). Then right-click on the microphone.
“Enable” will appear in the context menu; immediately activate the microphone. But sometimes “Disable” is reflected. Click on this inscription, and then “Enable”, this will reboot the device. Be sure to check that the microphone is working correctly. Try making noise or saying a few words. Observe whether the ticker (it is located next to the icon) moving, recording the noise level? If yes, then the microphone is working correctly.
What if the settings are lost?
It happens that the system sees the microphone, but still cannot hear you. Then you should check the signal settings. To do this, go to Start → Settings → System → Sound again. Below the list of connected microphones there is a scale (Check microphone) - it turns blue if the microphone picks up sound.
Speak loudly and then quietly, and watch the scale. If during a loud conversation the shading does not even reach half, click on Device Properties and try increasing the volume. Yes, in Windows 10 the sensitivity is called master volume.
Microphone is not selected in the program
Sometimes other microphones are connected to the laptop. And the main one stops working. What to do in such a situation? Use search to find “Voice Recording.” Click on the microphone image to start recording and check that the device is working correctly. If everything is fine, but the microphone still does not work, for example, in Skype, then the problem can be solved this way: in the program, select “Tools” / “Settings” / “Sound Settings”. The correct device must be indicated in the “Microphone” column.
Types of microphones that can be connected to a computer
Before connecting the device, you need to decide on its type. This will determine what work you have to do:
- The standard headset microphone is pre-configured so you don't have to make any additional settings. How well it will work depends on the quality of the headset. If there are no problems with the operating system, it will install automatically.
- Dynamic is used for recording in quiet rooms. In an ordinary apartment, it will only pick up noise. It should only be installed in studios and carefully configured. After connecting, downloading drivers is required. They usually come with a microphone on a small optical disk.
Based on the type of installation, devices can be divided into standard and wireless. The latter are a little more difficult to connect, but they work no worse than regular ones. First, let's figure out how to connect a microphone to a computer, if it is a regular one.
Microphone is occupied by another program
Has your previously working microphone stopped working? It is quite possible that the reason is that he is busy with another program. How can I check this? Open “Device Manager”, review in this window the programs that are currently active on your laptop. If you notice a program that is likely using a microphone, click on “Quit.”
In addition, certain web portals in the browser are also capable of “taking away” the microphone’s operation. This happens in cases where you connect one or another online service for communication, as well as a special application for recording video from a webcam. Actually, that’s why you should always close those tabs in your browser that you don’t need at the moment.
Using a wireless microphone
If you don’t want to bother with adapters and wires, buy a wireless microphone that connects via Bluetooth.
- Charge the device or insert batteries.
- Turn on the radio microphone and Bluetooth on your laptop. To do this, use the key combination Fn + F.
- Right-click to open the context menu of the Bluetooth icon in the tray (where the clock is) and select “Add device...”.
Windows 10 provides an alternative path: hold down Win + I, visit the “Devices” section and activate Bluetooth in the window.
- Click "Add Bluetooth or...".
- Specify the device type.
- After scanning and detecting the microphone, select it from the list.
If successful, a message will appear indicating that the wireless speaker is ready.
If Bluetooth does not turn on (the switch is not active) or the interface icon is missing in the tray, check whether the RF transceiver driver is installed and whether the module itself is activated on the laptop and microphone.
- Using the Win + I menu, open Device Manager.
- Expand the "Bluetooth" section to make sure the driver is there.
If there is no such item in the list or there is a yellow icon next to it, reinstall the Bluetooth software from the laptop installation disk or from the PC support site.
Suddenly, a gray arrow pointing down is drawn on the radio module icon, right-click on it and select “Enable device”.
The following steps will also help return the icon to the tray:
- Hold Win + R and run the command “ncpa.cpl”.
- Bring up the Bluetooth connection properties.
- In the second tab, click on the “Options...” link.
- Select the "Show Bluetooth icon in notification area" checkbox.
- Save the changes with the “OK” button.
The microphone will work.
The laptop does not detect the microphone from the headphones - what to do?
If the equipment just does not find your device connected, it is likely that the first one contains viruses. To check for their presence and eliminate them, you must follow the following instructions:
- First, you need to find a special spy program on the Internet and download it directly. The best of all is SpyHunter 4.
- Then you can scan your computer to detect possible pests of the unit.
- After which you should eliminate all malicious information.
- It is now possible to run a deep scan of the operating system. To carry out this manipulation, you will need any antivirus.
- All potentially dangerous files will need to be disinfected. Of course, this procedure cannot happen to everyone. The part that could not be cured must be removed.
- Finally, you need to restart the laptop and update the built-in drivers.
It is possible that the above method will not help. In this case, contacting a service center is inevitable.
How to turn on the microphone on a Windows 7 laptop
If you have Windows 7 installed, then these instructions are for you. In the lower right corner of the screen, find the speaker icon and right-click on it.
Next, click on “recording devices”.
The microphone settings window will open. Your microphone should be here. If it is not active, then right-click to open the window and click “enable”. Everything should work.
If it doesn’t work even after the above manipulations, then most likely you need to reinstall the sound card driver. This driver can be downloaded from the official website of the laptop manufacturer or sound card manufacturer.
To install or reinstall the sound card driver you must:
- In the “Start” menu, select “Control Panel”;
- In Control Panel, find “System”;
- In it, select the “Devices” tab;
- Here you need to find your built-in microphone;
- Right-click to open “Properties”;
- In the window that appears, find the “driver” tab and click update.
The system must update the driver itself. If you haven’t updated it, then find this driver or complex program on the manufacturer’s website and install it.
Enabling the microphone on Windows XP
For Windows XP there is a slightly different method.
- From the Start menu, select All Programs.
- Next “Standard”
- Then go to "Entertainment"
- Select "Volume".
- In the window that opens, select the “Recording Devices” tab.
- Select “Options” and then “Properties”.
- We find the microphone we need and select it with the left mouse button.
- We check the box next to our microphone.
- Next, right-click on the microphone. In the menu field that pops up, select “Enable”.
- After the manipulations have been completed, the icon should become colored with a check mark.
Next, in the “Volume” menu, you can configure the microphone the way you need. Set sensitivity, etc.
If all else fails
To turn on the microphone on a laptop and configure it, you can also download and install special programs, such as “Realtek Manager”. In such applications, the user is provided with a more advanced microphone setup system : noise suppression, various effects, distance from the microphone to the user, etc.
If you still can’t get your microphone to work, and you can’t figure out how to turn on the microphone on your laptop, then the problem is not in the software, but in a physical malfunction. In this case, take your laptop to a specialist at a service center for diagnostics.
Via standard or headset jack
To connect a microphone with a 2.5 or 6.35 mm plug to the input (pink connector), appropriate adapters are used. They can be bought in a store that sells musical instruments, computer components, car audio, etc. or order via the Internet, including from China or Moscow. The price starts from 80-100 rubles.
To connect headphones and a microphone to the universal headset input (the only one on a laptop, indicated by a headphone icon), you will need an adapter (it differs from the headphone connector by an increased number of rings).
The adapter's output is connected to the headset jack, and headphones or speakers and a microphone are connected to the inputs. Then, in HD Manager, change the interface purpose to “Headset” so that Windows recognizes both the speaker and headphones.
Remember: if the connector serves only as an output, connecting a microphone to it is useless. In such a situation, a speaker with a USB interface, an external sound card or a combined device will help.
A few important nuances
It is important to understand that for the operation of all components of computer hardware, special files are required - so-called drivers. That is, when answering the question - how to turn on the camera and microphone on a laptop, you should initially make sure that they are present and have been installed. This requires:
- Through the "Control Panel" go to the "Device Manager". In the tenth version of Windows, to do this you need to click on start and simply enter the name of the desired section on the keyboard, then use the link provided.
- In the list of equipment, pay attention to two sections - “Cameras” and “Sound, gaming and video devices.”
- Make sure they are fully functional. That is, next to all names there should not be a warning icon in the form of an exclamation mark.
- If the icon is there, then you should right-click on the name of the problematic component, go to its properties and select the driver update procedure.
Usually everything happens automatically, but sometimes you may need to manually install drivers. In such a situation, you will need to find them on the Internet (by name/model of equipment), transfer them to your hard drive and initiate installation of the files. Most often, after this, it is recommended not to forget about rebooting the system. Well, the last point - how to turn on the microphone in headphones on a laptop? Repeat one of the options suggested above. At this point, some users report that they are trying to check the gadget by recording a short message and trying to listen to it, but there is silence in the headphones. The reason for this trouble is most often the simple forgetfulness of the user, who made sure that the volume control in the system was set to maximum, but on the device itself forgot to turn the special wheel responsible for the same function.
How to find out where the microphone is on a laptop
In order to understand where the recording device is located in the laptop design, you first need to read the instructions from the manufacturer.
Most of them practice describing all the technical characteristics and built-in components of a laptop in the instructions and manuals that come with the laptop itself. In addition, on special boxes labeled by the manufacturer or hardware stores, there are small stickers with a list of specifications that describe all the technical characteristics of the device.
IMPORTANT! If you are using a laptop purchased second-hand or simply cannot find the necessary information in the instructions, you can look for the necessary information on the company’s official website.
Most laptop models have a special marker icon that displays the location of the microphone on the laptop body.
The hole located next to the marker icon is the exit to the built-in sound recording device.
In addition to the option shown in the picture, such a hole can be located on any internal part of the case - from the panel located under the keyboard to the upper frame of the built-in screen.
Acer
Laptops from the manufacturer Acer typically have a microphone located next to the built-in webcam. Most often, you will be able to find the hole for the built-in sound recorder on the top frame of the screen, as shown in the picture under number 2.
For older models, the microphone is typically located in the lower left corner of the case.
Asus
Most of the built-in microphones in the Asus laptop line are on the internal chassis and are located directly next to the keyboard. In more modern models, the sound recording device is located above the keyboard, while in older models the microphone is located in the lower left corner of the case.
Lenovo
Laptops from Lenovo are characterized by the location of the built-in microphone on the top frame of the laptop screen. You can notice them directly next to the built-in webcam lens in the photo below.
IMPORTANT! Regardless of the model and manufacturer of the laptop, most modern built-in sound recording devices are located directly next to the webcam lens and are often not indicated by a special marker icon.
Most often, you can find the output hole for the audio recording device in the lower left or right corner of the internal case, just below the keyboard.
If you cannot detect the microphone, carefully inspect the surface of the laptop case above the keyboard or examine the frames of the built-in LCD screen. It is in these parts that there is often a small hole in the built-in audio recording device.
How to connect two microphones to a computer
As a rule, a standard computer has one line output for connecting a microphone. But sometimes there is a need to connect two at the same time. For example, when recording joint vocals or karaoke. You can connect in several ways:
- The most reliable option would be to purchase a professional audio interface. It provides connectivity via several different ports (USB, Firewire, PCI and PCI-E);
- A good way would be to buy an external interface with built-in microphone preamps. Such a device is sold complete with the necessary drivers and, after installing them, makes it possible to simultaneously record and play back sound from different line inputs. This system also allows you to add special effects to the sound. To connect, you will additionally need three XLR cords with three pins;
- A more budget-friendly version of the connection can be to use an external DVD player, which has two inputs for microphones. To do this, you need to take a regular stereo cable and connect the player to the computer. To connect microphones you will need two XLR-TRS cables. The sound quality when connected in this way will be poor because the DVD player has a low pre-amplification level. This may cause abnormal noise and whistling when using microphones near speakers at the same time.
- Another way could be a homemade adapter. Using a soldering iron, you can make a small circuit in which two microphones will be connected to one line input. ATTENTION: when using this method, the sound recording quality will be extremely low and the noise level will be high.
Automatic problem solving mode
The Windows 7 and 8 operating systems provide the ability to automatically fix various problems, including those that arise with built-in microphones.
And although most often this method turns out to be useless, it is still where you need to start solving the problem, since you always need to go from simple to complex.
What do we have to do:
- 1. Go to the OS control panel and go to the “Troubleshooting” section.
- 2. In the next section, click on “troubleshoot audio recording problems.”
- 3. Next, a window like this will appear, click “Next”.
- 4. If a message appears that the troubleshooter did not detect the problem, as shown below, then see the “Drivers” section.
- 5. Otherwise, two ways to solve the problem will be offered, click the first one.
All corrections will be made automatically, and at the final stage you will be asked to accept all changes.
Wait until the process of applying all the fixes is completed and try whether the microphone works or not (read how to check below).
If not, then go to manual mode.
How to connect a microphone to a Mac OS computer
APPLE brand technology is radically different from other computers. The unusual interface makes the work a little difficult. But although the procedure for connecting a microphone on Mac OS is different from the Windows operating system, it will be quite easy to do. To do this you need to do the following:
- connect the microphone to the computer in any convenient way (USB, Bluetooth, audio input);
- in the upper left corner of the screen, click on the Apple icon;
- select “System settings”;
- open the “Sound” section;
- Select the “Login” tab at the top of the window;
- select a microphone (all available microphones will be shown in the list);
- on the selected device, by moving the slider, adjust the “Input sensitivity” parameter
- After speaking something into the microphone, check the signal level.
Manual problem solving mode
Everything is very simple. Click on the sound icon on the right side of the tray with the right mouse button.
A window like this will appear.
Go to the "Recording Devices" section.
Activate the microphone by single-clicking on it with the left mouse button and click on the “Properties” button (bottom right).
The following window will appear.
Make sure your settings are set as shown above.
Click the OK buttons one after the other.
In theory, everything should work, if not, then move on to the next section.
Checking the operation of the built-in microphone in a laptop
It's not difficult to do this. Click the start button - all programs - standard (at the very bottom).
Go to the "Sound Recording" section.
A window like this will appear.
You need to press record and give any speech. Stop recording and save the audio file.
This file can be listened to in any player, for example, VLC.
If your voice is heard, then everything is fine, the built-in microphone is working, if not, then you need to go deeper into the problem - check the settings, reinstall the drivers, etc.
But, as a rule, in 99.9% of cases the problem is solved using the above methods. Good luck.
Sources
- https://tehznatok.com/remont/noutbuk-ne-vidit-mikrofon.html
- https://pronoutbuki.ru/remont-noutbuka-svoimi-rukami/kak-vklyuchit-mikrofon-na-noutbuke/
- https://ichip.ru/sovety/ekspluataciya/ne-rabotaet-mikrofon-na-noutbuke-ili-pk-sovety-kak-vse-proverit-i-ispravit-722472
- https://geeksus.ru/instruktsii/chto-delat-esli-perestal-rabotat-mikrofon-na-noutbuke/
- https://setafi.com/elektronika/mikrofon/pochemu-ne-rabotaet-mikrofon-na-noutbuke/
- https://lookfornotebook.ru/kak-vklyuchit-mikrofon-na-noutbuke/
- https://welcom-comp.ru/all_text/89-kak-vkljuchit-mikrofon-na-noutbuke.html
- https://setafi.com/elektronika/mikrofon/gde-nahoditsya-mikrofon-v-noutbuke/
- https://itkompik.ru/remont-i-obsluzhivanie/kak-vklyuchit-vstroennyj-mikrofon-na-noutbuke.html
Unlikely (but possible): the sound card has failed
We deliberately put this point last. If you are using a 3.5mm connection and none of the recommendations have helped, try USB devices.
The fact is that an analog signal is supplied through 3.5 mm, which the sound card converts to digital. And in headphones with a USB connection, the sound is transmitted directly in digital form.
Sources
- https://SmartBobr.ru/poleznosti/podklyuchit-mikrofon/
- https://pronashkomp.ru/kak-vklyuchit-mikrofon
- https://winda10.com/nastrojki/kak-nastroit-mikrofon-na-windows-10.html
- https://AudioTop.ru/info/podklyuchenie-mikrofona-k-noutbuku
- https://journal.citilink.ru/articles/vas-ne-slyshno-kak-nastroit-mikrofon-v-windows-10/
- https://zagruzi.top/instruktsii/kak-nastroit-mikrofon-na-windows-7.html
- https://tehnika.expert/cifrovaya/noutbuk/podklyuchenie-mikrofona.html
- https://Lumpics.ru/how-connect-microphone-to-windows-10-laptop/
- https://kkg.by/razem-dzhek-i-mini-dzhek-kak-podklyuchit-mikrofon-k-kompyuteru/
- https://myearphones.ru/mikrofony/kak-podklyuchit-mikrofon-k-kompyuteru
- https://AudioTop.ru/info/podklyuchenie-mikrofona
- https://sovety-pk.ru/kak-podklyuchit-mikrofon-k-noutbuku.html
[collapse]