Standard iOS tools from version 11
You can enable iPhone recording in a couple of steps:
- Swipe up to open the phone's control panel.
- Next, you need to find the “Screen Recording” icon, which is indicated in the screenshot below.
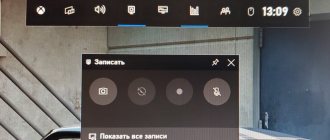
- Clicking this button will enable screen recording. At this moment it should change color to white.
You can stop the recording process by pressing again. The screen-recorded video file will be saved in the Photos app.
Take the test on the topic “Legends of the 90s”, remember which of these you had?
Which iOS versions have built-in recording?
The standard recording function is not available on all firmware versions. The screencast appeared in iOS 11. The easiest way out is to update to the latest firmware. But if this is not possible, then for earlier versions you need to install the program through the App Store.
For example, the paid application Vidyo for 300 rubles (works with devices above iOS 9) or Reflector.
What program to install on a jailbroken device is described below. A free, legal way is to install third-party software on a Windows-based computer or use the built-in utility on a Mac. This is what is written below.
Record screen with sound
By default, audio from the microphone is not recorded when capturing from the screen. To activate it, you must follow the previously discussed steps:
- Swipe up and look for the desired icon;
- If your device supports Force Touch, press the button with a little force and you will be taken to the screen recording menu. Older iPhone models are not equipped with this function, so a long press on the icon is enough to go to the desired section.
In the menu that opens, click the “Start Recording” button. You must first enable or disable the microphone sound by pressing the red button.
To complete, you need to press the corresponding key again in the menu or on the control panel. The file will be saved in MP4 format in the Photos folder.
What instrument are you? Take the test and find out
Method 1: Standard means
NOTE! It doesn’t matter what kind of iPad or iPhone you have (5, 5S, 6, 6S, 7, 7S, 8, X) - the main thing is that iOS 11 or higher is installed on your smartphone. If you have an iPhone 10, then this OS version is the default.
- “Settings” – “Control Center”.
- “Tune the element. management".
- Click on the plus sign next to “Screen Recording”.
- Exit settings to the desktop and open the additional menu “Blind”. Next, you should see an additional icon that allows you to capture the screen or make a video - click on it. After this, recording will begin without sound. To change the settings and enable sound recording, you need to hold down this button for a few seconds until an additional menu appears.
- Here you can turn the sound on or off.
To end the recording, you must also click on the same button. Next, the video will be saved on your phone, and you can use it for any available purpose. For convenience, you can easily send it by mail or any messenger.
How to add a screen recording button to Control Center on iPhone
Many users are faced with the fact that the required screen recording button is simply not in the quick access panel. This problem is solved in a few seconds.
- Go to settings and click on “Control Center”.
- Go to the “Customize Controls” section.
Here are all the controls available for use. You will need to find the “Screen Recording” item in the list, indicated by a green icon.
Now you need to click on the green + to the left of the icon. After this, the desired element will move to the top positions and will be in quick access. It should look like this:
Video instruction
Can you tell a cringe from a crash? Take this fun test and find out!
Best Apps to Record iPhone Screen on iOS 11
Although morally outdated
Screen Recorder+
A powerful and easy-to-use application for recording the screen of your smartphone. With it you can easily record any content: online videos, games, various shows or video calls. HD quality of saved videos and clear accompanying audio are the main advantages. Screen Recorder + provides the ability to add background music to a video and trim it, add emoji, text, and apply effects and filters.
The iPhone Screen Recorder+ screen recording app is absolutely free.
DU Recorder – screen recording
The main characteristic is reliability. With this application, you can not only record your screen, but also broadcast videos on social networks or YouTube. During a live broadcast, you can choose the required resolution and protect your video from being viewed by third parties. Through the Control Center you need to connect DU Recorder to instantly record the screen and save the video, which you can edit: trim and delete unnecessary things. Thanks to this application, the life of many video bloggers will become much easier, and their channels will be more interesting.
DU Recorder – screen recording without time limits and in-app purchases.
Display – Screen Recorder
It will help you record your iPhone screen, namely: create a demo video, watchable gameplay or an introductory video about the application. Display – Screen Recorder offers the convenience of saving recordings in one folder, gives you the ability to rename them and organize them for quick search. You can move the saved recording to another application or share it with friends.
Display – Screen Recorder for free. After review, you can pay $9.99 for the premium version and use it without restrictions.
Alexandra Plakhotina
For older versions of iOS up to version 11
Screen recording on iPhone was not available in earlier versions of the operating system. Users made do with applications that compensated for this deficiency. Below are the most popular ones.
Display Recorder
The iPhone supports the utility with iOS version no lower than 6. Users can choose the resolution and quality of video recording themselves. The saved file format is MP4.
Installation and use algorithm:
- The first step is to install and launch Display Recorder.
- On the main page you will immediately see the “REC” button. Clicking on it will start recording. You can minimize the application and switch between tabs, the screen recording will not stop. To stop recording, go back to the program tab and click on the “STOP” button. The recorded video will be saved in the device storage.
Video instruction
Volga or Pobeda? Are you familiar with the Soviet automobile industry? Test yourself in a fun test!
iREC
The application is similar to the previously reviewed one, however, it requires a version of iOS no lower than 7. You can record the screen in all existing social networks and instant messengers: VKontakte, Odnoklassniki, Facebook, Instagram, Telegram, WhatsApp and others. Supported on both iPad and iPhone.
Installation and use algorithm:
- Install and launch iREC on your iPhone;
- Once on the main page of the application, enter the name of the future file;
Press the "REC" key to start screen recording. To finish recording, go to the utility, click on the appropriate button and select a folder to store the file.
You should know that the cost of this application is $2.99.
Video instruction
RecordMyScreen
Another application posted in the official 4-PDA forum thread.
The program works in conjunction with Cydia and supports screen recording on iPhones starting from the earliest models. The quality of saved files is 30 frames per second, format is MP4.
Installation and use algorithm:
- First you need to install and run RecordMyScreen on your iPhone. You can download the utility on the 4-pda.ru site.
- You can start recording immediately. To do this, press the “Record” key.
- You can stop recording with the “Stop” button. All recorded files can be viewed in the application by going to the “Recordings” section.
What is important is that this utility is open access and does not require a subscription.
Why is there no sound on iPhone screen recording?
The most common reason why there is no sound on a screen recording is that the user forgot to turn it on or did not even know about such a function. In addition to this, there are several other reasons that may cause the sound to disappear on the screen recording:
- A small bug in the software. Sometimes it happens that the application may simply become slightly buggy. This is not critical, just a minor glitch. Cured by rebooting;
- The problem is in the iPhone software. This also often happens that due to some small error, the iPhone can behave very strangely. Most of these problems arise over time, when the memory is full of programs and some unnecessary open files. The easiest way to treat is by rebooting;
- Power saving mode error. The power saving mode in the iPhone is configured individually. You can turn off some applications, while certain functions will not work in others. With the camera it is a flash; with screen recording, the microphone may not work.
Another reason is hardware. The microphone on the iPhone may fail. In this case, you need to check whether you can record sound from the device; if not, reboot and try again. If the problem persists, you need to take the iPhone to a service center so that they can sort out the problem.
Via PC
An alternative way to record screen on iPhone is to connect it to a PC or laptop. To do this, you will need a device with Windows 7 or MacOS 3 software. First you need to synchronize your iPhone with your computer using USB or Wi-Fi.
Windows OS
Let's look at programs for the Windows operating system.
Camtasia Studio
This utility is released in versions for Windows and MacOS. First of all, let's look at the first option.
After downloading the mirror, you can start recording your screen:
- Go to the application and select "New Recording".
- Select the gadget you want to record video from;
- If you want to record microphone or internal sounds, make appropriate settings.
- The display preview will open. When ready, click “Start Recording”.
- To finish, click “Stop recording”.
It is important to note that you will be able to use the utility only after subscribing. Its cost is $249. Video instructions
LonelyScreen AirPlay Receiver
Unlike the previous one, this program is free and does not require downloading additional utilities for comfortable use.
The connection algorithm consists of the following points:
- Download and open LonelyScreen.
- You need to activate the “Screen repeat” option on your iPhone. To do this, swipe up and select the desired position.
- In the list that opens, look for the LonelyScreen application and click on it.
- A notification about connecting the iPhone screen will appear in the program on your computer.
How to record video from iPhone and iPad screen in Windows 10, 8 and Windows 7
Note: to use this method, both the iPhone (iPad) and the computer must be connected to the same network, no matter via Wi-Fi or wired connection.
If necessary, you can record video from the screen of your iOS device from a computer or laptop running Windows, but this will require third-party software that allows you to receive broadcasts via AirPlay.
I recommend using the free LonelyScreen AirPlay Receiver program, which you can download from the official website https://eu.lonelyscreen.com/download.html (after installing the program, you will see a request to allow it access to public and private networks, you should allow it).
The steps for recording will be as follows:
- Launch LonelyScreen AirPlay Receiver.
- On your iPhone or iPad connected to the same network as your computer, go to the control center (swipe up from the bottom) and click “Screen repeat”.
- The list will display available devices to which you can broadcast images via AirPlay; select LonelyScreen.
- The iOS screen will appear on the computer in the program window.
After that, you can record a video using the built-in Windows 10 screen video recording tools (by default, you can open the recording panel with the Win+G keyboard shortcut) or using third-party programs (see The best programs for recording video from a computer or laptop screen).
What to do if the function is not active
There are times when the iPhone gives an error and indicates that it is impossible to start recording. Often this is a simple glitch that goes away on its own after a little time. But still, reboot your device. Then try recording your screen without sound, or turn on the Camera app for a couple of seconds and then close it immediately.
If the problem is still not resolved, follow the instructions:
- Go to the iPhone settings and select “General”.
- We look for the “Restrictions” section and go there, enter the security code.
- Check for restrictions on the Screen Recording function.
- We remove all restrictions, if any.
What can you record from your iPhone screen?
Initially, the screen recording function was intended for streaming and creating videos with mobile content. Using the screen recording feature, you can record:
- Any games or watching videos on the phone;
- Technical videos for creating instructions;
- Videos with certain errors in order to send to someone who can help fix them;
- Show certain actions on the phone. Bloggers often use this.
Playing games and watching videos is the main function for phone screen recording. This way you can film gameplay and create content in general. There is no need to connect a PC and broadcast the image to it. Nowadays one phone is enough. The only negative is 50 FPs, in some applications it will be less if they are quite demanding.
Videos and how-tos are one of the important ways to create content. This is for bloggers or website owners who create user instructions. Instead of inviting an operator and picking up the phone, you can freely record the screen.
Bloggers often show their phone screens when they are trying to prove or show something to their subscribers. Interesting feature, really helps.
You can find any number of uses for the screen recording feature. They are limited only by imagination and the tasks that the user sets for himself.
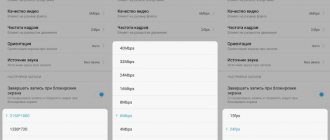
Is it possible to change the recording quality
Apple devices do not have this functionality by default. You can add something, change quality or other parameters using special applications.
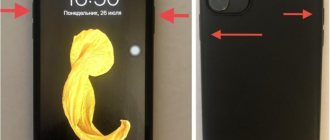
Why does the video stop when I rotate the screen? Stopping recording is associated with changing the screen orientation from portrait to panoramic mode. The device perceives this action as a new scene and completes the process.
This problem moves from one operating system version to another. The developers have not yet corrected this oversight. This unpleasant moment also occurs when recording the iPad screen.
Why record your screen?
First of all, the option will be useful for those users who independently create various kinds of tutorials. A saved video containing all the actions performed on the iPhone will allow you to show another person, for example, how to use the program or your progress through the next stage of the game.
Screencasting is also often used when you want to add video footage to a presentation instead of screenshots. This solution will present specific information in an accessible form, which will be convenient for many listeners.
Record via Mac or MacBook laptop
The third method is perfect for those users who use outdated devices that are not capable of updating to iOS 11. If you own a PC or laptop running Mac OS, you can record your screen using standard functions without the need to download third-party utilities.
This option is available through the standard QuickTime Player service, which is installed by default on all Apple desktops. The program allows the user to create recordings and then play them back. It is noteworthy that the quality of recording through this utility is an order of magnitude higher than through Windows. You can synchronize QuickTime with any Apple device that can also have any firmware version installed. You need to do the following:
- Connect your iPhone to your Mac OS device via a USB cable;
- If your device is connecting to the computer for the first time, then allow it access when the corresponding security tab appears;
- Launch QuickTime Player. To speed up the time it takes to find a utility, use the Spotlight assistant. To do this, hold down the two Command and Space buttons, and then enter the name of the service;
- In the upper left corner, click on “File” and then “New Video”;
- Also, if this is your first time capturing a screen, the program will ask for permission to use the microphone and video camera;
- The program will start recording, but will first start capturing video from your computer's webcam. To switch to screencasting from your smartphone, click on the upside-down arrow next to the record button (red circle with a white circle around it). Select the connected device. If desired, you can select other settings here - determine the sound source (select where the sound will come from) or adjust the video quality. Just keep in mind that the higher the quality, the greater the weight of the overall file;
- After switching to iPhone, the display will show what is displayed on the smartphone. If nothing appears on the screen, then remove the lock or try to disconnect the device and connect it again;
- To start a screencast, click on the Rec recording icon. To finish capturing the screen, click on Stop (gray square).
After recording is complete, the user will be able to immediately view the resulting video. If you want to save it, then close the screencast or click on “File”, then “Save”. Afterwards, the program will offer to export the recording (you need to select a name for the video).