When upgrading the system from Windows 7 SP1 or Windows 8.1 to Windows 10 (through the free upgrade procedure), a number of users began to complain that the system stopped seeing the DVD/CD drive . In BIOS/UEFI the drive is detected correctly, but in Windows 10 itself it is not displayed in the device manager, or is displayed but with an exclamation mark. The problem occurred on laptops/netbooks from HP, Lenovo, Acer and Dell.
In Device Manager, the CD/DVD drive may appear with an exclamation mark with one of the following errors:
- Windows cannot start this hardware device because its configuration information (in the registry) is incomplete or damaged. (Code 19)
- The device is not working properly because Windows cannot load the drivers required for this device. (Code 31)
- A driver (service) for this device has been disabled. An alternate driver may be providing this functionality. (Code 32)
- Windows cannot load the device driver for this hardware. The driver may be corrupted or missing. (Code 39)
- Windows successfully loaded the device driver for this hardware but cannot find the hardware device. (Code 41)
In this article, we have collected several ways to restore the functionality of a CD/DVD drive in Windows 10. If you have the problems described, you should try all of the above methods one by one.
Why doesn't Windows 10 see the drive?
The operating system may not see the drive for a variety of reasons. These may be hardware or software problems, the solution of which should only be approached after a thorough diagnosis. Often, the absence of a disk drive in Explorer indicates not so much a problem with the operating system as a failure of the component itself.
The system does not see the drive
Reasons why the system does not see the disk drive in Windows 10:
- A breakdown of the laser that reads information from the disks located inside.
- Grinding, uneven speed and similar phenomena indicate contamination or malfunction of the main lens. However, if the drive reacts in this way to only one disk, then the problem lies with it.
- Physical damage to the disk or incorrect recording can cause errors at the software level. An error when ejecting a CD from the drive on Windows 10 often leads to such damage.
- The drivers installed on the computer have disappeared.
- Some specialized software for working with disks has failed.
Important! To extend the life of the drive and prevent problems from occurring, you must follow the operating instructions. You need to know how to open the drive on Windows 10 without the risk of damaging internal components.
What is the meaning of the CD ejection problem?
The CD ejection problem is an error name that contains details about the error, including why it occurred, the system component or application that caused the error to occur, along with some other information. The numeric code in the error name contains data that can be decrypted by the manufacturer of the faulty component or application. An error using this code can occur in many different places within the system, so even though it contains some data in its name, it is still difficult for the user to determine and correct the cause of the error without much technical knowledge or appropriate software.
How to check whether the CD and DVD drive is connected correctly to the computer and whether drivers are available
Why the disk drive does not work on a Windows 7 computer
Before you begin to correct the defect, it is necessary to identify the cause of the malfunction as accurately as possible. To do this, you need to make sure that the drive is connected correctly, and also check that the drivers installed on your computer are up to date.
IDE connection and SATA connection, power supply
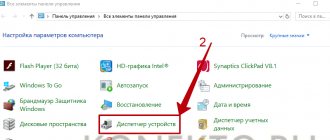
For proper operation, you definitely need to consider how to connect the drive to a Windows 10 computer. Devices must be connected directly to the motherboard using special interfaces. Similar interfaces include IDE and SATA. The IDE is a fairly outdated interface that is still found on some systems. Modern computers use SATA connectors, which provide high data transfer speeds and guarantee system stability.
Connecting a drive - connectors
To determine the type of connection on your computer, just look at the cords that connect the drive to the motherboard. SATA is a small wire with a plastic connector for connection. IDE is a large, wide connector that contains many more pins and requires certain rules to be followed during connection.
The wires must be connected to the appropriate connectors on the board and held very tightly. It also makes sense to check the power cable. In the most common SATA connector, a thicker part of the common cord is provided for it. In IDE, this role is played by a separate block of wires.
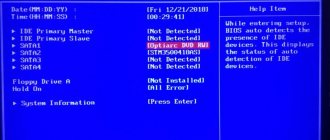
Note! It is worth making sure that the specific drive is activated in the BIOS. This can be seen in the corresponding section of the BIOS, where all equipment connected to the motherboard is listed.
It would be a good idea to immediately diagnose the system using the built-in utility immediately after turning on the computer.
You need to do the following:
- Right-click on the Start icon and select Control Panel.
- In the System and Security section, you will need to go to Find and fix problems.
- In the “Hardware and Sound” tab, click on “Device Settings”. Click "Next".
- An automatic search for problems will begin, during which the system will analyze the connected equipment and try to issue an appropriate report.
- If problems are found, they can be found in the “Viewing parameter changes...” section. Here the system actions are already configured, after which you click on the “Next” button again.
The system will make the appropriate changes and start the troubleshooting procedure again. If everything is normal, you need to restart your computer.
How to find and install drivers for a floppy drive
The operation of each computer component is controlled by special programs called drivers. If the drive drivers are not installed or are faulty, as a result, Windows 10 does not see the drive.
Drivers for floppy drive
To install drivers, you need to do the following:
- Right-click on the Start menu.
- From the drop-down menu, select “Device Manager”.
- Open the “Disk Devices” section.
- Find the desired DVD drive, right-click on it and select the “Delete” action.
- At the top of the main window, open the “Actions” tab and select “Update hardware configuration”.
Additionally, you can use a third-party DVD Drive (Icon) Repair utility. The program will easily check the driver installed on the drive, and will also try to correctly configure the computer software to restore the functionality of the component.
In this case, you just need to launch the program, select “Reset Autorun Option” and click on the “Repair DVD Drive” button. Once the process is complete, you must restart your computer. If the disk drive on Windows 10 does not appear after rebooting, the problem may be more serious.
Attention! Reinstalling drivers will only help in case of software problems. A damaged drive can only be restored by experienced specialists at a service center.
Fixing the “virtual drive not found” error UltraISO
If you have encountered the UltraISO application, then you know that it is high-quality software with which problems rarely arise. Personally, I have not encountered the “virtual drive not found” UltraISO error, but many readers write that such a defect sometimes appears. Therefore, I decided to dig deeper into this topic to suggest a solution.
How to enable display of the disk drive through Device Manager on Windows 10
Why Windows 10 SSD does not see - how to fix the problem
The technique described above for updating the hardware configuration will also help to correctly enable the display of the drive in Device Manager. In this case, between the actions of deleting the previous drive configuration and updating the list of equipment, you must restart the computer. This way, the system will be able to recognize unknown connected equipment and will try to independently install drivers for it from its own database.
Windows 10 Device Manager
Sometimes the drive can be activated in the BIOS and be fully functional, but Device Manager does not see the Windows 10 CD ROM at all. To fix this, you can do the following:
- Open "Task Manager" in any convenient way.
- Go to the “View” tab at the top of the main window.
- Select "Show hidden devices".
- In the list of connected devices, you need to find the “SPTD” driver, which will most likely be located in the “Non-plug and play device drivers” section.
- You need to remove the driver and reboot again.
Similar problems occur on computers that frequently use virtual drives. In this case, the system simply does not have time to figure out which driver is related to the real physical component.
Sometimes the required driver is located in the “IDE ATA/ATAPI controllers” section. In this case, you will need to determine which specific channel the desired drive is connected to. To do this, you should open each channel in turn and carefully study the “Device Type” parameter. Opposite it should be the value “ATAPI CD drive” or something similar. You will immediately need to check the box next to “Enable DMA”, and then restart the computer.
UltraISO: Fix virtual drive not found error
UltraISO is a useful program, but due to its limited functionality, it can be difficult to understand some aspects. This is why it is sometimes difficult to understand why this or that error occurs. In this article, we will figure out why the “Virtual drive not found” error appears and fix it using simple settings manipulations. This error is one of the most common, and many users excluded this program from their range because of it. However, thanks to a short sequence of actions, you can solve this problem once and for all.
Using Command Prompt or PowerShell to Enable a Missing Drive
Why Windows doesn’t see the hard drive - how to fix the problem
Another method of solving the problem is to enter registry keys responsible for a specific drive. Here you will need to use the traditional Command Line or PowerShell utility. Each application must be run as administrator.
PowerShell
In the window that opens, enter the command:
reg.exe add “HKLM\System\CurrentControlSet\Services\atapi\Controller0” /f /v EnumDevice1 /t REG_DWORD /d 0x00000001
To start the procedure, you will need to press the Enter button on the keyboard. As soon as it is completed, you should immediately reboot the system. If the computer still does not see the Windows 10 DVD drive, it makes sense to resort to another method.
Contents [show]
April 2022 Update:
We currently suggest utilizing this program for the issue. Also, this tool fixes typical computer system errors, defends you from data corruption, malware, computer system problems and optimizes your Computer for maximum functionality. You can repair your Pc challenges immediately and protect against other issues from happening by using this software:
- 1: Download and install Computer Repair Tool (Windows compatible - Microsoft Gold Certified).
- 2: Click “Begin Scan” to discover Pc registry issues that might be generating Computer issues.
- 3 : Click on “Fix All” to fix all issues.
How to configure drive display through System Registry Editor on Windows 10
A utility called “System Registry Editor” can also be extremely useful in restoring the functionality of the drive.
Registry Editor
Procedure:
- Open the Run window using the WIN+R key combination.
- Type the regedit command and press Enter.
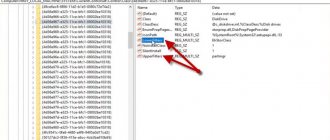
- Go to directory HKEY_LOCAL_MACHINE\SYSTEM\CurrentControlSet\Control\Class\{4D36E965-E325-11CE-BFC1-08002BE10318}
- Select a branch using the left mouse button.
- In the right window, find and delete the UpperFilters and LowerFilters parameters.
- Reboot the system.
Using the disk drive on Windows 10 computers in most cases does not cause any problems. However, sometimes user intervention may be required to help the hardware appear in the system. The right approach will make the drive work as expected.
Causes of CD ejection problem?
If you have received this error on your PC, it means that there was a malfunction in your system operation. Common reasons include incorrect or failed installation or uninstallation of software that may have left invalid entries in your Windows registry, consequences of a virus or malware attack, improper system shutdown due to a power failure or another factor, someone with little technical knowledge accidentally deleting a necessary system file or registry entry, as well as a number of other causes. The immediate cause of the “CD eject problem” error is a failure to correctly run one of its normal operations by a system or application component.