Windows XP was used when USB drives were just gaining popularity. Therefore, it is not intended for installation from a flash drive. It is much easier to create an image on disk and install from it. But today many have abandoned DVD-ROM, so installing from a flash drive is the only possible solution. There are several ways to create a bootable USB flash drive with Windows.
How to install Windows XP from a USB flash drive
How to install Windows XP from a USB flash drive
You can install the system:
- via “My Computer”;
- via BIOS;
A bootable USB flash drive is created using CMS clients, which include UltraISO, WinSetupFromUSB and others.
Installing Windows XP - selecting driver packages for unpacking
Important! When installing this Windows from a USB flash drive by creating an image via UltraISO, the error “txtsetup inf file is corrupted or missing” often occurs. This is due to the use of modern boot image recording algorithms that were not used when using Windows XP. To avoid this problem, it is recommended to use other programs.
Video - how to burn Windows XP to a USB flash drive
Initial system setup
- Update the system (just connect to the Internet, it will update automatically);
- Install missing drivers using DriverPackSolution;
- Activate Windows XP.
More details about the initial system setup after installation can be found in this article.
Using various programs during the installation process
If you do not have a disk with Windows XP, you need to download the image from the Internet. The computer won't read it when it boots, so it won't be able to start the installation. To solve the problem, there are various CMS clients that allow you to create a bootable USB flash drive. Let's look at the most popular ones.
Creating an image using UltraISO
Creating an image using UltraISO
This is a very simple and understandable program that is necessary for writing operating system images to a disk or flash drive. Supports all existing systems, starting with Windows 2000. If you plan to install from the original image, then 1 GB on a flash drive will be enough for you. But it’s better to take care and find in advance an image that has drivers and the minimum number of necessary programs. It is recommended to use 4 GB Flash drives.
To create a USB flash drive for recording Win XP, you must:
- download and install the program (there are Russian versions);
- launch the client and insert the USB flash drive into the computer;
- Click “Open” and select the operating system. The file must be in ISO format;
- Click “Boot” and “Burn hard disk image”;
- check that the recording method is USB-HDD+ and click “Burn”;
Before doing this, it is recommended to format the flash drive.
Burning a hard disk image
Using WinSetupFromUSB
This program does not support the ISO image of this operating system, so you will first need to emulate it using special programs such as daemon Tools and copy the existing information to your hard drive.
Next you need to do the following:
- download and install the program;
- run the program and insert the USB flash drive into the computer. It should be determined automatically;
- specify the path to the location where the Windows folder is located;
- Click on the “Go” button. The program will prompt you to format the flash drive before starting recording. It is recommended to agree;
After some time, the installation flash drive will be completely ready for use.
Creating an image using WinSetupFromUSB
Possible problems
- Windows cannot start due to hardware disk configuration errors.
Or sometimes appears as an error related to hal.dll. It looks something like this:
To solve this problem, boot from the flash drive again and select the second option in the boot menu (see step No. 13 above). - Very slow copying of files at the first stage of installation , up to 1.5-2 hours. This is due to the ACHI/SATA or USB drivers included with the installation program. You can fix it by integrating suitable drivers for your equipment using the nLite utility, but this is beyond the scope of this instruction.
- The mouse is not detected . XP can be installed without a mouse, the selection button will be Enter or spacebar, and you can navigate through the controls with the Tab key and arrows.
- Blue screen of death when installing on new hardware . Windows XP is no longer supported by hardware manufacturers or Microsoft itself. Therefore, the installation program (like the system itself) simply does not know how to work with new equipment. In this case, there will be no way to install XP at all. Take a closer look at more recent editions, such as Windows 10.
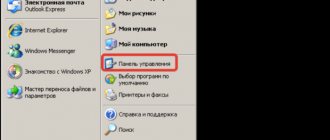
Installation via “My Computer”
This is possible if you have a working operating system. If you already have a Windows image, you need to insert the electronic drive, select it through “My Computer,” find the installation file in exe format and double-click on it. You will be prompted to restore the system, update or install. After selecting the required parameter, everything happens automatically.
Important! The big disadvantage of this method is the inability to format the C drive, which contains the previous operating system. As a result of this, a new Windows is installed on top of the old one. There is a high risk of a conflict causing the computer to not work correctly. It is necessary to resort to this method if it is impossible to use others.
How to install Windows XP from a flash drive to a netbook
The installation of a system of this type on a personal computer, regardless of its type, is not difficult. Some difficulties sometimes arise during the preparatory work. This is the BIOS setting, choosing a priority device during the boot process and other important points.
Difficulties especially often arise when trying to install XP on a PC model that uses SATA. This version of the OS has quite a problem working with the controller of this type. That is why, when setting up the BIOS, it is imperative to switch the hard drive controller to IDE compatibility mode.
If for some reason it is not possible to perform such an operation, then you need to use the XP version with built-in drivers that allow the system to work normally with SATA devices.
BIOS setup
Preliminary BIOS setup for XP installation includes two main steps:
- selecting a priority device for downloading;
- switching the hard drive controller to IDE mode (if the hard drive operates via a SATA interface).
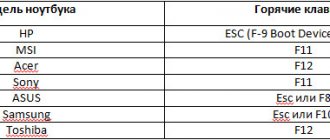
To enter the Bios, you must press a certain key combination, or any one, before starting to boot your personal computer.
These keys are different for different netbook models. It all depends on the specific Bios model:
- ALR – F2, Ctrl+Alt+Esc;
- AMD – F1;
- AMI – Del, F2;
- Award Bios – Del, Ctrl+Alt+Esc;
- DTK – Esc;
- Phoenix – Ctrl+Alt+Esc, Ctrl+Alt+S, Ctrl+Alt+Ins.
Download priority
To make a USB flash drive a priority when booting a personal computer, you must follow the steps in strict order:
- go to Bios;
- find a menu called Boot or a similar one with a similar name;
- find the Boot Device Priority item;
- select USB storage device.
The bootloader menu may look different. Often, under the “Boot” item there is a list of devices from which booting can be done. And just use the “-” and “+” keys to select the one you need. (1st boot devise, 2st boot devise). When all the required manipulations are completed, you need to switch the controller to IDE compatibility mode - if there are no drivers in the distribution.
Switching the SATA hard drive controller to IDE-compatible mode
Many netbook Bios today support IDE compatibility mode.
To enable this mode, you must perform the following steps:
- go to Bios;
- find the item called SATA MODE;
- use the “+” and “-” keys to change the mode to IDE.
The menu may differ significantly in different modes. When searching for the desired item, you need to focus on the technical term SATA. In most cases, menus with such names allow you to manipulate the controller and its operating mode.
Installation process
The process of installing Windows XP from a flash drive is as follows:
- after downloading from the distribution kit, a blue screen appears on which “installation” is written and the operating system will independently prepare for the installation;
- when the preparation is completed, a list of three items will appear - you just need to press the Enter key;
- in the next window, select the hard drive to which the system will be copied - after selecting, press the Enter key;
- when the selection is successfully made, a new window will open - you need to press the “C” key;
- If necessary, the system will give you the opportunity to format the partition - you must select the required item, and then press the Enter key.
After formatting is completed, the installation process will begin. It runs almost entirely automatically.
User participation is required only at the following stages:
- entering username and password;
- entering the license key;
- writing the name of a personal computer;
- setting date and time
The last step will be creating an account. After completing this stage, the personal computer can be used to perform various tasks.
The type of technology in question is gradually becoming a thing of the past (it is being replaced by tablets), as well as the XP operating system. Despite this, today netbooks are still relevant and widely available. Since many users are quite conservative and are in no hurry to switch to new software. That is why installing XP from a flash drive is still practiced.
Setting up boot via BIOS
Setting up boot via BIOS
Before using this method, you will need to ensure that you have the boot file. Next, you need to restart the computer and, when the first boot page appears, where the characteristics of the device are described, you will need to press “Del” to enter the BIOS. On some devices, the F2 button is responsible for this.
After loading the BIOS system, you need to go to Downloads or Boot. Here you must specify that the computer boots not from the hard drive, but from a flash drive. This is done by selecting the drive and pressing the F6 button until it is the first one. If you have Award Bios, you will need to perform the following steps: Advanced BIOS Features -> First Boot Device -> USB-HDD -> Save and Exit. After the device reboots, recording of the operating system will begin.
Important! It is not necessary to go into the BIOS settings. While the computer is booting, just press the F6 or F8 button, depending on the manufacturer, and select boot from the flash drive.
Video: Windows XP on a netbook
Bootable flash drive with WinSetupFromUS
An application called WinSetupFromUS makes it possible to prepare a distribution kit with a valid boot area in a minimum amount of time, allowing you to install the operating system on a netbook. The process of loading the OS onto the media thanks to WinSetupFromUS becomes almost completely automated. The user only needs to format it in advance.
Formatting
It is advisable to perform formatting using specialized software. The best option for this case is the BootIce program . It is important to remember one important feature of this process - after its completion, the data from the memory card will be completely destroyed without the possibility of recovery. Therefore, it is advisable to save them on another medium in advance.
The formatting process must be performed in strict order:
- connect the media to a free USB port;
- launch the BootIce utility;
- in the dialog box that opens, select the desired disk using the drop-down list;
- Click on the button called “Perform Format” - it is located in the lower right corner of the program window;
- A new window will open in which you need to select an item called USB-HDD mode (Single Partition) and click on the “Next Setup” button;
- you need to select a file system called NTFS (in no case FAT) and click “OK”.
When all the above operations are completed, you just need to wait a little. The formatting process itself takes a small amount of time. It is only important not to remove the device from the port during this operation, and also not to turn off the power to the computer. This may adversely affect the operation of the device, and the process will have to start again.
Creating a boot entry and bootloader
When formatting is successfully completed, you can proceed to the next stage of work - creating a boot area on the device and the boot record itself.
This is done as follows:
- open the workspace of the BootIce application and click on the “Process MBR” button - the second button from the left edge (in no case should it be confused with “Process PBR”);
- a window with a long list will appear on the computer screen - check the penultimate box (NT 5.x MBR);
- left-click on the “Install/Config” button and agree with all subsequent requirements.
When the operation is completed, you can safely begin loading the distribution onto the media. To do this you will need to use the WinSetupFromUS
.
Copying Windows XP to a flash drive
Launch the WinSetupFromUS application.
A window will open in which you will need to perform the following actions:
- in the field called “USB disk selection and format”, select the device to which you want to copy the operating system;
- check the box next to the box called “Windows 2000/XP/2003 Setup”;
- click on the ellipsis located opposite the empty field and select the folder on the local disk containing the OS distribution;
- click on the “OK” button;
- the path to the located distribution will appear in the empty field;
- At the bottom of the window there is a “GO” button - click on it with the left mouse button.
When all the above steps have been completed exactly, all that remains is to wait a while. After the creation of the boot device is completed, the message “Job Done” will appear on the screen - translated from English, this means that the job is done. After completing all the above operations, you can safely proceed with the installation.
Testing
To check whether it is possible to install using the distribution package copied to the device, simply insert the media into the USB port and wait a while. If autoboot is enabled on the PC, then after a while a dialog box will appear on the monitor, allowing you to complete the installation. If such a window is missing, then an error was made somewhere.
Video: Windows XP from USB-Flash drive to netbook
Installation process
The installation itself takes place manually or automatically. If manual mode is selected, you will need to enter the program key yourself and indicate which programs will be required during the installation process. When the system operates automatically (recommended), everything will be completed without user assistance.
You will have to wait about 20 minutes until the operating system is recorded on the PC. Next, you will need to independently install video, audio and network drivers for normal operation. If there are distribution kits on the flash drive, you can use them. If they are missing, you should take care in advance and download them.
What do you need
To install Windows XP OS on a netbook you will need:
- Windows XP OS distribution;
- memory card connected to a PC via USB port;
- netbook;
- specialized software.
In order to perform the action in question without any difficulties, it is advisable to acquire a “clean” version of XP, without various kinds of “makeweights” in the form of built-in applications and drivers. Because otherwise, all sorts of conflicts may arise at the software level in the PC, leading to difficulties during operation and configuration.
The key point is the presence of a special USB memory, onto which the OS is copied using a special application. This memory will be connected before starting the computer. To create a boot device, the WinSetupFromUS application is the best choice.
Minimum system requirements and XP versions
In general, there are 2 main versions of XP that I would like to highlight: Home (home) and Pro (professional). For a simple home computer, it makes no difference which version you choose. It is much more important how many bit system will be chosen.
That is why pay attention to the amount of RAM on your computer . If you have 4 GB or more, choose the x64 version of Windows; if less than 4 GB, it is better to install x86.
There is no point in explaining the essence of x64 and x86, because... most users don't need this. The only important thing is that Windows XP x86 will not be able to work with more than 3 GB of RAM. Those. Whether you have at least 6 GB or 12 GB on your computer, it will only see 3!
My computer is in Windows XP
Minimum hardware requirements to install Windows XP .
- 233 MHz Pentium processor or faster (at least 300 MHz recommended)
- At least 64 MB RAM (at least 128 MB recommended)
- At least 1.5 GB of free hard drive space
- CD/DVD drive
- Keyboard, Microsoft Mouse, or compatible pointing device
- Video card and monitor that support Super VGA mode with a resolution of at least 800×600 pixels
- Sound card
- Speakers or headphones
Working with the nLite program
We install nLite just like any other Windows program. After launch, click Next, and then click on the Browse button and specify the path to the C:\WinXP directory.
If there are no errors, information about the Win XP distribution should appear in the nLite window.
Click Next several times until the Select Tasks window appears in front of us. In it you only need to check the Drivers item.
Click Next again and select Driver folder.
Specify the path to the folder with drivers and click OK.
Now you should see a long list in front of you where you should indicate the ones that are suitable for your laptop platform. To start the integration process, click Yes.
When the integration is complete, a window will appear in front of you with the distribution size indicated in it.
Click Next and Finish to exit the program. We received a ready-made Windows XP distribution with SATA drivers integrated into it.
Finding and installing drivers for Windows XP
The next step in installing Windows XP is installing drivers.
You probably noticed that on a freshly installed Windows XP, the sound does not work, the network card does not work, the system slows down, Wi-Fi does not search for wireless networks, and other devices you need do not work. The reason for this situation is the lack of certain drivers.
What kind of beast is this “driver” anyway? Here is a laptop, netbook or other similar device. It consists of many components such as a network card, video card, card reader, and so on. For this whole enterprise to work, connecting links are needed between these devices and the Windows . Drivers serve as such links. Yes, Windows includes standard drivers for some devices. If they weren’t there, it’s unlikely that you would see the same Desktop . These standard drivers are not available for all devices. Also, their functionality leaves much to be desired.
To somehow correct this situation, you need to install drivers for various components of your electronic assistant. Where can I get them? The entire Drivers section of this resource will help you with this. To make it easier for you to find the information you need, a kind of guide has been created for the section: Drivers for laptops.
Asus laptops can immediately go to the page with a list of laptop models: List of drivers for Asus laptops. There are links to driver sets for Windows XP with detailed installation instructions. For owners of Acer , eMachines and Packard Bell, a similar page is available here: Drivers for Acer, eMachines and Packard Bell laptops. For many laptops manufactured by Lenovo, all drivers and utilities can be accessed in this section: Drivers for Lenovo laptops.
If you don't have Acer , Asus , Lenovo , eMachines or Packard Bell , then don't worry! The guide will help you find the drivers you need: Finding and installing drivers on Windows. A special place here belongs to drivers for webcams. A whole article is dedicated to them: Finding and installing a driver for a webcam.
These forum threads will also help you a lot:
- General topic on finding, installing and solving problems with drivers: Solving problems with finding and installing drivers;
- Solving problems with drivers for a video card: Solving problems with drivers for a video card;
- Finding and solving problems with the installation and operation of drivers for a sound card: Solving problems with drivers for a sound card;
- Drivers for network cards and Wi-Fi adapters are discussed here: Solving problems with drivers for network cards and Wi-Fi. The first message contains a small guide on finding and installing the required driver;
- You will find Bluetooth adapters and drivers for them here: Solving problems with drivers and Bluetooth adapter operation;
- Web cameras and issues related to them are discussed here: Solving problems with Web cameras. Pay special attention to the first message of the topic;
- Various branded utilities for a laptop or computer can be found using these forum topics: Problems with additional software, Description of utilities for Samsung laptops, Description and solution to problems with the operation of Lenovo branded utilities and Description of drivers and utilities for Asus laptops.
When searching for drivers on the forum, pay special attention to the first messages of topics. They usually contain typical solutions to the most common problems, and also have extensive collections of drivers with detailed instructions.
Also pay attention to the answers to frequently asked questions. This article contains answers to the most frequently asked questions.
Error installing windows xp
When asked “I can’t install Windows XP from a flash drive,” search engines return a lot of options that are difficult to sort out. But there are two most common cases. In the first, the system complains that the “asms” file is missing.
- LiveJournal
- Blogger
Solved by installing it first. At the same time, carefully select items during initial loading. For the first time - “3. First part...", in the second - "4. Second part..."
What you will need for installation
1) We need an installation disk with Windows XP, or an image of such a disk (usually in ISO format). You can download such a disk, borrow it from a friend, buy it, etc. You also need a serial number, which you will need to enter when installing the OS. It’s best to take care of this in advance rather than running around looking for it during installation.
2) UltraISO program (one of the best programs for working with ISO images).
3) The computer on which we will install XP must open and read flash drives. Check in advance to make sure it doesn’t happen that he doesn’t see the flash drive.
4) A normal working flash drive, with a capacity of at least 1 GB.
5) Drivers for your computer (will be needed after installing the OS). I recommend using the last tips in this article:.
6) Straight arms...
It seems like this is enough to install XP.
