05/06/2016 windows
Some users, more often after updating Windows 10 and less often during a clean installation of the OS, are faced with the fact that the laptop’s built-in webcam or a webcam connected via USB to the computer does not work. Fixing the problem is usually not too difficult.
As a rule, in this case, they start looking for where to download a driver for a webcam for Windows 10, although with a high degree of probability it is already on the computer, and the camera does not work for other reasons. This instruction details several ways to fix the webcam in Windows 10, one of which, I hope, will help you too. See also: webcam programs, Inverted webcam image.
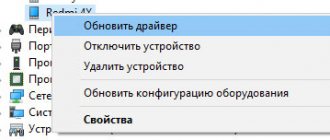
Important note: if the webcam stopped working after updating Windows 10, look at Start - Settings - Privacy - Camera (in the "Application Permissions" section on the left. If it stopped working suddenly, without updating Windows 10 and without reinstalling the system, try the simplest option: go to the device manager (via right-click on start), find the webcam in the “Image processing devices” section, right-click on it - “Properties” and see if the “Roll back” button is active on the “Roll back” tab Driver". If yes, then use it. Also: look, are there any in the top row of laptop keys with a camera image? If there is, try pressing it or her in combination with Fn.
Driver problem
First, open Device Manager and make sure you have all the necessary drivers installed.
In details:
- Open the processing devices section and make sure that the web camera icon is present. Also make sure that there are no red or yellow signs next to it and in the “Devices” section indicating that the software was installed incorrectly.
- If the icons are present, then you need to go to the office. website of the laptop manufacturer (MSI, ASUS, ACER, etc.), enter the model of your laptop into the search (you can see it on the box or on the back) and download the necessary drivers.
- Then install them. The procedure is actually extremely simple, I won’t dwell on it.
After installation is complete, don't forget to restart your PC.
There are times when, due to various failures, the webcam software fails and the laptop does not see it. Then, before installing a new driver, you need to remove the old one.
For this:
- We go to the device manager, right-click on the name and open “Properties”.
- Move to the “Driver” section and click “Delete”.
- We confirm the actions by clicking “OK”.
- Reboot the computer.
Now you can proceed to installing the latest software.
If the device manager does not see the webcam, it simply is not in any section, then most likely the problem is its malfunction.
Restoring compatibility
A fairly common practice is an outdated version of the driver for the video card itself. Every year new versions of operating systems are released, resulting in incompatibility with the updated system. This problem is quite easy to solve; just follow a simple algorithm:
- Left-click on the Start menu and select “Run programs created for previous versions of Windows” in the search bar. You can start entering only part of this request, the system will give a hint and find the desired application. Now it needs to be opened.
- If you click on the “Advanced” link, you are given the choice to log in with administrator rights. This option is the most preferable.
- Click "Run as administrator".
- You must click “Next” and wait for the compatibility troubleshooting process to complete. This procedure can take a long time.
Advice! To speed up the procedure, close all applications and programs so as not to load your PC.
You don’t have to resort to the above methods. Before starting any actions, the user should inspect the USB port for damage. It is likely that the issue is a technical failure, and not an erroneous operation of the system.
System errors
The second problem, which may well be, is damage to the system files responsible for the correct operation of the software.
How to fix errors:
- Launch the command line “cmd”.
- Enter sfc /scannow.
- Issue the command for execution by pressing “Enter”.
- Wait for the scan to complete and reboot the system.
This is a system tool that automatically restores important files from the backup area.
File system is damaged
Another reason why a laptop usually does not see the built-in webcam. In short, a file system is a way of organizing and storing information. And at the slightest error in it, the performance of certain components is disrupted.
How to fix it:
- Open "Computer".
- Right-click on the drive on which the OS is installed. Usually this is drive "C".
- Open the “Properties” section.
- Go to the “Service” tab and click on the check button.
- Check all available options and click “Launch”.
- Add to schedule by clicking on the appropriate button.
To start checking, you need to reboot the system. All errors found will be corrected.
We are looking for the reason why the webcam does not work in Windows 10
Let's look at the most common reasons why the webcam does not work in your Windows 10 operating system. The new version of the OS has a system-wide option that completely disables your webcam.
There are several switches in the Settings app that disable the webcam in all applications, individually and for the entire device. If the switches are in the inactive position, even desktop applications will not be able to use it.
In general, permission settings affect not only new Windows 10 apps from the official Store (UWP), but also some desktop ones. If your camera is not working, the first thing to do is go to System Settings.
This can be done from the Start button menu or by pressing a specific key combination. These are the Win + I keys, press them.
Next, we are interested in such a group of settings as “Confidentiality”. Find and go to it. Next, on the left side of the window, you need to find the “Camera” section, that’s what we need.
WHY THE WEB CAM DOESN'T WORK
At the top left of the window, make sure the "Allow access to the camera on this device" option is enabled. If not, click the Change button and set the value to Enabled.
In the next step, make sure that the “Allow applications to access the camera” option is turned on. Without this, no applications on the system, including desktop ones, will be able to see or use your webcam. This option has changed since the April 2022 OS update. Previously, it only affected UWP apps and did not affect traditional desktop programs.
In the "Select apps that can access your camera" section, make sure all the apps you need can access and aren't disabled. Otherwise, set to Enabled.
If all the above parameters are set correctly, the operating system should not interfere with anything. These are all the traditional steps to find and eliminate the reasons why your webcam is not working.
WHY DOES THE WEBCAM NOT WORK ON YOUR COMPUTER
In addition to simply unplugging, you or anyone else with access can disable/enable the webcam in the BIOS or UEFI on some PCs or laptops. This option is most often found on enterprise laptops because it gives you the ability to safely disable access to them.
You can also disable it in the OS Device Manager. If you previously completed this step, you will need to go back and turn your device back on.
The Windows 10 operating system tries to update device drivers whenever you connect them automatically. But this doesn't always work as expected. In some cases, you may need to download the device driver installation package from the manufacturer's official website and install it yourself.
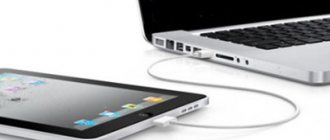
If no applications can see the webcam, it is worth checking again that it is connected correctly. This applies to the cable. This also happens. For USB, make sure the cable is connected to a USB port on your PC. Unplug it and plug it back in to make sure it's secure.
Some webcams have indicators. Please note whether the indicator is active after connection. It's also worth trying a different USB port if available.
OTHER REASONS
If nothing helps, all settings are activated, drivers are installed, the connection is correct, then there are two more options to solve the problem.
The first is that you may need to dig into the settings of the specific application you are trying to use. This is especially true if several video capture devices are connected to the computer. The wrong one may be automatically selected.
For example, in Skype, go to the Settings menu, then Sound and Video, and select your preferred camera from the drop-down list.
Attention! In Windows 10, the downloadable desktop version of Skype and the pre-installed version are almost the same, but the downloadable version can see more types of webcams. This is because it is a classic desktop app and comes pre-installed with UWP.
And the last second option - if it was not possible to find out why the webcam does not work using the methods described above, it may simply be faulty. Try connecting it to other computers and see the result. Thank you for your attention!
Troubleshooting compatibility issues
In some cases, the laptop may not see the built-in webcam due to problems with the compatibility of the installed software with the current version of Windows. Then the troubleshooter, originally built into the OS, comes to the rescue.
To run it you need:
- Open “Start” and enter “previous” into the search.
- Click on the appropriate item.
- After opening the main window, click “Next”.
- A scan will start and you will be prompted to select the faulty component. If the required component is not present, select “Not in the list” and specify the path manually. Click “Next”.
- Select the “Diagnostics” option and select the OS in which it should definitely work.
Everything should now work.
Installing webcam software through parameters
It is possible that for the webcam to work properly, you need special software for Windows 10. It is also possible that it is already installed, but is not compatible with the current OS (if the problem arose after upgrading to Windows 10).
To begin, go to the Control Panel (Right-click on “Start” and select “Control Panel.” In the “View” box at the top right, select “Icons”) and open “Programs and Features.” If there is anything in the list of installed programs that is related to your webcam, remove this program (select it and click “Uninstall/Change”.
After removal, go to “Start” - “Settings” - “Devices” - “Connected devices”, find your webcam in the list, click on it and click the “Get application” button. Wait for it to download.
What else could it be
I have discussed the main types of malfunctions, but there are other reasons why the laptop does not see the webcam.
Most often this is:
- The webcam is completely or partially out of order.
- Damage to the cable connecting the webcam to the motherboard.
- Motherboard failure. Usually in cases with a laptop, a separate component overheats.
You won't be able to fix all this on your own. It is necessary to contact specialists, for example, us, for help, for more thorough diagnostics and repairs.
What to do first?
First, you need to make sure your webcam is working properly. The best option is to connect it to another computer. If he does not react in any way to the new device, the latter is most likely not working.
Secondly, you need to make sure that there are no problems with the computer itself, specifically with the USB connectors. To do this, connect any other gadget to the connector selected for connecting the webcam, or connect the webcam to another connector.
Thirdly, make sure there are no factors that prevent the webcam from working properly. Remember: a webcam can only work fully in one application. If you enable 2 or more programs that use the webcam's resources, it will either not work as expected or will not turn on at all.
This device is built into laptops and netbooks by default; if you have an old PC, you need to check whether this camera is turned on. It is likely that it is turned off or blocked. This problem can be solved very simply. It is enough to press “Fn” + “F12” simultaneously. Instead of “F12”, you can use “F1” or other variations of “F”, since this key depends on the components of the computer, often on the version of the motherboard.
Also, before you start fixing the drivers, it is important to remember all the actions that were performed before the problem. It is likely that the user updated the system to a more modern version, or there was mechanical damage. All these factors must be taken into account.