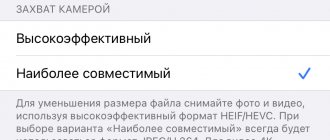
One of the main innovations of the iPhone 11, iPhone 11 Pro and iPhone 11 Pro Max turned out to be cameras. The first one received a double main module, and the last couple - a triple one. Now the manufacturer’s current smartphones have a wide angle with an aperture of ƒ/1.8, an ultra-wide angle (120°) with an aperture of ƒ/2.4, and a telephoto with an aperture of ƒ/2.0 - all with a 12 megapixel matrix. But in addition to fresh hardware solutions, the gadgets also received redesigned software tools for creating pictures and videos of the best possible quality. Oddly enough, all of them turned out to be exclusive to the new iPhone models - the rest did not receive them even after switching to iOS 13.
Subscribe to our Telegram
Subscribe to our Telegram
Most of the new features of the iPhone 11, iPhone 11 Pro and iPhone 11 Pro Max that relate to shooting are based on the work of neural networks - the new Apple A13 Bionic processor is responsible for them. Even after several months, it remains one of the most productive solutions that competitors today are just trying to reach. It is with the help of the new productive chip that one can explain the limitation of shooting chips to only a narrow circle of new smartphones - at least from a marketing point of view. However, some of them are actually related to the hardware features of the gadgets. Here are the top ten.
Change the aspect ratio of a photo to 16:9
Before the release of the iPhone 11 and 11 Pro, Apple smartphones had only two aspect ratio options for photography: 4 to 3 and 1 to 1. On current gadgets, they also added the ability to shoot in 16 to 9 format. The new format allows you to capture more of the surroundings in the frame space in height or width. With its help you will be able to get an excellent shot of any hills, vast mountain ranges, local attractions in historical cities and more. Interestingly, the new aspect ratio can also be used in conjunction with the ultra-wide-angle camera.
Example photo with 16:9 aspect ratio - taken on iPhone 11 Pro
How to do this: open “Camera”, expand the quick settings menu by swiping up from the bottom edge of the screen, click on the button to change the aspect ratio, select the “16:9” option.
Beastgrip
There are other options for attaching lenses, from a simple clothespin to a special rig, that is, a hard case on which you can hang not only lenses, but also lights and other equipment. The most famous mobile rig is made by Beastgrip. It is universal and suitable for most smartphones. The design allows you to place light, an external microphone, and lenses on the body. This rig is mostly needed for video shooting, which is why it has such a massive design and grippy handles for two hands. But this is an almost professional story, for those who want to shoot mobile films or film travel, so the prices here are appropriate. The rig itself costs $140, lenses will cost another $40 to $150. But the most amazing thing is that Beastgrip has adapters for lenses from full-fledged cameras from Canon, Nikon and other companies. If you decide to shoot movies on a smartphone, then be sure to take a closer look at Beastgrip. By the way, if you use other lenses, share your technique in the comments.
Start shooting video as quickly as possible
In the Camera application, which has been significantly updated in the iPhone 11 and 11 Pro, the principle of interaction with the shutter button has changed. Previously, pressing it for a long time launched the burst mode, with the help of which it was possible to take a whole set of frames in order to select the most successful one. This turned out to be useful if there was a desire to capture an interesting moment in active sports competitions. However, high-speed shooting with a forced minimum shutter speed killed the quality of the photos, which most often turned out to be too blurry and noisy. Now the same action starts video recording, which is much more practical.
The quick video recording mode is especially useful when you need to create a short video for social networks or instant messengers. There is a possibility that the developers from Apple spotted the implementation of this feature on Instagram - this is how stories are created there.
How to do this: open the “Camera”, hold your finger on the shutter button to start video recording and release it to stop it.
By the way, if you swipe the shutter button to the right corner of the screen, you can lock the video recording mode so you can continue shooting without holding your finger.
Tip #7: A digital grid will help you use the Golden Ratio rule
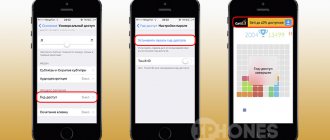
Using the Settings > Camera menu, you can activate the so-called “Grid”.
These are thin guide lines that appear on the display. The grid makes it easier to follow the Golden Ratio rule when shooting, which will give you the opportunity to create very interesting photographs. Starting with iOS 11, the grid comes with a level. An indicator will appear in the central of the nine rectangles formed on the screen - you will see two crosses. If the image is aligned correctly, both crosses will be located on top of each other.
Special filter applications will help you edit and improve your photos.
ichip.ru
Take photos while recording videos
It was possible to take photos while recording a video before, and this feature was retained in the iPhone 11. For this purpose, there is a separate shutter button, which appears after the start of recording a video in the lower right corner of the screen.
How to do it: open “Camera”, start recording video, take a photo using the small additional shutter button in the lower right corner of the screen.
OS13 Camera – Cool i OS13 camera, effect, selfie
QR Code
OS13 Camera Cool i OS13 camera effect selfie
Developer: Cool Launcher App Team
Price: Free
As the name implies, the developer was inspired by the iPhone camera when creating the program. The application has the familiar iOS interface, as well as many beautiful filters and effects.
OS13 Camera is primarily suitable for taking selfies, as it has a wide range of tools for enhancing and beautifying your photos. If necessary, you can use the beauty function to correct skin imperfections.
Using the built-in photo editor, you can quickly process images, creating beautiful and stylish photos.
For users with some experience in photography, there is a professional mode in which you can adjust exposure, white balance, ISO and other parameters.
Advantages:
- Convenient built-in editor with a large number of tools.
- Wide selection of filters.
- Beauty function.
- Availability of professional shooting mode.
- There is an album manager.
Flaws:
- A large number of advertisements that appear after almost every action.
- Some useful functions, effects and filters are available by subscription.
Capture panoramas with an ultra-wide-angle camera
“If you can’t fit everything you need into the frame, just zoom in. When shooting with the new ultra-wide-angle camera, the image area is quadrupled. It can be compared to walking far back. Now mountain peaks, high spiers, and endless horizons will be included in the frame.” (Apple)
Few people noticed that with the release of the iPhone 11 and 11 Pro, it will be possible to shoot panoramas not only using the main wide-angle camera, but also through the additional ultra-wide-angle camera. This will make it possible to fit even more into the photo both within the city and beyond.
Example of a panoramic photo on iPhone 11 Pro using the ultra-wide camera
How to do this: open the “Camera”, switch the shooting mode to “Panorama” using horizontal swipes, switch the zoom to “0.5x” mode.
External lenses
Any novice photographer and videographer can easily do without tripods and stabilizers, but external lenses are absolutely necessary. Fortunately, today there are dozens, if not hundreds of options for different lenses on the market, from the cheapest to the most expensive and almost professional. Lenses are needed to expand the capabilities of built-in lenses. Most smartphones are equipped with lenses with a focal length of 24 mm. Add to this the inability to change the aperture and you get a rather limited camera, perfect for shooting landscapes. But for indoor photography you will definitely need a wider angle, and for portraits a telephoto lens. This is exactly what external lenses allow you to achieve. A telephoto lens will give more depth and add volume, fisheye will allow you to achieve unique shots indoors or when photographing people, and a wide-angle is indispensable for photographing architecture.
Capture an image outside the viewfinder
One of the main differences between Apple and other companies is that it does not add technical innovations to its devices just for show. Instead, it tries to squeeze the maximum out of every hardware feature of the device. This also applies to the ultra-wide-angle camera in the iPhone 11, iPhone 11 Pro and iPhone 11 Pro Max.
iPhone 11 supports out-of-frame photo capture. If there is enough lighting, the smartphone takes two pictures at once: with the main and ultra-wide-angle cameras. The gallery only displays photos taken with a regular camera, but you can go into the editor and expand the main image by attaching part of an ultra-wide-angle photo to it (it is stored in memory and is automatically deleted after 30 days). To do this, use the cropping tool - the main thing is to enable this function before you start shooting.
How to do this: open “Settings”, go to the “Camera” section, switch the “Capture photos outside the frame” and “Capture video outside the frame” switches to the active position.
How to get the coolest photos from the iPhone 7 Plus camera
Many rightly criticize Apple for its too simple camera application, where even the video quality cannot be set without going to Settings, not to mention manual modes. Previously, one could have said, “You don’t need this,” but with the release of iOS 10 the situation has changed.
Developers gained deep access to camera settings in iOS and began creating and updating applications to new standards. Why put everything into one application when you can let programmers create and users choose? That's probably what Apple thought, and there's a grain of wisdom in it.
The cult phrase “There is an app for that” sparkled with new colors like never before in the case of the iPhone 7 and iPhone 7 Plus. They have the most advanced camera modules, image processing chips and P3 profile displays.
Well, here are the best photographic applications for these smartphones.
The most convenient application with a huge number of settings: manual settings for focus, shutter speed, exposure and light sensitivity, separate focusing and exposure by tap, several shake stabilization modes, switching lenses for iPhone 7 Plus, support for RAW shooting (as well as RAW+JPG) and P3 profile.
A bonus is tactile feedback , which adds an analog feeling when working with the camera. It's like you're flipping real switches and levers.
You can separately purchase modes for taking photos in poor conditions and HDR. One of the unusual things in the standard set is a barcode scanner.
There are several nuances: full manual settings and RAW shooting are only available when using separate lenses. The dual camera mode involves minimal intervention in the shooting process.
In general, this application perfectly complements the dual camera capabilities of the iPhone 7 Plus, without cutting them down in any way. Even the optical zoom was retained as in the original camera.
In the case of this application, there is no dual camera mode at all - only separate lenses, only hardcore. The interface is less visual, but it is entirely in Russian, and there are even more settings than in the previous program. In addition, there is the ability to process RAW images immediately after shooting within the application.
To display them in a standard gallery, a JPG is embedded in the DNG file, the quality of which can be adjusted. ProCamera does it differently: the standard gallery displays two photos - a regular JPG and a DNG with built-in JPG. The downside is that the built-in image is of low quality even at the maximum setting.
But there are a lot of bonus modes: you can make 3D animations (wigglegrams), record videos with a more flexible choice of frame rate, and take interesting photos with blur or light trails in slow shutter mode.
Thus, this application is more suitable for enthusiasts who need maximum functions in one program. The tactile feedback is just not enough.
It's the easiest app for shooting and processing RAW on the go. There is only exposure and focus adjustment. It's as if the iPhone camera shot in RAW by default and couldn't do anything else.
The main feature of the application is the ability to directly publish photos to the 500px service, including for selling images, as well as work on special assignments from global brands.
Not a bad tool for a professional who already works with 500px and wants to use the iPhone as an additional camera.
This is not only a popular photo processing application, but also a good program for shooting them in RAW.
You can select lenses and play with manual parameters. The photos are saved in DNG, but there is one problem with this: you can only work with them inside Lightroom itself or send them directly to Creative Cloud , and only then pull them out on your computer into desktop Lightroom or Photoshop.
In general, the application is for those who are tied to the Adobe ecosystem, but need a convenient means of processing RAW photos on the go. ProCamera, for example, can export to Creative Cloud.
The popular app and photography community has become more photo-centric and offers the ability to shoot and process RAW photos with full manual settings and manual focus.
Combined with subscription filters, VSCO X can be a great tool for a mobile photographer. The downside is the confusing settings and unclear icons.
Application designers are on their own wavelength and with each update they only complicate the user experience.
A minimalistic application with tactile feedback and a simple interface. Shoots RAW+JPG and allows you to apply filters in real time by simply swiping across the screen.
This is very convenient and does not force you to worry about image processing, choosing immediately the appropriate style for your mood and environment. A brief description will help you understand them.
There are a lot of manual settings, there is switching between lenses and even support for Live Photo . There is only one downside - the application heats up the iPhone 7 Plus and sometimes slows down. The rest is all positives.
The most popular app for shooting in poor conditions, it literally works wonders. It stitches several photos with different exposures into one - that's all the magic.
With the release of iOS 10, the application received advanced manual settings with ISO and exposure adjustment, as well as support for shooting in RAW, switching lenses, the ability to select the number of frames for stitching (from 10 to 99) and tactile feedback.
A must-have for those who like shooting stationary objects in not the best conditions.
The first photo editor to add P3 profile to its filters. You are very familiar with its capabilities, so I won’t describe them. The only thing missing is RAW processing. And for some reason the promised support for optical zoom in Stories was never added.
A popular application owned by Google. It can do everything you need for processing and even more, but the main thing is that it supports RAW. Seriously, I don't know what might be missing here.
Of course, none of these programs will replace a professional camera, familiar desktop applications and other tools of a real photographer, but in some situations they can be at least a good alternative.
In the end, it is not the camera that takes pictures, but the photographer, and the annual awards in the field of mobile photography only confirm this. Be creative and don't be afraid to experiment.
(5.00 out of 5, rated: 1)
www.iphones.ru
Control the use of Deep Fusion mode
“iOS 13.2 introduces advanced image processing system Deep Fusion, which uses the Neural Engine built into the A13 Bionic chip to capture photos with improved rendering of fine details and textures and reduce noise in photos taken in low light conditions on iPhone 11 , iPhone 11 Pro and iPhone 11 Pro Max.” (Apple)
One of the main innovations of the “Camera” of the iPhone 11 and 11 Pro turned out to be the Deep Fusion mode, which Apple pushed especially hard at the presentation of new gadgets. But it didn’t appear immediately after the launch of sales of new smartphones - the company postponed it until iOS 13.2. Using neural networks and a mode that automatically triggers in low light conditions, new smartphones can create photos with as much detail as possible. But few people know that it does not work with the ultra-wide-angle camera, so even its indirect use should be excluded.
The first image is an example of a shot taken on an iPhone 11 without Deep Fusion, the second is an example using Deep Fusion
How to do this: open “Settings”, go to the “Camera” section, turn the “Capture photos outside the frame” switch to the inactive position.
Light
To take photos and especially videos, you will definitely need an artificial light source. For example, a small LED lamp. There are a great many of these today, from 10 dollars to infinity. Some of the most famous companies include Youngnuo, Manfrotto, Godox and iKan. This light will also help with artistic photography, is suitable for key light when photographing people, and will help for night vlogs. The most famous mobile light is the Manfrotto LumiMuse8. This is a very compact lamp with its own battery and the ability to attach diffusers and filters. But this model costs $120, so if you have a limited budget, then it is better to take a closer look at inexpensive Chinese solutions.
Set shutter speed for night mode
In conditions of extremely low ambient light, iPhone 11 and 11 Pro activate night mode - this is one of the most anticipated features of the new Apple smartphones. It simulates the use of a long shutter speed to get the best possible photo - it takes several pictures and stitches them together using neural networks. The output is a picture of very good quality. The Camera can set the shutter speed automatically, but you can change it to get a creative effect - for example, draw something with a light source directly in the air.
Examples of using night mode with different exposure times on iPhone 11 (source Mashable)
How to do this: open the “Camera”, make sure that the night mode is active (yellow icon at the top of the screen), click on the corresponding button and adjust the shutter speed - the maximum level will change depending on the intensity of the external light.
Focos
Focos specializes in such a promising area as computational photography. The program uses complex algorithms to simulate the properties of expensive lenses. As a result, you can get, for example, a stylish bokeh effect even on an older iPhone. Please note that most of the functions are paid.
Focos
Bending Spoons Apps ApS
Price: Free
Download
Price: Free
Currently reading