You can create a folder on Android in all versions of the operating system. On later versions, as well as on Samsung or Lenovo, a large number of files are generated. There are different ways to create folders, depending on your usage needs. On the desktop, menu bar or drive, this function groups shortcuts and applications according to specified parameters.
Create a folder on your phone's desktop
Folders on the desktop are designed to increase free space on the screen. With their help, you can distribute applications into convenient groups. Sorting can be done by importance, topic, frequency of use of the program. To correctly create folders, we recommend that you read the instructions:
- Select two applications of interest.
- Click on the program icon until vibration appears (or before it starts moving).
- Layer one application on top of another.
An icon named “Folder” now appears on the display. By clicking on it you can see the combined applications. If you need to add a new program, then drag it to this location.
To change the name of a shortcut you need to do the following:
- Click on the folder name .
- In the window that appears, delete the old name and enter a new one.
- Click on any area of the screen.
After carefully reading the manual, there should be no questions left about how to create a folder on the Android desktop.
Typical actions with a new element
An important advantage of the system is working with files and folders to optimize the space of the gadget. However, in practice it is difficult to get to the file zone, so program managers are installed.
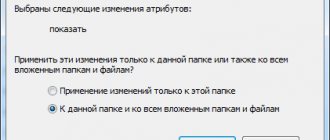
To completely delete a directory storage with attached files or applications, just tap on the icon and, while holding it, move it to the trash can at the top of the screen. You can also move internal files to your desktop. The directory will automatically disappear after being emptied. This option does not work on all shells, so users are offered an alternative.
To combine shortcuts into one directory on the workspace, using a standard launcher, you can move one icon to another. In place of the second shortcut, a new storage file appears, in which both icons are located. The user taps on the shortcut, holds it down with their finger, and quickly drags.
To add to the catalog, you need to open the icon, then click on the “Add” icon. You can hide data that is not intended for third parties on Android using a file manager. To do this, the user needs to find and open the file, then select an item to rename from a large list. Using the keyboard, a dot is placed before the name without a space.
In the item “Show hidden files” you need to uncheck the box. To view hidden files, the checkbox is reactivated in the settings.
To classify information, a password is set on the directory . You can create a private folder on Android (for example, obb) using additional tools. To do this, you need to download the KNOX, Apps Locker Master or Smart AppLock applications. Each option serves a specific purpose (password protects photos, videos or text files).
Creating a folder using your computer
In order to make a folder on Android, you don’t have to use only your phone. You can use a computer or laptop. To do this, connect the device to the PC via a cable and follow the instructions:
- Open the Start .
- Go to the “ Computer ” section.
- Find the “ Portable Devices ” tab and click on the connected phone. If the smartphone is not displayed, then wait a while.
- In the window that appears, select the location of the folder (SD card, internal memory).
- Right-click on a free area of the screen and click “ Create folder ”.
- Enter the name and confirm the changes with the “ OK ” button.
After completing all the steps, disconnect the phone from the computer (don’t forget to select “ safely remove hardware ”) and check for the presence of the folder.
Programs that allow you to create an album in the gallery on your smartphone
The App Store and Google Market offer a huge number of third-party applications and file managers. They differ in functionality and user-friendliness. You can read more about these and other applications at. All programs will require you to give access to your phone files. Let's look at how to create an album
using additional tools
in the Android
.
OI File Manager
When you turn on the program for the first time, you will be asked to confirm your acceptance of the license agreement. To make a new folder, click on the button in the upper right corner and select the last item in the pop-up menu. Enter the name and click “OK”.
FolderSync
When you first launch, a welcome panel will appear with a thank you, license agreement, and an overview of new features. The main feature of the program is the synchronization function between cloud services and local network drives.
Click on the “File Manager” item. A window will appear with a list of all files on the smartphone. Click on the green plus icon at the bottom right of the screen. Enter a name for the new folder.
File Expert
A nice manager with sorting files into several categories depending on the format. Click on the blue button. From the context menu, select “New Folder” and give it a name.
QuickPic
A convenient application for viewing photos and images. If necessary, the user can not only make new directories, but also hide favorite directories. Select the button with three dots in the upper right corner. Click “Add”, a window with a list of folders will appear. Click on the inscription “New” and give a name. An album will appear on your smartphone into which you can transfer photos.
What can you do with the folder?
Manipulating folders on Samsung a30, a50, a51 and other models is needed to conveniently use the smartphone’s memory and expand the capabilities of working with files, music, and documents. You can create new sections or delete unnecessary ones, hide and protect them from viewing.
Removal
Removing unnecessary files helps structure the contents of the internal memory of your device or SD card. In order not to search for individual documents, images or applications in different directories, you can place them in one and delete them all at once.
The Android operating system provides 2 types of folders - directories on the desktop and in the file system itself. To remove a group of icons from the main screen, after a long touch, drag it to the “Remove from screen” item. You can remove a directory from the file system in the following way:
- Go to Explorer. It may be called "My Files".
- Select the desired directory with a long press.
- From the menu that appears, select “Delete”.
All files located in this directory will be erased. Therefore, before deleting, it is important to make sure that the section does not contain the necessary information.
Hiding
Samsung phone users can hide files and documents by setting up a hidden folder. To do this, you need to go into the internal storage. There is no special function in the directory settings that allows you to create a hidden section. However, this can be done during the naming process.
- Go to the application viewer. To do this, swipe up from the very bottom of the main screen.
- Select "Settings".
- Find the line “Battery and device care.”
- Go to the “Storage” section.
- Click on the 3-dot icon, and then continue by selecting Advanced. After this, “extended storage” will open.
- Select Files.
- Tap the 3-button icon on the right side of the screen and find the “Create Folder” option. To hide a newly created section, put a dot before the name of the new section.
The created partition will be stored in the selected storage branch, but it will not be visible until you set “Show hidden system files” in the settings.
Setting a password
Only setting a password allows you to ensure deep data protection. This method is called "Secure Folder". It is available in most models, including new ones such as the Samsung M31 or A70. To create a directory you need:
- Launch the Settings application and find the Biometrics and Security section.
- Find the line “Secure folder” and click. After that, click “Accept”.
- The next step is setting up a protected partition. You need to select the type of blocking and click “Next”.
- All that remains is to draw a graphic key and confirm the set password.
After creating a protected directory, a corresponding shortcut appears on the applications screen.
Computer
You can also create directories on a memory card or internal storage of Android using a computer. This way, by the way, is very convenient for sorting music. But you can also make a system folder “obb”.
- Connect Android to your computer as a media device.
- Open the memory card and create a folder in the root. If you need to create an "obb", go to the "Android" directory.
You can create a catalog of music in the same way. Place albums in folders in the “Music” directory on a memory card or internal storage so that the songs are structured in the Android player. If the built-in player does not display the directory structure, download a third-party application for playing music from the Play Market.
How to hide or put a password on a folder
AppLock app
Instructions:
- Download and install the application from the Play Market https://play.google.com/store/apps/details?id=com.domobile.applock&hl=ru.
- When you first launch the utility, you must enter a pattern key to protect this program and all files where the password will be set.
- Enter your current e-mail and click “Save”.
- In the main window of the utility, find the “General” tab, then go to “Gallery” (here you need to specify the software used as such, for example, “Google Photos”). Click on the open lock icon.
- We grant the application permission to access information by clicking on “Allow” in the displayed window. Then we find it in the settings menu and activate the switch next to the line “Access to usage history”.
- Now the “Gallery” will become locked.
- If you try to launch the software, you will be asked to specify a pattern key.
Such a lock will function as long as the AppLock utility is installed on the phone. After deleting the application, the lock disappears.
Read How to extract photos or extract files from a protected folder on a Samsung phone
How to create a folder on Android
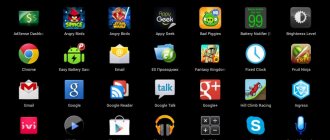
How to create a folder on Android . Any active user of a mobile device is probably familiar with the situation when the number of icons for installed games or applications exceeds the capabilities of the screen so much that a completely logical question arises - how to create a folder on Android to make searching for the desired program as convenient as possible.
Using standard tools
In order to combine shortcuts into one directory on the desktop of an Android smartphone (when using a standard launcher), we need to drag one icon onto another, and in place of the second icon a new folder will be formed in which both icons will be located. To do this, click on the desired icon, hold your finger for a couple of seconds and, without releasing, drag:
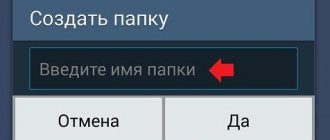
If we need to drag other icons into the same folder, then we need to open the folder by clicking on it and touching the + icon (“ Add ”). Select from the list that opens the icons of those applications that we want to combine in one folder and click “ OK ”. If we want to give the folder a name, then click below the name that this folder received by default (in the screenshot “ New folder 2 ”). A keyboard will open, with which we will give a name, after which we press the “ Done ” button:
To launch the application, open the folder by touching your finger and click on the icon of the desired application.
To return the program to the desktop, from the open folder, also by pressing your finger, pull out the desired shortcut onto a free space on the display.
Creating a Folder in TouchWiz
If the Android device uses the shell from ( TouchWiz ), then we can use one of two methods to create a folder.
The first option: click on the free space on the display until the menu appears and select the “ Folder ” item.
And in the second case, call up the context menu on the desktop, where we select the “ Create folder ” option.
After this we will need to set the folder name:
Using the built-in file manager
A file manager (can be “ Manager ”, “ File Manager ”, “ Files ” or “ Explorer ”) is a special utility designed to work with the file system of a smartphone. File managers can be pre-installed (built-in) or installed by users.
The standard Android device manager (or rather its icon) is located in the main menu. Having opened the program, we will be taken to the “ Memory ” section, here we need to choose where exactly we will create the folder, in the internal memory or on the SD card. After the choice is made, a list of files in this storage will open, and in the lower left corner there is a folder icon with a + sign, click it, the keyboard will immediately open and a window in which you need to enter the name of the folder, then in the lower right corner of the display press the button " Ready ":
Using a third-party file manager
If you have already installed an alternative file manager or the capabilities of the built-in one do not suit you, then for the task at hand you can download the necessary software from the Play Market or directly from our website. We will look at the process of creating a folder using the ES Explorer application as an example.
So, our actions should look like this. We launch the utility, go to the “ Device ” section, there we see all our folders, and on the left, on the bottom panel, the “ Create Folder item , then, using the keyboard that appears, set name, click the “ OK ” button (maybe “ Done ”), that’s it, we can use the created directory:
Creating the obb folder
Active users of mobile devices running Android OS who download various gaming applications from different sites know that often, along with the installation apk file, a folder containing the game cache is downloaded, which is placed in the obb directory.
As a rule, this folder is absent in smartphones, and if the game is downloaded from Google Play, then this directory is created automatically, but in cases where the download is performed from third-party sites, then you need to create this folder yourself. There is nothing complicated about this, and the procedure can be performed in any of two ways, which we will now discuss.
The first is using a file manager (see above), standard or installed, that’s not the point. Open the manager, select the item “ External / internal memory ”, open the “ Android ” folder (it is in it that you need to create the “ obb ” directory), in the lower left corner click + “ New folder ”, enter the name of the folder “ obb ”, press the button “ Save " and in the lower right corner " Done ":
The second method involves using a computer, how to create the obb folder using this method, read below.
Using a computer
It is very convenient to create folders using a PC.
If we need to create one in the internal memory of the gadget, then for this we need to connect our Android to the laptop with a USB cable. We wait a few seconds for the PC to detect our gadget. Then click “ Start ”, open the “ My Computer ” section, find your mobile device and double-click on it with the left mouse button:
We see the file section of our smartphone, open it like any folder by double clicking:
Then, either on an empty space, or by opening the desired directory, click on the free space in it, and in the window that opens, select the “ Create folder ” item:
If you need to create a folder on an SD card, then first make it on the computer desktop and set a name (I created the Grand-screen folder, but you can use any other folder, for example, the obb folder) and, using a connection via a USB cable:
In the window that appears on the PC desktop, open the device to view files:
All folders that are in our drive will open. You can directly transfer the created folder here from your computer desktop, or we can (if necessary) open the desired directory and move it to it:
After this, we will see that the folder that we just created has appeared on the SD card of the smartphone:
How to create a folder in the gallery
To create a folder in the Gallery to organize your photos, we again turn to the file manager. We create a new directory, set a name and copy or move the necessary photographs into it. After this, the system will automatically detect it as a directory containing graphic objects, and the folder will be displayed in the application.
How to hide a folder on Android
You can also hide a folder with photos or any other content not intended for prying eyes on Android devices using the file manager.
So, open the file manager, find the directory in which the folder we need is located and open it. Then (as described above) call up the menu and select “ Rename ” from the proposed list of actions. Now, using the keyboard, put a dot in front of the folder name (without a space):
After this, you need to go to the manager settings, and in the “ Show hidden files and folders ” item, uncheck the box if it was there, and to view it you will need to activate this item again in the reverse order. There are other ways to make a folder invisible, read more here.
Where to store ringtones
You can install music for your ringtone from the “Music” folder.
But if you prefer to put cut melodies on your call, then you will not find it convenient to store them with general music. And that’s why many people create “ringtones” in the “audio” folder, which previously appeared on the sdcard, where they send short clips to the call.
And another important point. If you have Android version higher than 9, ringtones are added and installed through the settings.
For those who like to watch videos:
Source
How to recover a deleted folder
Google Photos
When creating photos, all images are saved in memory, and after deletion they are placed in the “Trash”. Most users do not use the “Trash”, so all photos are deleted independently after a certain period of time. To restore a deleted folder from the gallery, follow these steps:
- Launch the Google Photos application.
- Go to the “Cart” menu.
- We look at the deleted files and select the desired folder for recovery. Then click on the icon, as in the screenshot below, to restore the folder with photos.
This method is only suitable for folders with pictures that were deleted no later than a certain time. Often, files in the Recycle Bin contain 60 days, during which they can be restored.
Read How to recover deleted photos on Android
DiskDigger
The utility scans the device's memory for deleted and existing files. To increase the effectiveness of this software, you must have root rights.
Instructions:
- Download and install DiskDigger.
- Launch the application, click “Simple search”.
- Users will be able to see existing and recently deleted folders and files. To restore the desired folder, select it and click on the corresponding button in the control panel.
Photo recovery
The utility functions without root rights, but the chances of finding a long-deleted folder are low. During the first launch of the software, the entire memory of the gadget will be automatically scanned.
Photos will be shown based on where they were originally posted. The program will show existing and deleted files at the same time, so you should be careful not to get confused.
PC program GT Recovery
For this method to function, you need to connect your Android phone to your computer via a USB cable. We perform the following steps:
- Download GT Recovery and install it on your computer.
- During the first launch, you will be asked to use the free trial mode of the software or activate a license. Click “Free Trial”.
- A menu will appear asking you to specify the types of files to recover. If you want to get pictures back on your phone, click “Mobile Data Recovery”.
- We are waiting for the scanning process to complete. After finding the device, click on it to search for pictures. The software will display the found photos, after which we select them and click “Recover”.
The effectiveness of using this utility depends on how long ago the gallery folder was deleted.
How to go to the root folder?
If you have an Android phone, download the Total Commander program from the Play market. Once installed on your phone, open the application. You will see many folders with different names, among them will be the “File System Root” folder. That's what you need.
Interesting materials:
What password should be for zoom? Which pepper is best to plant? What kind of sand is used in hourglasses? What file should I use to remove gel polish? What type of government did England have in the Victorian era? What mail server does Gmail have? What breed is the dog that starred in the movie Hachiko? What primer should I use under gel polish? What holiday is January 11, 2022 in Ukraine? Which fuse is responsible for opening the trunk on a Priora?
How to set a password
In the standard package of Android system options, setting a password for partitions or applications is not included. But we can easily install a special utility to protect programs from entry. There are a large number of such applications. The best of them are Apps Locker Master and KNOX.
The main difficulty is to find a version for your smartphone that can support the folder locking option. A program called AppLock “Gateway” creates storage for pictures and material captured on camera: launch the utility and open the main menu. All the necessary folders will be presented here. Everything that ends up in the folders will be password protected. It will be possible to open the folder only using the code.