If you do not enable Google account synchronization on Android, then you can forget about such a convenient feature as accessing contacts from any device with Internet access or creating a backup copy of data.
Next, I will look at the reasons for the lack of synchronization between Android and Google accounts, as well as errors that may appear in this case.
This article is suitable for all brands that produce phones on Android 11/10/9/8: Samsung, HTC, Lenovo, LG, Sony, ZTE, Huawei, Meizu, Fly, Alcatel, Xiaomi, Nokia and others. We are not responsible for your actions.
Attention! You can ask your question to a specialist at the end of the article.
Other ways
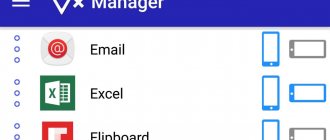
There are other ways by which it is possible to copy information. For a branded device Manufacturers use branded shells (add-ons) that provide an option.
The algorithm is executed:
- “Settings” - “Device account”.
- Activate "Synchronization".
- Check the box to activate “Synchronization”.
- The procedure applies to other devices as well.
How to disable contact synchronization on Android
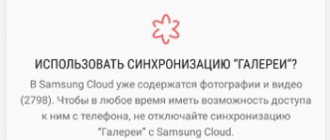
By default, when creating a backup, Android copies all settings and user data to the cloud. If you do not want to sync contacts between devices, you can disable this. Instructions:
Step 1 . From the setup menu, select "Advanced Settings". Here find the item “Backup and reset”.
Step 2 . Select “Auto-reservation” and in the page that opens, click on the line “Reservation objects”.
Step 3 . If you do not want to synchronize Android contacts, then select “System Settings”. Here, uncheck the “Contacts” line and click on the “Ok” button to confirm the action.
Step 4 . If you want to disable synchronization of other applications, then click on “Select applications” and mark those objects whose data you do not plan to save.
The names of some menus and buttons may differ depending on your device model. The same applies to the location of some sections. Therefore, if you cannot disable synchronization of contacts, then you can transfer them to a SIM card and delete them from your Google account.
Enable synchronization
Things can be quite different here. There can be a very big difference in different versions of Android. There are several options for how to connect it. Anyway. First you need to go to settings.
Next, try to find the synchronization section. If it is there, then select Google there and check the boxes of what you want to synchronize. If this is not the case, then go to accounts, select other accounts and go to Google.
There will also be a list of things you can check for synchronization. Check the boxes and confirm your choice. Basically, that's all there is to it.
Now the data will be saved in Google accounts and will also become available on your other devices.
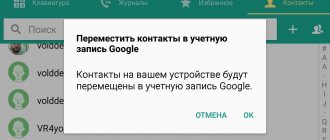
How to enable Google account synchronization on Android
Using a Google account, you can synchronize contacts, messages, photos, passwords and other user data. For example, to have access to them from another smartphone or computer. How to enable backup:
Step 1 . If there is a “Synchronization” item in your phone settings, select it. In the page that opens, move the “Auto-sync data” slider to the “Enabled” state.
Step 2 . Confirm the action. If necessary, synchronize objects immediately, limit data synchronization (for example, only via Wi-Fi ). Here you can set up individual accounts.
Step 3 . In Settings, find and select Google. Here click on the line “Backup”.
Step 4 . Move the Upload to Google Drive slider to Enabled. After this, the information on the screen will be updated, the “Start copying” button will appear, with which you can immediately create a backup copy of the data.
Step 5 . Through the settings, go to the “Advanced settings” menu. Here, find and select “Backup and Reset.”
Step 6 . In the Local Backup settings, you can manually back up your system settings or delete an existing one.
Step 7 . In the “Google Backup” section, you can select an account, auto-recovery, and configure other settings. Depending on the device model, there may be other sections here.
After that, you can synchronize Android with Android. To do this, it is enough to use one Google account on two devices. This is convenient if you want to transfer all user data from one smartphone to another.
What data can be synchronized in Google Chrome
Saving and restoring can affect almost all variables in the Chrome browser, which the user can change or configure independently. These include:
- applications;
- bookmarks;
- extensions;
- story;
- options;
- Topics;
- tabs;
- passwords;
- autofill data;
- Payment methods and addresses saved in Google Pay.
Good to know! It is not necessary to synchronize all data. We can manually select what we want to transmit to the servers and receive from there.
What to do if an error occurs during synchronization
It is not uncommon for errors to occur during file sharing. In most cases, they disappear on their own after a few minutes or after rebooting the device. But if the problem persists for a long time, you need to find out why it appeared and eliminate its cause. Most often, a failure is caused by user inattention or minor glitches in the system. To resolve this issue, as a rule, it is enough to work through several important points.
Network connection
DF-DFERH-01 - error on Android on Google Play
In the absence of a high-quality and stable Internet connection, synchronizing your Google account with Android is impossible, so you need to check the availability of Internet access, the quality of coverage and the data transfer speed. It is advisable that the smartphone be connected to Wi-Fi, but stable 3G or 4G will be sufficient.
Important! Before moving on, you should also make sure that the auto-sync option is still activated, since errors often occur due to its spontaneous disabling.
Login
Next, you need to find out whether the error is related to account problems. To do this, you can try logging into any Google service through the same profile. If you succeed in logging in, you can proceed to the next step; if not, enter your login and click on “Forgot your password?” and restore access to your account.
If only contacts are not synchronized from Google to Android, it is recommended to delete this account in the settings and log in to it again.
Google Account Recovery
Checking for updates
Often Google synchronization on Android does not work due to outdated software, so you should also check for updates. You need to make sure that the Android OS version and the following system components are up to date:
- "Contacts" program;
- Google Play services;
- Play Market;
- Google app.
Note! You can check for updates to the device’s operating system in its settings, the version of the Play Market in the parameters of the program itself, and the relevance of the remaining services in the application store.
Data cleaning
In some cases, a failure may be associated with errors in the operation of the OS or its elements. Removing the cache and temporary data will help solve the problem.
To do this you need:
- Open “Settings”, go to the “Applications and notifications” section, and then to the “All” tab.
- Find the Google program in the list and click on it.
- Click on the “Erase data” and “Clear cache” buttons.
- Perform the same actions with the “Contacts”, “Play Market”, “Google Play Services” programs.
- Reboot your phone.
Manual update
If your contacts are not syncing with Google on Android while you are sharing other files, you need to go to the Phone app and do the following:
- Enter the combination *#*#2432546#*#* into the dialing line.
- Press the call button.
Note! After these steps, a message indicating a successful connection should appear on the smartphone screen.
Synchronizing data through a Google account is an important and convenient feature that does not require complex setup and is available in most Android devices. Using the account, it uploads the necessary information to the cloud and instantly sends it to all devices running under the same profile. The option provides access to data from any linked device and allows you not to worry about its safety. But it is important to remember that for its smooth operation, all gadgets require a high-quality Internet connection and the latest software versions.
Additional data protection
To keep your device as secure as possible, we recommend creating a passphrase. By default, the account's standard password is used to access the unified database, but specifying a passphrase increases the security of the account.
Now, if Google Chrome is reinstalled or downloaded to a new device, you will need to enter not only your email and password, but also this secret phrase to log in.
Instructions:
- Open the settings.
- Go to the synchronization section, then “Encryption settings”.
- Select the option using a passphrase.
- We indicate the phrase and confirm it.
Data protection in Google Chrome
Important! If you forget a phrase, you can change it. But at the same time, all synchronization settings will be reset, and other devices will be automatically logged out of your account.
Why sync doesn't work in Google Chrome
Sometimes problems occur in Google Chrome at one of the stages of synchronizing bookmarks, history, tabs, and other things. In this case, it’s time to resort to additional corrections.
Some tips:
- If synchronization in Google Chrome is paused for no apparent reason, we recommend disabling and re-enabling the technology. It is also possible that it was accidentally turned off or stopped by the user.
- Data is not transferred between devices. There may be two reasons: synchronization is incorrectly configured on one of the devices or there is no access to the Internet. If you have access to the network, you should check your antivirus and firewall settings.
- The function is not activated. Most likely the problem is a system failure, it is better to reinstall the browser.
This is all the information you need to enable, configure, disable, and fix basic problems with the synchronization feature in the Google Chrome browser. We find the technology useful and quite convenient, so it's best to leave it turned on. If you have concerns about the security of your personal data, you should avoid using the function.
To sign in to Chrome, follow these steps
- Open Google Chrome.
- Click the Chrome menu on the browser toolbar.
- Select Sign in to Chrome
- Sign in to your Google account in the dialog box. If you don't have an account, create one.
- In the Confirm Synchronization Settings dialog box that opens, select the data to sync.
- Sync everything: Click the "Sync everything" button.
- Select specific data to sync: Click Advanced and then select the Select data to sync option from the drop-down menu.
Check the boxes of the items you want to synchronize:Programs from the Chrome Web Store.
Autofill (except credit card numbers).
- Sync everything: Click the "Sync everything" button.
- Bookmarks.
- Chrome Web Store extensions (except extensions with plugins).
- History of the universal search window.
- Passwords.
- Setup.
- Themes.
- Open tabs.
- Additional: advanced encryption settings
- Encrypt synced passwords with Google credentials , which means Google account credentials will be used to protect the passwords.
- Encrypting all synced data with a passphrase means that all synced passwords and other Chrome data will be password protected. Without the password, you will not be able to read the encrypted data.
- Click OK.
If you previously created a special passphrase to encrypt your data, you will be prompted to enter that passphrase. If you've forgotten your passphrase, you'll need to reset your sync using the Google Dashboard.
If more than one person uses the browser, add them as Chrome users so each user can set their own browser settings, such as bookmarks, programs, extensions, and theme.
Remember: Don't set up Chrome using your Google Account on a public or untrusted computer. When you set up Chrome with your Google Account, a copy of your data is stored on the computer you're using, so it can be accessed by others who use that computer. To delete your data, delete the user you are logged in as.
Deleting synced data
Synced data can be removed from your Google account at any time using the Google Dashboard:
- Click the Chrome menu on the browser toolbar.
- Select You are signed in as <your email address> .
- Under Sign In, click Google Bar.
- In the panel, select the Chrome Sync section and click sync and delete data from Google.
Syncing will be disabled , and any synced data saved in your Google Account will be deleted (but it will remain on your computer). If information from one computer, such as bookmarks, programs and extensions, is not displayed, you can log into Chrome and enable synchronization on another computer.