On mobile phones running the Android operating system, there is a special “USB debugging” mode that is disabled in the normal state, so some users are looking for an answer to the question of how to enable debugging on a smartphone or tablet.
USB debugging mode allows you to use your mobile device as an external drive: move files from computer to phone, from phone to computer, install applications, view logs.
USB debugging mode is in demand by software developers in the Android operating system to test functions and applications. Regular users will need debugging mode to operate some programs, for example, recording a smartphone screen, restoring data deleted from the phone, creating a backup, flashing device firmware, etc.
How to enable developer mode on Android
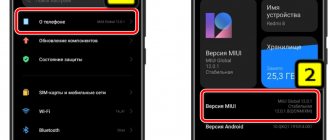
Enter the settings of your smartphone or tablet. In the settings of your mobile device, click on the “System” item.
In the window that opens, click on the “About phone” option.
In the next window, you will need to click on the “Build number” item several times in a row. The system will tell you how many more times you need to press to enable the desired settings option.
After this, the message “You have become a developer!” will appear on the screen.
Read more: Android Developer Mode: Enable or Disable
Enabling Debug Mode on Samsung Products
This is how easy it is to turn on debugging mode on most smartphones. But on some devices the developer mode is hidden. For example, this is observed on the Samsung Galaxy Note 10.1 2014 Edition tablet and other South Korean gadgets. Here you need to use another method:
Step 1 : Go to Settings.
Step 2. Go to the “About device” section. If necessary, visit the "General" tab to do this.
Step 3. Click on the “Software Information” item. This must be done on the Android 6.0 operating system. On older versions of the operating system this item may not be available.
Step 4. Pay attention to the “Build number” item. You need to quickly press it with your finger about 7 times. This will activate developer mode, which the system will immediately notify you about.
Step 5: Now go back to the main Settings menu. You will find the “Developer Options” option that has just appeared. Click on it.
Step 6. Click on the checkbox next to “USB Debugging”.
Step 7. Confirm your actions by clicking the “OK” button.
This is a simple algorithm of actions. It is noted that on old South Korean devices with Android 4.2.2 on board, developer mode may be enabled by default.
How to enable USB debugging mode on Android
After activating developer mode, a new item “For Developers” appeared in the phone settings, in the “System” section.
- Click on the "For Developers" option.
- In the "For Developers" section, activate the "Enabled" setting.
- In the Debugging option, enable USB Debugging mode.
As a result of activating this parameter, the debugging mode is activated on the mobile phone, which can be used when connecting the device to a computer via USB.
- In the warning window “Allow USB debugging?” click on "OK".
That's it, USB debugging on Android is enabled, the mobile device can be connected to the computer directly using a USB cable.
Why is debugging needed?
Before you enable USB debugging on your Android device, you should understand in more detail the features of its use and the need for activation.
Without enabling debugging, you will not be able to send any extended commands or perform additional functions to your smartphone or tablet via a USB cable.
Developers are most interested in how to enable USB debugging mode on various Android devices. They are the ones who most often enable this mode to launch the application and test it.
Even among amateurs, there are many who want to try their hand at writing mobile software, creating a simple game, a puzzle, or a more complex project. Android Studio is usually used for these purposes. But with each new innovation, you need to test it and understand how efficient it has become, whether the functionality has changed the way you wanted. The easiest way to do this is through debugging, connecting the device and establishing a connection in just a few clicks.
IMPORTANT. Testing using USB debugging is much faster and more convenient than downloading an APK file and installing it manually.
It would seem that an ordinary user just needs to disable USB debugging and never enable it, since there is no such need on his Android device. This is not entirely true.
Those who are not developers still use this mode. Largely with the goal of gaining super-user rights. Aka root access.
Those who want to use the ADB command cannot do without USB debugging. This is Andriod Debug Bridge. This command allows you to install APK files from your computer to your phone.
Interesting fact. Long before Android 10, and even versions 7 and 8 of the mobile OS, came out, USB debugging was already in use. Moreover, for such purposes that it is definitely not necessary to turn it on now. On more modern versions of the OS, including Android 8, you just need to press a combination of two buttons to take a screenshot of your desktop. But previously, USB debugging was used to create a screenshot. Now this is surprising, but before it was a common occurrence.
There are many reasons to enable a special debugging mode via USB on an Android gadget.
Now you need to find out how to do this USB debugging and where in the Android OS the corresponding activation menu is located.
How to disable USB debugging on your phone
In debug mode, you have access to the operating system, and this is unsafe. Therefore, after completing the necessary actions, it is recommended to disable debugging mode and deactivate developer mode in the device settings.
- Enter the “System” section, click on the “For Developers” option.
- In the “For Developers” window, opposite the “USB Debugging” settings item, move the switch to the “Off” position.
- Slide the switch to the Off position.
Developer mode and USB Debugging mode will be disabled in this gadget.
The developer mode option will remain in the phone settings. To remove this mode from your smartphone settings, you will need to reset your phone to factory settings, deleting data and programs. Another option: the developer mode will disappear after installing a system update from the device manufacturer on the phone.
If you reset your device, take care of data safety in advance, for example, by synchronizing with Google.
Disabling Features
There shouldn’t be any particular difficulties with how to disable previously activated USB debugging on any modern Android device.
The deactivation procedure is similar to the algorithm for enabling this mode. That is, you will need to activate developer mode by clicking on the build number several times, then enter the hidden developer menu, find the debugging section and move the slider in the opposite direction. That's it, the mode is deactivated.
It cannot be said that USB debugging is needed by the overwhelming majority of owners of phones and tablets running on the Android mobile platform. This feature is mainly relevant for mobile application developers. But some ordinary users also need it.
The main thing here is not to abuse the inclusion of this mode and activate it only when necessary. After completing a particular task, be sure to turn off the mode. You already know how to do this.
Thank you all for your attention! Subscribe, leave comments, ask relevant questions and tell your friends about our project!
Step-by-step instruction
Let's move on to directly setting up the function. There are several methods on how to enable USB debugging mode on Android. This is through the settings menu and through the PC.
Switching on via phone
- On the main desktop, click on “Settings”.
- Select the item: “About phone”.
- In the list that opens, you must click on “Build Number” many times until the corresponding gray pop-up notification appears.
- We return to the main menu and select the “For Developers” item.
- In the “Debugging” subsection, find the slider opposite “USB Debugging” and move it to the right.
- We confirm that the debugging mode has indeed been activated by clicking on the “Ok” button.
Switching on via computer
This method is relevant for owners of broken devices, since it is impossible to find and activate USB debugging with a broken screen. A computer (or laptop) comes to the rescue, but not everything is so simple here. To implement this method, it is necessary that a custom TWRP recovery (Android OS recovery environment) be installed on the device.
- Download the following programs: the latest version of QtADB v0.8.1 (must be saved directly to the root of the C: drive or the partition on which the Windows operating system is installed) and SQLite version 3 (installed in a previously created folder on the C: drive called “SQlite3_Windows”).
- Prepare a USB cable, launch TWRP and connect your phone to your computer.
- Open the pre-installed QtADB Android Manager and follow the instructions after the initial launch.
- Click on "Advanced".
- Open the built-in file manager by clicking on the corresponding button.
- On the left side of the program, go to the folder called “SQLite3_Windows”, and on the right, use the “Browse…” function and specify the following path “.../data/com.android.providers.settings/databases”.
- This folder contains a file called "settings.db". Select it and move it to the left column.
- Manipulate the command line: run it as administrator and enter the following lines in order without quotes (for example, the first line is “Enter”, etc.): enter the folder with the database “cd C:\Sqlite3_Windows”; We manipulate the settings file “sqlite3 settings.db”; activate USB debugging using the appropriate command “update secure set value=1 where name='adb_enabled'”; exit the “.quit” program.
- After that, open the file manager again and return the “settings.db” file to the right half of the program.
- Give agreement to overwrite the file.
- Restart your device.
Did the procedure go wrong? There is a solution
If suddenly a failure occurs, or the second method does not help activate debugging mode on Android, check the following:
- USB cable for all kinds of defects;
- make sure ADB drivers are installed (if installation does not occur, disable the digital signature of driver verification in Windows 10);
- smartphone firmware - the method only works for devices with the original Android build.
If one of these 3 points fails, USB debugging will not be enabled.