Modern computers use more advanced UEFI firmware instead of the traditional BIOS system. And although low-level software of the new type is already quite widespread and is actively displacing the familiar BIOS for a whole decade, not all users are accustomed to or even have time to get acquainted with the software solution. We will look at what UEFI is, what are the differences from BIOS, and how to get comfortable with the interface and proceed when installing the Windows 10 or 7 operating system.
Advantages and disadvantages of UEFI compared to BIOS
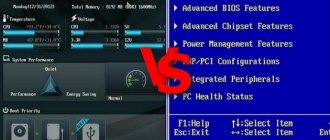
It is difficult to find a user who is unaware of the low-level BIOS program stored on the motherboard chip of a computer device. It has existed since the days of archaic MS-DOS. At the same time, the old BIOS was improved not very actively and clearly did not keep up with the evolution of the personal computer, which led to the need to introduce a new generation of low-level software. In 2007, major companies Intel, AMD, Microsoft and computer manufacturers adopted the new UEFI specification and the lion's share of PCs available for sale today uses improved firmware instead of the classic BIOS. Updating from BIOS to UEFI will not work, since the software must be supported by the hardware. At the same time, backward compatibility is present - most UEFI versions provide the ability to emulate BIOS, which may be required by users when installing a not-the-new OS that requires a BIOS.
Benefits of the new specification:
- Support for disks with a capacity of more than 2.2 TB, which is due to the use of a partition structure in the GPT partition instead of MBR.
- The OS loads much faster.
- It is possible to have a graphical interface in various languages and mouse support.
- There is an OS boot manager that allows the device to boot from drives that do not have their own boot loaders.
- The presence of a network driver, which allows UEFI to be updated without the need to start the operating system.
- Possibility of expanding functionality by installing third-party software and drivers.
- Secure Boot support.
- Functioning over a network, which makes it possible to configure or debug remotely.
The interface and functionality of UEFI may differ on different computers; many PCs today work with new firmware, but with the options and appearance inherited from the BIOS.
Among the shortcomings of the specification:
- No support for 32-bit OS. It is possible to install an old or 32-bit operating system while being compatible with the hardware by switching UEFI to BIOS emulation mode, which will also disable many firmware functions.
- HDDs with MBR partitioning are not supported (due to limitations on disk capacity up to 2.2 TB and the number of volumes up to 4, the standard is being replaced by GPT).
Bottom line
What is a good PC? No, you don’t need to imagine a device with a modern processor, a powerful video card and an advanced motherboard. From the point of view of individual marketers, this is secondary, and the main thing in a computer is a certain UEFI substance...
In fact, UEFI is by no means an attribute of coolness. This is simply new, improved software (firmware) of motherboards, which replaced the BIOS. Today, this “beast” lives on all computers released after 2010-2011, and not only on gaming ones, but also on “typewriters”. Let's figure out what UEFI is, what its global differences are from BIOS, and how to find a common language with it when installing operating systems.
How to create an installation flash drive for a computer with UEFI
To ensure UEFI booting from a USB drive, it is formatted in FAT32 format (this condition also limits the volume - 4 GB), for this reason the official Microsoft utility is not suitable for us. It can be used only when an outdated 32-bit OS is installed in BIOS emulation mode.
To install Windows 10 x64 in UEFI with Secure Boot enabled, the easiest way is to write the distribution data to a flash drive by simply copying it, for example, using Explorer. There is no need to create a bootloader on the media, since it is already present in the UEFI system.
Let's look at several options for creating a bootable USB flash drive with Windows 10 or 7 for a device with UEFI.
Creating a bootable USB flash drive for Windows 7 or 10 in Rufus
To complete the procedure, you will need a USB device and an ISO image (in the new version you can download it without leaving the program). After downloading the utility, let's get started:
- We launch Rufus, in the “Device” line, select the drive where we will write the OS.
- Click the “Select” button and indicate the image from Windows, if you have one already downloaded, or select “Download” by clicking on the arrow next to “Select”, then select and download the appropriate image.
- In the “Image Options” column, leave “Standard Windows Installation” (here it is also possible to create Windows To Go media, which will launch the OS from it without installing it).
- In the “Partition scheme” column, select the layout of the disk on which we will install the system – MBR (you will need to switch to Legacy/CSM mode) or GPT (for UEFI).
- In the “Format Options” block you can specify the media label.
- The file system will be set to FAT. It can also be changed to NTFS, but to start from such a flash drive you will need to deactivate secure startup in UEFI (Secure Boot), see below for more information.
- Click “Start”, agree that all currently located information will be erased from the drive, and wait for the file copying process to complete.
- Click “Close” to exit the utility.
Manually creating a bootable USB flash drive for UEFI
This method is suitable for users who like to work with the command line. Run the tool as administrator. In Windows 7, you can find it in standard applications; on Ten, select it from the “Start” context menu.
To make a bootable USB flash drive with Windows 7, 8 or 10, you need to write the following commands in the terminal:
diskpart list disk
We look in the displayed list to see what number is assigned to the flash drive, where we will write the OS, for example, it will be “1”
select disk 1 clean create partition primary format fs=fat32 quick active assign list volume exit
Now let's copy all the elements from the OS distribution to our flash drive. When creating a UEFI flash drive on a device with Windows 10 or 8, mount the image in the OS by right-clicking – “Connect”, selecting the contents, clicking RMB – “Send” – “Removable disk”. The contents of the installation DVD are copied in the same way.
If we are talking about Windows 7, then we mount the image with the operating system distribution using third-party software and copy the contents of the image to a flash drive. You can also open the ISO in an archiver and extract it to a removable drive.
- When creating a bootable USB drive with Windows 7 (x64), you will also need to do the following:
- Copy the efi\Microsoft\boot folder on the media to the directory above, efi.
- Using the archiver, open the file souces\install.wim, go to it along the path 1\Windows\Boot\EFI\ and copy the bootmgfw.efi element located here to your computer anywhere.
- Rename this element to bootx efi and copy it to efi\boot on the USB drive.
- The flash drive is ready for use.
Creating bootable media using WinSetupFromUSB
The program is a universal solution for writing bootable and multiboot flash drives. It can be called a professional tool, since its functionality allows you to download distributions of several operating systems (for example, Windows 10, 8.1, 7, Linux Ubuntu), as well as other useful utilities, onto one medium. But this is material for another article.
To install only one specific distribution, follow these short instructions:
- Open the WinSetupFromUSB utility.
- Select the USB drive, then click on the “bird” next to the second item with Windows and select the ISO image.
- Click “Auto format from FBinst” to erase the data on the flash drive and make it bootable. Then press GO.
- Agree with the warning about deleting all data and wait for the process to complete.
In the future, you can add more operating systems to this bootable media. Read more in the article on how to create a multiboot flash drive.
How to switch to UEFI from Windows 10
On devices with BIOS, to go to low-level software settings, you need to reboot the device and press the key or key combination assigned for this purpose, while you can also go to UEFI directly from the operating system interface. If the computer does not provide such an option, for example, the device operates in BIOS emulation mode, then we go to UEFI in the standard way - by pressing the assigned key. This is usually Del, F2, Fn+F2, etc., for different motherboards the keys or their combinations may differ, this information is usually indicated on the initial screen when the computer boots.
Let's look at how to enter UEFI from Windows 10:
- Open the “Settings” snap-in (Win + I or through the “Start” menu).
- Go to “Update and Security”.
- Go to the menu on the left to the “Recovery” tab and in the “Special boot options” block, select “Restart now”.
- After the reboot, a menu will appear where we select “Troubleshooting” (in some editions “Diagnostics”).
- Go to “Advanced Settings” – “UEFI Firmware Settings”, after which the computer will reboot immediately into the desired settings.
Determining the hard drive structure
There are two options for hard drive structure:
- MBR
- GPT
Finding out this information is very easy. You need to go through the following path:
- Right-click on the “My Computer” icon and go to “Manage”.
- Next, click on “Disk Management”.
- In the window, select the disk and open its properties.
- Select the "Volumes" tab and pay attention to the "Partition Style" item.
Ready! The structure of the hard drive has been determined and now you can proceed to the UEFI settings.
How to switch to BIOS mode to install an unsupported OS
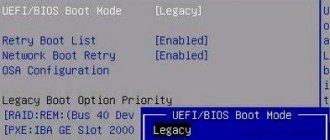
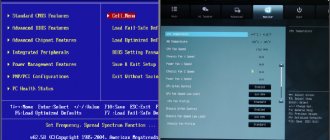
To install an old or 32-bit version of the operating system that is not supported by the new standard on a computer with UEFI, you need to switch to BIOS emulation mode. In some firmware versions it is called CSM, in others – Legacy, usually this function can be found in Boot.
It may also be called CSM Boot, CSM Support, Launch CSM, Legacy Support, Legacy BIOS, etc. To activate, move the option to Enable or select Disable UEFI Boot and save the settings.
How to disable Secure Boot
The Secure Boot option in UEFI prevents the launch of unauthorized OS and software components when the device boots by scanning the digital signatures of the boot loaders, thereby ensuring security. In some cases, it may interfere with booting the device from a flash drive when installing Windows 7, XP or Ubuntu, and therefore requires disabling. Deactivation may also be required before enabling BIOS emulation, since the settings may not initially display the option to switch the mode.
Depending on the firmware version, Secure Boot may be located in Boot, Security, Advanced – System Configuration, Authentication. To deactivate the secure startup option, move it to the Disable position. In some firmware variations, in addition to activating the BIOS and disabling Secure Boot, in the software settings you also need to specify the type of OS being loaded - “Other OS”.
Installing Windows UEFI
The installation process for an OS with the UEFI interface is slightly different from that performed in the BIOS. To complete the task, we need a drive with a distribution kit (see above for how to prepare it). The steps to install Windows 10 and 7 from a flash drive will be different, so we’ll look at each option separately.
How to install Windows 10 in UEFI BIOS
The procedure is simple:
- We write the OS image to a flash drive.
- Go to UEFI and in the “Boot Priority” section set the boot priority from a USB drive and save the changes by pressing F.
- When booting from a flash drive, the standard installation program will launch, select the language and keyboard layout, click “Install” and follow the wizard’s prompts, setting the necessary settings.
How to install Windows 7 on a computer with UEFI
Installing “seven” is not much more difficult, but you will need to do some manipulations in the settings. We do the following:
- Prepare a bootable USB flash drive with the OS.
- Go to the “Advanced” section (F7) and on the “Download” tab, in the “USB Support” item, set “Full Initialization”.
- Go to the CSM/Legacy section and set the function to Enable.
- In the boot device options, select “UEFI Only”.
- Opposite the line “Boot the system from storage devices” select “Both, UEFI first”.
- We go to the “Secure Boot” section and opposite “OS Type” indicate “Windows UEFI Mode”, then return to the previous menu.
- Set the boot priority by specifying the flash drive next to the first parameter, and press F10 to save the changes.
- Having launched from the flash drive, we will see a standard installation window; we carry out the procedure according to the prompts on the screen.
The difference between the installation for computers with UEFI and devices with BIOS is actually only in the preparation of the drive and the settings that precede the Windows installation process itself; then the installation proceeds in the same way.
Burning a distribution using the Windows 7 USB/DVD Download Tool
An old but time-tested tool from Microsoft allows you to make installation media for both Windows 10 and any other system in this family.
Advice!
For correct operation, the program requires Microsoft .NET Framework 2.0.
The program is intuitive, recording media takes 4 steps:
- Provide the path to the Windows 10 ISO file.
- Select the media, in our case it is a USB device.
- Connect the flash drive to the USB port and select it (click the Refresh button if the data is not pulled up), then click “Begin copying”.
- In the window that appears, to format the flash drive, click “Erase USB Device”, and then confirm deleting the data again by clicking “Yes”.
- Do not remove the flash drive from the USB and wait until the recording finishes.