In this article I will tell you how to flash a TP-Link TL-WR741ND router without outside help. The material I wrote will be useful to people who do not know why to flash a router and how to do it correctly at home. It should be said that, similar to the process of flashing the TP-Link TL-WR741ND router, you can flash some other TP-Link router model. Well, if you understand the principle of the router firmware process, and don’t do everything according to a template, you can flash any router.
Do not also forget that you need to flash the router only in cases where it is necessary. For example, the router freezes, loses the network or Wi-Fi turns off... In addition, you can flash a router from TP-Link or some other manufacturers if you find out that the new firmware version contains technical changes that you need to fine-tune the router, or maybe and support for some standards appeared. If everything works flawlessly and there are no technical changes in the new firmware that you need, then there is no need to update the firmware.
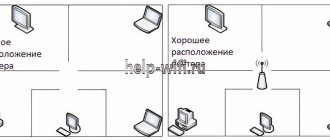
By the way, if you notice a weak Wi-Fi signal on a wireless network, this does not mean that you need to flash the router. The router may be positioned incorrectly or the signal may be affected by other sources. Try to immediately determine why the devices receive a weak Wi-Fi signal from the router or conduct diagnostics in the inSSIDER program.
Firmware is a microprogram that is located in the non-volatile memory of a computer, tablet, mobile phone, GPS navigator or any other digital computing device. In simple terms, it is an operating system, which in turn consists of many small programs. The firmware is contained in the device's permanent memory, and the process of updating it is called flashing.
By the way, before flashing your router model, you should understand well that as soon as you change the software in it, you will automatically lose the warranty from the manufacturer.
Setting up PPPoE
- On the left menu select Network -> WAN
- WAN connection type: PPPoE/Russia PPPoE
- Enter the login and password from your provider
- Secondary connection: Dynamic IP
- Connection mode: connect automatically
- Click Save
The connection is ready to use.
Setting up PPtP
- On the left menu select Network -> WAN
- WAN connection type: PPtP/Russia PPtP
- Enter the login and password from your provider
- Dynamic IP (Dynamic IP) and fill in the server IP address (issued by the provider)
- Connection mode: connect automatically
- Click Save
The connection is ready to use.
Wi-Fi setup
- On the left select Wireless mode
- Fill in the Wireless Network Name field. Latin! This will be the name of your Wi-Fi network
- Save. We ignore the reboot offer for now.
- On the left select Wireless Security
- Select WPA/WPA2 – Personal
- Set a password, at least 8 characters
- Save
- Reboot the router for the changes to take effect.
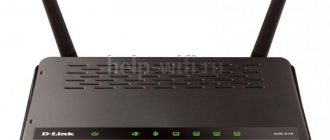
Let's look at the general connection diagram for Tp-Link WR740N / Tp-Link WR741ND. As you noticed, this article will look at setting up two routers at once, since they differ from each other only in antennas (the 741ND has a removable antenna, and the 740N has a non-removable one).
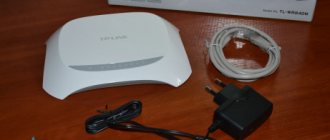
As you can see, everything is quite simple, connect the router to a 220 V power supply, then use the included network cable to connect your computer/laptop, insert the provider’s cable into the WAN port, and to turn it on, just press the Power button.
Now I propose to deal with the indication on the Tp-Link WR740N / Tp-Link WR741ND router.
Indicator - Power Off Tp-Link WR740N / Tp-Link WR741ND is turned off. Lit Power is on.
Indicator - System
On The router is booting up. Flashing The router is in operating mode. Off There is a system error
Indicator - Wireless network Wi-Fi Off The Wi-Fi network is turned off. On The Wi-Fi network is on.
Flashing Data is being transferred via Wi-Fi
Ports LAN 1-4, WAN Connection to network connectors Off The cable is not connected to the corresponding connector of the Internet center, or the network connection is not established. Lit or flashing The network connection has been established and information is being transferred.
Indicator - WPS (QSS) Flashing slowly The wireless device is connecting to the network. This process will take about 2 minutes. On The wireless device has been successfully added to the network. Flashing quickly The device has not been connected to the network. Off WPS function is disabled .
Tp-Link WR740N / Tp-Link WR741ND firmware update.
The first thing you need to start with is updating the Tp-Link WR740N / Tp-Link WR741ND firmware. To do this, connect your computer/laptop using a cable as indicated in the diagram above.
Attention!!! Firmware updates should not be performed over a wireless Wi-Fi network.
Configure your computer/laptop to automatically receive network settings . Then open any browser (IE, Chrome, Yandex, Firefox, Opera) in the address bar write the IP address of the router 192.168.0.1 , after that you need to enter a login and password to connect to the web interface, the standard login is admin, the password is admin.
After this, you will be taken to the router’s web interface; pay attention to the firmware version and hardware version.
After this, on a computer/laptop with Internet access, go to the Tp-Link website and download the latest firmware for your version of equipment.
Attention!!! Choose your version of the equipment; firmware of a different version can damage the router and disable it.
Download the latest firmware from the website.
Unzip the downloaded archive, as a result you should receive a file with extension . On the router’s web interface, go to “System Tools” - “Firmware Update” - “Browse” , specify the path to the firmware file and click the “Update” .
Updating the Tp-Link WR740N / Tp-Link WR741ND firmware will take a few minutes, eventually the firmware version will change to a newer one.
Attention!!! While updating the firmware, do not turn off your computer/laptop or router. This may damage the router and render it inoperable.
Setting up Internet on Tp-Link WR740N / Tp-Link WR741ND.
To set up the Internet on the router, you need to go to “Network” - “WAN” , then you need to specify the type of WAN connection; you can find out more detailed information from the provider’s contract or by contacting technical support. provider support. Next, depending on the type of connection, you must specify a login and password.
Click the "Save" and reboot your device. In the future, to apply all changes, you must click “ Save ”, after which a line will appear asking you to reboot the router, click “click here”.
And reboot the router.
Setting up a Wi-Fi network on Tp-Link WR740N / Tp-Link WR741ND.
In order to set up a Wi-Fi network on the router, you need to go to the web interface “Wireless mode” - “Setting up wireless mode” in the line:
Network name - specify the name of your Wi-Fi network, in this example pk-help.com
Region - Russia (indicate your region of residence)
Channel - Auto or determine a freer channel and select it; how to do this, read the article How to select/change a wireless channel on a router/router .
Mode - 11bgn mixed
Channel Width - Auto
Click the "Save" and reboot the router.
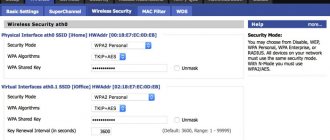
Next, you need to secure your Wi-Fi connection and specify a password for connecting to it; to do this, on the web interface, go to “Wireless mode” - “Wireless mode protection” . Select “ WPA-Personal/WPA2-Personal ” and enter a password. I recommend using a complex password - at least 8 characters with letters, numbers and special words. signs ( [email protected] #$%).
Don't forget to click " Save " and reboot your router.
Changing the password for the web interface on Tp-Link WR740N / Tp-Link WR741ND.
For more secure operation of the router, I strongly recommend changing the username and password for logging into the web interface. To do this, in the router’s web interface, go to “System Tools” - “Password” . Enter your previous login and password (login - admin, password - admin) and the new one.
Save your settings.
If you forget the specified login and password, you will need to reset the settings to factory defaults by holding down the Reset button. Please note that a factory reset will delete all your configurations and you will have to set everything up again.
After configuring the router, you can begin setting up a local network on Windows XP or Windows 7 , making a network folder or setting up a network printer .
I really hope my article helped you! Please share the link with your friends:
Port forwarding
If you want to access a specific device from the Internet, the server on your local network needs to configure port forwarding (port forwarding). Ports are forwarded to a specific IP, i.e. First you need to set a static IP address for the device. And for this you need the MAC address of the device. So.
- Launch the command line
- Type the command ipconfig /all and press Enter
- We need a physical address. This is the MAC address of the network adapter.
- Go to the router settings, on the left, DHCP –> Address Reservation
- Click the Add new button
- Insert the MAC address and fill in the IP address
- Save
Now the router will always give the device with this MAC a static IP address.
Configuring port forwarding:
If you want to set up port 80 forwarding, you must first change the router interface control port:
- On the left, select the Security section
- Subsection Remote Management
- Set another port
- Save
- Reboot the router
Actually, port forwarding:
- On the left, select the Forwarding section
- Click Add new
- We specify the ports and indicate the IP address of the computer
- Save
How to flash a TP-Link TL-WR741ND router.
To flash the TP-Link TL-WR741ND Wi-Fi router, you first need to find and download the current firmware version for the router (we are talking about official firmware). If, of course, there is a current firmware version on the official website for your version of the router. I already mentioned above that there are several hardware versions of the TP-Link TL-WR741ND router.
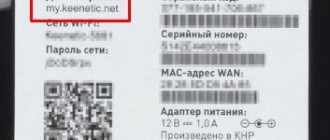
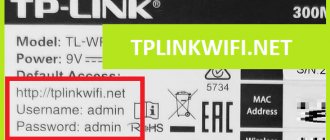
Therefore, for the firmware process to be successful, the firmware version must match the router hardware. You can see the version of the equipment on the label glued to the bottom of the router (look at the image below from the official website) and, in accordance with your version of the device, download the latest firmware version from the official Internet resource of TP-Link.
For example, if your router version is Ver 1.1, then download the firmware for V1, and if Ver 4.20, then download for the hardware version Ver4. Before downloading the firmware, be sure to look at the “Notes” line. Incorrectly selected firmware can damage the router.
Download the latest firmware from the official website: TP-LINK 741 ND.
Unpack the firmware and log into the router's admin panel. To do this, enter 192.168.1.1 in the address bar of the browser (after updating the firmware, the address may change to 192.168.1.0) and in the window that appears, fill in the user name and password (admin by default). In the System Tools , click on Firmware Update and on the page that opens, specify the location of the firmware and click the “Update” .
The update procedure may take several minutes and once completed, the router will automatically reboot. Now, at a minimum, your TP-Link TL-WR741ND router has improved stability under heavy load.
Attention! You update the firmware at your own risk. Please be aware that if the firmware update process fails, your device may become damaged.
Guys! When asking a question in the comments, indicate the auction or official patient is being stitched. In conclusion of the article, I suggest watching a video on setting up access control on the TP-Link TL-WR741ND.
Firmware update
No matter how loud the word “firmware” sounds, the process of flashing a router is very simple. You must first download the firmware file to your computer (we recommend downloading from official websites).
There is a chance that the router will stop working (the chance is very small, but it exists)
- On the left select System Tools
- Sub-item Firmware Upgrade
- Click the Select file button
- Specify the path to the firmware file
- Click Update
Preparing and flashing the TP-Link TL-WR741ND router.
To flash the TP-Link TL-WR741ND router, you need to connect the router hardware to your computer. Insert one end of the patch cord (the process and diagram for crimping a LAN cable) into the computer’s network card, and the other into one of the four yellow LAN ports of the TP-Link TL-WR741ND router.
When updating the firmware, you should never turn off the power, because this will damage the router. Also, during the firmware update, the router cannot be rebooted and updated over the wireless network. In addition, you need to disconnect all patch cords from it (except for the computer router), including the Internet cable (WAN port).
First of all, make sure that the computer and the router have a connection. That is, the computer must receive network parameters from the router. For example, you can set the IP address and DNS server parameters to “Obtain automatically” in the network settings of a computer running Windows XP or Windows 7.
To configure automatic IP address and DNS settings in Windows XP, you need to select “Start> Control Panel” and go to “Network and Internet Connections> Network Connections”. Right-click on “Local Area Connection”, select “Properties” and “Internet Protocol (TCP/IP)” and click the “Properties” button. The network settings should be set to “Obtain an IP address automatically” and “Obtain a DNS server address automatically.” Click "OK".
To automatically configure IP address and DNS settings in Windows 7, you need to go to “Start > Control Panel > Network and Sharing Center.” Select “Local Area Connection” in the window that opens, click “Properties”, highlight “Internet Protocol Version 4 (TCP/IPv4)” and click “Properties” again. The IP address and DNS server parameters should be assigned automatically.
If you already have access to the administrative control panel, then you do not need to prepare for the firmware of the TP-Link TL-WR741ND router. By the way, make it a rule to make a backup copy of the current settings before updating your router firmware. If after flashing all the router settings are lost, you can load the saved copy. Otherwise, you will have to reconfigure the TP-Link TL-WR741ND router, via the WEB interface or using the wizard (Quick Installation Assistant).
In the administrative panel, click on “System tools” and go to “Backup and Restore” and make a backup copy (you can also download it here). First of all, let's look at how to flash the TP-Link TL-WR741ND (KS) router from.