How to set up Mail.Ru mail on Android
First you need to find the Mail utility, which comes standard preinstalled on Android. Go into it, go to the “E-mail” item and click the “Menu” icon and then “Settings”. In the upper left corner there will be an “Add account” button. After this, the “E-mail supports most popular services” window will appear. There will be two lines, you need to fill them out. The first line is “Name”. It must be entered in full as name@mail.ru and mailbox password.
The next window will prompt you to select an account type. There will be 3 options: POP3, IMAP, Exchange.
For better smoothness and speed of operation, it is better to choose the second option. Consider the case where POP3 was selected.
Here another window will appear where you will need to fill in the “POP3 Server” fields. Here you need to enter pop.mail.ru. Next “Port” – enter 995, “Security Type” – SSL/TLS, and in the last column “Delete messages from the server” you need to select “Never”.
IMAP is configured in a similar way. Only in the “Port” column you need to enter 993, “IMAP Server” - imap.mail.ru, respectively, “Security Type” is the same as in POP3. We leave everything else unchanged.
After installing the protocol, the last window will appear where you need to fill in the “SMTP Server” item, you need to enter smtp.mail.ru, “Security Type” - SSL/TLS, and in the “Require account login” item there should already be a checkmark. Everything else is already filled in.
After this, all that remains is to click the “Next” button and enjoy all the benefits of your email account. It was described in detail how to set up Mail.Ru mail on your device. If there is a need to add another account, you will need to do everything described above, only change the data in the “Password” and “Username” columns.
Yahoo
The search engine and mail Yahoo was created back in 1995 in America. One of the most visited resources on the Internet. This is an American service, but it can be used in almost any country - the interface is translated into many languages, like the Google system.
How to create an email on an Android phone:
- Go to the web resource and click “Login” or “Let’s get started.”
- Click “Create an account.”
- If there is another country code to the left of the “Mobile number” field, click on the menu and select your country from the list. Next, fill out all the lines with the following data: first name, last name, login for your email address, password, phone number (starting with operator code), date of birth and gender (optional). Click Continue.
- Check the "I'm not a robot" box. Click Continue.
- The next field should already contain a phone number. If the line is empty, enter it again. Tap “Send verification code via SMS message.”
- Write the code from SMS. Click "Check".
- Wait until the service completes registration. Click "Done."
- You will find yourself in the newly created mail. To write your first email, click “Create” in the top right (in my case, “Create” in Ukrainian).
You can also register in the system through the Yahoo Mail mobile application. The course of action will be the same as on the service website. After launching the application, click “Register”. Fill out the form with your data and confirm your phone number with the code from SMS.
Through the same program you can log into your Gmail mailbox. Other email services are not available here.
Application - Mail.Ru Mail Free application - Mail.Ru - Email App v.12.12.0.30728 android apk
If you regularly use email, then the Mail.Ru mobile application
. With its help, you can simultaneously work with several mailboxes at once and not necessarily this service. You will be able to send letters from addresses on Yandex, Gmail, Rambler, Yahoo, send documents and photographs, and read incoming correspondence. Push notifications will inform you of every new message, and you will be protected from annoying spam using a special filter.
Mail.Ru application is a convenient service
which gives the following advantages
Install Mail.Ru on Android 4.4 or older, test and evaluate its performance. If you have any wishes or suggestions, be sure to send them to the developer through the application. They will help improve the service and make it as convenient as possible for everyone!
Specialized email clients
If you have only one mailbox, then the optimal solution would be to choose a specialized client for the Android OS. An example is the Gmail application, installed by default on all Android devices, or Yandex.Mail, the functionality of which allows you to use cloud storage (Yandex disk).
Yandex Mail
By installing Yandex mail on Android, you will be able to use the following functions:
- Writing and reading letters (including with attachments);
- Automatic receipt of notifications about new correspondence;
- Searching and grouping letters by topic;
- Filter for notes (“important” or “read”);
- Other.
A very popular and free agent. It works on the principle of open source, which means that anyone can participate in improving the program.
Functions
:
- Search and reading;
- Possibility of inserting a signature;
- IMAP push notification;
- Folder synchronization and email marker;
- Save content to SD card.
- Other.
Perhaps the best client for Android. There are paid and free versions available. The difference between them, in general, is insignificant: the budget option does not have a widget and independent buttons for scrolling through letters, but scrolling is easily done by swiping.
Functions
:
- Zooming in/out of emails with HTML markup;
- Modern interface with theme change (dark/light);
- Intuitive control of the buttons located at the top of the screen;
- Incoming mail filters and sorting settings;
- Other.
Mail.Ru
An email client for Android that provides all the benefits of the Mail.ru service.
Functions
:
- Flexible settings for instant notifications;
- Smart accelerated search;
- Simple and convenient interface;
- Full work with all types of investments;
- Synchronization with other devices;
- Tips for choosing contacts;
- Other.
Working with different email addresses
By downloading Mail.Ru Mail for Android, the system user will be able to perform basic actions with mail in a couple of clicks:
You can open the full text of the received letter with just one click. Moreover, information about new messages will be sent from all email addresses specified by the user. At the same time you can work with mailboxes Mail.ru, Outlook, Yandex, Google, Rambler, YAHOO! and others.
In your personal profile you will see which mailboxes the program already has access to. To add a new email address, click on the “+” icon at the top of the screen.
Mail client for multiple mailboxes
If you manage several mailboxes, then, of course, it is better to use mail clients that can service more than one mailbox from different providers. A striking example of such a client is the free myMail
.
By downloading the myMail application, every Android owner will be able to become the owner of a free mailbox in the login@my.com format. You can attach photos and other attachments to letters, write, read, reply and forward emails with one touch, managing your mail from your smartphone or tablet.
myMail
- Possibility of fast push notifications for all IMAP mailboxes with filters, privacy settings and receipt time;
- Instant search through the entire contents of the mailbox;
- Friendly interface;
- Function for convenient access to server or local contacts (hint based on the first characters of the name);
- Many other features that make working with letters simple and comfortable.
myMail is a guaranteed operation that combines the following services:
- Google Mail (Gmail with a set of cloud services Google apps);
- Rambler mail;
- AOL Mail;
- Mail.Ru mail;
- Ymail (Yahoo mail);
- Apple (Mac.com, iCloud and com.);
- Microsoft (Office 365 and Live, Outlook, Hotmail, MSN);
- Yandex Mail;
- Meta mail (Meta.ua).
- As well as any other IMAP or POP3 mail services.
Adding and setting up an account is extremely simple: enter your email and password, and the application will do everything you need! myMail automatically detects IMAP, POP3 and SMTP settings.
Setting up the built-in Android mail application
Setting up a standard email service on a smartphone running the Android operating system is not difficult at all.
If the user's email is on one of the popular email services, the program will try to automatically set the remaining settings and connect to the email server. If automatic configuration does not work, then you need to manually configure mail transport parameters, incoming and outgoing mail server names, ports, and security settings. There is nothing complicated here, but you will have to spend a little time.
Server settings
To enter server names and other parameters, click on the “Manual” button. In the window that opens, enter the provided data for the desired service. You can find them in the help section of your email client.
Configure using a standard mail program
The easiest way is to use an email application, which comes standard with the Android operating system and is available to all users for free.
You can find it by opening the application menu and selecting “Email”. You will see two fields: “Email Address” and “Password”. After filling, click the “Next” button.
A window will open with a choice of protocol, “POP3” and “IMAP”.
“POP3” allows you to reduce traffic consumption, since the user carries out all operations with letters on his computer. After downloading letters, the server automatically deletes them.
"IMAP" is more convenient, it stores messages on the server, this is useful if you plan to work with mail using several devices.
Which email to choose
There are quite a few email services that you can use to send and receive emails. Each of them has both its advantages and disadvantages.
| Service name | Advantages | Flaws |
| GoogleGmail | The most popular and reliable mail. 1. You can set up two-step verification via your phone. |
2. You can chat and conduct video conferences.
3. In the first seconds, you can cancel the sending of the email.
4. Works even without the Internet. That is, you can type a letter, and it will be sent as soon as there is a connection.
5. 5 GB of cloud storage is provided.
| Mail memory capacity is limited to 15 GB, although this volume can be significantly increased for a fee. | ||
| Yandex Mail | A popular postal service. 1. Good protection against spam. 2. There is a division into black and white lists. 3. You can send an SMS message about the letter to the recipient. 4. 3 GB of cloud storage is provided. | If the page is open during the day, you will need to periodically confirm your login and password. |
| Mail.ru | This service was once the most popular. 1. Free storage up to 100GB is provided and can be synchronized. | 1. Mail often freezes while sending letters. 2. Too much spam is missed. 3. If you do not enter your mailbox for more than 3 months, it may be blocked or deleted. |
| Rambler | This service has few advantages. 1. Clear and simple interface. 2. To protect against spam, you must enter a captcha each time you send a letter. | 1. Box with a capacity of 20 MB. 2. The maximum allowed size of any letters is 25 MB. 3. Files are downloaded one at a time. 4. Problems often arise when sending emails with attached files. 5. Sometimes letters do not reach the recipient.
To properly configure “Mail Collector”, it is recommended to first study the help section of the service. Source |
Learning to use an email account
All actions with mail take place in the user’s personal account. Through it we receive and send letters, photographs and documents.
Your mail.ru personal account looks like this:
On the left side there are folders:
- Inbox - all received messages are stored here.
- Sent is the folder where sent messages go (they are duplicated in it).
- Drafts is a folder where your unsent messages are saved. Through this folder you can restore a letter after a failure.
- Spam - advertising junk is placed here.
- Trash – emails that you have deleted from your mailbox are stored here.
The most important folder is the “Inbox”. All new messages (except spam) go into it. Messages that have not yet been opened are highlighted in bold, and those that have already been opened are highlighted in light blue.
To open a letter, you just need to left-click on it.
How to send a letter
To write and send a letter, click on the button labeled “Write a letter” in the upper left corner.
A new page will load. In the “To” line, type the email address of the person you want to write a letter to.
On a note. All addresses on the Internet consist of letters of the Latin alphabet (English). Approximately in the middle there is an @ sign, after which the mail site is written. There is no period at the end. Example
In the “Subject” line, type the subject of the letter, that is, briefly say what it is about or from whom. You can print the topic in Russian letters.
The text of the letter is printed in a large white field. If there is a lot of text, this field will automatically expand (a slider will appear on the side).
After you fill out the required lines, click the “Submit” button once and wait a few seconds. If everything is in order, a page will load that says “Your email has been sent.” A copy of the letter will remain in the Sent Items folder.
How to send a file
To send a photo or document, you need to do the same as when sending a letter normally. Namely, fill in the “To”, “Subject” fields and print the text of the letter.
But just before you click the “Submit” button, you need to add a file inside. To do this, click on the “Attach file” sign (under the “Subject” line).
A small window will appear. Find in it the photo, document or other file that you want to send and double-click on it with the left mouse button.
The window will disappear, and the letter will show the file you added.
If the file is large on your computer, you may have to wait a little while for it to download.
You can add not one, but several files to a letter. To do this, repeat the same with each of them: click “Attach file” and select the desired one from the window.
When all files are attached, click on the “Submit” button. After this, a page will load that says “Your email has been sent.” This means everything is in order - within a few minutes it will reach the recipient.
How to reply to a letter
Email has a function to reply to an incoming letter. Thanks to it, you do not need to enter the sender's address and subject. In addition, all previous correspondence is duplicated, which is very convenient.
1. Open the incoming letter and click on the “Reply” button at the top.
2. The form for composing a letter will be loaded with the “To” and “Subject” lines already filled in. The sender's text will be duplicated in the message print field. Write your text first, before the previous correspondence.
Example:
Important! It is considered good form to respond to incoming letters and save the correspondence. Therefore, it is advisable not to change anything in the “Subject” field and not to delete the previous text.
Just like when composing a regular letter, you can add files inside. And to send, the “Send” button is also used.
Configure via IMAP protocol
To configure the Mail for Android program using the IMAP protocol :
Please note that you must provide the full name of your mailbox, including login, "@" dog and domain (for example,).
If the application already has previously configured accounts, go to the application settings and select “Add account”.
Specify how often you want to synchronize mail, and also indicate whether you want to receive notifications when you receive mail, and also set up automatic settings for files attached to letters when connected to Wi-Fi;
Once all settings are configured, click Next.
I can’t log into Mail mail - what to do?
Problems with logging into mail.ru mail occur for various reasons:
- Incorrect box name;
- Password error;
- Logged in to another email;
- and others.
Now I will tell you in detail about the most common access problems and ways to solve them.
"Invalid username or password" error
This is one of the most common problems: you enter the mailbox address and password for it, and instead of letters the error “Invalid name or password” pops up.
Solutions:
- Check email address
- Copy the password using Notepad
Step 1: Check your email address. If, when entering, you type at least one incorrect letter or number in the mailbox address, the mail will not open. In addition, it is important to choose the right prefix - after all, it can be not only @mail.ru, but @list.ru, @bk.ru or @inbox.ru.
Let's say my mail address. If you miss just one letter, number or dot, the mailbox will no longer open. For example, instead of iliya.86, type ilya.86.
It is also equally important to choose the right ending. After all, even if I type everything correctly, but mail.ru is indicated instead of list.ru, the mail will not open. Because [email protected] and are two different addresses.
Please note that the address cannot contain Russian letters - only English ones. And it is written together, without spaces.
Step 2: Copy the password using Notepad. The situation with a password is approximately the same as with an address: there is only a mistake in one letter or number and it will not work. In addition, the size of the letters is also important. If you type a small letter instead of a capital letter, the password will be incorrect.
The Notepad program will help you avoid mistakes. To launch it, open Start, type the word notepad in the bottom search bar and select the program.
A white window will open. Type your password into it. Remember: there are no spaces (neither before, nor after, nor in the middle) and it consists only of English letters/numbers.
If all your letters are printed in large size, press the Caps Lock key on your keyboard once.
Then click on the "Edit" button at the top and select "Select All".
It should look something like this:
Now hover your mouse over the highlighted password, right-click on it and select “Copy”.
The password is saved in the clipboard and now you need to paste it into Mail. To do this, go to mail.ru, right-click in the “Password” field and select “Insert”.
Now that both the email address and password are entered correctly, all that remains is to click the “Login” button. If all is well, your inbox will open.
Restoring access to mail
Have you carefully entered your login and copied your password from Notepad, but your email still won’t open? Then the only way to get it back is to restore access.
But to do this you need to know exactly your address (see Step 1). If you are not sure about it, it is better to ask the person with whom you have previously corresponded. Maybe he has saved messages from you - then the address will be written at the top of the letter.
How to restore access to mail. Open the mail.ru website and in the mail login form, click on the “Forgot your password?” link.
Enter your email address and click “Recover”.
Next, Mail will ask you to perform some action: answer a security question, indicate part of a phone number or another email address. This is the data that was assigned to password recovery.
For example, the system asks you to enter two phone numbers. This phone number was specified in the mail settings. So, we write the numbers, enter the code from the picture and click “Receive code via SMS”.
A window will appear to enter the code, and it will be sent to this phone number via SMS message. We print and click “Done”.
Then you will need to enter a new password to log in to your mail and repeat it. We print and click “Login to mail”.
The password must contain English letters and numbers. There are at least six characters in total.
Immediately after this, your email account will open. Now it will be accessible using the new password.
If access cannot be restored. Often the user is unable to recover the password because the data is lost. I don't have access to my phone number, I forgot the answer to my security question.
For such cases, there is a special link in the password recovery form. It’s called “I don’t have access to the specified phone number” or “I don’t remember the answer.”
Clicking on it will open a questionnaire. It must be filled in with the data for which the mail was registered:
- Name
- Surname
- Date of Birth
- Registration password
- When was the post office registered?
- Secret question and answer
- Email for contact
Enter the information you remember and click “Continue.”
Be sure to enter a different email address in the “Email for contact” line. After all, it is he who will make the decision to restore access. If you don't have an address, register it in Yandex or Gmail.
After submitting the questionnaire, you will have to wait several business days. Usually in two or three days the administration sends a decision on your issue. If the answers were correct, you will receive an email with a link to assign a new password.
Configure via POP3 protocol
To configure the client for Samsung Android phones POP3 protocol :
Please note that you must provide the full name of your mailbox, including login, "@" dog and domain (for example,).
If the application already has previously configured accounts, go to the application settings and select “Add account”.
Specify how often you want to synchronize mail, and also indicate whether you want to receive notifications when you receive mail, and also set up automatic settings for files attached to letters when connected to Wi-Fi;
Once all settings are configured, click Next.
What is IMAP Gmail com?
IMAP is a more modern protocol that supports receiving and managing email directly on the mail server. When viewing mail using the POP3 protocol, all emails are downloaded to the user's computer and automatically deleted from the server (although this can be disabled).
Interesting materials:
How to remove colored pencil from wallpaper? How to feed Japanese quince? How to feed the lawn in early spring? How to feed cabbage so that it starts to grow? How to feed lilies for the winter? How to feed carrots in June? How to feed flower seedlings after picking? How to cover the wall near the kitchen stove? How to cover a wooden tabletop? What are the benefits of coconut and coconut juice?
Change SSL settings
To set up your Mail for Android email program using SSL security:
Launch the Email application;
Go to the application settings and click on the name of the account for which you want to change the settings;
If the mail program is configured using the POP3 protocol (the “POP3 Server” field):
SSL/TLS in the Security Type field 995 in the Port field .
If the above settings are already installed in your email program, then no changes need to be made.
Source
Instead of my mail someone else's is opened
It also happens that you go to the mail.ru website, and someone’s mail is already open there.
This happens when someone else previously entered their box and did not close it. It turns out that you see other people's letters, but cannot access your own. There are three ways to solve this problem:
- Add your box
- Log out of someone else's mail
- Login to your mailbox via incognito mode
Adding your mailbox means connecting one more mail to Mail. It turns out that you leave someone else’s mail and enter your own. Thus, two boxes will be open on the computer at once.
1. Open the mail.ru website and click on the small arrow next to someone else’s email address.
2. Select Add Mailbox.
3. Enter your address (login) and password in the window. Click "Login".
Now two boxes will be open at the same time. You can switch between them through the upper right corner of the site.
Exiting someone else's mailbox means closing it in the browser. Mail will still work, but you will close it on a specific computer.
In order to exit someone else's mail, just click on the icon with the image of a door.
Or click on the “exit” sign in the upper right corner of the site.
Of the minuses, it should be noted that not everyone remembers their address and password. And it may happen that you come out of the box, and then the person will not be able to get into it.
For example, you came to visit a friend and he allowed you to use his computer. You go to Mail’s website, and the owner’s mailbox is already open there. If you leave it, you may be doing the person a disservice. In such a situation, I recommend logging into your mail either by adding a mailbox or through incognito mode.
Login to the mailbox via incognito mode. Incognito is an anonymous mode of working on the Internet. When you work in it, your actions are not saved in the browser. This means that another person will not be able to see what sites you visited and what you looked at on the Internet.
And if you open your email in incognito mode, the data from it will not be saved on your computer. It turns out that you will check your own mailbox and not close someone else’s.
Enable incognito mode through the browser menu:
- In Google Chrome: – New window in incognito mode
- In Yandex browser: – Incognito mode
- In Mozilla Firefox: – New private window
- In Opera: – Create a private window
Or you can enter this mode using the keyboard shortcut Ctrl+Shift+N
A new window will open - usually black or gray. This is where you need to work.
Log in to Mail as usual: open the mail.ru website and enter your mailbox information. When finished, simply close the window.
On a note. After starting anonymous mode, two identical browsers will be opened at once. One in normal mode, the other in incognito.
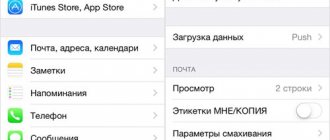
Setting up Mail.ru mail on Android
The mail client from Mail.Ru for Android provides almost the same capabilities and functions as its desktop version. Here you can send images, videos, documents of various formats, music and much more. Now let's move on to setting up the application.
Are common
Accounts
Decor
This group of settings provides parameters for regulating the appearance of the list of letters.
This was the last position in the settings of the mail client from Mail.Ru.
Having analyzed in detail and applied all sub-items of the settings, you will be pleased to work with email in the Mail.Ru Mail application.
In addition to this article, there are 12,289 more instructions on the site. Add the Lumpics.ru website to your bookmarks (CTRL+D) and we will definitely be useful to you.
Thank the author and share the article on social networks.
Source
Official application
After downloading the software from the Play Store:
Without the above permissions, the software will work with restrictions.
Next, the user finds himself on the main page in the “ Inbox ” folder. To personalize the program:
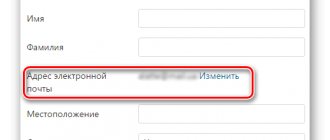
Now let's talk about how to set up Mail on Android for each user. The “ Account Settings ” section is divided into 2 tabs. The first “ Login and Security ” contains the following parameters:
The next tab allows you to change “ Personal Information ”. It sets:
The “ Mail Settings ” section is more extensive and is divided into 3 main subsections. The first " Application Job " allows you to:
The second is centered around the " Work of the Post ", which includes:
The third is responsible for “ Design ”, which includes:
The methods for setting up email on a tablet are similar to those on a smartphone.
Setting up mail using the operating system itself
So, how to set up mail on Android? Standard tools of this system allow you to receive and send letters from an attached email address, for example, the same Gmail or connecting a separate address for working with mail. We will consider both options.
The first option is Standard Mail from Google
Initially, we will consider the option of working with standard mail from Google. As soon as you add an account for your smartphone running the Android operating system, mail will be set up automatically, and all messages will be downloaded to your device, both previously read and not yet opened.
To work with accounts and configure them, you need to go to the “Settings” tab, select “Accounts and synchronization”, and then log in to the account in which your mail is attached. In this case, we are talking specifically about Google - the Gmail service, which is used by millions of people around the world.
Second option - Connecting mail from third-party services
Let's say that you use mail from Yandex or Mail.ru. What to do in this case? As mentioned earlier, the principle of operation of mail services is the same, the only thing is that some settings in the records differ.
To set up mail in any other service, you need to select the E-mail application in the main menu of the system and open it. First try logging in with automatic setup. To do this, simply enter your email address in the “E-mail” field and your password in the “Password” field. Once the data has been entered, click the “Next” button.
If the system gives an error, return to the previous point and click the “Manual configuration” button. Using the example, we will configure Mail.ru mail.
In the window that appears, enter the settings as in the picture:
For the outgoing message server, set the following parameters:
Attention! All parameters for your email client can be viewed on the official website, for example, www.mail.ru or www.yandex.ru, by going to the appropriate section. In the “Help” section, find the item that mentions setting up mail on your smartphone, and see the list of parameters that you need to register for your account.
Once all the data has been entered, you will need to click on the “Finish” button, after which the system will check the accuracy of the entered data and synchronize with the mail server. All your emails will be automatically downloaded to your phone. You can delete incoming emails from your phone at any time by first making copies. It is also worth considering that several email accounts can be connected on one smartphone, for example, if you work directly with Yandex, Mail.ru and other email services!