The This PC icon is better known by its old name, My Computer. This is what this desktop element used to be called, which provided convenient and quick access to disks, logical partitions, folders and files on a Windows computer. It was one of the most important elements of the OS graphical interface for many users.
My Computer is no longer on the Windows 11 desktop, but you can return it to its original location. Let us consider in detailed step-by-step instructions a set of methods that will allow you to return “My Computer” (“This Computer”) to the desktop of the new OS.
If necessary and desired, you can also return the shortcut to its usual name and configure the “My Computer” utility to launch instead of Explorer.
Method One - Personalize Your Desktop
Right-click on the desktop. From the context menu, select “Personalization”.
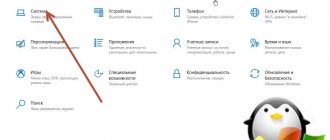
The personalization options window will open on the display. Click the Themes tile in the right pane.
In related advanced settings, click on the Desktop Icon Options tile. Activate displaying the utility icon in a new window. To confirm the changes, click the “OK” button at the bottom of the window.
Close or minimize your windows to see the This PC icon is back on your desktop.
How to return My Computer/This Computer to Windows 10 desktop
Call the context menu on the desktop (right click). In the menu that opens, select “Personalization”.
Great commanders. Hannibal Barca
After this, the “Personalization” window will open in front of you. Here you need to click on the link “Change desktop icons”. You can find this link on the left side of the window.
Next, the “Working window icon settings” window will open in front of you. In this window you need to check the box next to “Computer”.
To save the settings, close the window by clicking on the “OK” button. That's all, these simple manipulations are enough to create a My Computer shortcut on the desktop.
How to enable modular grid in Photoshop
Add a computer icon to your desktop
Windows 10 has a special function responsible for displaying system icons on the desktop. Users who are well versed in previous versions of the program know about it, but the method is slightly different.
- You need to call the desktop context menu by right-clicking. Here we select the “Personalization” item. There is also a different way to open this window: Launch “Settings” (to do this, press Win + I) and select, respectively, “Personalization”.
- Go to the “Theme” tab. To do this, click on the item in the vertical menu on the left. Next, scroll to the right side of the window and click on “Desktop icon settings.”
- Once the window opens, you can specify which icons should be displayed on the desktop and which should not. The list of icons for displaying on the desktop shows not only the computer, but also the user’s files, recycle bin, control panel and network.
- To display the computer icon on the desktop, you need to check the corresponding box and click “OK” to save the changes and close the window. Accordingly, to remove the computer icon from the desktop, you need to uncheck the box and also save the changes.
There is another way to quickly get to the desktop icon settings.
- We launch the command interpreter (the “Run” input line) by pressing the Win + R keys.
- We write the command “ Rundll32 shell32.dll,Control_RunDLL desk.cpl,,5 ” and click “Enter” or “OK”.
- Next, also select the computer icon and click “OK” to confirm.
Video
Method using the Registry Editor
The method will be useful for those users who do not have Windows 10 activated but have administrator rights.
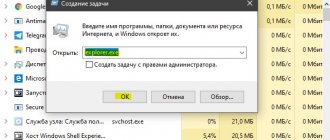
To get to the editor, you need to simultaneously press the WIN+R buttons (OS windows icon) from the keyboard.
In the window that opens at the bottom of the screen, in the “Open” line, enter the word with a small letter regedit (without spaces at the beginning and end of the word). Press Enter. Next, allow the application to make changes by clicking “Yes”.
Now, to display the “My Computer” icon on the desktop screen, you need to select folders in the pop-up window in the following sequence:
- Find and open a folder whose name contains the word “USER”;
- Find Software and open Microsoft;
- Go to Windows;
- Select CurrentVersion;
- Click the Explorer folder and then Advanced.
Each operation will be reflected by changes in the right block of the window. After selecting the Advanced item in this block with files, you need to find an object called Hidelcons. Next to it will be a combination of numbers. In it, instead of the number 32, you need to indicate 0.
Confirm action. If a file with a similar name is not in the list, you will need to create it yourself. To do this, click on the blank area of the right block. Call up the menu with the right key.
Then select “Create” and select “DWORD Value 32” from the list.
To Home screen
The icon can be placed not on the desktop, but on the start screen. This means that it will appear as one of the tiles in the main menu. I recommend starting with this method. The habit of placing everything on the desktop is outdated.
Click the OS logo button in the lower left corner. The main menu will open. Find the "Search" line.
Children's room for a boy (50 real photos)
- Open it.
In the input field, type “this computer” as shown in the illustration below. You need an application with that name on your local PC, not results from the Internet.
Lots of Christmas Gingerbread Cookie Recipes
Right-click on it and a list of available actions will open. These include the ability to pin a software tool:
- From the Home screen
- On the taskbar
- The first option is needed, but the user may prefer the second if he finds it more convenient for himself.
- The program is now available to the user in the Start menu.
Adding a computer to your desktop through the registry
There is a third way to move a computer icon to your desktop. But here you will have to do a little more steps than in the previous methods, and the procedure is somewhat more complicated. And despite the fact that this method is practically not used, still, let’s look at it.
As we know, the system registry stores all operating system settings. And you can open the parameters directly through this very registry or using third-party programs. You can also use the program's graphical interface (as in option 1, discussed above).
So, let's do the following:
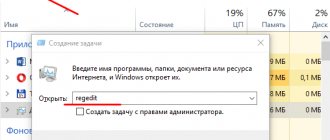
- Call the command interpreter. To do this, press the Win+R key combination.
- A window will appear where we enter the command regedit , press “Enter” or “OK”. Next, we allow the application to make changes to our device, after which the registry editor will open.
- Here in the HKEY_CURRENT_USER branch, which contains the configuration regarding the user profile, we need to go to the “Advanced” folder. The full path looks like this: HKEY_CURRENT_USERSoftwareMicrosoftWindowsCurrentVersionExplorerAdvanced There are many folders in this registry, however, their search is made easier by the fact that they are all located in alphabetical order.
- Once we are in the desired folder, find the “HideIcons” file or double-click on it.
- In the window that opens, we need to set a zero value. Then click “OK” to save the changes and close the registry editor. If the key is not there, you will have to create it (DWORD 32 bit type).
- For the settings to take effect, you need to restart Explorer or log out and then log in again.
Windows support is ending. What to do
Support for the “seven” ends on January 14, 2022. Users of this OS will have to prepare for this event and make a decision for themselves:
- Upgrade to new version
- Continue using unsupported
Previously, I wrote about how to upgrade to Windows 10 in 2022. From the material you will find out whether your PC is ready for the new operating system.
For a clean installation, you can download the Tens ISO image. I also discussed in detail the features of the download process using phones, Mac and Linux computers.
Do you prefer to get used to the new system interface or configure it so that there are as few differences as possible compared to the past?
Method two - pin the icon
First, use the first method and return “This PC” to the Windows 11 desktop. Or, place the icon on the desktop in another way that suits you. After the icon appears on the desktop, right-click on it. From the context menu, select Pin to Start.
Click on the “Start” button to find that the “This PC” icon is pinned to the main OS menu. A convenient additional way to access the utility in case there are many windows open on the screen and it is undesirable to minimize them.
Right-click on the icon in the main menu. From the item menu, select Move to Beginning.
As a result, the “This PC” icon will appear at the beginning of the pinned elements of the Windows 11 main menu. This block of the “Start” menu is intended for quick access to software you often use. Generated automatically by the operating system based on an analysis of your PC usage scenario. It does not always contain the icons that you most need. But you can add the most necessary ones yourself. The sequence of actions is similar to that discussed above.
Don't change icons for new themes
I would like to draw the readers' attention to additional important changes that may be made here.
For those who like to customize the interface. After applying the new theme, the icons on your desktop will also change. If this approach is not convenient for you, disable the option that allows themes to change icons. To do this, left-click in the box marked in the illustration. The bird will disappear from it. Afterwards, click the “Apply” button.
Method three - move the shortcut from Explorer to the desktop
Display the “This PC” system utility shortcut on your desktop. To directly access Windows 11 File Explorer, simultaneously press Win + E on the keyboard of your desktop PC or laptop. “This PC” with its subelements is located in the left pane of the file manager.
Using your mouse, touchpad, trackpad, or trackpad, drag "This PC" to your desktop. After dragging, the item's shortcut will appear there. Including along with the system icon of the same name.
The Windows 11 system icon and the program shortcut are visually similar, but different in their capabilities, elements of the OS desktop.
Remember that the functionality of the shortcut is reduced compared to a full-fledged operating system desktop icon. There is no access to PC properties; going to computer management from the context menu will also not work.
External differences are also present, albeit minor. The label is marked with an "arrow".
You need to get used to the new OS
Before changing the settings, I recommend using the “ten” for several days without changing its parameters. It is possible that you will like the interface and will no longer want to return to your previous desires.
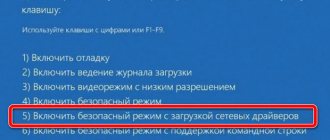
The yellow icon on the bottom panel is the File Explorer file manager. By opening it, the user gains access to files and directories. The tool replicates the functionality of My Computer.
On the left side of the screen you can go to your “Computer”.
Think about whether you need duplicate functionality and an additional icon on your desktop.
Method four - reconfigure the launch of Windows 11 Explorer
Press Win + E to open the standard OS file manager - Windows Explorer. Click on the “horizontal ellipsis” on the utility toolbar.
From the Windows 11 Explorer extended menu, select Settings.
In the Folder Options window, go to the General tab. Expand the "Open File Explorer for:" list. The default option is “Quick Access”.
Select "This PC" from the list. Confirm changing settings by clicking the “OK” button at the bottom of the window.
In the future, no matter how you open Explorer, “This PC” will open. If you need to return to the standard view of Explorer, follow the steps described above and change “This PC” to “Quick Access”, and then click “OK”.
Method five - make changes to the registry
Open the standard Windows 11 text editor - Notepad. Copy or retype into a new empty file:
Windows Registry Editor Version 5.00
[HKEY_CURRENT_USER\Software\Microsoft\Windows\CurrentVersion\Explorer\HideDesktopIcons\NewStartPanel] "{20D04FE0-3AEA-1069-A2D8-08002B30309D}"=dword:00000000
[HKEY_CURRENT_USER\Software\Microsoft\Windows\CurrentVersion\Explorer\HideDesktopIcons\ClassicStartMenu] "{20D04FE0-3AEA-1069-A2D8-08002B30309D}"=dword:00000000
Save this file with a random name and .REG extension. For example: mycomp.reg
Close your text editor. Double-click the previously created REG file for execution. The OS will ask for your consent to perform actions - making changes to the Windows 11 registry. If you haven’t changed your mind, confirm and the “This PC” icon will take its usual place on the desktop of your laptop or desktop PC.
Windows 7 support is ending. What to do
Support for the “seven” ends on January 14, 2022. Users of this OS will have to prepare for this event and make a decision for themselves:
- Upgrade to new version
- Continue using unsupported
Previously, I wrote about how to upgrade to Windows 10 in 2019. From the material you will find out whether your PC is ready for the new operating system.
For a clean installation, you can download the Tens ISO image. I also discussed in detail the features of the download process using phones, Mac and Linux computers.
Do you prefer to get used to the new system interface or configure it so that there are as few differences as possible compared to the past?
Method six - command in the Run line
You can get "This PC" back to your desktop using the command. Simultaneously press Win + R on the keyboard of your computer - desktop or laptop. In the Open: line of the Run dialog box, type: desk.cpl ,,5
Confirm the command by pressing the Enter key or clicking the OK button at the bottom of the window.
The Desktop Icon Options window opens. On the “Desktop Icons” tab, there is a block with the same name in a thin frame. Contains the names of items that can be placed on the Windows 11 desktop.
Activate the "Computer" option. Sequentially click on the “Apply” and “OK” buttons to place the “This PC” icon on the desktop of the new OS of your PC.
Experience shows that the main reason for dissatisfaction with the new OS is the unusual interface.
Read how to move the Start button back to the left in Windows 11:
Blog
How to move Windows 11 taskbar up and additional features Taskbar11 November 26, 2021
If you don’t like the new name of “My Computer”, return it to the old one.
Through Personalization
The first action is to right-click on any icon-free area of the operating system desktop. Go to the bottom of the context menu items - “Personalization”.
On the left side of the window there is a list of categories of settings for the appearance of the operating system. You need the “Themes” item.
Scroll to the right side of the window until the “Related Options” settings category appears. In this case, you need a link to the desktop icon settings. Go along it.
Navigating the GUI is not the only way to open the settings you need. A universal approach to accessing Windows 10 utilities is the Run software tool. With it, the user can open:
- Internet resource
- File
- Catalog
An alternative method to go directly to the desktop icons window:
- Press the "R" and "Win" keys
- In the input field type: “desk.cpl,5”
- Click "OK"
The second command to open the icon display settings window: “rundll32.exe shell32.dll,Control_RunDLL desk.cpl,,0”
In an additional small window, the user is prompted to place on the desktop icons for quick access to a number of operating system functions:
- Computer
- User files
- Net
- Control Panel
The Recycle Bin icon, into which files are placed for later deletion, is present on the desktop by default.
You can:
- Place “birds” to the left of the elements that need to be placed on the desktop
- Remove the “bird” to the left of the “Trash” so that it no longer appears on the main screen
- Change interface element icon
To confirm user-changed settings, an “Apply” button is provided. Located in the lower right corner of the window.
How to use the This PC icon or shortcut in My Computer in Windows 11
Renaming an icon
I have come across the question of how “This computer” differs from “My computer” more than once. It is necessary to clarify - there is no difference. The first name is current, the second is outdated. The new name of the software tool more accurately reflects modern realities. The computer you use does not always belong to you and will only be used by one person personally. A Windows device may be located in an office or classroom and intended to be shared among staff or students.
The new name of the utility may be unusual for users who have been working with PCs for a long time. There is no need to relearn in this case. Restoring the old name of a desktop shortcut is a simple task.
Place the utility icon on your desktop using any of the methods discussed in the “System Administrator’s Blog”. The approaches to renaming an icon and shortcut on the Windows 11 desktop are slightly different.
Either way, right-click on “This PC.”
Select Rename from the desktop item's context menu if you want to rename the full-featured This PC icon.
Enter: "My Computer". Then press Enter on your keyboard for the changes to take effect.
The name is classic and familiar since the days of Windows 95. But you can give the desktop element any name that makes sense to you.
The usual name of “My Computer”
If it is important for the user that the similarity with familiar operating systems is complete:
- Right click on the icon
- Item for renaming a desktop element
- Entering a common name
- "Enter"
A user-defined icon name can be used. In combination with the ability to change the icons of desktop elements discussed above, this is a convenient option for customizing devices for those users who have several computers.
The user can use those names of desktop elements that are more familiar or understandable to him. Knowing about this feature is useful if you are setting up an older user's PC.