F1 COMP en Computer magazine for beginners and professionals
Home › Internet, Wi-Fi, local networks
Hello. Recently responding to a comment on a blog, I promised to write an article on how to set up a local network via a Wi-Fi router . And since I have TP-Link TL-WR841N installed, I will write instructions using this router as an example. Although in setting up a local network between computers, the router will practically not be configured, so even if you have a different Wi-Fi router, this article will be useful to you.
Local network is a useful thing. You can exchange files, you can play games, especially since setting up a network through a router is not very difficult. If you have two or more computers accessing the Internet through one router, then there is already a network between them. And it doesn’t matter how they connect, both via a network cable, Wi-Fi, or one via cable and the other via a wireless network. Let's get started with the setup process. I will write in order what we have and what needs to be configured. Go.
Connection methods
Organization and configuration of the local network is carried out taking into account:
- characteristics and features of network equipment (router and network adapters on computers);
- the selected connection method (via copper or optical cable, wireless communication channels);
- software of network nodes - router firmware and operating systems installed on workstations.
By cable
In any case, work begins with configuring the LAN (local area network) on the router, first of all, the DHCP server (a service for distributing network addresses). Most routers come with DHCP settings out of the box and do not require any additional action from the user. To check and, if necessary, set parameters, perform the following steps (for example, for a TP-Link router):
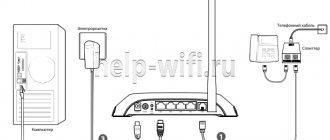
- Connect the router to the computer. To do this, connect one of the LAN ports of the router and the PC network adapter using the cable supplied. Some models use a USB connection to set up the initial configuration. These routers connect to any USB port on a PC.
- Launch the router configuration program or enter the device’s web interface (the address, login and password for logging in are indicated in the technical documentation or on the device nameplate).
- Go to the LAN item (“Local Network”) in the router setup menu and select the DHCP item.
- Enable the DHCP server if automatic distribution of addresses to network nodes is necessary. Set the pool of addresses (starting and ending) and update time for each client.
- If you are going to assign permanent IPs to network nodes, reserve addresses for each device. To do this, MAC-IP pairs are specified in the “Reservation” item.
Save the configuration and reboot the router.
You don’t have to configure address distribution, but in this case you will need to set the IP not on the router, but manually for each adapter.
For other router models, the setup is carried out similarly. Only the names of menu items and data entry fields differ.
Via Wi-Fi router
To organize a local network through a router with a Wi-Fi access point, you need to configure a wireless network on the router.
Set the configuration in the following sequence (using TP-Link as an example):
- Connect the router to the PC, enter the configuration program or web interface.
- In the router menu, select the wireless network settings item (Wireless, Wi-Fi).
- Set the network name (SSID).
- They indicate the region, channels and protocols used, exchange speed and other network parameters (if you do not have experience and a clear understanding of what values to enter and why, it is better to leave the default settings).
- Set security parameters. Here you need to specify the security protocol, encryption method and network key (password for connecting users). Recommended choice: WPA2-PSK, AES encryption, password with standard strength indicators (non-associable, at least 8 characters long, includes upper and lower case letters, numbers).
- Save the configuration and reboot the device.
After making these settings, the router is ready to perform the functions of a central LAN node and service wired and wireless connections. The remaining actions are performed on network nodes (laptops, desktop PCs and other equipment).
The need to create a local network via a router
You can do it the old-fashioned way by copying files from one computer or smartphone to another, using cords and flash drives. However, in order not to waste your time and not create unnecessary inconvenience, it is best to combine all devices by creating a home network via a Wi-Fi router.
Having a single network storage will allow you to acquire the following advantages:
- prompt exchange of information between devices;
- access to all files on different devices;
- connection for use within the network of a printer, scanner, camera and other devices;
- participation in intranet online games.
OS
Connecting to a local home or office network is supported by all versions of modern operating systems - Windows 7, 8, 10, Linux clones, MacOS. Only the settings for each specific OS differ.
To connect a PC to a LAN based on a router, do the following:
- installation and configuration of network equipment (Ethernet and wireless network adapters);
- creating and testing network connections;
- setting up the computer's connection to the network;
- allocation of shared resources and distribution of access rights.
Windows 7
Creating and configuring a network in Windows 7 is done as follows.
Installing and configuring network adapters
These steps will be necessary if the PC initially does not have integrated or discrete Ethernet or Wi-Fi adapters, as well as when replacing equipment.
After installing network cards, the operating system automatically finds connected devices and tries to install the most suitable drivers. After installation is complete, the adapters become available for use and appear in the list of network interfaces.
You can check the installation and operation of drivers in the Device Manager in the Control Panel. If the device does not work correctly with standard software, or problems arise during its installation, the driver should be updated. The correct version is installed from the disk included with the equipment or from the official website of the device manufacturer.
You need to select a driver that matches the OS version (Windows 7) and its bit depth (x86 for 32-bit systems and x6 for 64-bit systems).
If new adapters are added to existing equipment (for example, integrated), be sure to ensure that there are no conflicts between devices. If necessary, change some of the available parameters, for example, the port number or hardware interrupt (selected from the list available in the properties).
Physical connection to the network
To physically connect to the network you need:
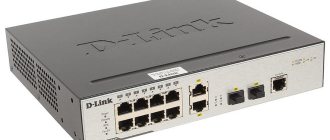
- connect the Ethernet ports of the network nodes to the LAN ports of the switch (for a wired network);
- connect to the Wi-Fi network running on the router.
Before connecting, it would be a good idea to check the equipment settings for receiving network parameters (for example, IP) automatically.
- Go to Control Panel.
- Launch the Network and Sharing Tool (Network and Sharing Center).
- In the window that opens, select the menu item “Change adapter settings”,
- Call the context menu for the desired device (click on its icon with the right mouse button).
- Select “Properties” and the “Network” tab.
- Check that the Client for Microsoft Networks services and access to files and printers on the network are running.
- In the properties of Internet protocols versions 4 and 6 (IPv4 and IPv6), set (if other settings are made) the checkboxes to obtain the IP address and DNS server automatically.
For a wired connection, just connect the ports of the router and the PC with a cable. If the equipment is configured correctly, a network connection will be established, the local network node (PC) will receive a dynamic IP address from the router pool or a static one specified in the reservation section.
This set of steps is repeated for all computers that are planned to be used on a home or office LAN. After it is completed, the network connections are checked.
For Wi-Fi connection:
- Open a list of available network connections in the tray (notification area on the taskbar).
- Select the name of the wireless network configured on the router.
- Make a connection and enter the key specified when setting up the router for authorization.
- Repeat the steps for all PCs using a Wi-Fi connection.
After completing the steps, it will not hurt to check the network connections.
Checking connections
You can check network connections from the command line of any computer.
For this:
- Get a list of used IP addresses. You can see it in the router’s web interface as a list of active DHCP clients. Another way is to run the arp –a command in the command prompt on your PC. The host IP and MAC addresses for each interface will be displayed.
- In the command line, type a command like “ping XXX.XXX.XXX.XXX”, where XXX.XXX.XXX.XXX is the IP address of the node with which the connection is being checked. If present, the packet transit time and TTL will be returned. The check is performed both for the router address and for all LAN nodes.
A successful check of all addresses indicates that the physical wired structure of the LAN has been successfully built, and packets are being exchanged between computers.
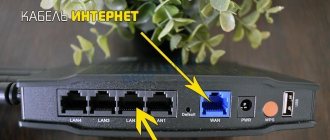
If the router is used for its intended purpose - to provide communication with an Internet provider, it is important not to confuse the WAN and LAN ports when connecting external lines and a local network. Otherwise, local broadcast traffic will enter the external network (so-called “flood”), loading communication channels and equipment ports.
Creating and setting up a local network
For computers to work together on a LAN, they must:
- belonged to the same network space (network or workgroup);
- were in the same address space (subnet) or in spaces between which routing is configured (both can be easily implemented in the router settings);
- had unique network addresses and names.
Some of these tasks (address allocation) are implemented at the stage of setting up the router and connections (described above).
Setting network and computer names is part of the standard OS installation procedure. As a rule, users treat this very formally, leaving the default values. It is possible to work with such settings, but it is inconvenient. Therefore, it is recommended to change the names (this will take no more than 1 minute for each PC).
- In the Start menu or on the desktop, open the Computer context menu by right-clicking and go to properties. An alternative option is to launch Control Panel and in “System and Security” - “System” select “View the name of this computer.”
- Follow the “Change settings” link on the right side of the “Computer name, domain name and workgroup settings” block.
- In the “System Properties” window that opens, go to the “Computer name” tab and click on the “Change” button.
- Enter a new PC name and workgroup name. It is recommended to use the Latin alphabet to avoid problems with computers running localized versions of the OS.
These operations must be performed on all workstations on the network.
Go to setting up your home network and group in the Network and Sharing Center snap-in.
- Check the category of the created local network. It must be "Home", which means that all nodes in it are trusted. If necessary, change the category “Public” or “Work” to “Home” (click on the category, select the one you need from the list).
- Go to “Select Home Group and Sharing Options.”
- In the window that opens, click on the “Create home group” button and then specify the resources that will be included in the list of shared ones.
- Complete the wizard's work.
- Reboot all PCs.
As a result, a home group will be created, in which the PCs connected to the network and the resources allocated to them will be visible (you can see it in the “My Computer” - “Network” window).
A home group is created on one of the PCs, the rest join it with a password (if password protection is enabled) or without.
Windows 10
The Windows 10 operating system before build 1803 supports a home group, so setting up a local network for it is not much different from similar actions in Win 7 or 8.
Starting with version 1803, the concept of a home group has been abolished, and setup has become easier and faster.
For this it is enough:
- Set the “Private” profile for each network connection used by the LAN, which means that only trusted nodes are included.
- Enable network discovery and configure file, folder, and hardware sharing.
If a local network is created only to provide access to files, folders, printers, creating a homegroup is not necessary for Windows 7 or 8. On these PCs, it is also enough to share resources, enable network discovery and configure sharing. Resources will become visible on any PC included in the router’s address space.
Preparation
After you have decided on a router, you should make some kind of marking, that is, determine where each of the network devices will be installed. This must be done in order to correctly place the router.
Important! When using wireless equipment, try not to interfere with the signal path from the router to the client. In the case of a distributed network (if subscribers are located in different rooms), it is recommended to install the router so that the computers are equidistant from it. In the case of using a wired transmission medium, approximate marking of the location of all network participants will allow you to prepare switching cords of the required length in advance (you can read about making network cords).
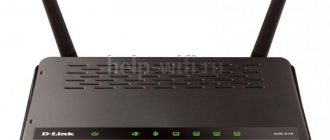
When choosing a Wi-Fi router, do not forget to check whether all computers have a wireless network card.
To connect to a wireless network, all computers must have a network card
When setting up a home network, for each subscriber, you should use a network address from any private range, that is, an IP that is not used on the Internet:
- 10.0.0.0 – 10.255.255.255;
- 100.64.0.0 – 100.127.255.255;
- 172.16.0.0 – 172.31.255.255;
- 192.168.0.0 – 192.168.255.255.
On a note! If you have not configured subscriber addresses manually, and your router does not have the “DHCP” operating mode (from the English Dynamic Host Configuration Protocol, a protocol for automatically assigning an IP address to a host), then network clients will be assigned an address from a special “APIPA” stack (from the English Automatic Private IP Addressing, automatic IP addressing of the private range), which includes networks 169.254.0.0 - 169.254.255.255, and there is no guarantee that devices connected to the network will have access to each other. It is recommended to configure network cards manually.
Manual network settings
When setting up addresses, do not forget about network masks - these are additional identifiers of a network address. It is used to delimit subnets and is a group of 32 bits, just like IP, but without alternating zeros and ones.
On a note! An IP address, as you know, consists of four decimal numbers in the range 0 – 255, for example 192.168.0.3. However, the computer perceives information precisely as bits, that is, in the binary number system, respectively, the specified address is seen by the machine as 11000000.10101000.00000000.00000011. As you can see, there is an alternation of zeros and ones. The subnet mask is also entered in the decimal system, but alternations in it are unacceptable - the left side always consists of ones, the right side is padded with zeros up to 32 bits, for example, 255.255.255.192 will be perceived as 11111111.11111111.11111111.11000000.
A subnet mask can be used to restrict access to your network. The limit values for the number of devices can be calculated, but it is quite difficult, so it is better to use a special table or calculator. Let's assume that you are using a wireless router, and there will be a total of five devices (including the router) on the network.
Step 1. Go to the site with the IP calculator.
Go to the site with the IP calculator
Step 2. Fill in the required fields. The source network can be any private IP. In the “Subnetwork sizes” field, indicate the number of subscribers in your network. Leave the mask column as default. To process the data, click the “Calculate” button.
We indicate the number of subscribers in the “Subnetwork sizes” field, click “Calculate”
Step 3. Review the calculation results. The calculator automatically selects the subnet mask as close as possible to the required one. Note the Required Size column, it contains the given hosts value and "+2". These two additional addresses include the address of the network itself (in this case 10.19.1.0) and the broadcast address (for broadcasting to all addresses on the network, in this case 10.19.1.7).
Window with calculation results
On a note! Of course, since all information in computers is processed in a binary system, the number of computers in a subnet should be a power of two. The closest value that can accommodate 5 devices is 23, that is, 8.
Set up network discovery and file sharing
Setting up network discovery and sharing is similar in all versions of Windows:
- Go to Network and Sharing Center.
- In the menu, select “Change advanced settings...”
- For the Home and Work (in Windows 7), Private (in Windows 10) network profiles, make the necessary settings.
Check and, if necessary, change (turn on or off) the parameters:
- Network discovery. When turned on, the computer will be visible to other PCs on the local network and will be able to see them itself.
- File and printer sharing. Other users and network nodes will have access to the shared computer resources.
- Access to shared folders. Makes folders such as “Shared Music”, “Shared Documents”, etc. available to other PCs and users for reading and writing. For other folders you need to set the permission manually
- Password protection. When enabled, you are prompted for a password when attempting to access. On a home network where only trusted computers and users are not required to install.
Important note! It is not recommended to enable sharing for the “Public” network profile. Network discovery can also be disabled in this case. You can leave it if you need access to shared public resources from your home network.
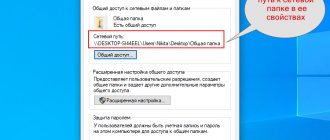
Folders, files, and printers that are intended to be shared must be granted permission on the network host where they are located.
You can do this in the Explorer menu:
- Select a resource.
- Open the “Sharing” list in the menu bar.
- Grant the required permission level.
A good practice is to create a network user account and grant permissions only to that account. This will significantly increase the level of security even on a trusted home network.
Replacing the firmware on a Wi-Fi router
We went to the router, and everything there is in Chinese? An unpleasant surprise. You can look for a language change in the settings, but not everyone has Russian. In this case, only flashing will help. Find firmware with Russian language on the Internet. Go to the “System”, “Software Update”, “Local Update” menu, select our firmware and click the “Update” button. The software must be updated regularly. Manufacturers always update firmware; they fix all sorts of minor problems, add functionality, and improve security. Therefore, we are not lazy, we periodically check the firmware version on the Internet.
Main problems and methods for solving them
There are several typical problems with setting up a local network through a router and accessing shared resources.
- The router is configured, the network and connections of all computers are created according to all the rules, the equipment is fully working, and there is no exchange between network nodes. The most common reason for this situation is the influence of third-party programs on the network connection. For example, ESET integrates an additional traffic filter into the list of active network services and protocols for a particular connection. Similar actions are typical for other antivirus programs, firewalls and firewalls. Simply deleting entries from the list does not help - after the next reboot of the computer, they will appear again and continue filtering packets. The best option is to disable the source of the problems directly in the defender program interface or configure it correctly.
- One or more computers cannot see shared resources located on another computer(s). Most likely, the issue is in the sharing settings - the permissions on the owner’s PC are incorrectly set. There may be other variations of this problem, such as read-only access. There is another reason - not all resources can have shared access configured using simple steps. For example, it will not be possible to share access to the entire disk with the operating system using a simple method. Additional configuration required. In short, to fix the problem you need to check the permissions and, if necessary, make additional settings.
- After creating a local network, it is not always possible to connect to applications (for example, games or databases) on one of the PCs in the group. The main reason is that the connection is established not by the LAN host name, but by IP address, and their dynamic distribution from the router. The solution is quite simple - a static IP is reserved for the server computer on the router.
- LAN nodes from other PCs are not visible. A typical reason is incorrect configuration of the router or network on several computers. It is possible that during the configuration process, not all machines were set to the same network profile (remained “Public” instead of “Home”), the PCs belong to different groups, and network discovery is not enabled. To correct the situation, they check the settings, ranging from the router configuration and connection properties to the sharing settings.
In general, the question of how to create a local network on Windows 7 or 10 using a router is solved quite simply. Configuring the router, creating and setting up network connections and workgroups, and distributing access rights are well documented by the developers, the action algorithms are as formalized as possible, which allows you to practically avoid mistakes when building a home or office LAN. For other operating systems, the procedure is practically similar, with the exception of the sequence and content of some steps.
Computer
After creating and configuring the local area, you can connect additional PCs to it. To connect, the user needs to check active networks. To connect to the desired network, click on the corresponding line.
If there is no such record, proceed as follows:
- go to the “Public Network” section;
- navigate to the desired network.
Now you need to connect the device correctly:
- Open a section that provides access to home PCs.
- Join the local network using the button.
- Collect all necessary elements for access.
- Enter the correct password.
- Click the “Finish” button.
This sequence of actions must be performed on each connected PC.