Author of the article
Vladimir Novoselov aka Rescator
Technical support specialist, PHP programmer, WordPress developer
Ask a Question
The D-Link DIR 615 model was the next after the DIR 300 - an iconic model of the brand, which received its share of both popularity and criticism. And although it is far from new, users still have questions. Let's look at how to independently configure the D-Link DIR 615/S/T4D router and other modifications, connect the Internet, raise Wi-Fi, set up TV, which is offered by most Russian Internet providers.
Ports, buttons and indicators
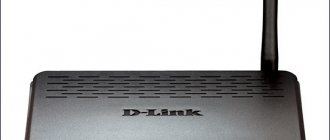
The router was released in a standard design for devices of this class. Ports and antennas on the back, a sticker with service information on the bottom cover, indicators on the top. The side faces are empty, only holes for air convection. The decoration on the top cover is the brand name.
With the exception of T4 revisions, which have only 3 indicators, all modifications have 8. From left to right:
- Power (lit when the device is working normally).
- Wi-Fi (lit when idle, if enabled in the admin panel. Flashes while data is being transferred).
- WPS (flashing indicator indicates that the router is “negotiating” with a newly discovered device. In other cases it is turned off).
- WAN (like Wi-Fi, blinks if there is a transmission, lights up if there are no problems with the Internet).
- LAN 1-4 (lights up if you connect a cable to the corresponding jack on the rear panel - from a PC or laptop).
All lights glow green.
The back panel isn't much different either.
Here:
- Power button;
- Power socket;
- WPS;
- 5 RJ-45 sockets for wired devices and the Internet;
- 2 antennas.
An interesting detail is the coloring of the sockets for wired devices. Yellow - for the provider. For some reason they are black for home connections.
Another interesting distinctive feature of the revisions is the location of the WPS and factory reset buttons on the D-Link DIR-615.
The first from the front panel (in the first versions) gradually moved back to the standard location, the second changed its “place of residence” several times: from complete absence to moving along different sides of the device. For example, in the picture below it is located on the bottom (near the lower left leg).
Here you need to stop and note that it is better to take a photo of the sticker located here with your mobile camera; the information from it will definitely be needed when connecting.
Specifications
| Microprocessor | RTL8196D @ 390 MHz |
| Allowed Internet connections | PPTP/L2TP – static and dynamic |
| PPPoE - static and dynamic | |
| IPv6 PPPoE | |
| Stat. and dynam. IPv4 | |
| Stat. and dynam. IPv6 | |
| Inner memory | 32 MB |
| Functionality and support | RTSP |
| UPnP IGD | |
| DHCP | |
| DNS relay | |
| Dynamic DNS | |
| VLAN | |
| SIP ALG | |
| Internet port | WAN 10/100BASE-TX |
| Application | UDPXY |
| Filtration | IP |
| IPv6 | |
| 4 network ports | LAN 10/100BASE-TX |
| 2 Antennas | 5dBi gain |
| Nutrition | 12V DC 0.5A |
| Frequency Range | 2400 – 2483.5 MHz |
| Data transfer rate | Up to 300 Mbps via IEEE 802.11n technology |
Connection
Since connecting to a router is somewhat different from similar operations on devices of other brands, below we will separately describe how to log into the DIR-615 router via a wireless network and via a cable connection. While the latter algorithm is generally standard, the former requires special instructions. Let's start with him.
Login via Wi-Fi
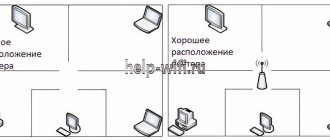
To connect the D-Link DIR 615 router, follow these steps:
- On the laptop (or PC, if it has such a module), turn on the wireless network;
- After displaying the list of found networks, select the new DIR-615 grid (it may be called a little differently, but it will definitely be in tune with the modification);
- The Wi-Fi connection proceeds in the standard way, except that the network is locked with a password. It is shown only in one place - on the sticker.
- You need to enter the numbers next to the WPS PIN line. In the future, when setting up Wi-Fi for the D-Link DIR 615, you can change it to something more convenient.
Cable connection
Connecting via cable can also be presented in the form of a step-by-step plan:
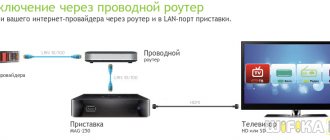
- Insert the provider cable into the yellow socket on the router (WAN).
- Use the supplied cable to connect one of the black sockets (LAN) to the computer socket.
- Plug the router's power supply into a power outlet and turn on the device using the button on the back wall.
When the power diode stops blinking, the router is ready for use.
Attention! If the user purchased the 615T4C model, there will be no cable included. It must be purchased additionally.
Comments (15)
Ivan
12/11/2013 at 00:50
THANK YOU SO MUCH for the article, while I was tinkering with the piece of hardware, my brain almost boiled. Very detailed description of the settings, without unnecessary pathos)Answer
Ruslan(roger)
01/02/2014 at 23:20
Thank you. The article was very helpful. Sales on the official Beeline website There is no such setting. True, you need to adjust the settings a little. The router should receive IP, DNS, Gateway (main gateway) automatically via DHCP. VPN server address tp.internet.beeline.ru. L2TP connection type. MTU (Maximum Transmission Unit) - 1460. Authorization via Challenge-Handshake Authentication Protocol (CHAP)
Answer
Malvina
01/25/2014 at 00:41
A huge thank you!!!!!! I've scoured the entire internet, I've racked my brains, I'm exhausted... and only thanks to your article - everything worked out!!!!!!!! my joy knows no bounds!!!!! everything is simple, clear and accessible even for me, a natural blonde)))) once again, THANK YOU SOOOOOOOOOOO!!!!))))
Answer
Yuri
01/27/2014 at 22:47
Thanks a lot! For three days I blew my mind
Answer
Mikhail
02/26/2014 at 20:36
I agree with what was said above, firmware 1.0.5 K helped me, I suffered for a very long time and could not configure it..
Answer
Anton
03/11/2014 at 19:23
If the router IP does not open?
Answer
Alexandra
08/07/2014 at 22:48
thanks a lot! The only article that made it possible to sort out this mess. I've been bugging the router all evening - neither technical support nor the de-link service helped. and then 5 minutes and everything works. miracles
Answer
Max
08/09/2014 at 23:48
Did everything as told. But the connection is broken. I've tried it many times and it doesn't help. what is the problem?
Answer
Nikita
08/28/2014 at 12:08
thank you very much it helped a lot, but sometimes it does not connect to the Internet and you need to connect as before where you enter the Beeline name and password in the window, why is that? Accordingly, Wi-Fi no longer works
Answer
admin
09/05/2014 at 13:30
But I don’t know what to suggest.
Answer
Naraz88
08/30/2014 at 17:15
Thank you, it helped. If it weren’t for you, my head would have exploded) nothing is clear on the Beeline forum
Answer
Volod'ka
09/03/2014 at 09:58
Thanks a lot! I've been fiddling with the router all evening. Beeline said that this model is not supported, like come and buy OUR working equipment. I came across this article by accident =) I set everything up right away. Thank you very much!
Answer
Alexander
10/14/2015 at 20:15
I fill everything out correctly, only where is the port line, it doesn’t change to port 5:2, it’s internet. and it doesn’t connect……what’s the reason?
Answer
Andrey Sorvin
05/12/2016 at 18:25
I invited Beeline specialists to pull the wire, they asked what router I had. When I voiced the model, I heard so much negativity that I even felt ashamed of the crap I was using. That supposedly my router won’t work with a Beeline. The specialists offered to buy a router from them, but I refused. In the end, they did not want to set up my router for Beeline, and thanks to your instructions, I was able to set up Internet access myself. Thank you!
Answer
La2Walker
07/09/2016 at 00:42
Before configuring the DIR-615 router itself, you need to make sure that there is a network between it and the computer; to do this, look for the Run command in the Start menu and enter ncpa.cpl.
Answer
Login to settings
Whichever login option the user chooses, the information from the sticker will still be required to access the settings. Although for the first login to the router for DIR 615 it is standard. In any browser installed on the user, you need to enter 192.168.0.1 in the address bar. In response to the prompt that appears, enter the word “admin” (lower case and without quotes) into both fields.
Since this data is standard and known to most experienced users, the router immediately prompts you to change the password.
Having come up with a new password, click the “Done” button. The device reboots and prompts you to log in again, using the user data.
Sometimes the control panel starts in English, and then the buttons will also be in a different language, but the order does not change. You need to enter the new password twice and click confirm. You can change the language to Russian later - under the model name (Russian flag in the picture above).
Automatic setup
If the router has not been configured before, or it has been reset to default settings, when entering the user settings, the automatic configuration wizard will greet you.
There is no solution here, but according to user reviews, the developers did a good job, the wizard is quite smart and in automatic mode you can not only set up the Internet, but also increase Wi-Fi and even connect IPTV.
The wizard suggests starting with setting the language. By clicking the corresponding button on the previous screen, you go to the new screen. In the drop-down list you can select a language or agree with the proposed one.
The language is picked up from the OS settings, so here it is usually immediately installed “Russian”.
Having agreed with the choice, proceed to the next screen. If you have not previously changed the default password for the D-Link DIR 615 (admin), you will be prompted to do so here. The field is required, so you will have to come up with a new password. Immediately (a little unclear) the wizard will prompt you to set a name for the wireless mesh. The D-Link Deer-615 router will offer to configure the Wi-Fi router later, but it is proposed to change the network name here.
Probably, the developers assume that quick setup is still carried out from a PC with a cable connection, and not on a smartphone.
The following screen confirms this:
“Wired connection” is already indicated here. Usually everything is correctly picked up here, but the lower field provides an opportunity to study in which modes the device can operate. After viewing the drop-down list, return the setting to “Router”.
A new window and a proposal to configure the addresses of the internal grid. You can leave it as default and change it later.
Having configured all the preliminary data, the router will offer to set the Internet settings. Select one of the proposed options from the drop-down list.
What exactly to install needs to be looked at in the contract with the provider. Depending on your selection, additional fields open. All information is usually specified in the contract.
Having connected to the Internet (there is also a “check” or “turn on” button - the name depends on the firmware version), proceed to raising Wi-Fi.
Since the network name was entered earlier, here you can only change the password. More detailed settings are performed only in manual mode.
If the user wants to watch TV on a set-top box, the next step will ask you to configure it.
You need to specify the port to which the set-top box is connected. Here you can enable Vlan ID support if it is needed. All necessary parameters are specified in the contract.
According to user reviews, automatic settings for TV are not enough. You need to go manual, and then enable support for Igmp and Udpxy. Most providers in Russia require this for TV to work correctly.
If there is no set-top box or you plan to watch it not only on it, you can reset all the checkboxes and move on to further settings.
A new window is used to connect an IP phone. The settings here are similar to the previous step, so we won’t stop there. If there is no phone, all checkboxes are cleared and “Next” is pressed.
The user can again be returned to the page for changing the password to enter the router settings. If they have already changed, you can simply click “Next”.
A new window will display all the entered settings and prompt you to “Save the settings file.” If the user agrees, he is offered a file that can be downloaded to his computer.
The finishing touch is the suggestion to close the settings.
By this time, the Internet is usually already working, so they click the “Done” button.
Manual Internet setup
For most users, what is described is sufficient. But if a person wants to understand what and where he is changing, or is going to configure some advanced settings, then we offer detailed step-by-step instructions for setting up the D-Link DIR 615 router manually.
- In the “Network” menu, select “WAN” and click “Add”.
- The user is asked to select the “Connection Type” that is used by the provider. This information is provided in the contract.
- Next, fill in the remaining settings in accordance with the type of connection. If the user selected “Static IP”, fill in the fields as in the screenshot below (all information about the address is in the contract).
- After filling out all the fields, go to the next screen by clicking the “Apply” button.
- The router will display the connection status. Here you can check its functionality. If everything is correct, the screen will show that there is a connection to the node, and the settings can be completed.
Rostelecom
The setup for Rostelecom or Dom.ru is not much different. You need to select the connection type PPPoE. Accordingly, in the “username” and “password” fields, enter the data from the contract. Once confirmed, try the connection.
Beeline
The Beeline router is configured via a VPN connection. In this case, you need to select the “L2TP + dynamic IP” option and then fill in all the fields according to the data from the contract.
Remote access
An excellent opportunity for system administrators to manage and change settings in the router.
- To do this, in the “Advanced” select “Remote access” .
- Next, click “Add” .
- In the first field, select the IP protocol that will be used by the remote computer.
- If you enable “Open access from any external host” , then you can access the router from any computer on the Internet. If you remove the value, you need to enter the IPv4 address or IPv6 address, as well as the network mask of the connected machine from which external control will be carried out.
- Also indicate the port for the router through which the connection will be made, as well as the protocol. The standard is HTTP.
- Click “SAVE” .
WiFi
Having connected to the Internet, proceed to establishing a wireless connection:
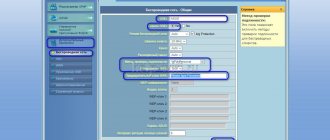
- The setting is displayed on a separate “Wi-Fi” tab.
- In the “Basic Settings” section, you need to specify the name of the network (home devices will use it to access the router). The remaining settings can be left as in the screenshot below.
- To secure your network, we recommend setting a password. This is done in the “Security Settings” tab. In the “PSK encryption key” line, indicate the desired password for connecting to Wi-Fi. You will need to enter it the first time you connect.
Parental control
If your child likes to climb harmful sites, clogging his young head with prohibited information, then you can set a rule that will prohibit visiting the URL.
- In the menu go to “Firewall” .
- Next is the URL filter.
- Move the switch to enable the filtering rule.
- In the filters section, enter the addresses that will be banned in the format: www.plohoysayt.ru or plohoysayt.ru.
- Now these sites will be blocked.
- You can block all sites except certain ones. This is useful for the office when workers work in a certain range of sites.
Repeater
A special case of using a wireless network is when the router does not offer its own network to devices, but serves as a repeater, strengthening the network of another device.
Unfortunately, the factory firmware for DIR 615 does not provide repeater or repeater modes. But you can set the client mode of another network, and then the router will distribute a signal from another network - it will become a repeater.
However, judging by user reviews, the 615 distributes the received signal well only via cable.
The same option allows you to make a bridge out of the router (connect 2 devices via a wireless network) or a receiver (use Wi-Fi on computers that do not have a built-in receiver, for example, on a desktop).
- To configure, you need to go to the Wi-Fi block in the left panel, where you select the “Client” tab.
- On the page, check the “Enable” and “Broadcast wireless network” checkboxes. The first one is clear, the second one is responsible for distributing the network. When turned off, only wired devices will be able to use the network.
- Next, select the one you need from the list. You can use the “Search for networks” button and in the parameters configure the same data that is specified on the main device of the network.
- The first part of the setup is complete.
To avoid device conflicts, go to the “Network” block, selecting the “WAN” tab. Delete all connections on the page and create a new one.
- Connection type - Dynamic IP;
- Interface - WiFiClient.
The remaining parameters can be left untouched. During the setup process, the router will try to connect to the main device. You may have to reload additionally.
IPTV
Most Russian Federation providers allow you to watch TV on your computer screen without any special settings. If the user wants to use another set-top box in parallel, additional steps will be required. To do this, go to the “Advanced” block to the “VLAN” tab and on the page that opens, select the LAN block (depending on the firmware, this can be either a block or one line).
Having opened it, you need to uncheck the port to which the set-top box is connected (if there are several of them, several checkmarks).
Then everything depends on the provider. Perhaps this will be enough, but in some cases (for example, Rostelecom often indulges in this) you will have to configure the port separately.
You can find out more about this in the contract; you need to look for the term Vlan ID.
If this exists, you need to configure the port according to the data. To do this, on the “VLAN” page you need to click the “Add” button and fill in the fields.
For example it could be like this:
- name - TV;
- type - transparent;
- VLAN ID - 16 (the number depends on the provider);
- tagged port - WAN or internet;
- untagged port - port3.
Confirm by clicking “Save”.
Firmware update
As already shown in several screenshots above, DIR 615 can automatically monitor firmware updates. The presence of a new one is shown in the upper right corner of the web interface. The update function itself is located on a separate tab in the “System” block.
If there is a new version or if you want to install an alternative, you need to go there. The firmware of the D-Link DIR 615 router itself follows the standard. However, several conditions must be taken into account:
- The router’s power cannot be turned off during the process;
- It is highly not recommended to update the firmware via Wi-Fi; you need to connect via cable.
After downloading the firmware file (you don’t need to download anything in auto mode), you need to indicate it on the page and start the process. Confirm your desire and wait for completion. After completion, the router will ask you to change the administrator password to log into the web interface (you can enter the same one that was set earlier - there is no verification). Then you can go to the settings and see what has changed.
The local network
The local network is configured automatically by the device, and in most cases, there is no need to change existing settings. You can go to settings by clicking on “Network -> LAN”. In most cases there is no need to change them.
It is recommended to keep the DHCP server (automatic assignment of local IP addresses) always turned on. This will minimize the chance of possible problems with the network and simplify its installation.
You can also change the router address and the range of addresses issued by DHCP here. For correct operation, automatic IP acquisition must be enabled on all local computers.
Factory reset
Like competitors, resetting the router settings can be done in 2 ways.
- Software - by going to the “Configuration” tab in the “System” block;
- Physically - by holding down the “Reset” button on the device body for 15 seconds.
In any of the options, all the lights on the device should go out and the power will start blinking. After rebooting, the router will “forget” all user settings, returning to the settings received at the factory.
Let us remind you that the “Reset” button is recessed into the body to avoid accidental pressing. To use it you will need a rod, needle or something similar.
The computer does not connect to the Internet
Before moving on to the reviews, let’s look at a typical situation when we installed and configured the router, but were unable to connect to the Internet.
Binding by MAC address
Some Russian providers indulge in blocking devices by MAC address, explaining this as increased security. But users have to pay for this by the fact that if they replaced a computer or installed a router, they need to call TP, explain the situation, talk about the purchase, etc.
But why does the provider need to know about this? All you need to do is change the MAC on your device and connect easily. If the router is connected to the same computer that was previously used to access the Internet.
This can be done on the “WAN” tab (“Network” block). In the “Ethernet” section in the central part of the window that opens, the current MAC of the device is displayed. Here, on the right, there are buttons “Clone” or “Restore to default”.
The presence of the second depends on the firmware. It may not exist.
After copying the address, they try to connect again. If the router is working, the problem is solved.
Incorrect Windows settings
You need to make sure that the IP address for the IPv4 protocol is issued automatically by the system.
Algorithm:
- In the lower right corner (tray), right-click on the Internet icon and open “Network and Internet settings.”
- Next, select “Configure adapter settings.”
- In the list of networks, select the one you need and open its properties.
- Click on “IP version 4” and look at the properties.
- Set the settings as in the screenshot. Checking the Internet.
Changing the administrator password
For security purposes, it is important to change the default administrator login and password. By leaving it at default, you create the risk of giving control to a random person. This may seem like an unnecessary measure for home Internet, but it will probably save you a lot of nerves.
You can change it by going to “System -> Administrator Password”. Don't make it too simple and be sure to write it down somewhere: reconfiguring your router is rarely required, and during this time you may simply forget it. Make sure that no one else can gain access to it.